Pulsera de cuentas paso a paso (Video) /Bead bracelet step by step (Video)
3
About :
¡Hola amigos de la comunidad Hive Diy!!!
Espero estén bien, Hoy les traigo un tutorial para realizar una linda y sencilla pulsera tejida. Pueden realizarla si desean emprender en el mundo de la bisutería o como yo que las realizo para mí o para regalar a familiares y amigos. Siempre les digo que si no tienen los materiales pueden practicar con algún collar roto que tengas en tu joyero, lo importante es comenzar el proyecto y ponernos manos a la obra.
Para su realización vamos a necesitar:
1 metro de Cordón piel de serpiente grueso, color azul
1 metro de Cordón piel de serpiente grueso, color rojo
Balines o cuentas plásticas que combinen con el cordón
Tijeras
Regla
Gancho
Encendedor
Hello friends of the Hive Diy community!!!!
I hope you are well, Today I bring you a tutorial to make a nice and simple woven bracelet. You can make it if you want to start in the world of jewelry or like me I make them for me or to give to family and friends. I always tell them that if they do not have the materials they can practice with a broken necklace that you have in your jewelry box, the important thing is to start the project and get down to work.
For its realization we are going to need:
1 meter of thick snakeskin cord, blue color.
1 meter of thick snakeskin cord, red color.
Balinese beads or plastic beads that match the cord.
Scissors
Ruler
hook
Lighter

Para comenzar vamos a unir con un nudo y medimos 9 centímetros (ver imagen) Vamos a fijar los dos cordones con un gancho a un pedazo de cartón o una carpeta con gancho para que no se muevan nuestros cordones. (ver imagen).
To begin, we are going to tie a knot and measure 9 centimeters (see image). We are going to fix the two cords with a hook to a piece of cardboard or a folder with a hook so that our cords do not move (see image).

Vamos a introducir por ambos cordones nuestra cuenta plástica, dejando unos milímetros de separación entre el nudo inicial y la cuenta (ver imagen).
We are going to introduce through both cords our plastic bead, leaving a few millimeters of separation between the initial knot and the bead (see image).

Luego, vamos a tomar nuestro extremo del cordón azul y lo introducimos por detrás del espacio que quedo entre el nudo y la cuenta (ver imagen), y luego ese mismo extremo lo introducimos por el orificio que se forma y ajustamos (ver imagen).
Then, we are going to take our end of the blue cord and introduce it behind the space left between the knot and the bead (see image), and then we introduce that same end through the hole that is formed and adjust it (see image).


Tomamos nuestro extremo del cordón rojo y lo introducimos por el orificio que quedo entre el nudo y la cuenta. luego ese mismo extremo lo introducimos por encima del orificio que se forma del cordón rojo y ajustamos (ver imágenes)
We take our end of the red cord and introduce it through the hole left between the knot and the bead, then we introduce that same end over the hole formed by the red cord and adjust it (see images).


Volvemos a introducir una cuenta roja por el hilo central y tomamos nuestro extremo del cordón azul y lo introducimos por detrás del espacio que queda en la parte superior y luego ese mismo extremo lo introducimos por el orificio que se forma y ajustamos.
Tomamos nuestro extremo del cordón rojo y lo introducimos por el orificio que queda entre la parte superior. Luego, ese mismo extremo lo introducimos por encima del orificio que se forma del cordón rojo y ajustamos (ver imagen) .
We reinsert a red bead through the central thread and take our end of the blue cord and insert it behind the space left at the top and then insert that same end through the hole that is formed and tighten.
We take our end of the red cord and insert it through the hole that is left between the top. Then, we introduce that same end over the hole that is formed in the red cord and tighten it (see image).

Introducimos nuestra tercera cuenta por ambos cordones, tomamos nuestro extremo del cordón azul y lo introducimos por detrás del espacio superior (el que queda entre el nudo que realizamos y la cuenta) y luego ese mismo extremo lo introducimos por el orificio que se forma y ajustamos. (ver imágenes).
We introduce our third bead through both cords, we take our end of the blue cord and introduce it behind the upper space (the one between the knot we made and the bead) and then we introduce that same end through the hole that is formed and adjust it (see images).


Tomamos nuestro extremo del cordón rojo y lo introducimos por el orificio que queda entre la parte superior. Luego, ese mismo extremo lo introducimos por encima del orificio que se forma del cordón rojo y ajustamos (ver imagen).
Hay que tratar de no dejar mucho espacio, entre una y otra cuenta para que se vea más pegado el tejido.
We take our end of the red cord and introduce it through the hole that remains between the upper part. Then, we introduce that same end over the hole formed by the red cord and adjust it (see images).
Try not to leave too much space between one bead and the other, so that the fabric looks more attached.


Repetimos el proceso anterior de introducir la cuenta y realizar el tejido con ambos extremos del cordón. Hasta completar el contorno de nuestra muñeca.
Como siempre les dejaré un video para que puedan ver como es el tejido.
Una vez tengamos todo el contorno de nuestra muñeca, terminamos con un nudo simple (ver imagen) y dejamos 9 centímetros. Luego, cortamos el exceso e introducimos una cuenta en cada extremo, hacemos un nudo simple y quemamos con el encendedor (ver imágenes).
Repeat the previous process of introducing the bead and weaving with both ends of the cord. Until completing the contour of our doll.
As always I will leave a video so you can see how the weaving is done.
Once we have all the contour of our wrist, we finish with a simple knot (see image) and leave about 9 centimeters. Then, we cut the excess and introduce a bead at each end, make a simple knot and burn it with the lighter (see images).


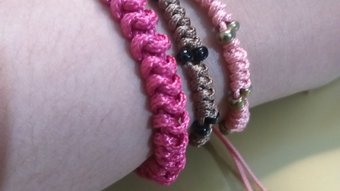
Ya para finalizar, cerramos nuestra pulsera con un nudo macramé (ver imágenes)
Finally, we close our bracelet with a macramé knot (see images).


Aquí les dejo la publicación en caso de que no sepan cómo realizarlo
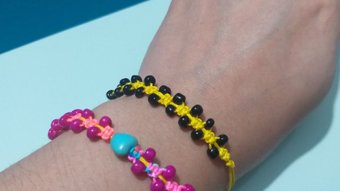
Una vez finalizado el nudo macramé, tenemos lista nuestra pulsera, como siempre puedes combinar las cuentas o realizarla en un solo color.
Si se animan a realizarla, me etiquetan para ver sus creaciones.
¡Cualquier duda pueden realizarla en los comentarios!!
Las fotografías y video fueron tomados por mí.

Here I leave the publication in case you do not know how to do it.
Once the macrame knot is finished, we have our bracelet ready, as always you can combine the beads or make it in one color.
If you dare to make it, tag me to see your creations.
Any questions you can ask in the comments!!!
The pictures and video were taken by me.

Show more
Tags :
Woo!
This creator can upvote comments using 3speak's stake today because they are a top performing creator!
Leave a quality comment relating to their content and you could receive an upvote
worth at least a dollar.
Their limit for today is $0!
Their limit for today is $0!
[ESP- ENG] Como hacer Pulseras con tejido macramé y mostacillas / How to make bracelets with macramé
11 views
a year ago
$

2 views
a year ago
$
6 views
a year ago
$

3 views
2 years ago
$

5 views
a year ago
$
More Videos
37 views
a year ago
$
11 views
2 years ago
$

5 views
3 months ago
$

30 views
a year ago
$

18 views
5 months ago
$

1 views
3 years ago
$

17 views
8 months ago
$

2 views
2 years ago
$

5 views
4 years ago
$

3 views
2 years ago
$

1 views
4 years ago
$
10 views
2 years ago
$

17 views
a year ago
$

12 views
a year ago
$

9 views
3 years ago
$

4 views
11 months ago
$

12 views
2 years ago
$

21 views
3 months ago
$

5 views
a year ago
$

22 views
3 years ago
$

21 views
8 months ago
$

2 views
2 years ago
$

154 views
a year ago
$

109 views
3 months ago
$

21 views
a year ago
$
Comments:
Reply:
To comment on this video please connect a HIVE account to your profile: Connect HIVE Account