[ESP- ENG] Como hacer Pulseras con tejido macramé y mostacillas / How to make bracelets with macramé
7
About :
Hola amigos de hive! Hoy les voy a enseñar como hacer unas pulseras tejidas con la técnica de macramé e intercalando mostacillas. Puedes elaborarlas en un sólo color o realizando combinaciones entre el hilo y la mostacilla. Para realizar una pulsera necesitarás:
Mostacillas del color que desees, en este caso utilice fucsia y negras.
2 mts Hilo chino amarillo
2 mts Hilo chino de colores
2 mts Hilo chino rojo
Un dije o aplique en forma de corazón
Cinta métrica ó regla
Encendedor
Tijeras
Gancho
Un pedazo de cartón.
Hello friends of hive! Today I am going to show you how to make bracelets woven with the macramé technique and interspersing beads. You can make them in a single color or making combinations between the thread and the beads. To make a bracelet you will need:
Beads in the color of your choice, in this case use fuchsia and black.
2 mts Yellow Chinese thread
2 mts colored Chinese thread
2 mts Red Chinese thread
A heart-shaped charm or applique
Measuring tape or ruler
Lighter
Scissors
Hook
A piece of cardboard

Paso 1
Medir el contorno de tu muñeca (la mía mide 16) agregarás 4cm mas (20 cm) para la base de nuestra pulsera. Como nuestro hilo base es doble medirás entonces 40 centímetros. Una vez lo tengas dobla a la mitad y realiza un nudo dejando 4 centímetros (ver imagen). Este nudo será nuestra base para empezar a tejer. Fija al cartón con el gancho el hilo de cuero, para que puedas trabajar con mayor comodidad.
Step 1
Measure the circumference of your wrist (mine measures 16) and add 4cm more (20 cm) for the base of our bracelet. As our base thread is double you will measure 40 centimeters. Once you have it folded in half and make a knot leaving 4 centimeters (see image). This knot will be our base to start weaving. Fix the leather thread to the cardboard with the hook, so you can work more comfortably.

Paso 2
Pasa
el hilo de colores por debajo del hilo principal.
Step 2
Pass the colored thread under the main thread.

Paso 3
El extremo derecho lo pasas por encima del cordón principal.
Step 3
Pass the right end over the main thread.

Paso 4
el extremo izquierdo del hilo de colores lo pasas por encima del principal y lo metes por el orificio del lado derecho, estirando ambos extremos para armar la base del tejido (ver imagen).
Step 4
pass the left end of the colored yarn over the main yarn and thread it through the hole on the right side, stretching both ends to form the base of the fabric (see image).

Paso 5
luego el lado izquierdo del hilo de colores, lo pasas por encima del hilo principal y el extremo derecho por debajo del hilo principal y lo metes por el orificio del lado izquierdo.
Step 5
Then pass the left end of the colored thread over the main thread and the right end of the colored thread under the main thread and put it through the hole on the left side.
Paso 6
luego repites el procedimiento del lado derecho, pasándolo por encima del hilo principal y el lado izquierdo por debajo del hilo principal y luego por el orificio del lado derecho.
Irás alternando el mismo procedimiento de un lado a otro hasta tener 3 pasadas.
Step 6
then repeat the procedure on the right side, passing it over the main thread and the left side under the main thread and then through the hole on the right side.
You will alternate the same procedure from one side to the other until you have 3 passes.
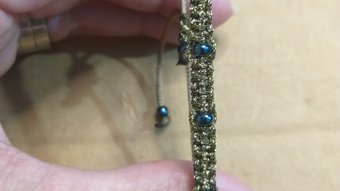
Paso 7
Luego vas a introducir en cada extremo una mostacilla, y continúas tejiendo pasando el lado izquierdo del hilo rosado lo pasas por encima del hilo principal y el extremo derecho por debajo del hilo principal y lo introduces por el orificio del lado izquierdo.
Step 7
Then you will insert a bead at each end, and continue weaving by passing the left side of the pink thread over the main thread and the right end under the main thread and insert it through the hole on the left side.

Paso 8
luego repites el mismo procedimiento de realizar el nudo macramé 3 veces y vuelves a colocar dos mostacillas por ambos extremos.
Veras como va tomando forma nuestra pulsera.
Una vez tengas 5 tejidos con mostacillas, introduces por el hilo central un dije o aplique. Y luego, corta y quema los extremos (ver imagen).
Step 8
Then repeat the same procedure of making the macramé knot 3 times and place two beads at both ends.
You will see how our bracelet takes shape.
Once you have 5 weaves with beads, insert a charm or applique through the central thread. And then, cut and burn the ends (see image).


Paso 9
luego repites el procedimiento inicial (paso 2- 3 y 4). Y continúas realizando 3 tejidos de macramé y alternando con las mostacillas de lado y lado, hasta completar las 5 pasadas con mostacilla.


Cortamos el hilo sobrante y quemamos con el encendedor los extremos, para darle una buena terminación a nuestra pulsera.
Para cerrar la pulsera, unimos ambos extremos y con un trozo de hilo, hacemos el mismo tejido macramé y colocas en las puntas de la pulsera mostacillas o balines dorados, en este caso use mostacillas.
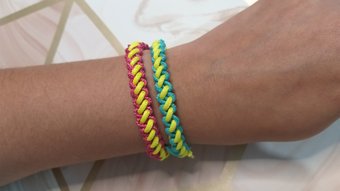
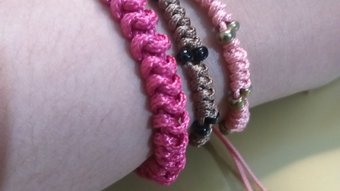
Y listo, tienes un nuevo modelo de pulsera. A mí particularmente, me gusta combinarlas con otras pulseras de distintos tejidos y colores. Se ven súper lindas todas las pulseras juntas.
Step 9
then repeat the initial procedure (step 2- 3 and 4). And continue making 3 macrame weaves and alternating with the beads from side to side, until completing the 5 passes with beads.
We cut the excess thread and burn the ends with the lighter, to give a good finish to our bracelet.
To close the bracelet, we join both ends and with a piece of thread, we make the same macrame weave and place at the ends of the bracelet golden beads or pellets, in this case I used beads.
And ready, you have a new model of bracelet. I particularly like to combine them with other bracelets of different fabrics and colors. They look super cute all the bracelets together.


Como siempre les dejo un video para que puedan guiarse con el tejido.
As always I leave you a video so you can guide you with the weaving.
Si te animas a practicar esta técnica, encantaría leer tu experiencia en los comentarios.
If you dare to practice this technique, I would love to read your experience in the comments.
Las fotos fueron tomadas por mí/ The photos were taken by me.
Show more
Tags :
Woo!
This creator can upvote comments using 3speak's stake today because they are a top performing creator!
Leave a quality comment relating to their content and you could receive an upvote
worth at least a dollar.
Their limit for today is $0!
Their limit for today is $0!
[ENG-ESP] How to make a macrame bracelet step by step / Como hacer una pulsera en macramé paso a pas
3 views
a year ago
$

3 views
2 years ago
$
4 views
9 months ago
$
6 views
a year ago
$

3 views
9 months ago
$
More Videos
7 views
a year ago
$

10 views
a year ago
$
28 views
a year ago
$

2 views
a year ago
$
64 views
2 years ago
$

13 views
2 years ago
$

1 views
3 years ago
$

8 views
a month ago
$

5 views
a year ago
$

5 views
3 years ago
$
0 views
3 years ago
$

15 views
4 years ago
$

21 views
a year ago
$

16 views
a year ago
$

9 views
9 months ago
$

4 views
3 years ago
$

18 views
a year ago
$

4 views
2 years ago
$

15 views
4 years ago
$

0 views
2 years ago
$

3 views
a year ago
$
2 views
a year ago
$

27 views
a month ago
$
43 views
3 years ago
$
Comments:
Reply:
To comment on this video please connect a HIVE account to your profile: Connect HIVE Account