Combustion chamber preparation and assembly
14
About :
Greetings,
Dear friends what a pleasure to greet you and to be able to pass again by these spaces, in this opportunity I come to show you a video of the process of how to seat the valves manually in a combustion chamber.
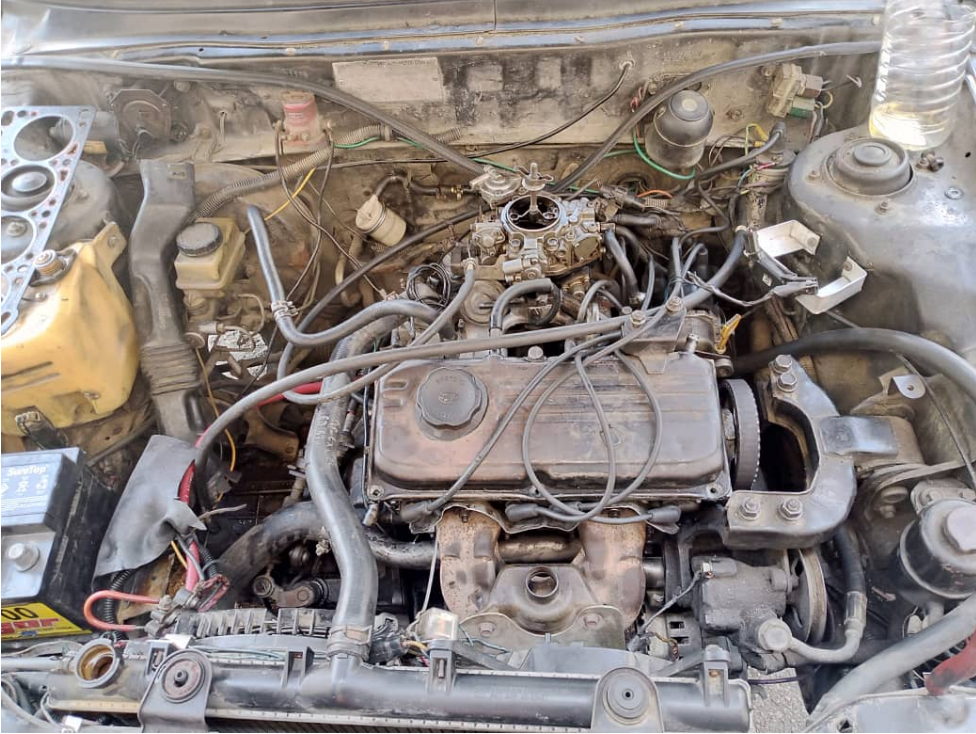
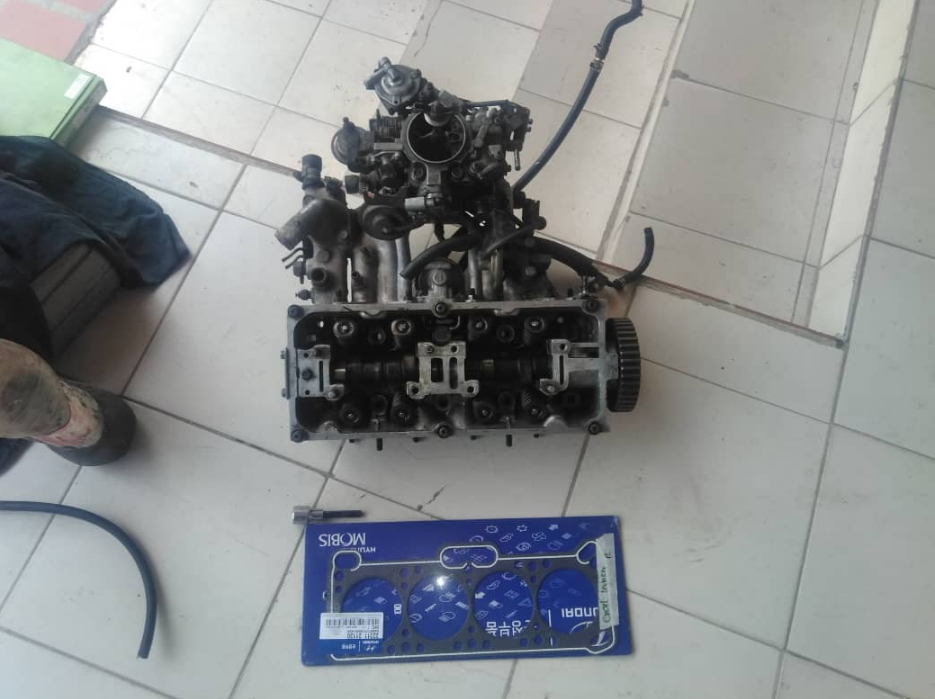
This combustion chamber belongs to the 1.5 Hyundai Exel engine, this car in my country was marketed until 1998, is a car with a basic engine with a single camshaft and is fed with a carburetor, the ignition is controlled by a distributor with pickup coil and current module.
These previous data are only a reference to emphasize that the work of tuning the car is a little tedious because with technology all this work is not facilitated by the computer and sensors.
When I go to attend to the customer he tells me that the car would not start and took an electrician to solve the electrical problem of the vehicle, when the technician takes care of the fault and gets the engine to start he tells the owner that the engine starts and what were the faults that had but still had mechanical problems, that he in his little experience presumed a burned valve.
When I go to make the diagnosis, cylinders two and three were not working, so the car had no power to run, I make compression tests on these cylinders, and were very deficient, we decided to disassemble the camera and evaluate why it was presenting this problem.
The first thing I asked the person was that if the car had been overheated or something similar, he told me that he had not had any problem only that one morning did not ignite more, I continue with my disassembly because in one way or another the fault was in the combustion chamber could be burned valves or the gasket that was damaged.
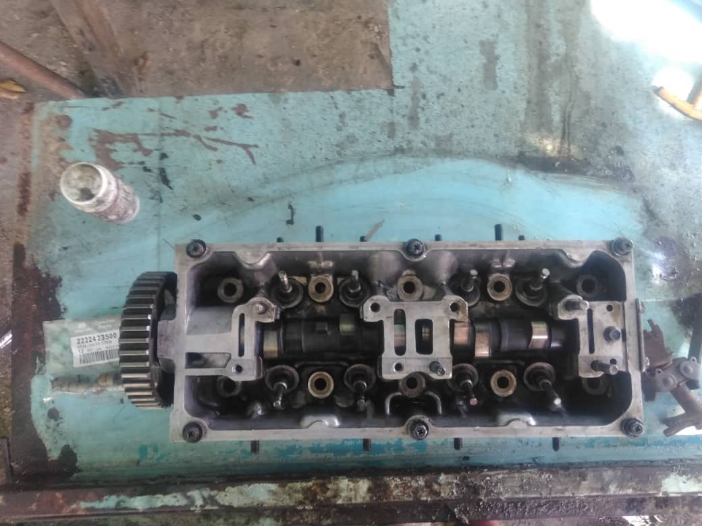
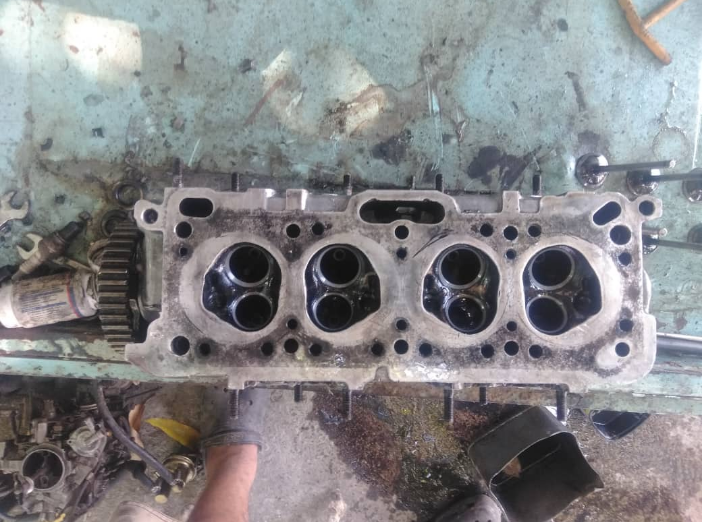
When I finished disassembling the chamber the first thing I noticed was the burned gasket between the two cylinders that had the fault, and there was the problem now was to evaluate the plane of the chamber in the grinding machine, to verify that it was fine I decided to seat the valves manually as one of the cylinders was not airtight in its entirety.
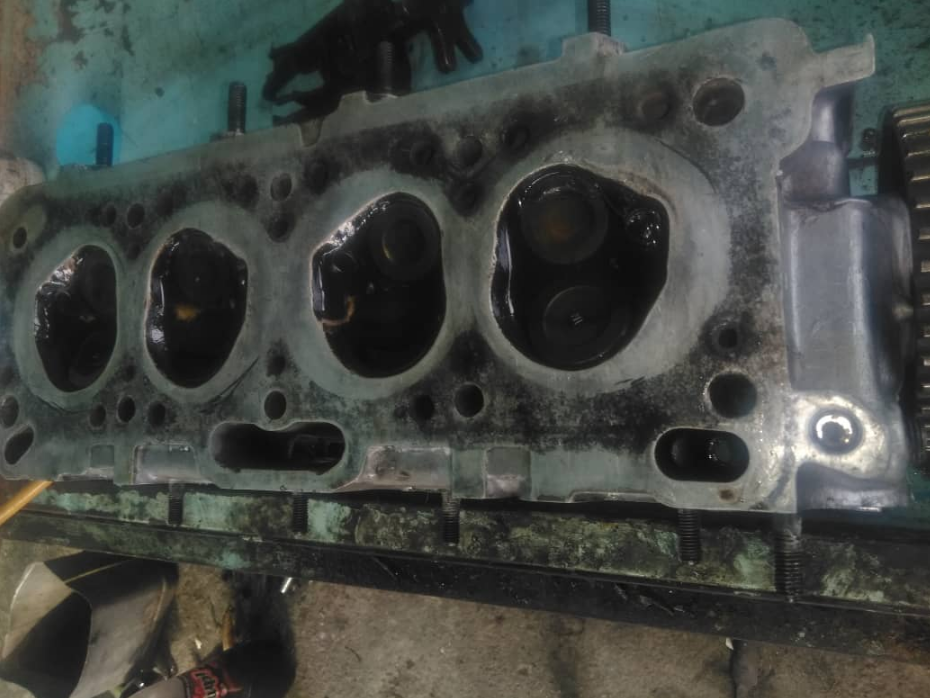
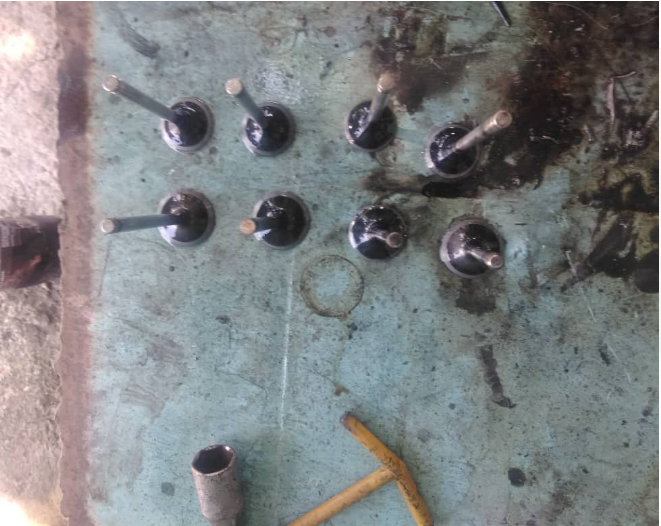
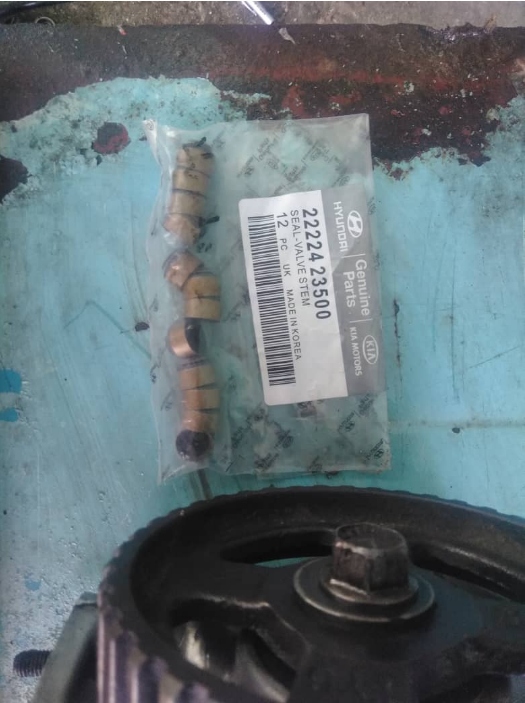
Taking advantage of the disassembly of the chamber clean well with degreaser and proceed to seat each of the valves as seen in the video, once this process ends I replace the valve caps in this path check the tolerance of movement of the guides all this to avoid oil consumption and smoke to walk.
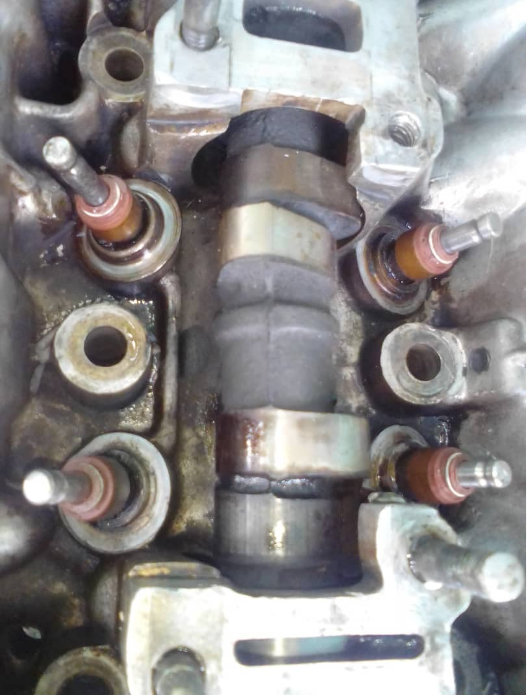
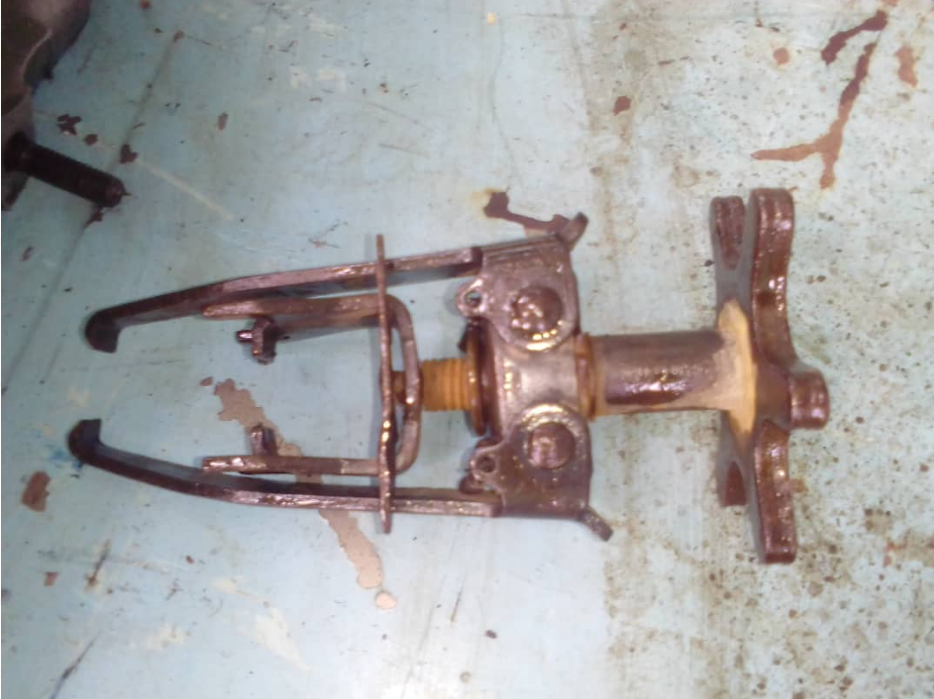
After this is finished, I assemble each valve as shown in the video with my tool to collect the springs, although I know it is a little old I consider it safe and effective.
Once all the springs are in place and the cam is ready, I just place the intake manifold with the carburetor, replace the cam sprocket stopper, I go to the vehicle to install the new cam gasket.

When the cam is installed a torque wrench is required to adjust the screws correctly under the manufacturer's standards and thus prolong the life of the gasket, when I have everything installed and we started to start the engine we had a failure in the starter motor but that is content for another publication.
Already the car is in proper operation and the customer is satisfied, it should be noted that the timing belt and the tensioner were replaced once to ensure a good job as a mechanic.
So far my delivery I hope you enjoyed the video and the images that accompany it in the publication, I read you in the comments.
SPANISH
Saludos,
Queridos amigos que gusto el saludarles y poder pasarme nuevamente por estos espacios, en esta oportunidad vengo a mostrarles un vídeo del proceso de cómo asentar las válvulas de forma manual en una cámara de combustión.
Esta cámara de combustión le pertenece al motor 1.5 de Hyundai Exel, este auto en mi país se comercializo hasta el año de 1998, es un auto con motor básico de un solo árbol de levas y se alimenta con carburador, la ignición es controlada por un distribuidor con bobina captadora y modulo de corriente.
Estos datos anteriores solo son referencia para acentuar que el trabajo de colocar el auto a punto es un poco tedioso ya que con la tecnología todo este trabajo no los facilitan la computadora y los sensores.
Cuando voy a atender al cliente me dice que el auto no prendía y llevo a un electricista a que le solucionara el problema eléctrico del vehículo, cuando el técnico se encarga de la falla y logra que el motor arranque le comenta al dueño que el motor ya prende y cueles eran las fallas que tenia pero que aun tenía problemas mecánicos, que él en su poca experiencia presumía alguna válvula quemada.
Cuando voy a realizar el diagnostico los cilindros dos y tres no estaban funcionando, por eso el auto no tenía fuerza para andar, le hago pruebas de compresión a esos cilindros y estaban muy deficientes, decidimos desarmar la cámara y evaluar el porqué estaba presentando este problema.
Lo primero que le pregunte a la persona era que si el auto había sido recalentado o algo similar, él me dice que no que no había tenido problema alguno solo que una mañana no encendió mas, sigo con mi desarmado porque de una u otra forma la falla estaba en la cámara de combustión podía ser válvulas quemadas o la empacadura que estaba dañada.
Al terminar de desmontar la cámara lo primero que observo es la empacadura quemada entre los dos cilindros que presentaban la falla, ya ahí estaba el problema ahora quedaba evaluar el plano de la cámara en la rectificadora, al verificar que estaba bien tomo la decisión de igual asentar las válvulas de manera manual ya que uno de los cilindros no estaba hermético en su totalidad.
Aprovechando el desarmado de la cámara limpio bien con desengrasante y procedo a asentar cada una de las válvulas como observaron en el vídeo, una vez que este proceso termina reemplazo los gorros de válvulas en este trayecto chequeo la tolerancia de movimiento de las guías todo esto para evitar consumo de aceite y humo al andar.
Luego de terminado esto, armo cada válvula como lo aprecian en el vídeo con mi herramienta para recoger los resortes, aunque sé que ya es un poco antigua la considero segura y efectiva.
Una vez colocados todos los resortes ya la cámara esta lista solo le coloco el múltiple de admisión con el carburador, reemplazo la estopera del piñón de la leva, me voy al vehículo a instalar junto a la empacadura de cámara nueva.
Cuando se instala la cámara se requiere un torquimetro para ajustar los tornillos correctamente bajo los estándares del fabricante y así prolongar la vida útil de la empacadura, cuando ya tengo todo instalado y empezamos a encender el motor se nos presento una falla en el motor de arranque pero eso es contenido para otra publicación.
Ya el auto esta en correcto funcionamiento y el cliente se encuentra satisfecho, cabe resaltar que se reemplazo de una vez la correa de distribución y el tensor para como mecánico garantizar un ben trabajo.
Hasta aquí mi entrega espero que hayan disfrutado del vídeo y de las imágenes que lo acompañan en la publicación, los leo en los comentarios.
Thanks for stopping by to read and God bless you greatly.
Gracias por pasar a leer y que Dios les bendiga grandemente.
The video was recorded with my Infinix Hot 10 i cell phone and edited with the cap cut app, the pictures are my property taken with the cell phone.
El vídeo fue grabado con mi celular Infinix Hot 10 i y editado con la app capcut, las fotos son de mi propiedad tomadas con el celular.
Show more
Tags :
Woo!
This creator can upvote comments using 3speak's stake today because they are a top performing creator!
Leave a quality comment relating to their content and you could receive an upvote
worth at least a dollar.
Their limit for today is $0!
Their limit for today is $0!

14 views
3 years ago
$
8 views
3 years ago
$

8 views
2 years ago
$

15 views
3 years ago
$

18 views
3 years ago
$
More Videos

39 views
2 years ago
$

8 views
2 months ago
$

7 views
3 years ago
$

13 views
2 years ago
$

3 views
3 years ago
$

35 views
3 years ago
$

11 views
2 months ago
$

8 views
6 days ago
$

8 views
a month ago
$

21 views
3 years ago
$

6 views
3 years ago
$
15 views
3 years ago
$

6 views
2 years ago
$

13 views
2 years ago
$

5 views
2 years ago
$

6 views
10 months ago
$

4 views
5 years ago
$

2 views
a year ago
$

14 views
3 years ago
$

11 views
2 years ago
$

5 views
a year ago
$

0 views
2 months ago
$

17 views
2 years ago
$

16 views
2 years ago
$
@threespeak: 17.4130
@ocdb: 17.0284
@life-timer: 1.7386
@ocd: 0.9604
@jschindler: 0.7435
@nbs.gmbh: 0.4187
@dcityrewards: 0.3232
@smartsteem: 0.3054
@brofi: 0.2660
@ocdb: 17.0284
@life-timer: 1.7386
@ocd: 0.9604
@jschindler: 0.7435
@nbs.gmbh: 0.4187
@dcityrewards: 0.3232
@smartsteem: 0.3054
@brofi: 0.2660
Comments:
Reply:
To comment on this video please connect a HIVE account to your profile: Connect HIVE Account