MY FIRST EMBROIDERED PICTURE. // MI PRIMER CUADRO BORDADO.
8
About :

Hola. Siempre que quiero hacer un diseño bordado pienso en flores. Cuando voy a dibujar me pasa igual, me encanta plasmar de alguna manera los árboles y las flores. En esta ocasión quise realizar para mí un cuadro de flores bordadas. Anteriormente he bordado flores, pero no para dejar como cuadro y tampoco para dármelo como regalo.
Hello, Whenever I want to make an embroidery design I always think of flowers. When I am going to draw it happens to me the same way, I love to capture in some way the trees and flowers. This time I wanted to make a picture of embroidered flowers for myself. I have embroidered flowers before, but not to leave as a painting and not to give as a gift.
Para realizar este cuadro voy a utilizar los retazos de telas y de hilos que tengo apartados en la cesta. Lo haré del tamaño de mi bastidor. Luego lo montaré sobre un cartón y le colocaré un colgante, ya que es el único bastidor que tengo no puedo dejarlo colgado en la pared. Comparto contigo el proceso.
To make this frame I am going to use the scraps of fabric and yarn that I have set aside in the basket. I will make it the size of my frame. Then I will mount it on a cardboard and I will put a pendant on it, since it is the only frame I have, I can't leave it hanging on the wall. I will share the process with you.
MATERIALES:
- Telas de fieltro y pop.
- Hilos para bordar.
- Agujas para bordar.
- Tijeras.
- Botones de tres tamaños diferentes.
- Pegamento.
- Cartón.
- Papel de repostería (opcional) yo lo usé porque no tengo tela blanca.
- Dibujo del diseño a elaborar.
MATERIALS:
- FELT AND POP FABRICS.
- Felt and pop fabrics.
- Embroidery threads.
- Embroidery needles.
- Scissors.
- Buttons of three different sizes.
- Glue.
- Cardboard.
- Pastry paper (optional) I used it because I don't have white fabric.
- Drawing of the design to be made.
PROCEDIMIENTO:
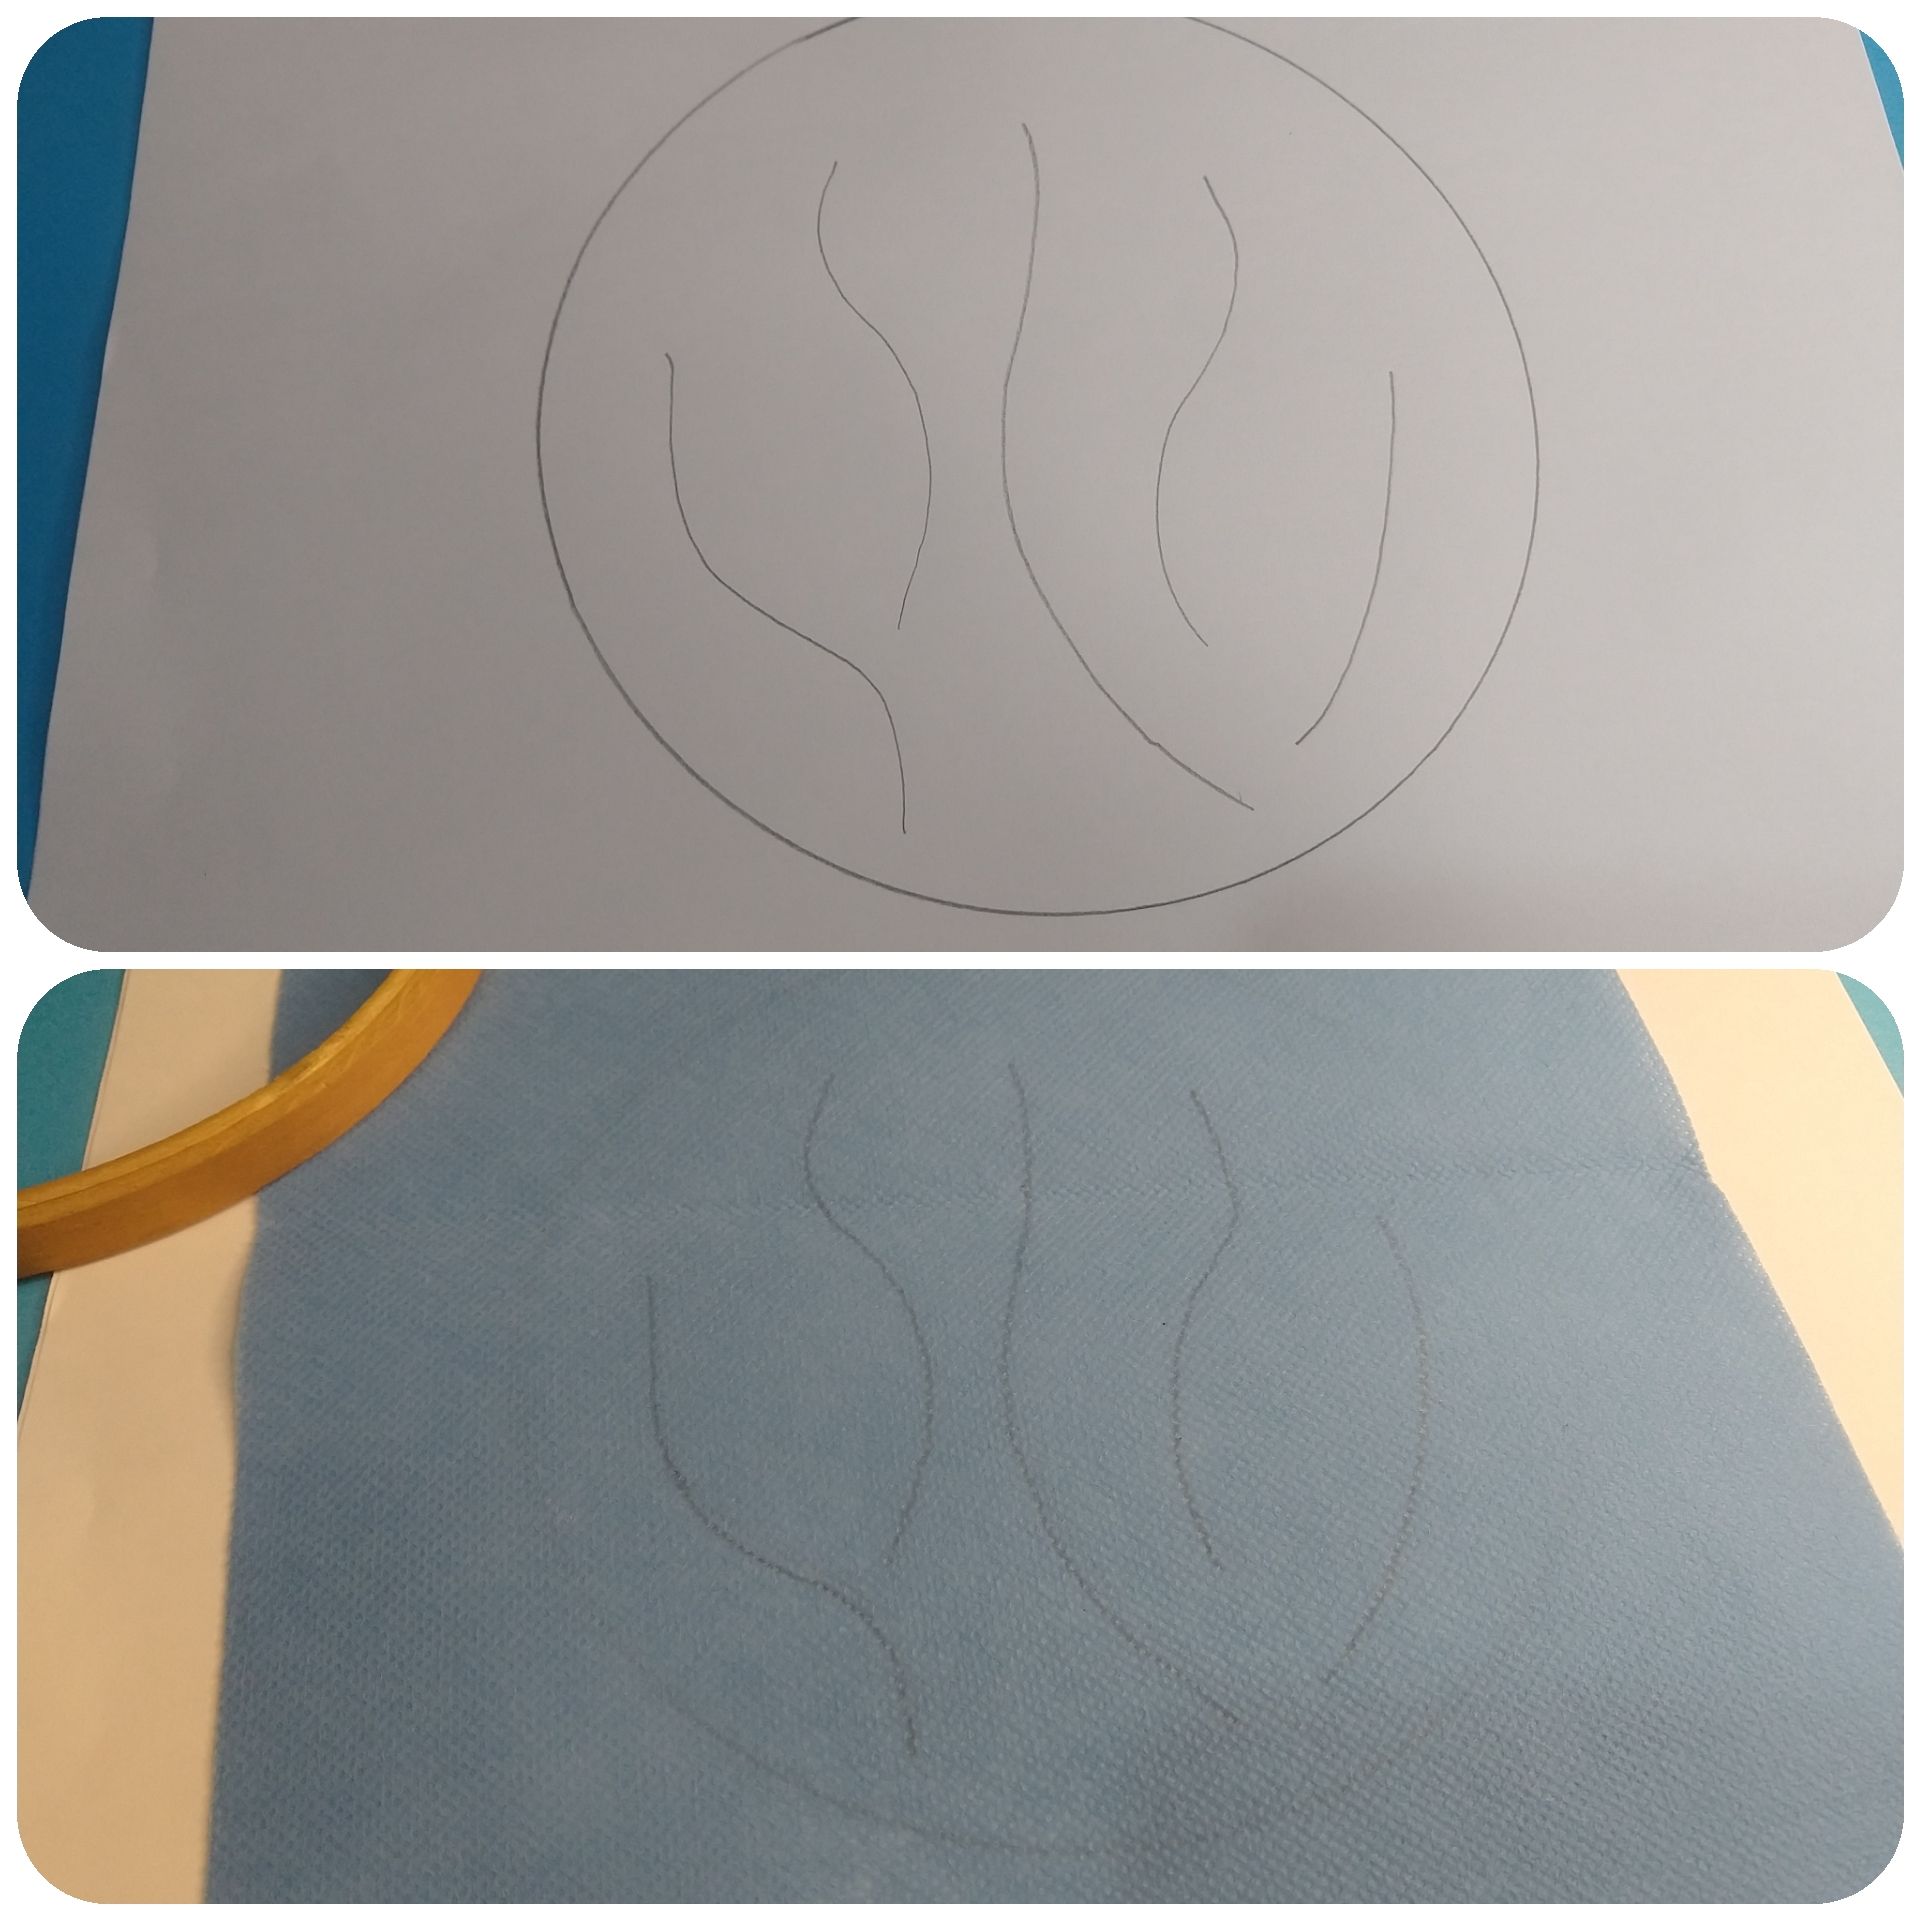
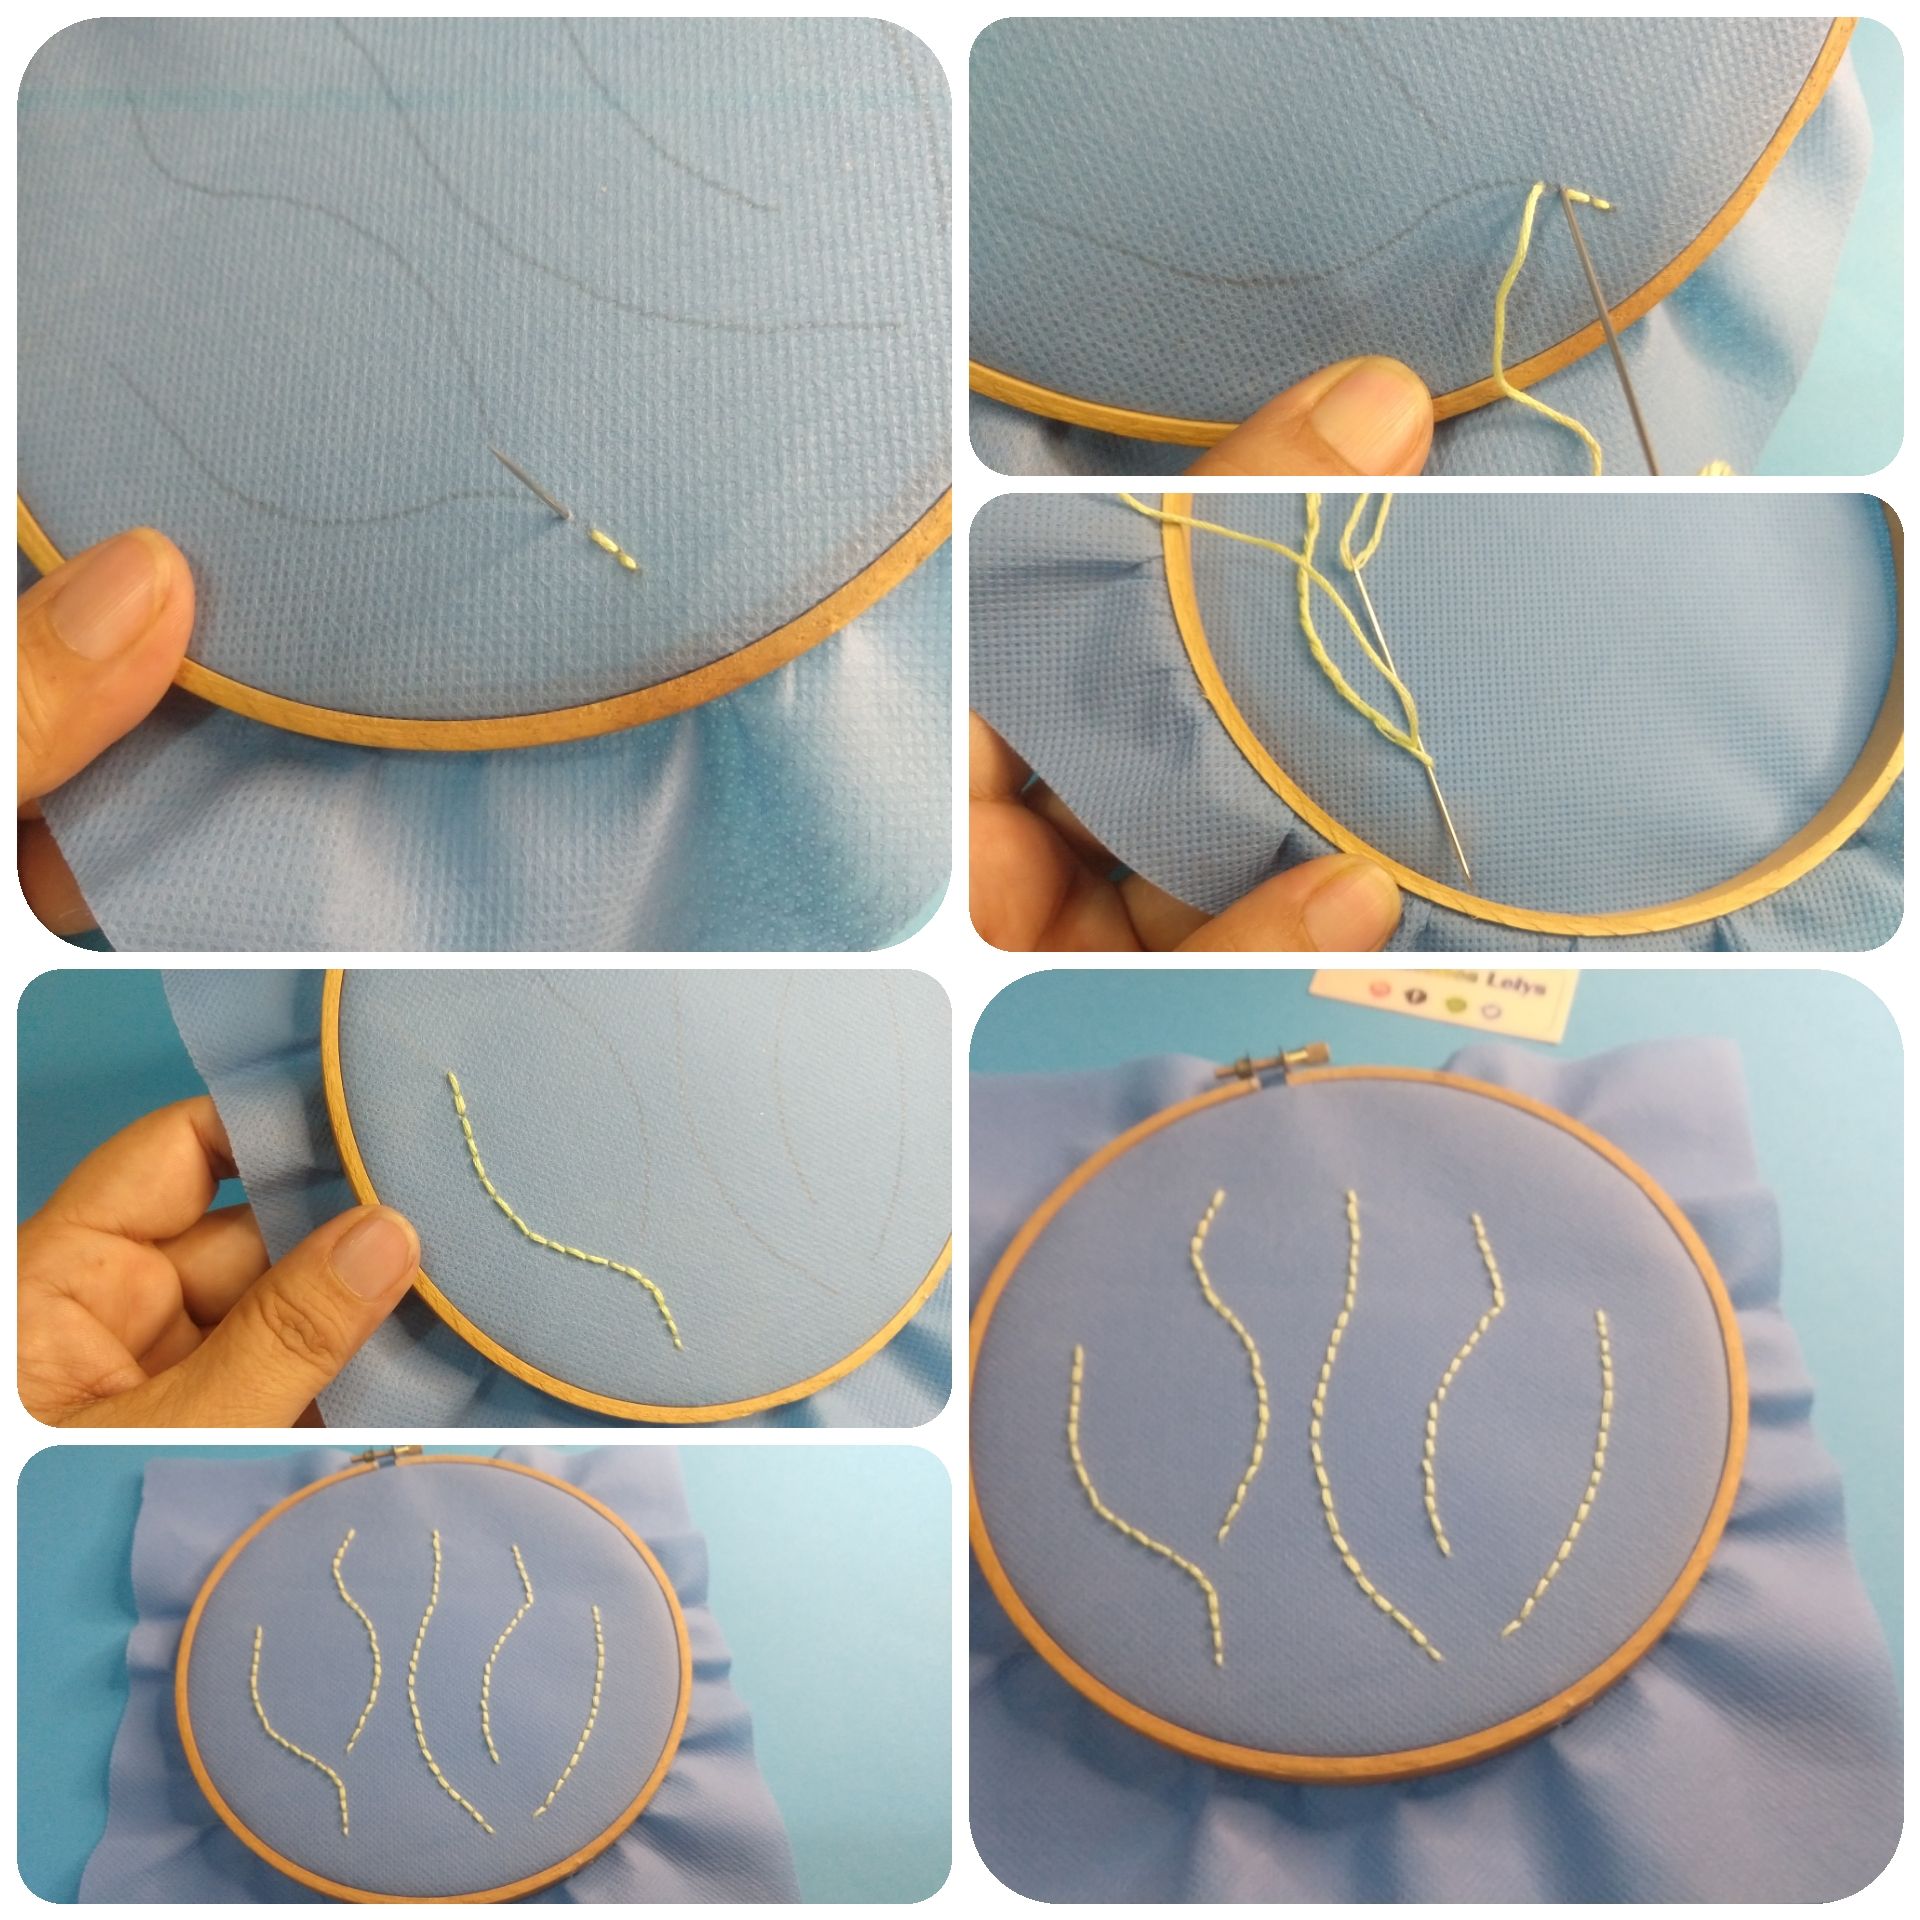
- Trasladamos el diseño a la tela.
PROCEDURE:
- We transfer the design to the fabric.
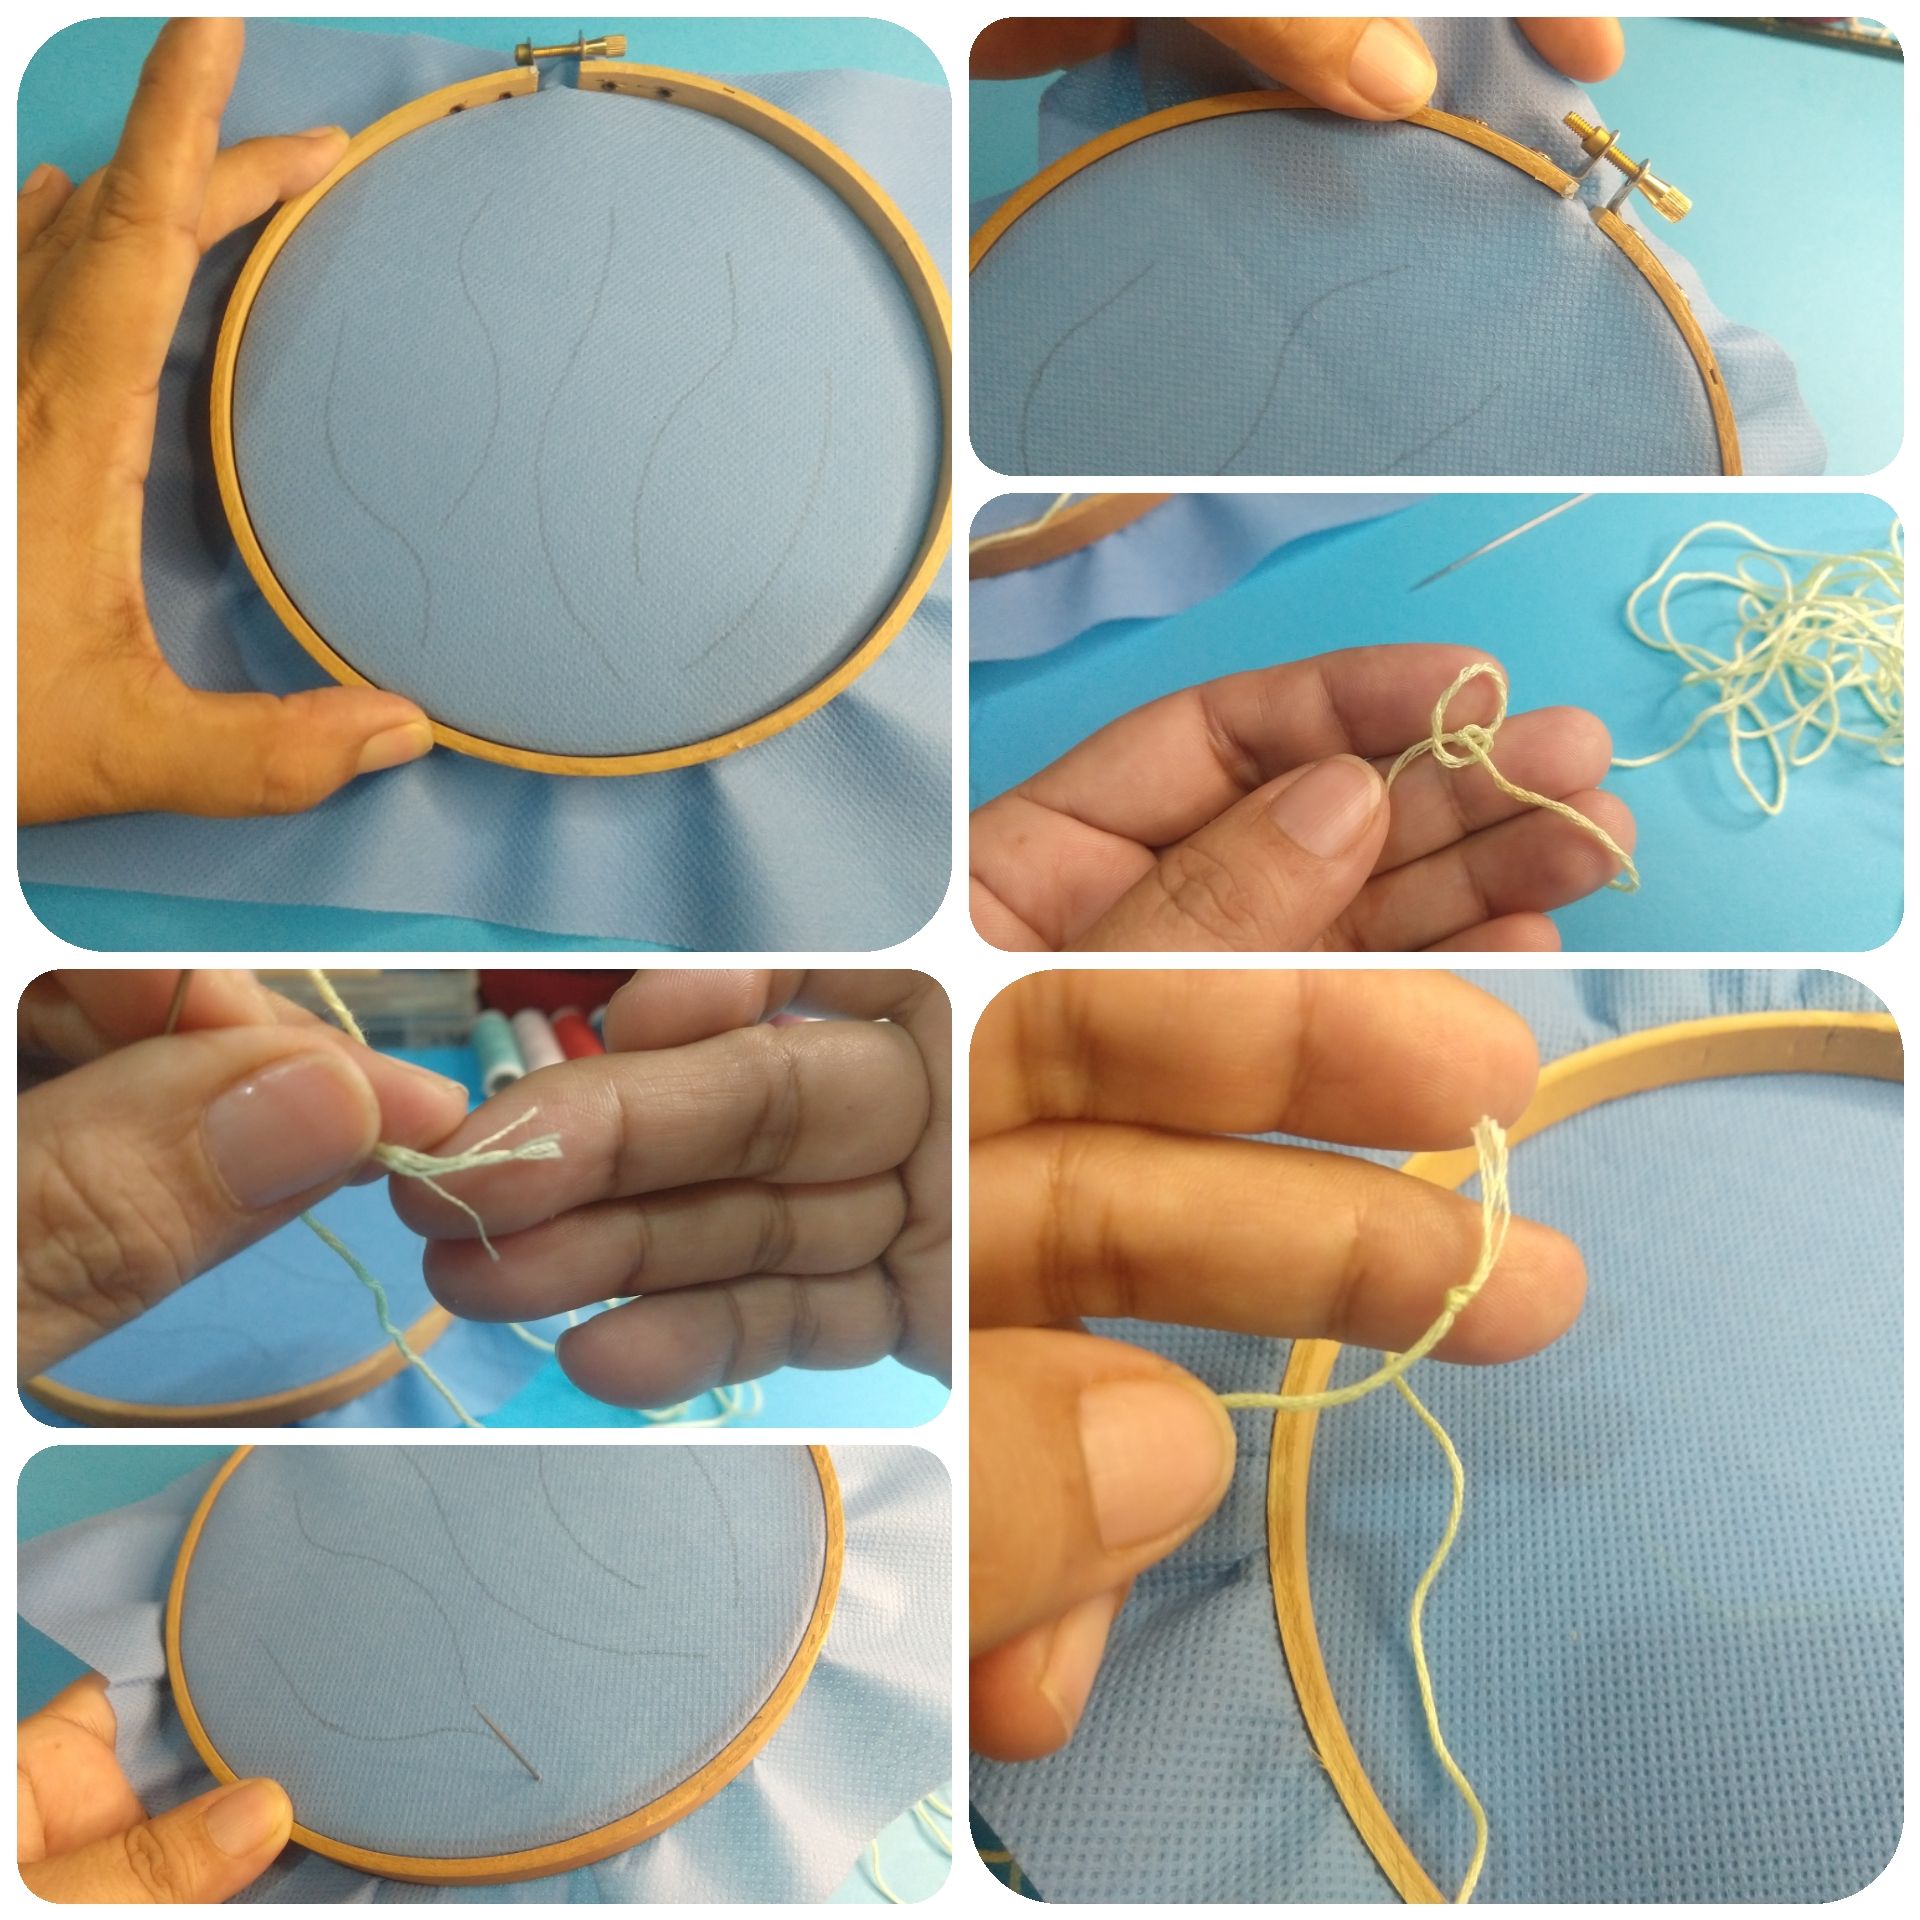
- Colocamos la tela pop en el bastidor.
- Preparamos el hilo para bordar de seis hebras.
- Le hacemos un nudo en una de las puntas.
- Comenzamos a bordar.
- We place the pop fabric in the frame.
- Prepare the six-strand embroidery thread.
- We make a knot in one of the ends.
- We begin to embroider.
- Mi diseño de flores comienza por los tallos. He realizado cinco tallos y voy a bordarlos cada uno por separado. Es decir cortando la hebra al finalizar cada tallo.
- Esta es una puntada simple, básica del bordado.
- Pasamos el hilo desde abajo, luego dejamos un espacio entre cada punto hacia adelante y devolvemos el hilo desde arriba pinchando desde donde sacamos el punto anterior.
- My flower design starts with the stems. I have made five stems and I am going to embroider each one separately. That is, cutting the thread at the end of each stem.
- This is a simple, basic embroidery stitch.
- We pass the thread from the bottom, then leave a space between each stitch forward and return the thread from the top, pinning from where we pulled out the previous stitch.
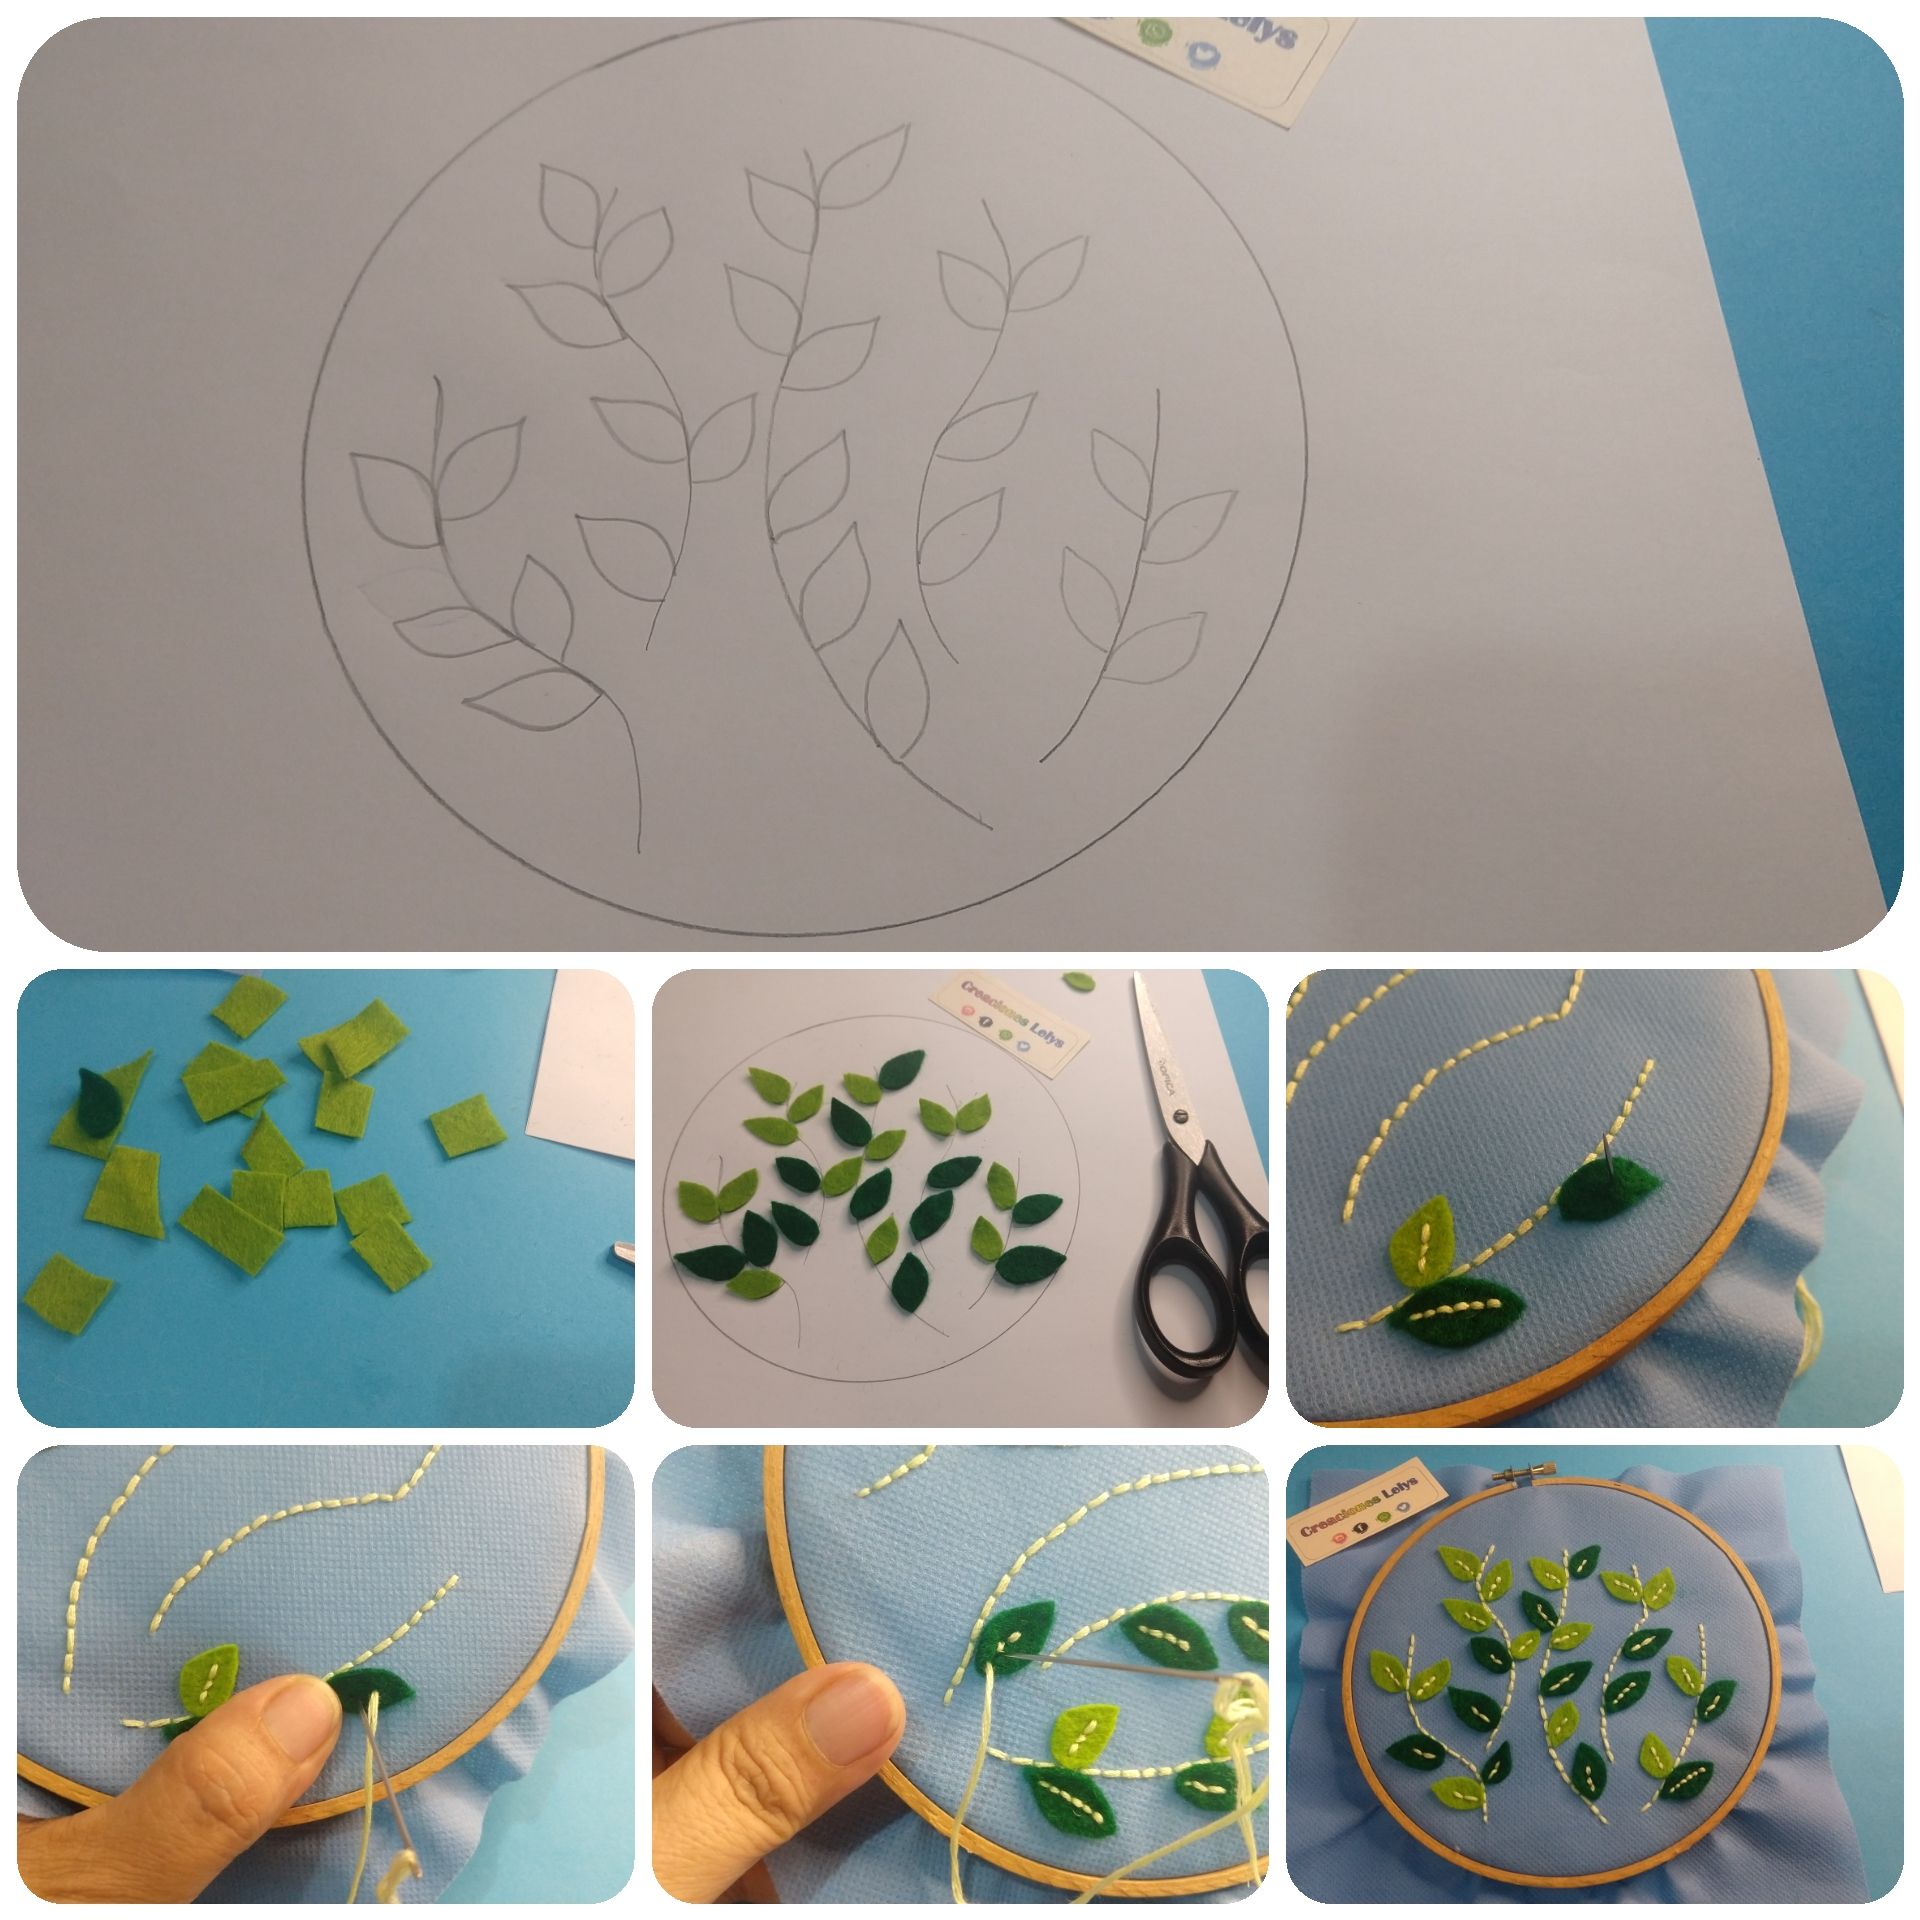
- Después de bordar los tallos corto en tela de fieltro verde todas las hojas. 26 hojas en total para mi diseño. 12 en color verde oscuro y el resto en verde más claro.
- Me voy guiando por el diseño y comienzo a fijar cada una con el mismo color de hilo que usé para los tallos.
- After embroidering the stems I cut in green felt fabric all the leaves. 26 leaves in total for my design. 12 in dark green and the rest in lighter green.
- I go by the design and start attaching each one with the same color thread I used for the stems.
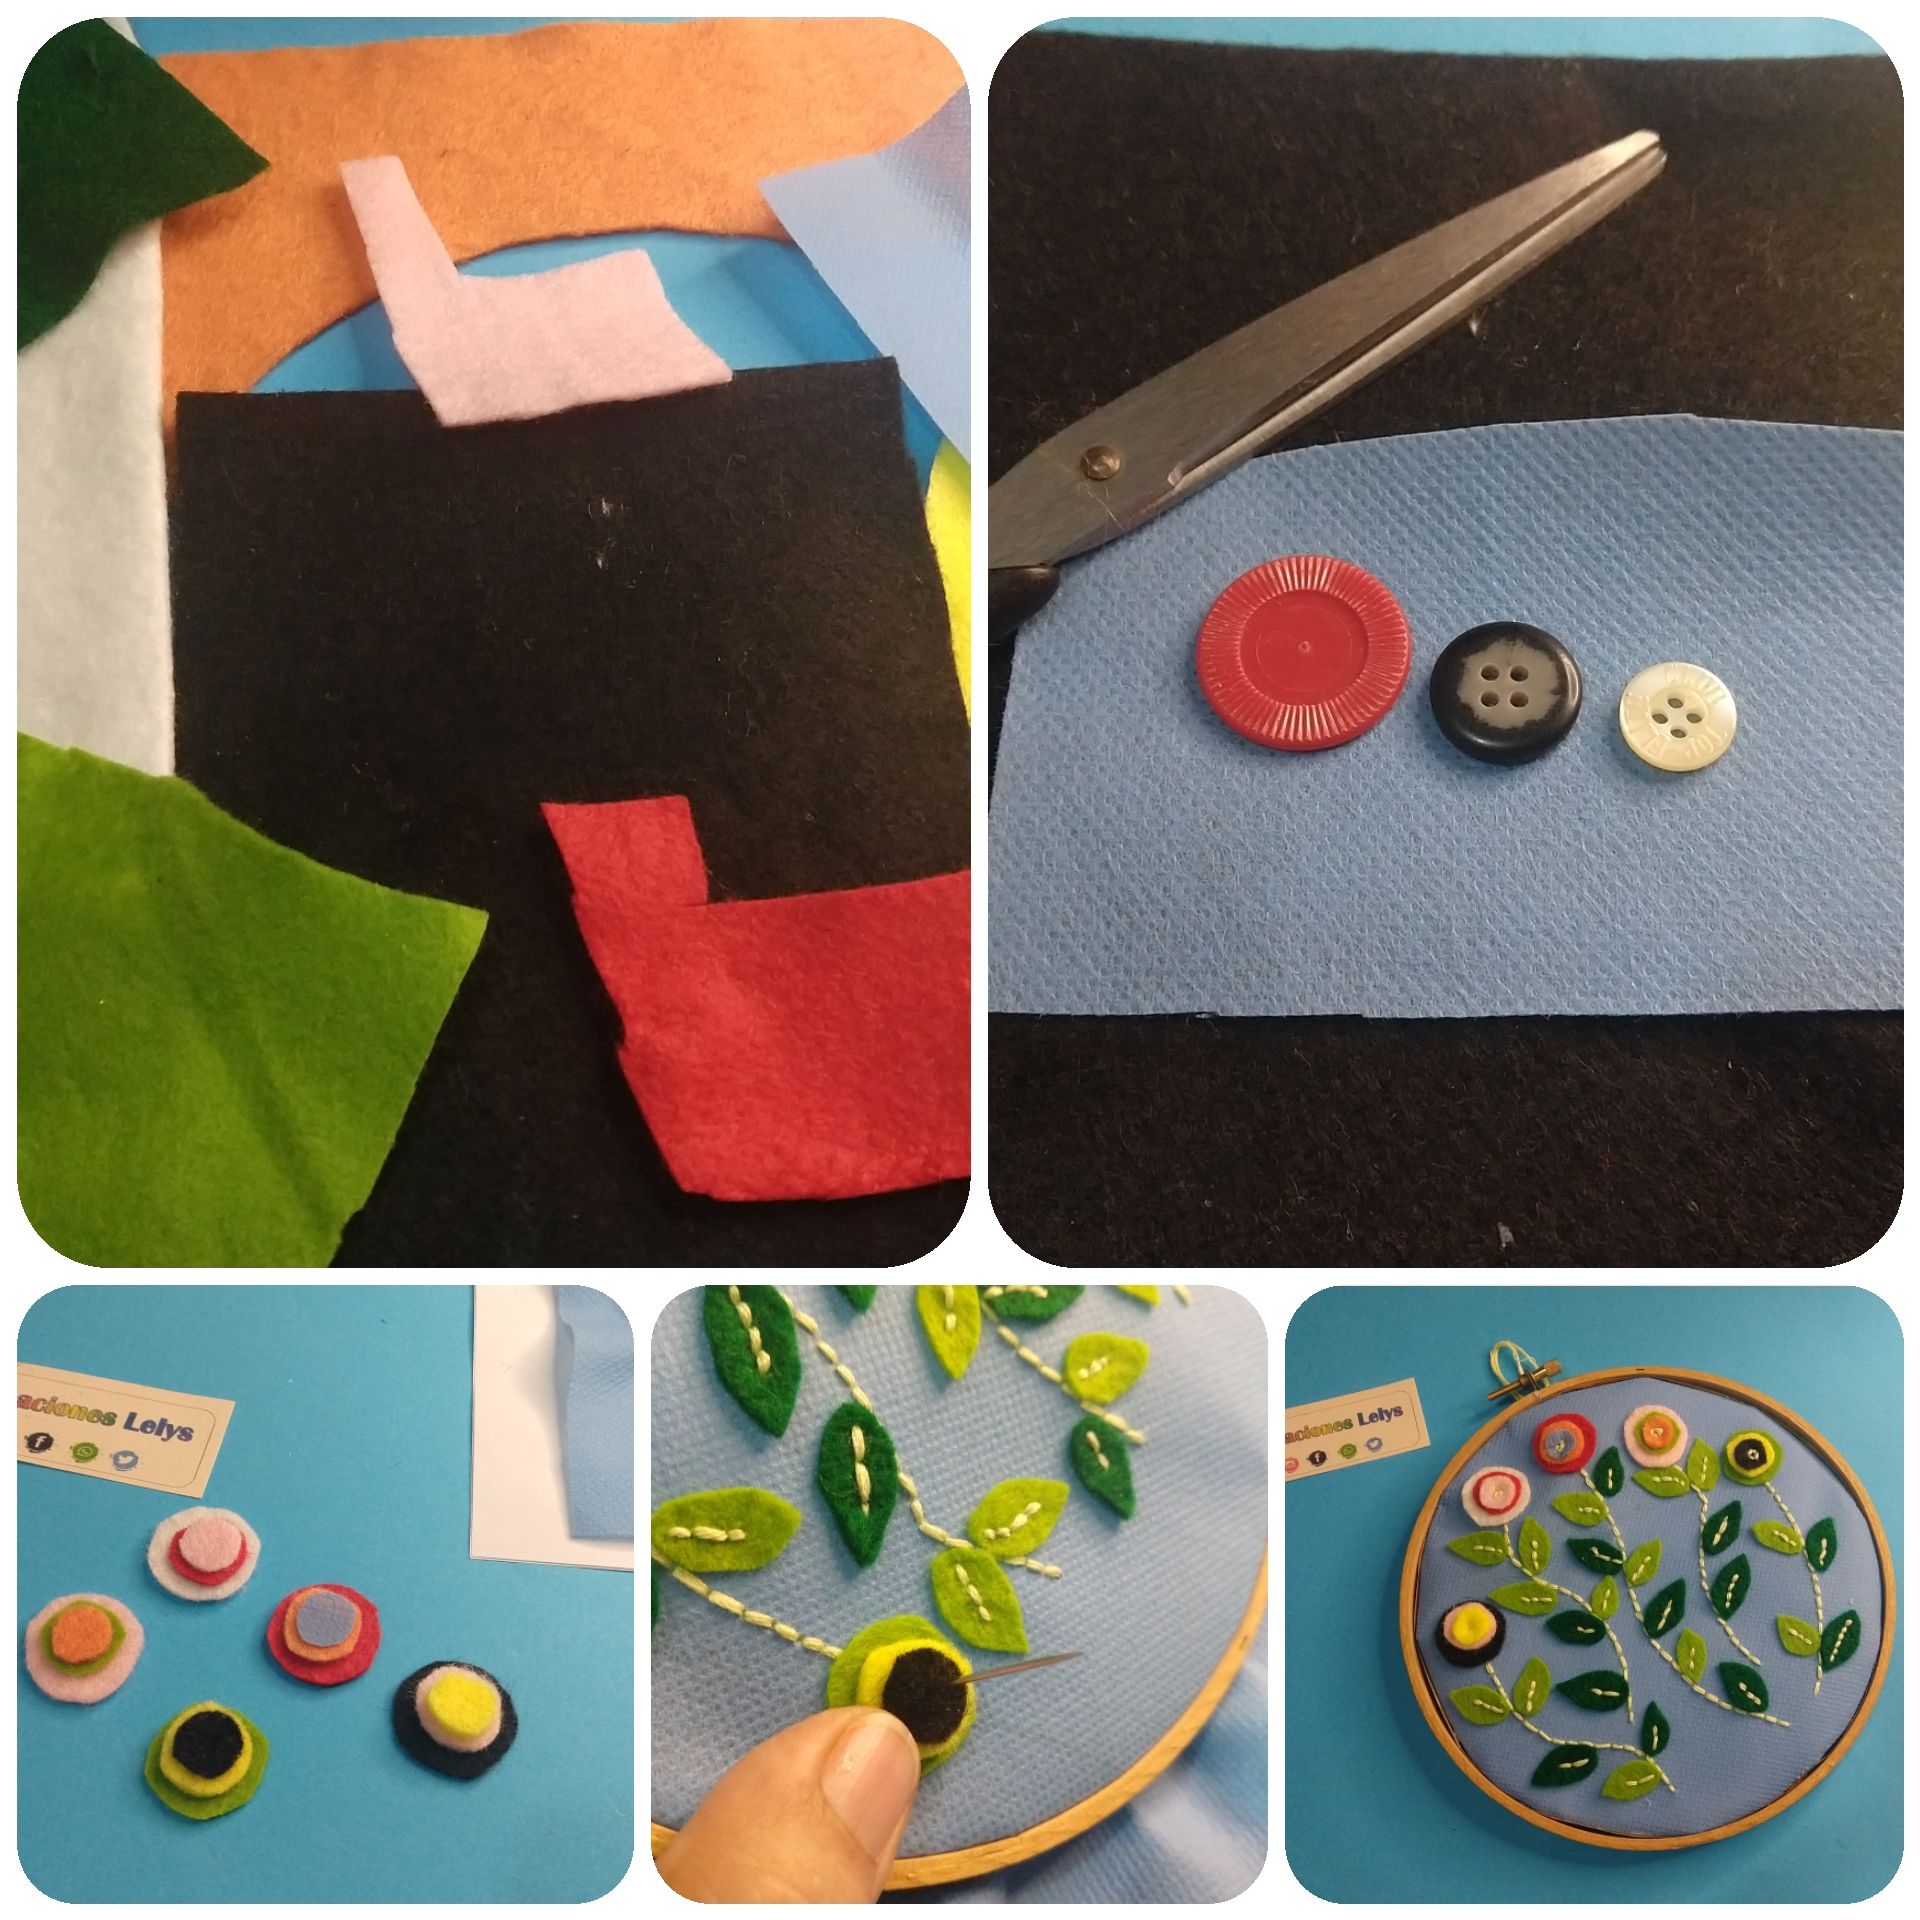
- Ahora corto círculos de tres tamaños diferentes midiendo con los botones. Cada círculo de un color distinto. Haremos con ellos las flores.
- Montamos un círculo sobre otro dejando el más grande de base.
- Combinamos los colores.
- Luego cosemos cada flor en la punta superior de cada tallo, cinco en total.
- Fijadas todas las flores ya habré terminado.
- Now I cut circles of three different sizes by measuring with the buttons. Each circle of a different color. We will make the flowers with them.
- We assemble a circle on top of another leaving the larger one as a base.
- We combine the colors.
- Then we sew each flower on the top of each stem, five in total.
- Once all the flowers are attached, we are done.
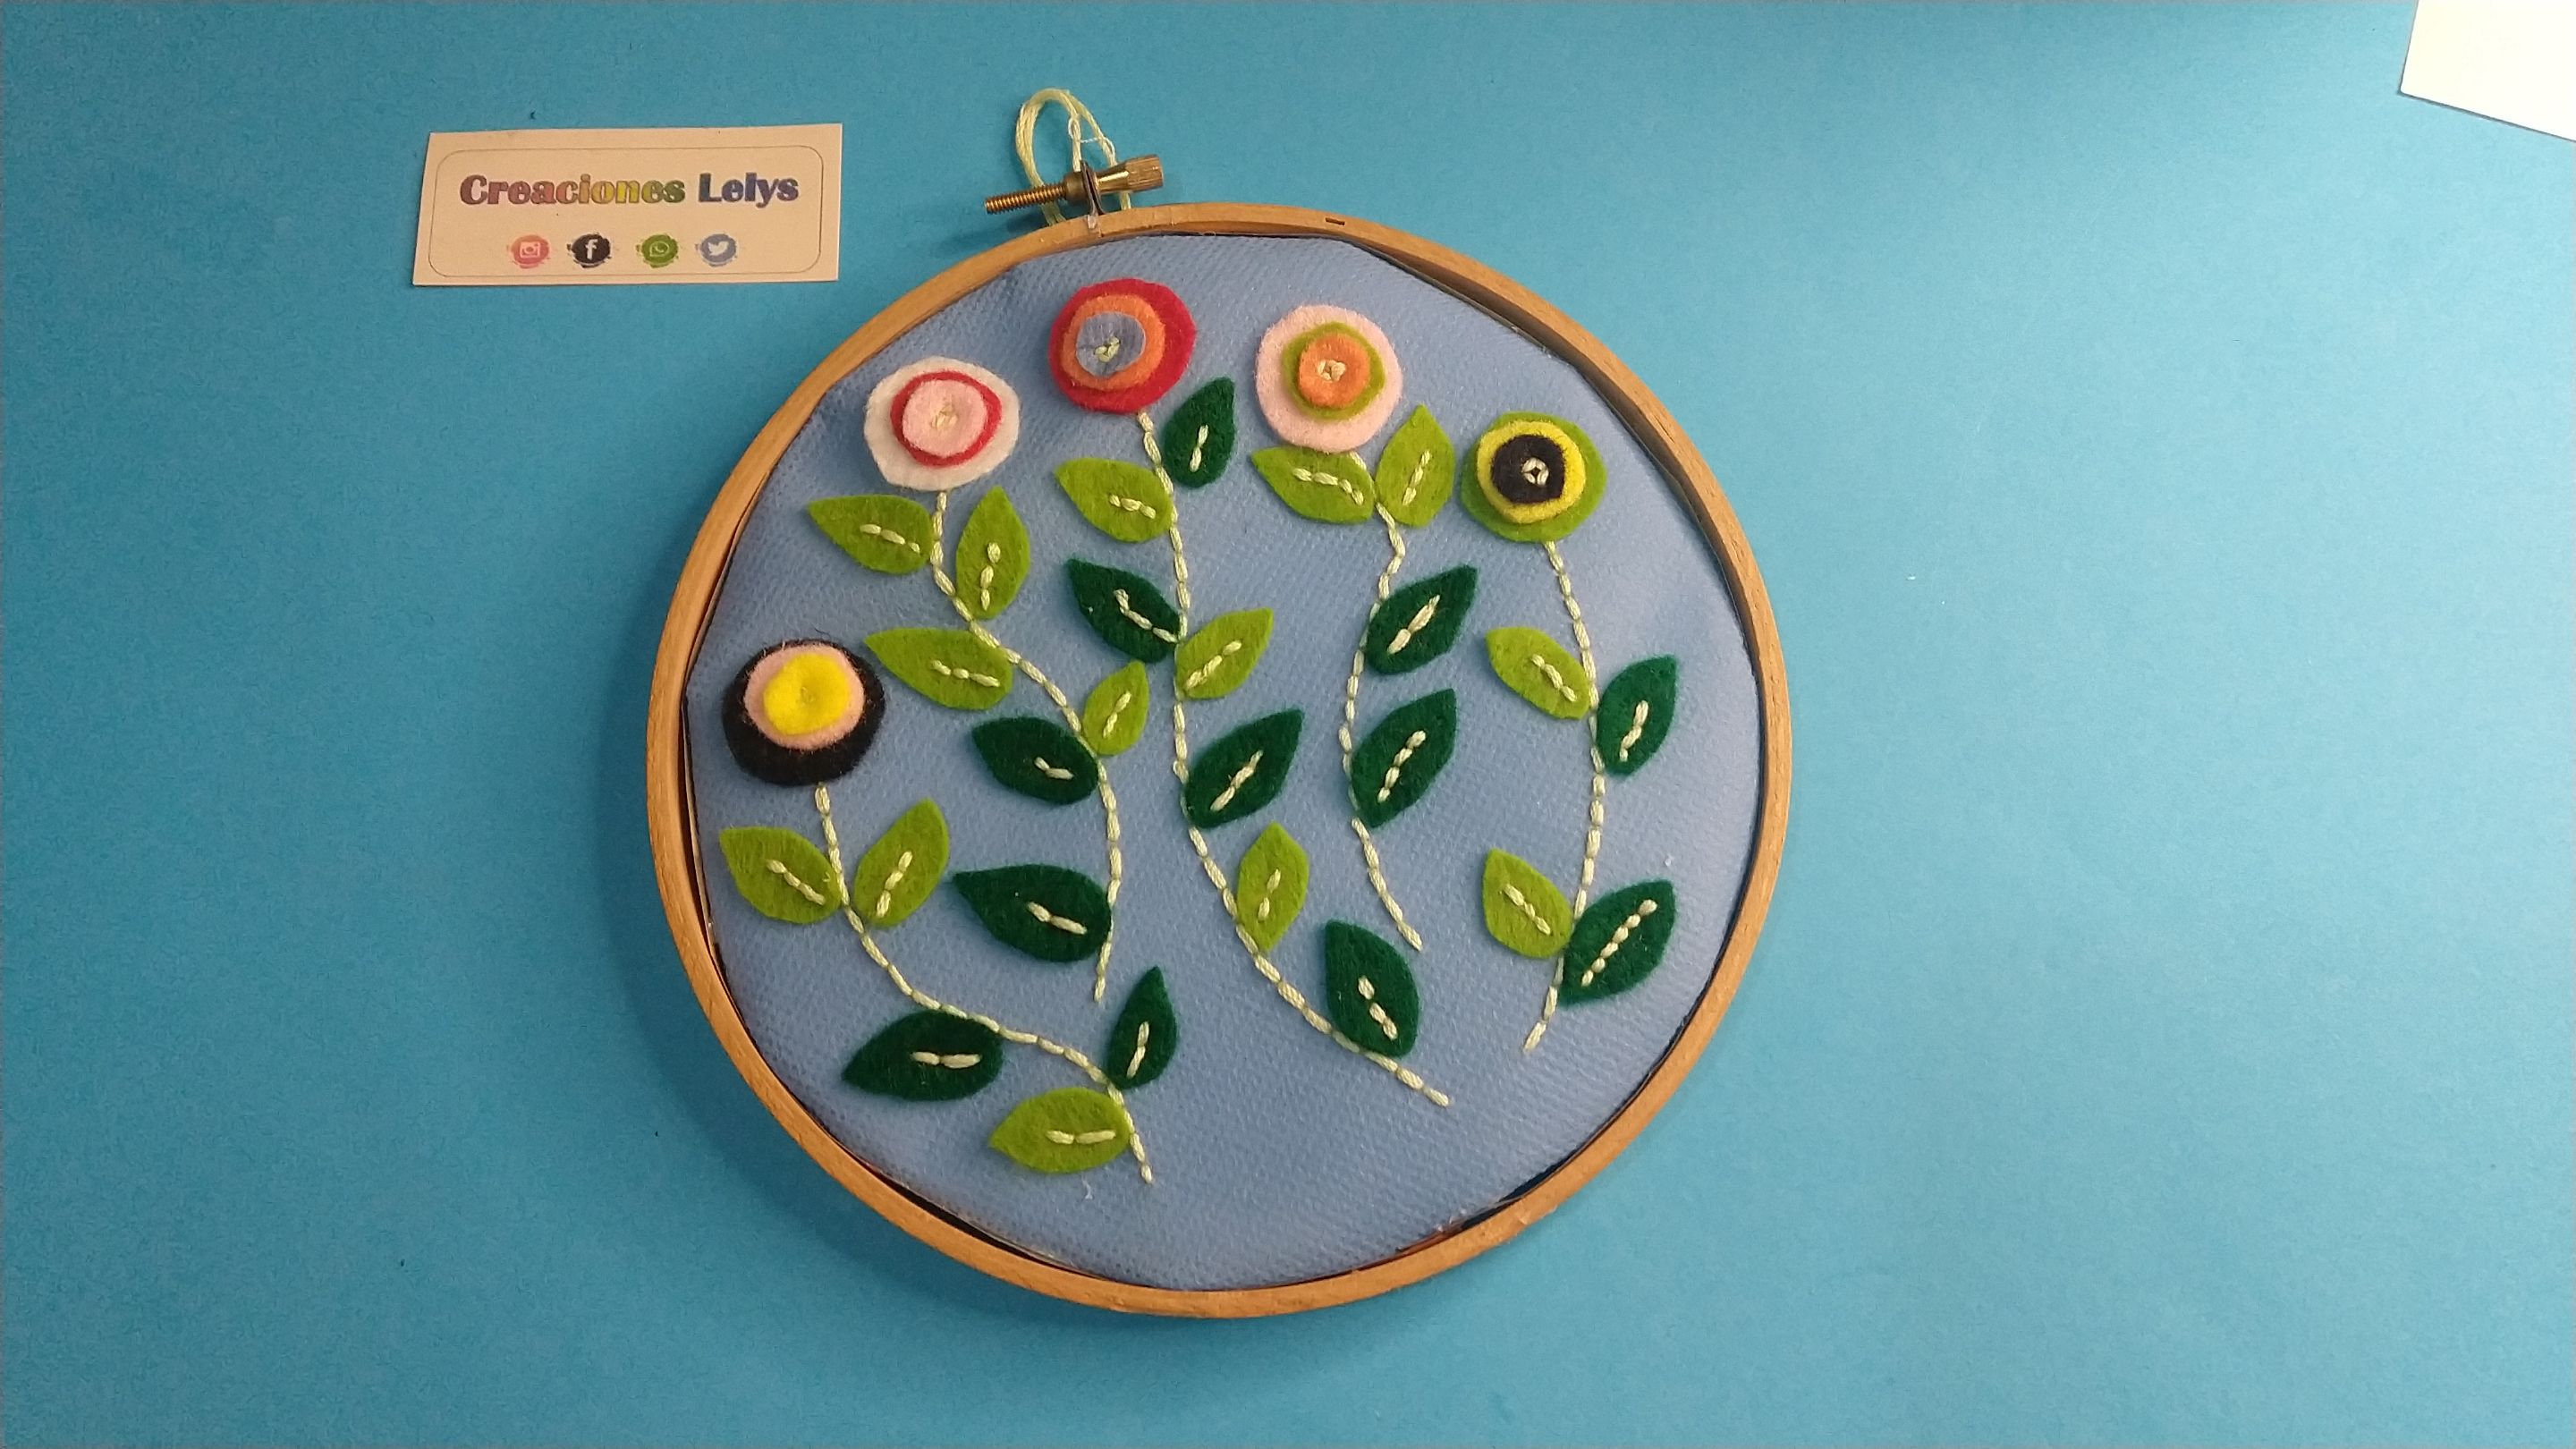
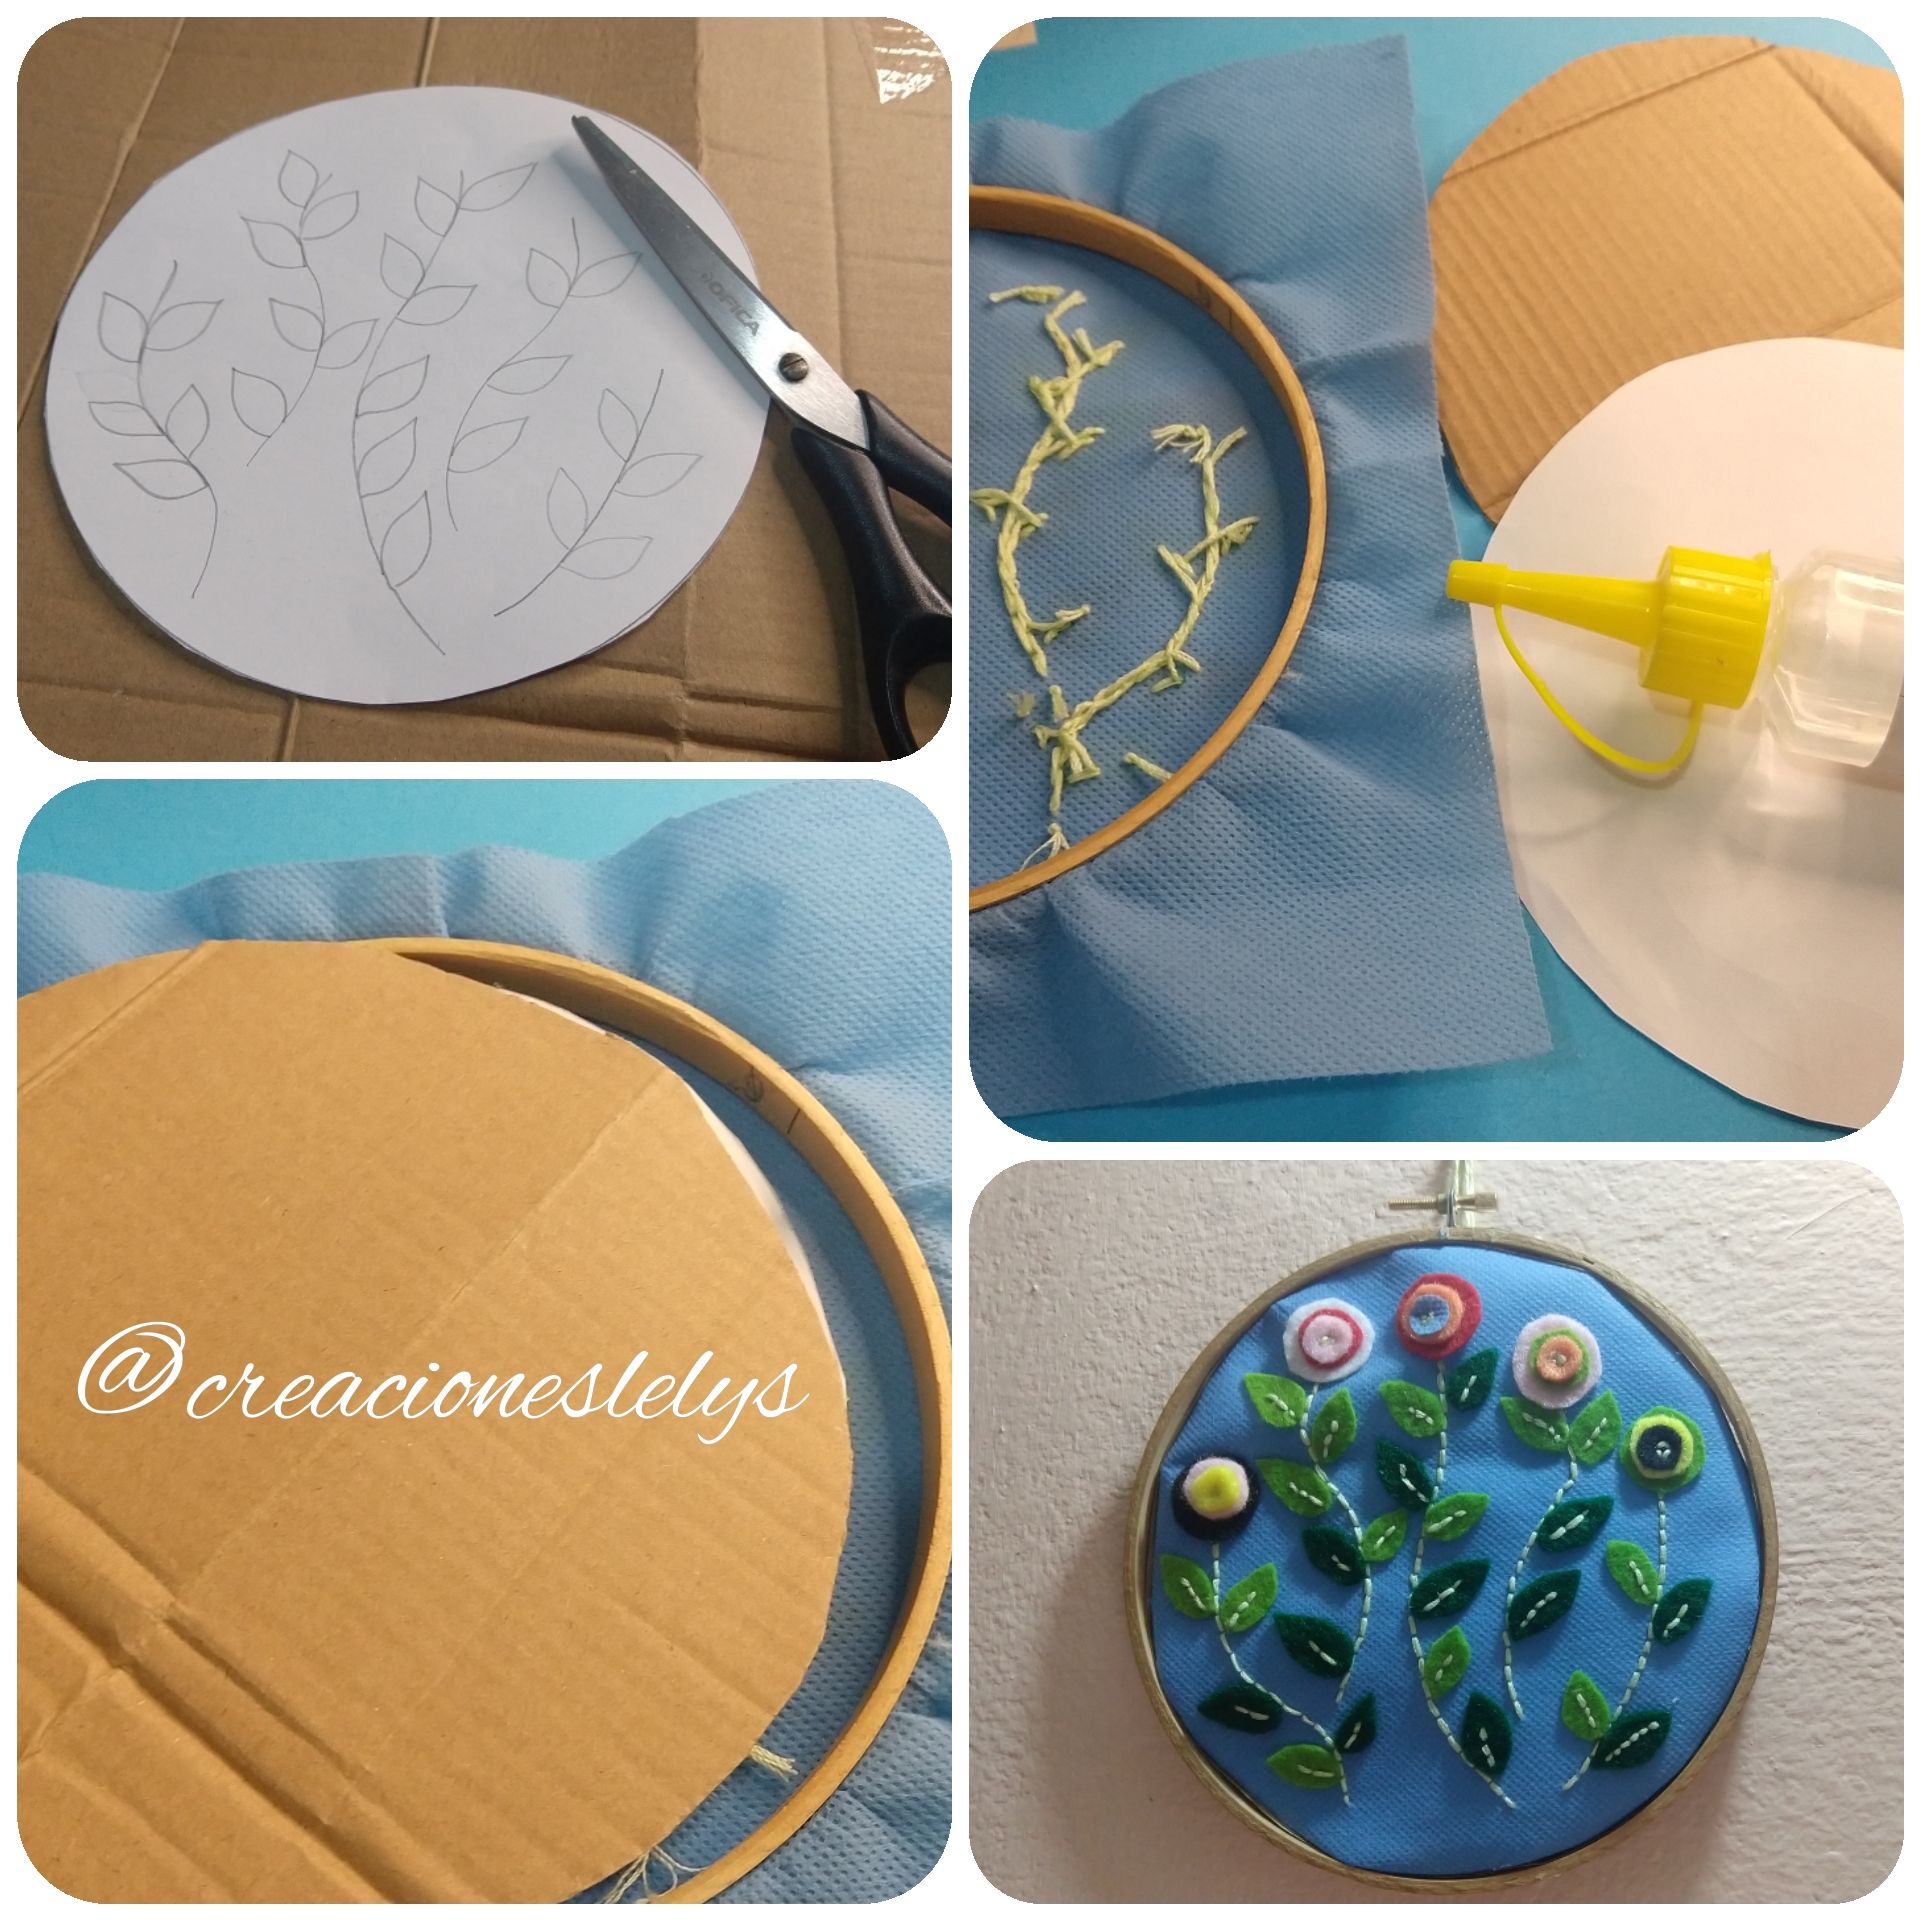
- Si no dispones de más bastidores en tu casa, entonces coloca la tela bordada sobre un cartón. Coloca tela azul o blanca en la parte de atrás y hazle un colgante. Así luce se bonito mi cuadro de flores bordadas.
- If you do not have more frames at home, then place the embroidered fabric on cardboard. Place blue or white fabric on the back and make a pendant. This is how beautiful my embroidered flower frame looks.
Estoy bastante satisfecha con el resultado. espero que les guste esta idea de reciclaje o aprovechamiento de los retazos de telas e hilos que tenemos en la cesta de materiales. Me da mucho gusto compartir con ustedes esta creación. Acepto recomendaciones y sugerencias ya que es el primer video tutorial que publico por este medio. De antemano, muchas gracias por tu apoyo.
I am quite satisfied with the result. I hope you like this idea of recycling or making use of the scraps of fabrics and threads that we have in the basket of materials. It gives me great pleasure to share with you this creation. I accept recommendations and suggestions as this is the first video tutorial that I publish through this medium. Thank you in advance for your support.
¡Gracias a @kattycrochet por los separadores! Hasta una próxima oportunidad.
Thanks to @kattycrochet for the dividers! See you next time.
Show more
Tags :
Woo!
This creator can upvote comments using 3speak's stake today because they are a top performing creator!
Leave a quality comment relating to their content and you could receive an upvote
worth at least a dollar.
Their limit for today is $0!
Their limit for today is $0!

46 views
a year ago
$
8 views
a year ago
$

8 views
a year ago
$
9 views
a year ago
$

5 views
11 months ago
$
More Videos

13 views
3 weeks ago
$

1 views
2 years ago
$

9 views
2 years ago
$

34 views
2 weeks ago
$
10 views
a year ago
$

13 views
a year ago
$

1 views
3 years ago
$

22 views
3 years ago
$

Liga Futuras Estrellas | Ya tenemos los 4 campeones en sus categorías - ¡Aquí te lo cuento! - [ESP-E
8 views
a year ago
$

1 views
a year ago
$

27 views
a year ago
$
6 views
a year ago
$
4 views
8 months ago
$

20 views
9 months ago
$

8 views
7 months ago
$

2 views
2 years ago
$

27 views
2 years ago
$
3 views
2 years ago
$

12 views
11 months ago
$

20 views
3 months ago
$

16 views
3 months ago
$
30 views
2 years ago
$

13 views
a year ago
$

9 views
2 years ago
$
Comments:
Reply:
To comment on this video please connect a HIVE account to your profile: Connect HIVE Account