0 seconds of 0 secondsVolume 90%
Press shift question mark to access a list of keyboard shortcuts
Keyboard Shortcuts
Shortcuts Open/Close/ or ?
Play/PauseSPACE
Increase Volume↑
Decrease Volume↓
Seek Forward→
Seek Backward←
Captions On/Offc
Fullscreen/Exit Fullscreenf
Mute/Unmutem
Decrease Caption Size-
Increase Caption Size+ or =
Seek %0-9
[ESP-ENG SUBTITLED] "Tutorial" Como aumentar la velocidad de carga en tus vídeos para 3Speak,
About :

Miniatura de mi autoria diseñada en Photoshop Cs6


Cordial saludo querida familia de Hive y la comunidad de @espavlog, el día de hoy les traigo un tutorial de como mejorar la velocidad de carga de nuestros vídeos a la plataforma de 3Speak.
Esta iniciativa de realizar este tutorial es basada en mi experiencia al principio en esta plataforma, una de las cosas con las que me lleve muchos tropezones y horas de angustia y estrés, fue con las largas horas que tardaba para subir un vídeo a la plataforma de 3Speak, recuerdo que una vez tuve que dejar el computador encendido toda la noche y mi vídeo no logro subirse, con un mismo vídeo intentaba una y otra vez publicarlo pero nada, eran hasta cinco y seis intentos de cargar por completo el vídeo.
lo primero que hay que tomar en cuenta es que 3Speak es una plataforma que se mantiene en constantes actualizaciones en Pro de mejorar la experiencia para nosotros los usuarios, también que a la hora de cargar vídeos es importante la calidad del Internet que posea y también si tu vídeo es muy largo y muy pesado, pero tranquilo te tengo una solución efectiva que cambio mi experiencia por completo y mas nunca supe lo que fue pasar por ese amargo momento de ver tu vídeo casi al 100% y quedarse colgado y tener que comenzar de nuevo.
Warm greetings dear family of Hive and the community of @espavlog, today I bring you a tutorial on how to improve the upload speed of our videos to the 3Speak platform.
This initiative to make this tutorial is based on my experience at the beginning in this platform, one of the things that took me many stumbles and hours of anguish and stress, was with the long hours it took to upload a video to the 3Speak platform, I remember once I had to leave the computer on all night and my video failed to upload, with the same video tried again and again to publish it but nothing were up to five and six attempts to fully load the video.
The first thing to take into account is that 3Speak is a platform that is constantly updated in order to improve the experience for us users, also when uploading videos is important the quality of the Internet you have and also if your video is very long and very heavy, but quiet I have an effective solution that changed my experience completely and never knew what it was like to go through that bitter moment of watching your video almost 100% and get hung and have to start again.
Con este método que te voy a explicar a continuación pase de esperar horas para ver mi video cargado en 3Speak a solo esperar menos de 10 minutos, si asi como estas leyendo en menos de 10 minutos ya mi contenido esta listo para ser publicado.
lo primero que vas a necesitar es el reproductor multitudinaria VLC, aquí te dejo el enlace para que lo descargues de forma gratuita y lo instales en tu computador.
https://www.videolan.org/vlc/index.es.html

With this method that I am going to explain below I went from waiting hours to see my video uploaded in 3Speak to only wait less than 10 minutes, yes as you are reading in less than 10 minutes and my content is ready to be published.
the first thing you will need is the VLC player, here I leave you the link to download it for free and install it on your computer.
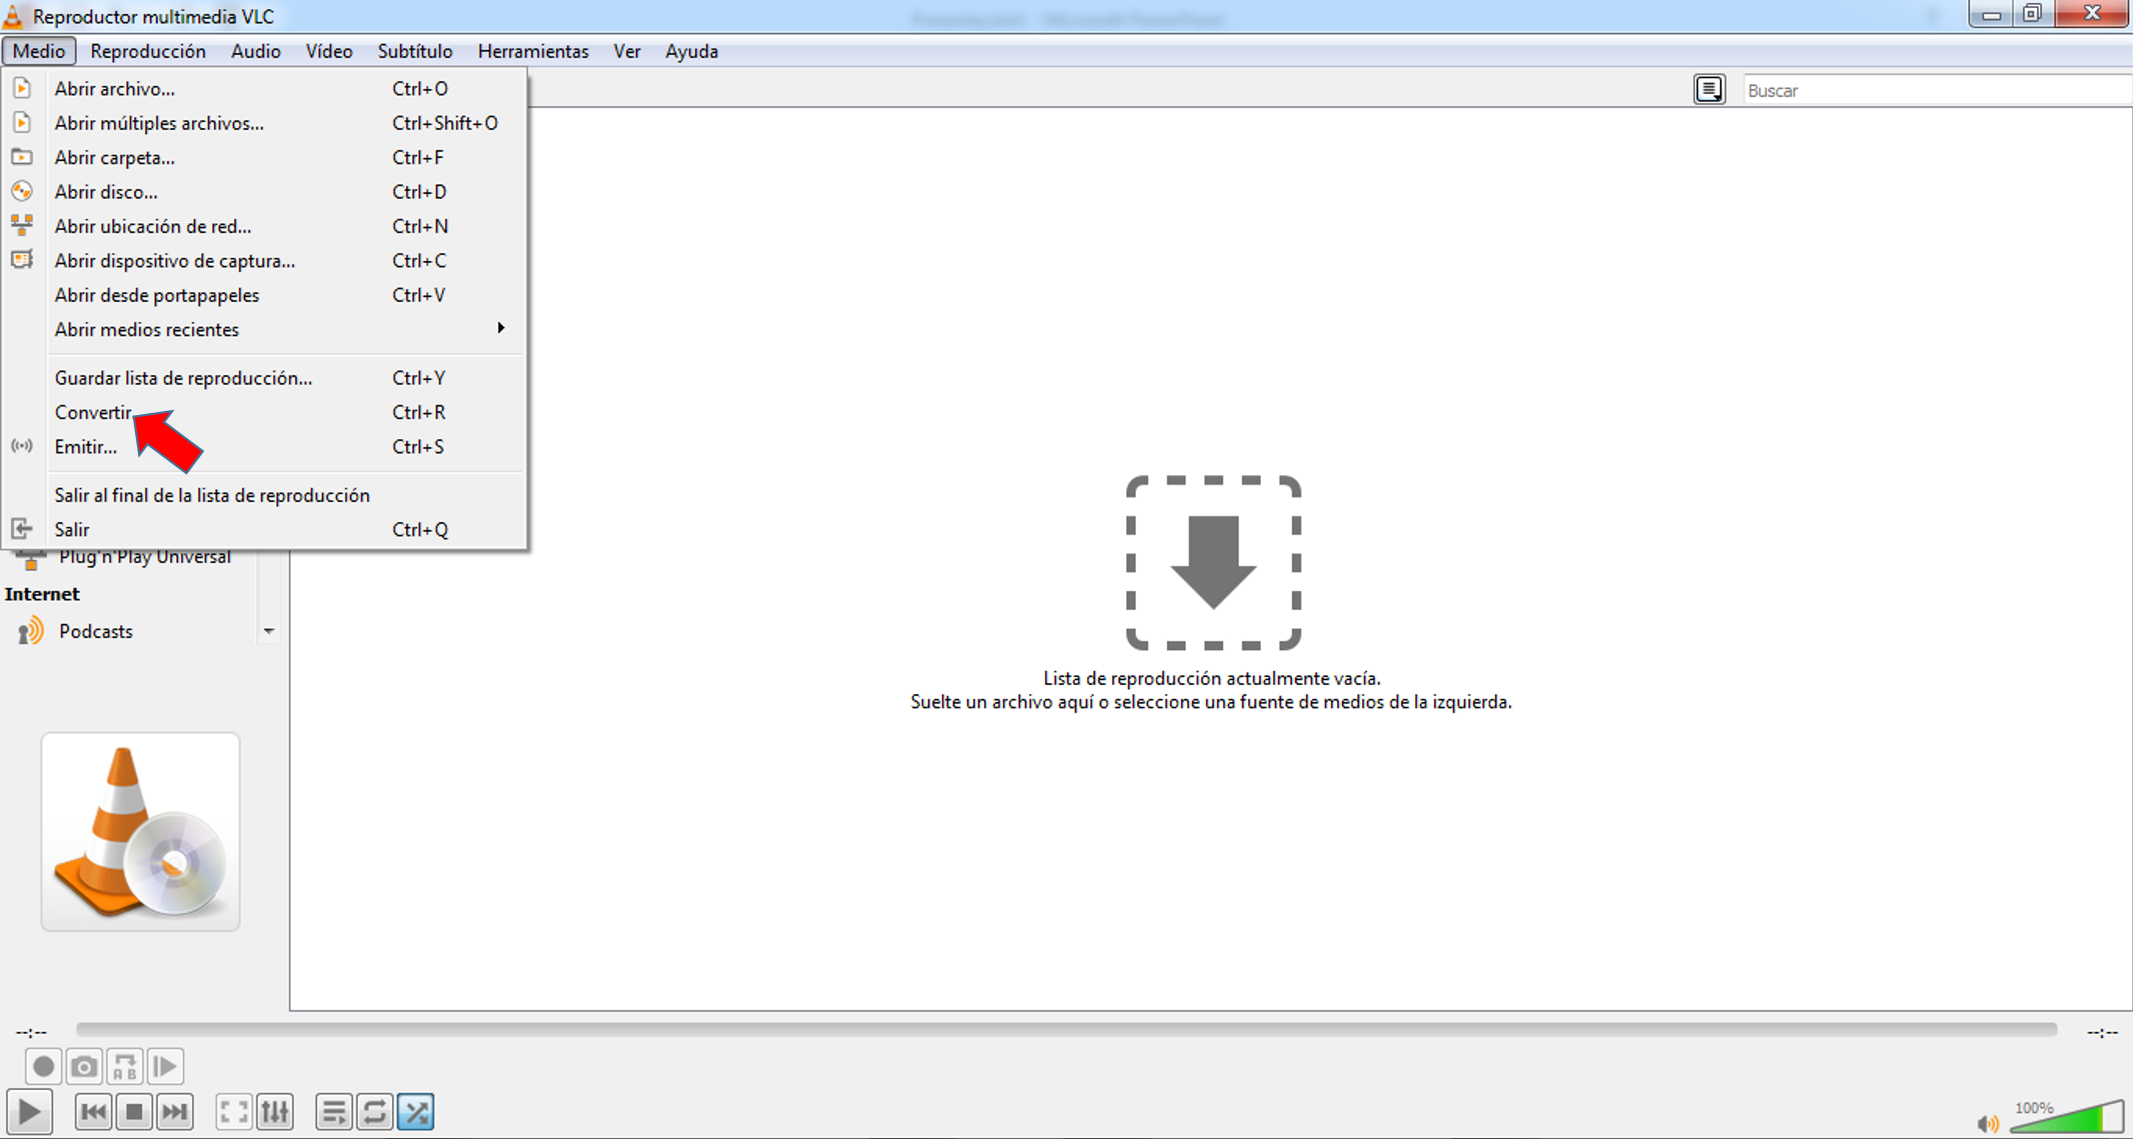
Paso 1
Abrimos nuestro reproductor VLC y nos ubicamos en la pestaña que dice medio en la parte superior izquierda, desplegamos y hacemos clic en convertir.
Step 1
We open our VLC player and we go to the tab that says media in the upper left part, we unfold and click on convert.
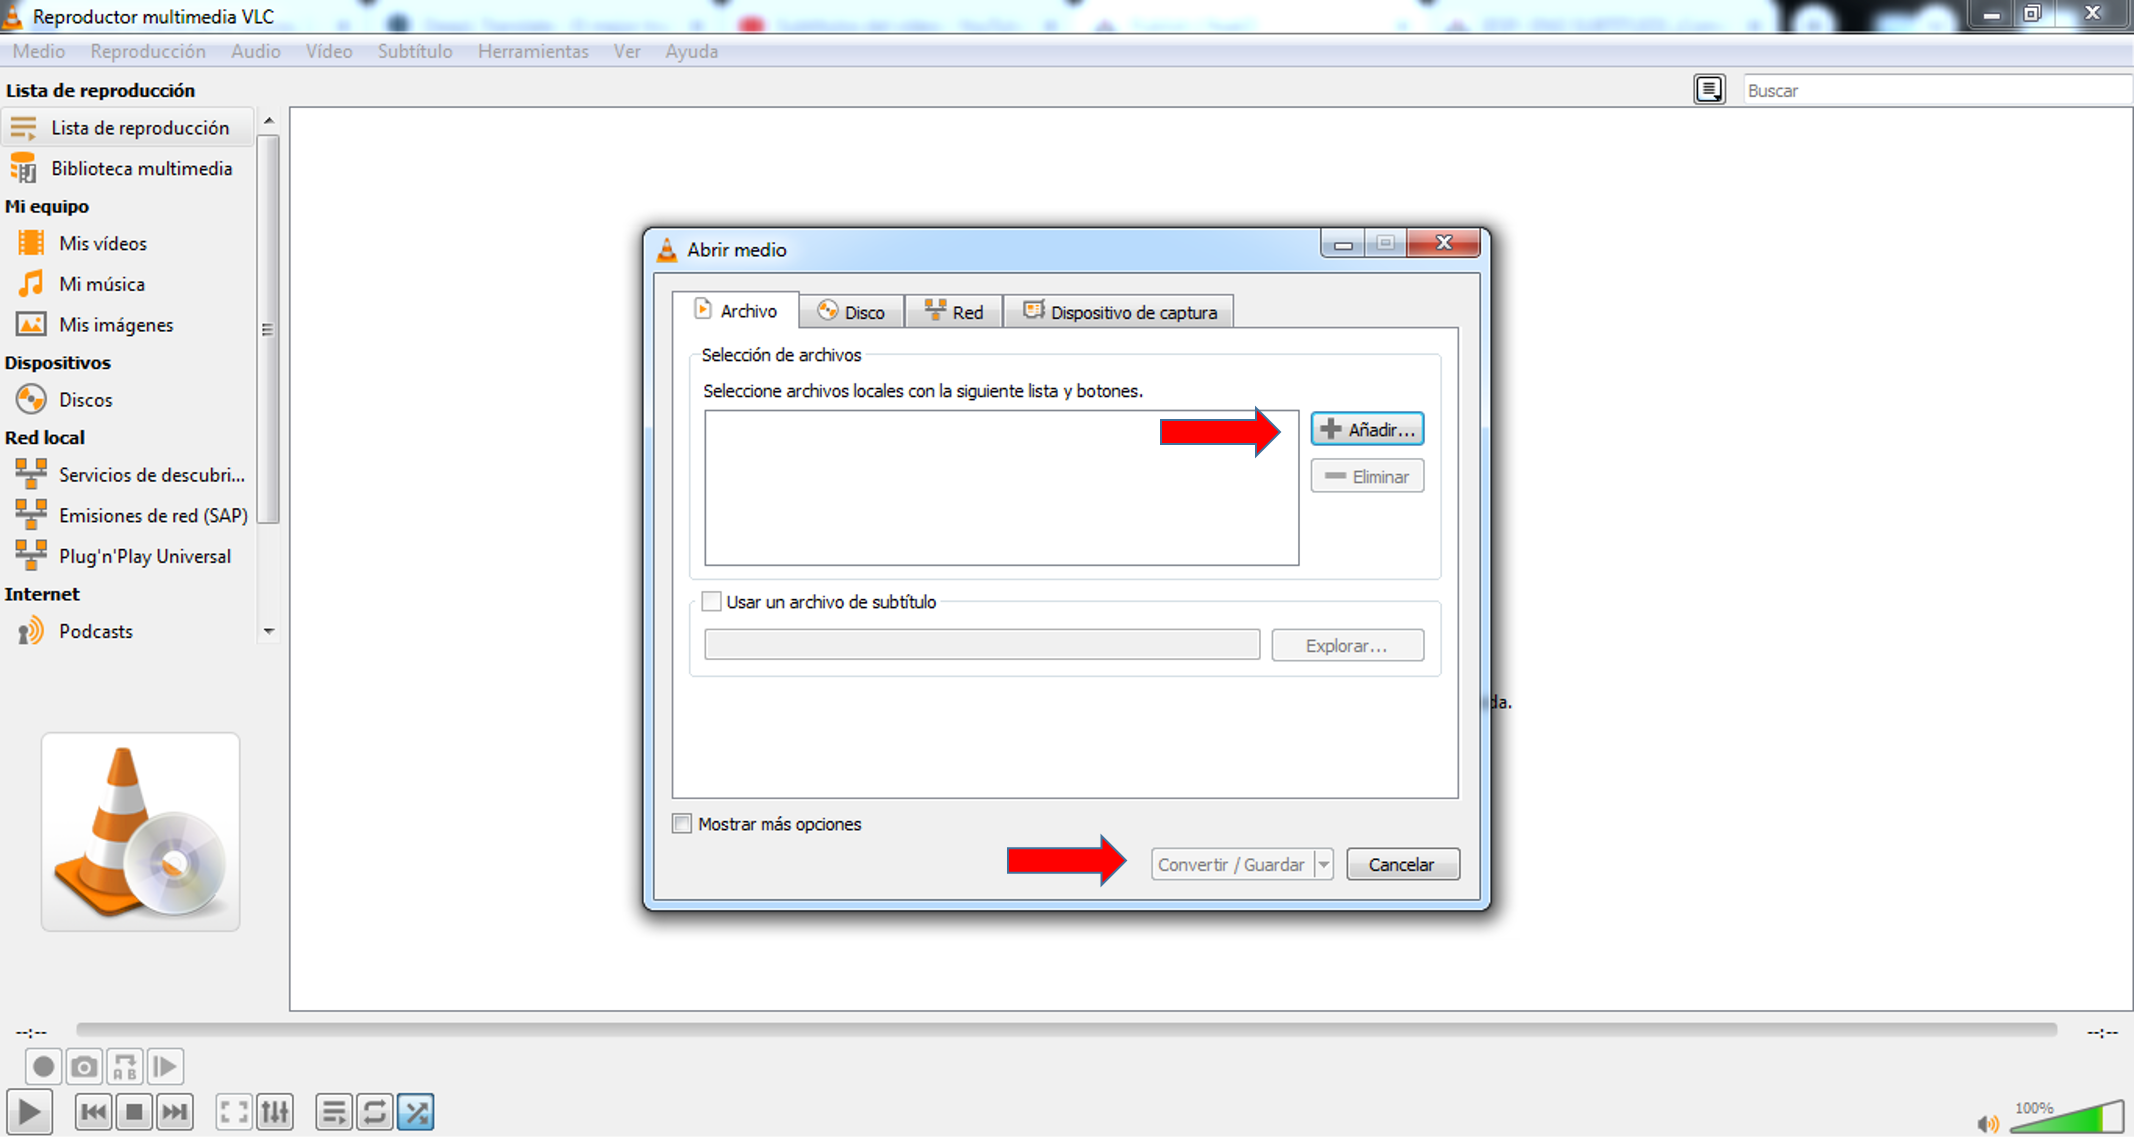
Paso 2
Una ves realizado el primer paso aparecerá una ventana don vamos a añadir nuestro vedo, para esto hacemos clic donde dice añadir y despues que el video este seleccionado hacemos clic en "Convertir/Guardar" así como te lo reflejo en la siguiente imagen.
Step 2
Once the first step is done a window will appear where we are going to add our video, for this we click where it says add and after the video is selected we click on "Convert/Save" as shown in the following image.
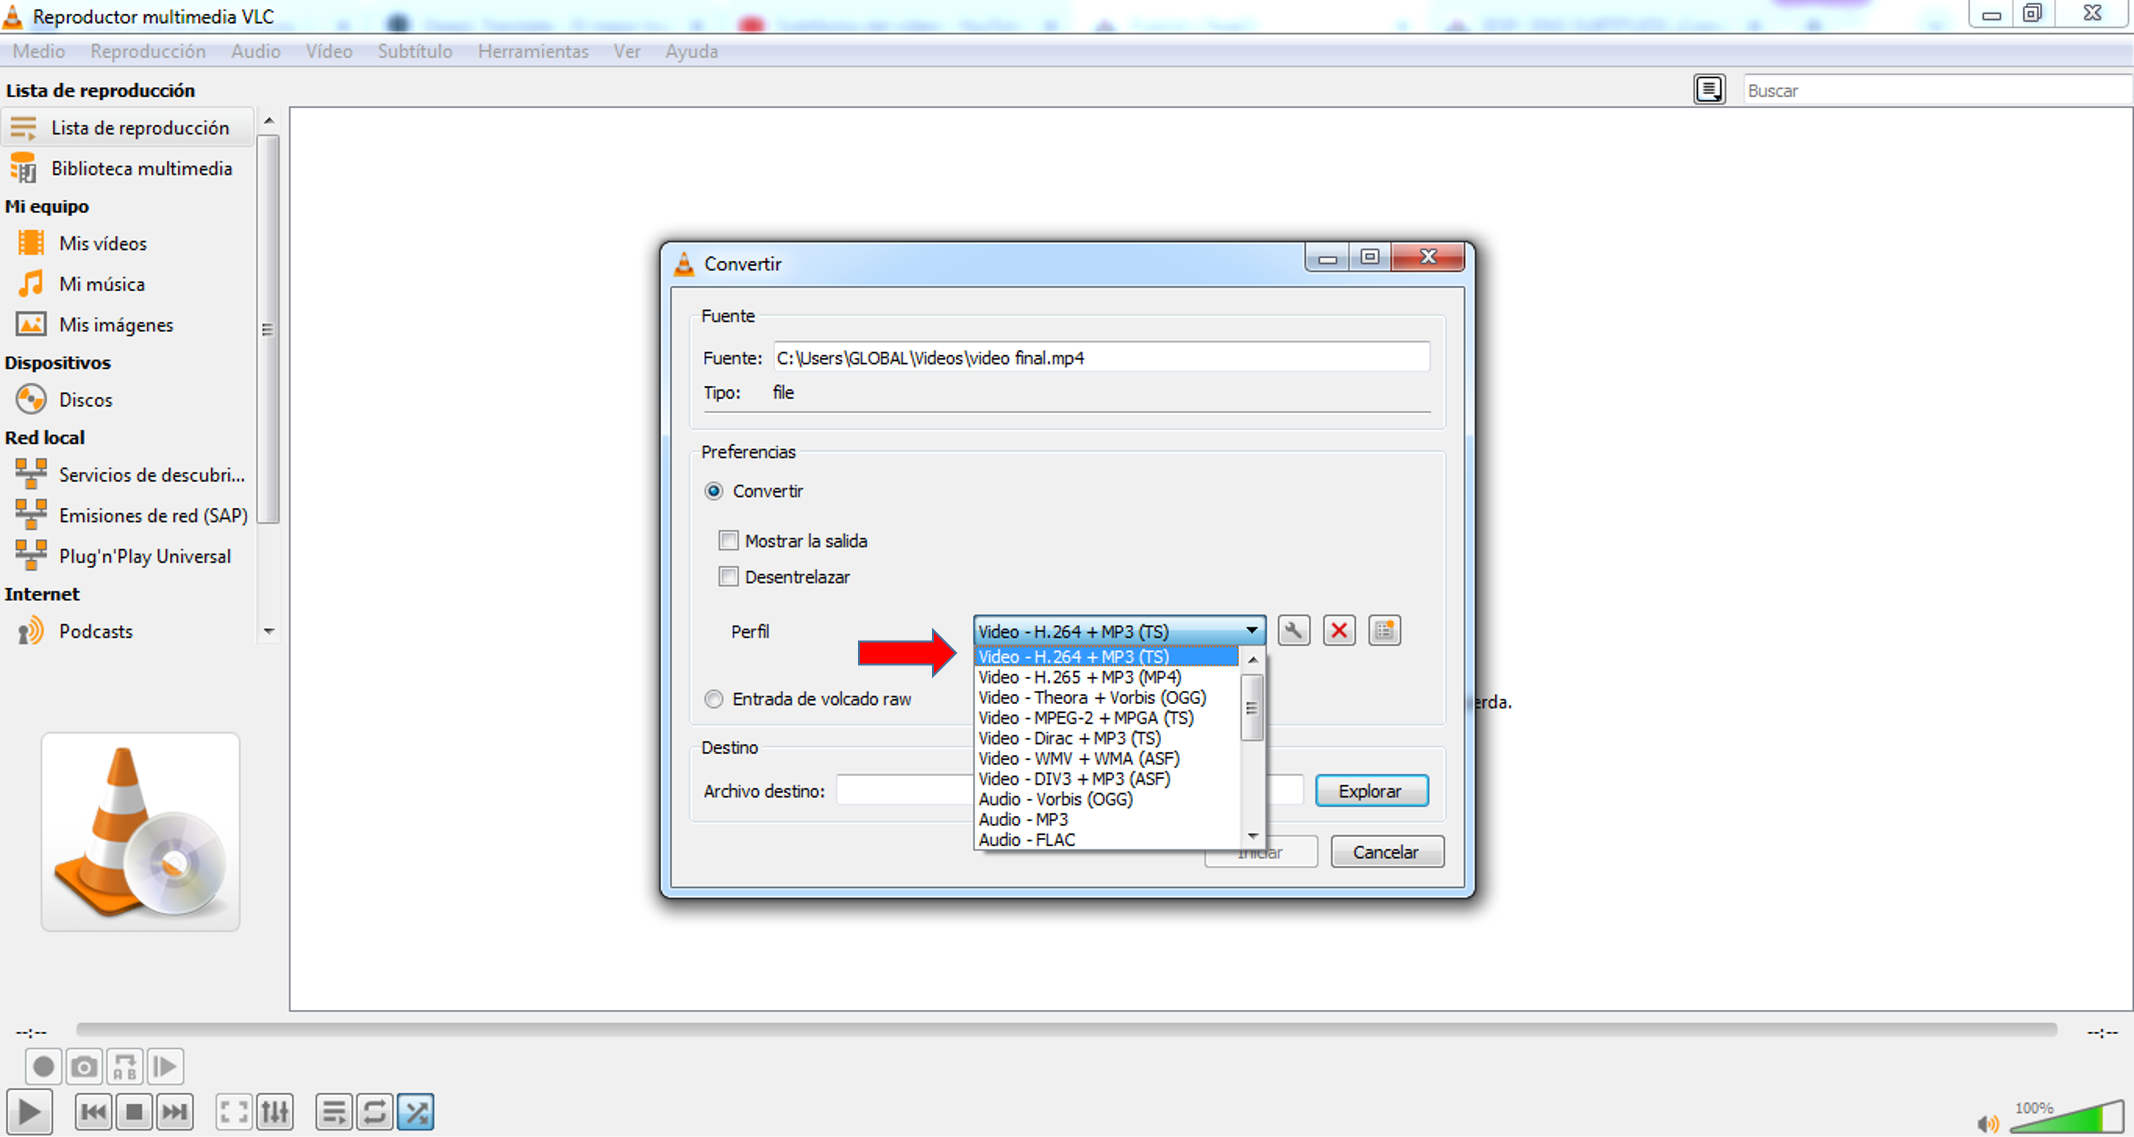
Paso 3
Ahora, vamos a hacer algunas configuraciones en la nueva pestaña que aparecerá luego de que realizamos el paso anterior.
Allí nos ubicaremos donde dice "Perfil" y debemos desplegar la siguiente lista que vez en la imagen y seleccionar la siguiente configuración:
"Vídeo h.264+MP3(TS)"
Step 3
Now, we are going to make some settings in the new tab that will appear after we performed the previous step.
There we will locate where it says "Profile" and we must deploy the following list that you see in the image and select the following configuration:
"Video h.264+MP3(TS)".
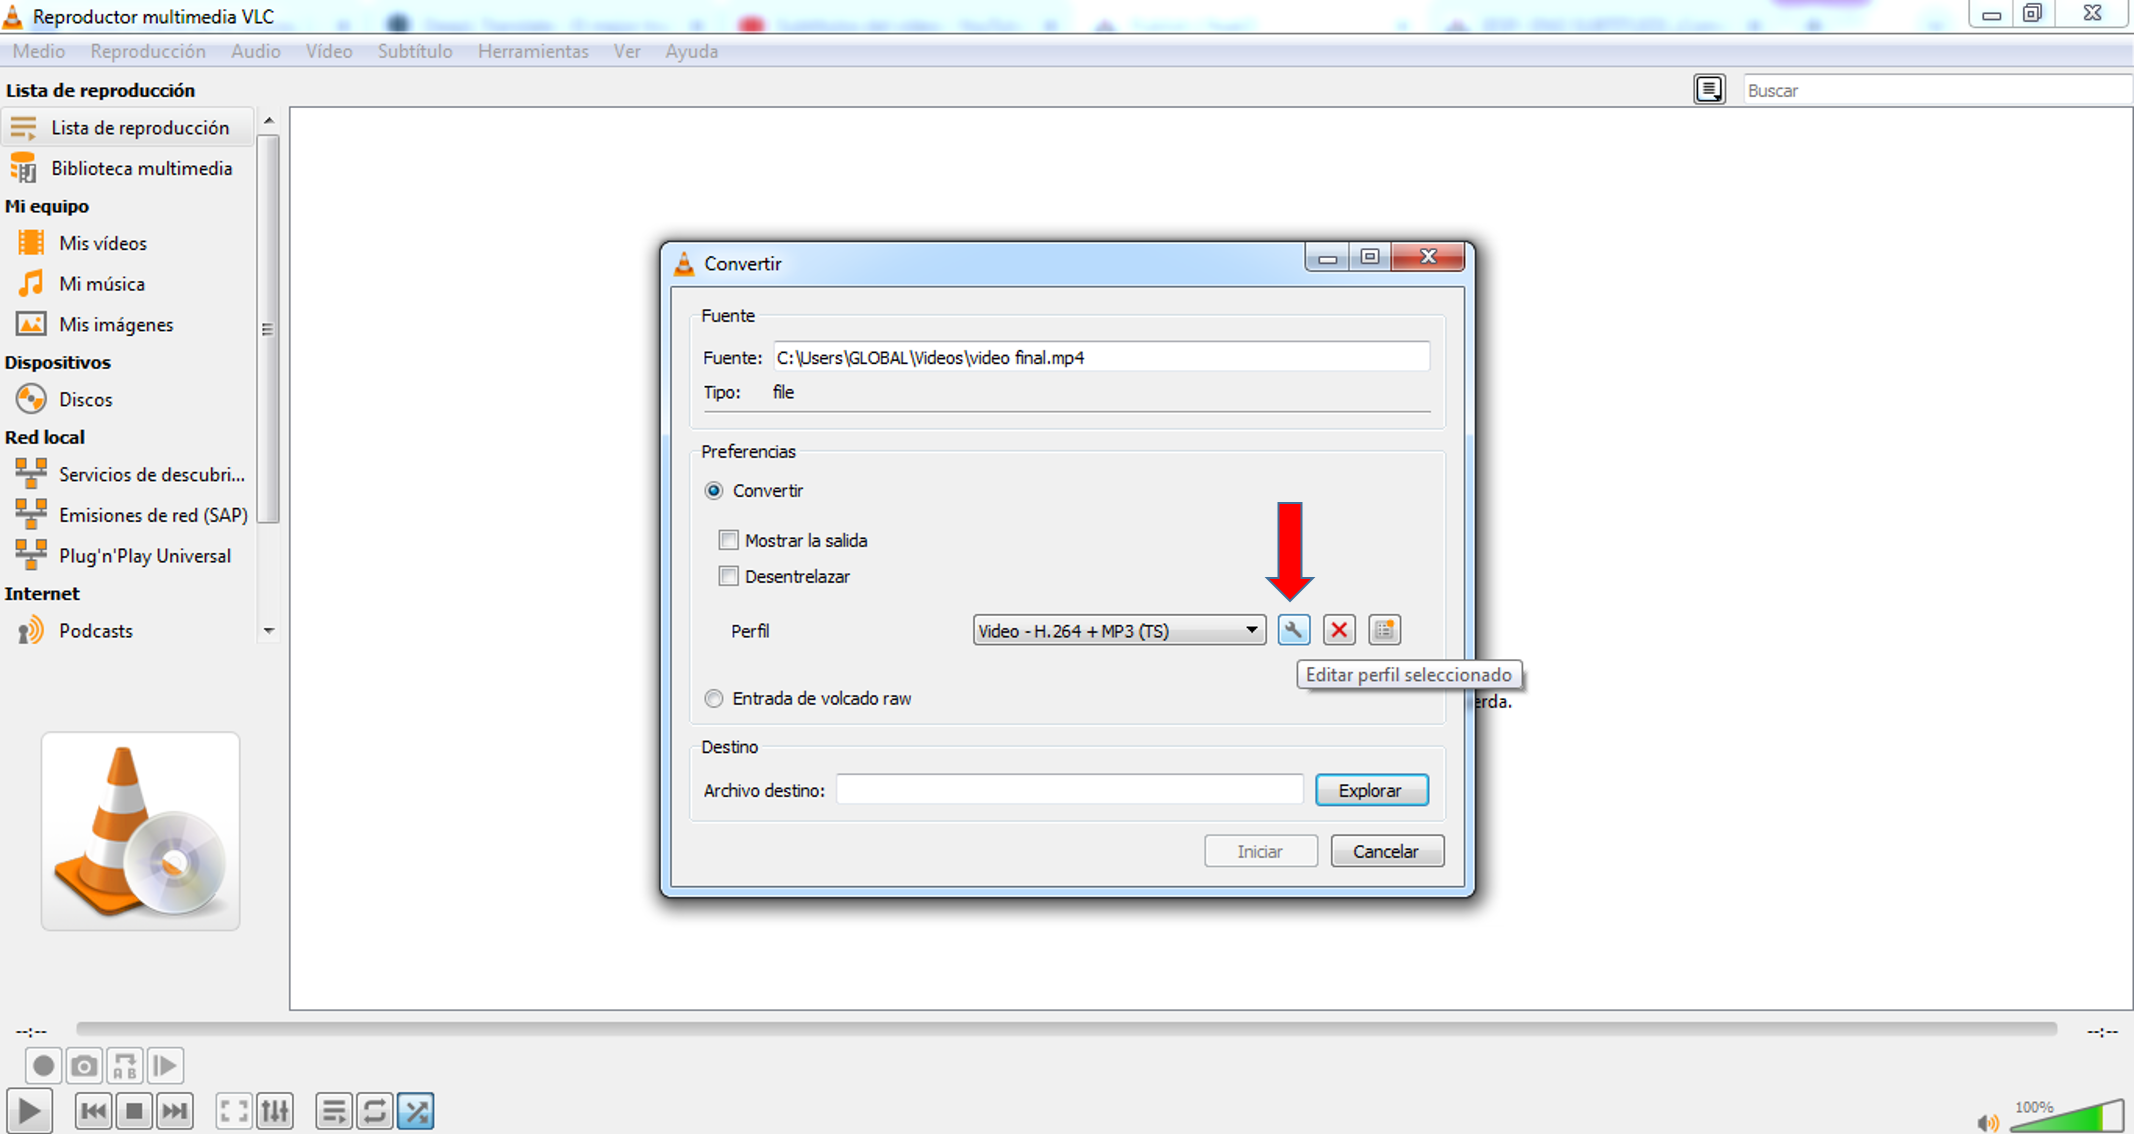
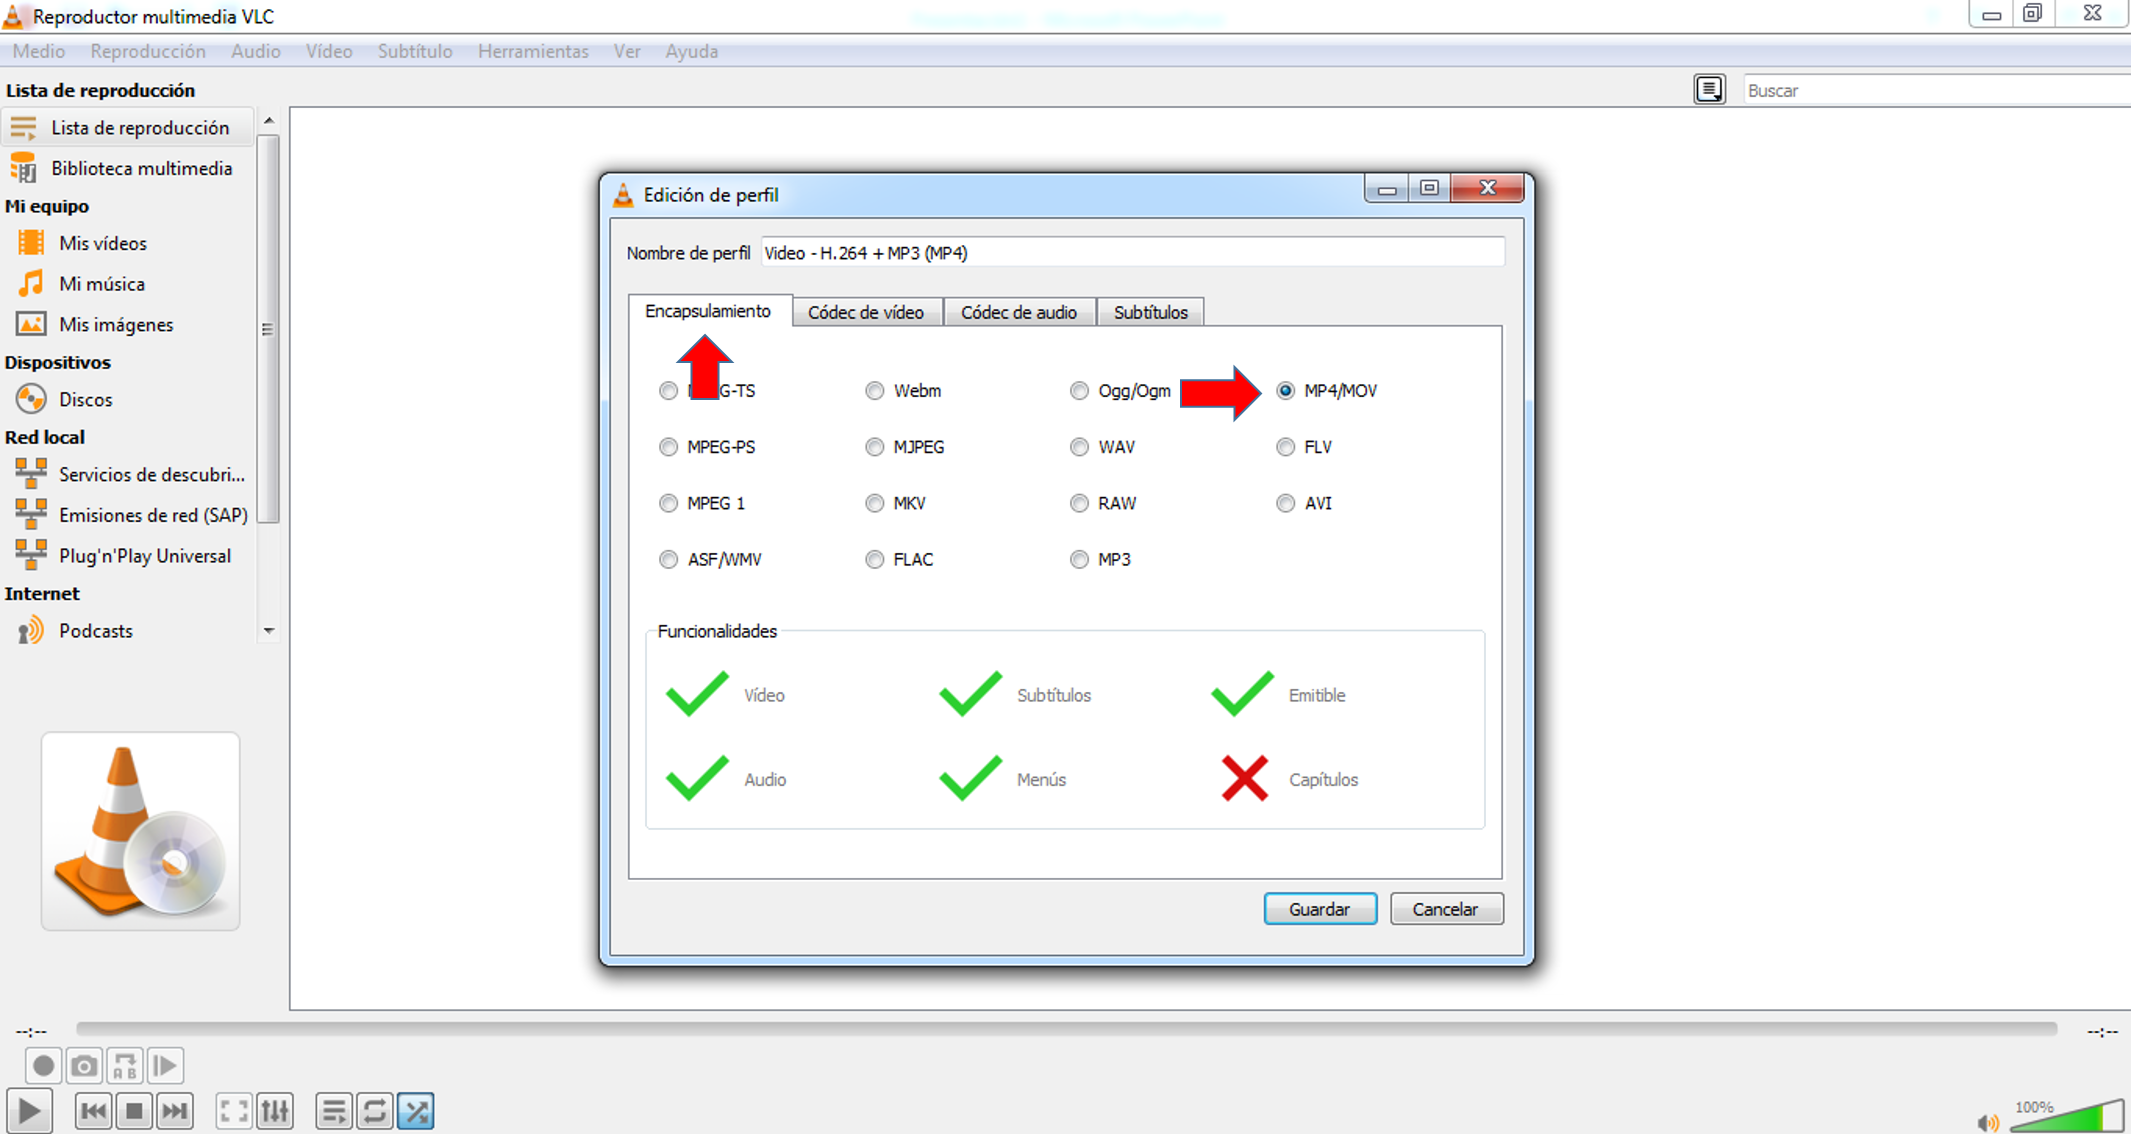
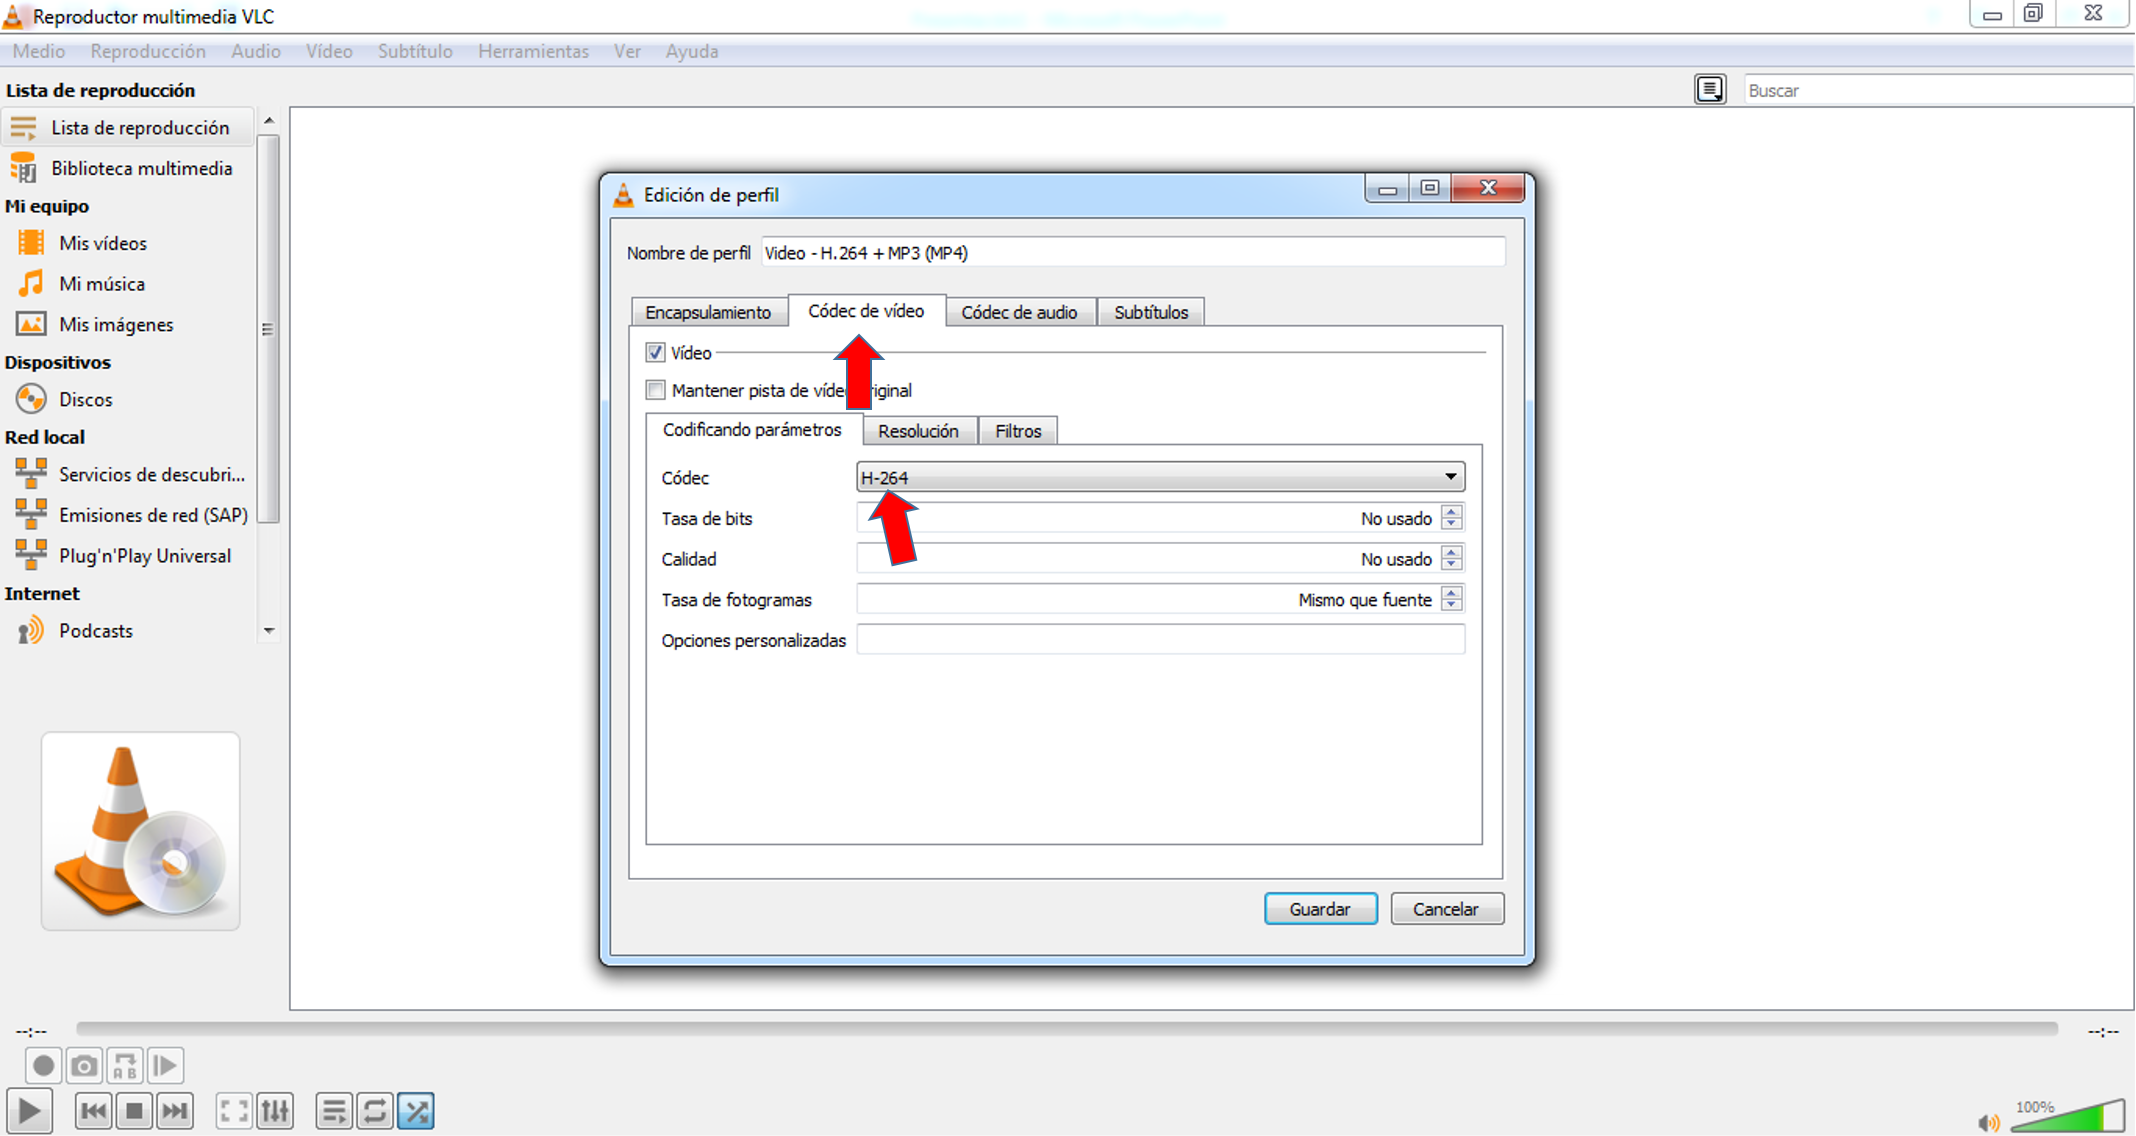
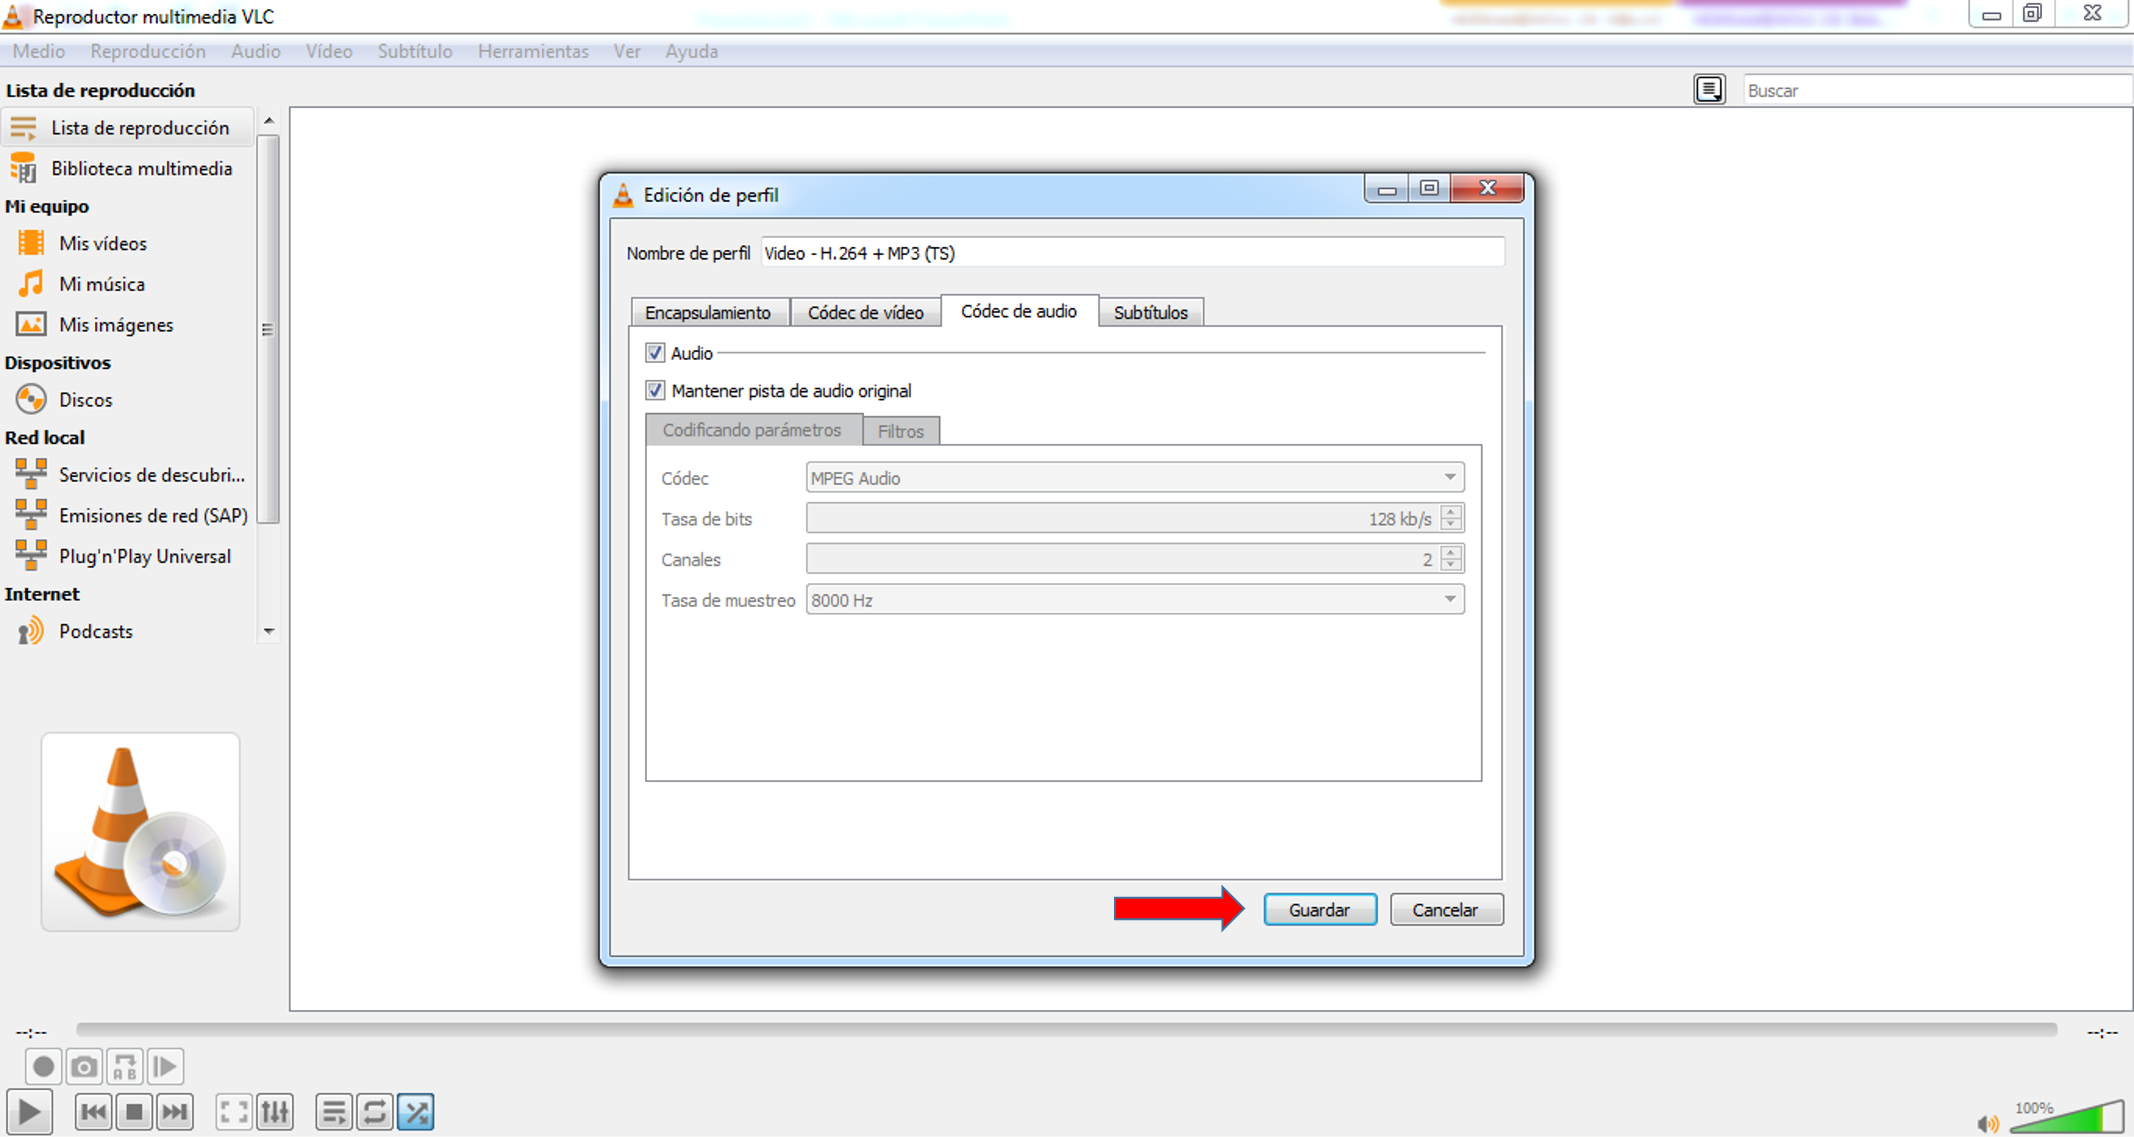
Paso 4
Ahora vamos a hacer clic en la llave de herramientas y aparece una nueva ventana donde procedemos a configurar de la siguiente manera:
- En encapsulamiento debe estar habilitada la opción MP4/MOV
- En Códec de vídeo habilitar H-256
- En Códec de audio deben estar habilitadas las secciones de "Audio" y "Mantener pista de audio original".
Step 4
Now let's click on the tool key and a new window appears where we proceed to configure as follows:
- In Encapsulation the MP4/MOV option must be enabled.
- In Video Codec enable H-256
- In Audio Codec the "Audio" and "Keep original audio track" sections must be enabled.

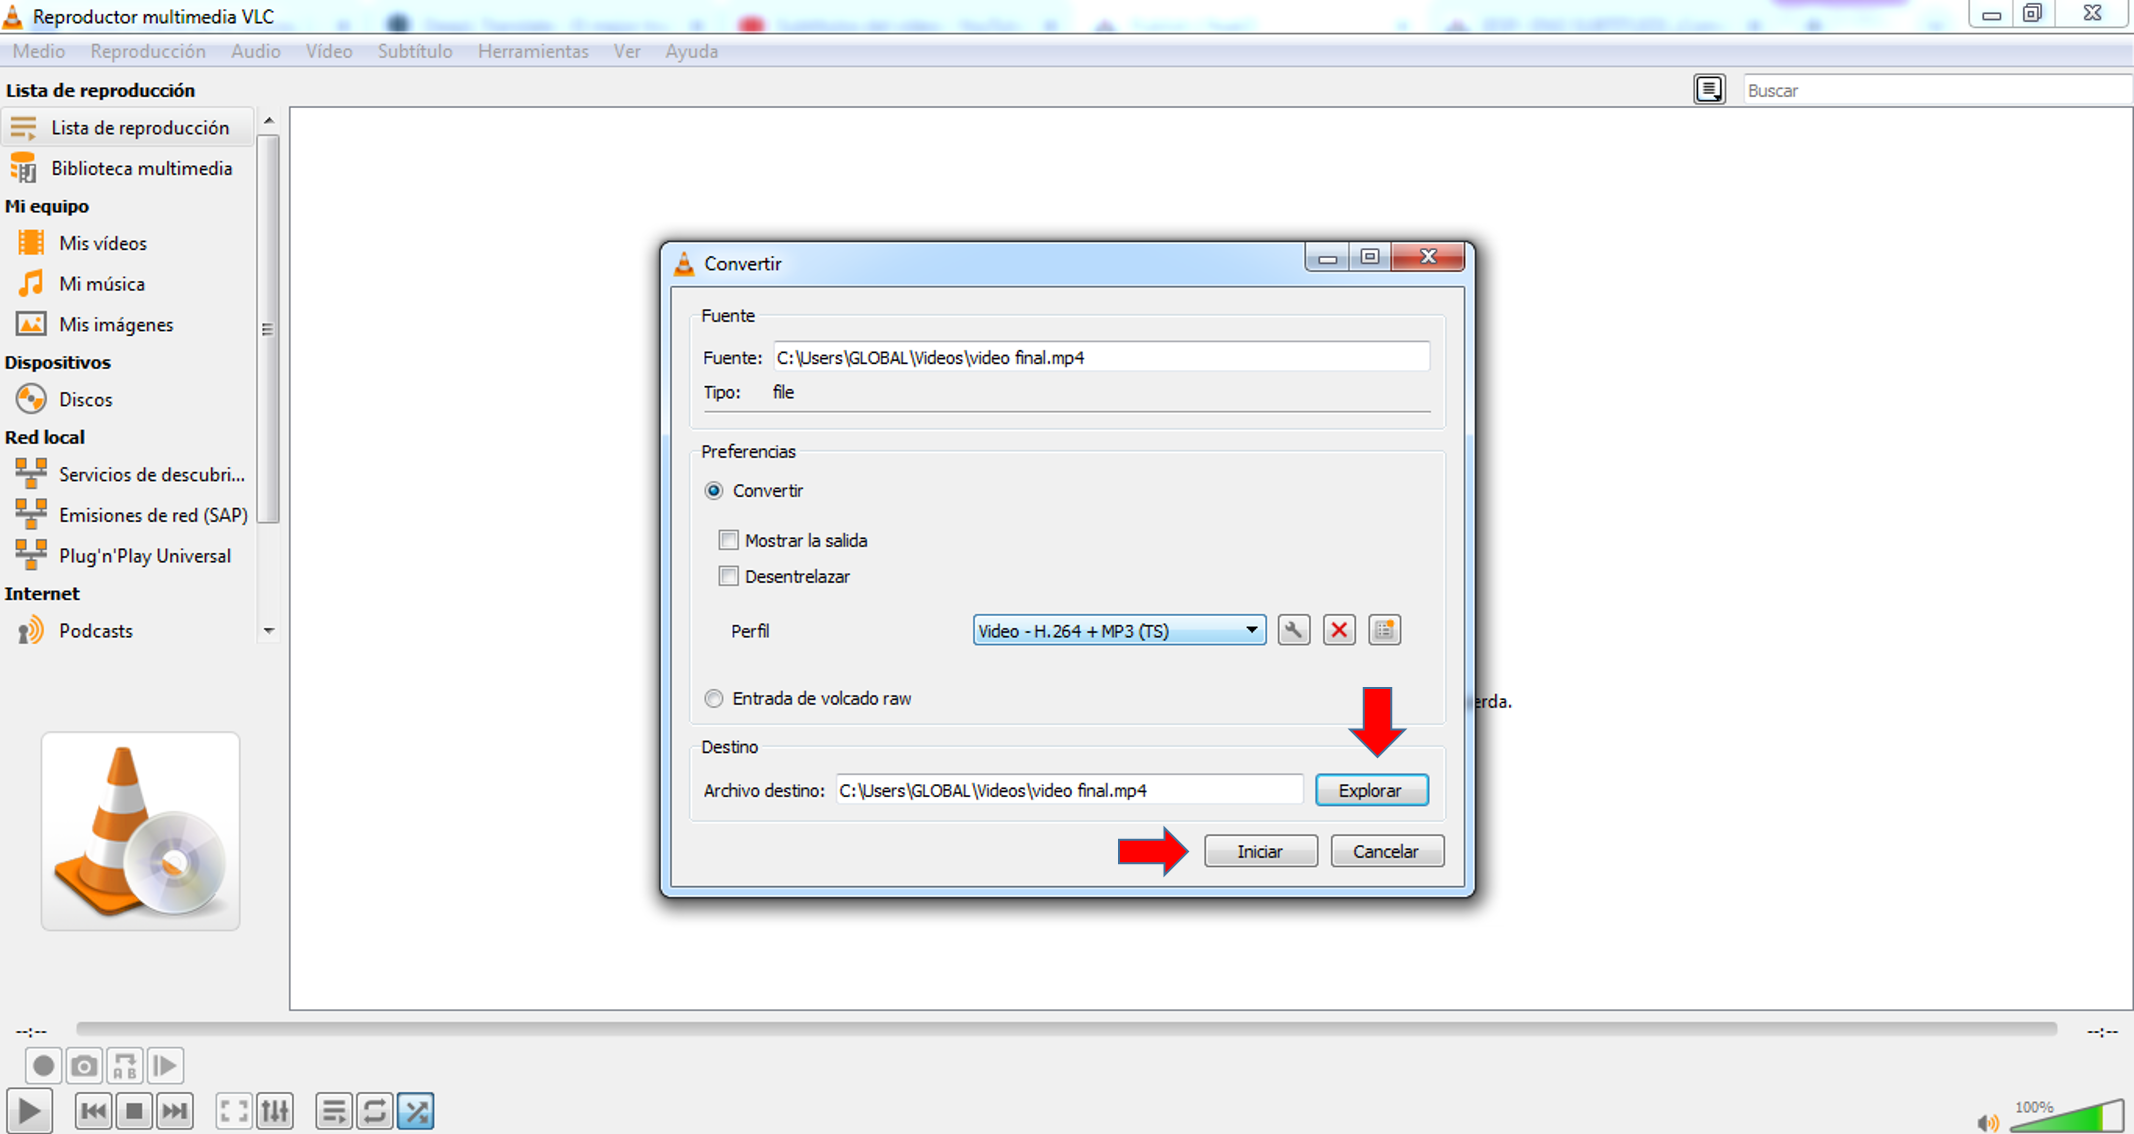
Paso 5
Ya para finalizar hacemos clic en guardar, allí nuevamente se abrirá la ventana inicial y debemos hacer clic donde dice "Explorar" para agaragar la ubicación y nombre donde se guardara nuestro vídeo y luego hacemos clic en "Iniciar" y eso es todo al cabo de unos minutos encontraras tu vídeo que paso de pesar mas que un camión cargado de concreto a ser mas liviano que una pluma, y ahora si te garantizo que tu vídeo subirá muchísimo mas rápido que antes.
Espero este tutorial te sirva de mucha ayuda, lo importante es compartir nuestras experiencias para mejorar las de otro.
Step 5
Already to finish we click on save, there again the initial window will open and we must click where it says "Explore" to grab the location and name where our video will be saved and then click on "Start" and that's all after a few minutes you will find your video that step of weighing more than a truckload of concrete to be lighter than a feather, and now if I guarantee that your video will go up much faster than before.
I hope this tutorial will help you a lot, the important thing is to share our experiences to improve those of others.
Vídeo grabado con mi celular "Motog8 Power lite" y editado con la aplicación InShot para android.
Grabado de pantalla de mi computador con la aplicacion Icecream Screen Recorder 7.
Intro de presentación en el vídeo, banner de bienvenida, banner de agradecimientos y separadores de idiomas fueron diseñados por mi persona en el software de diseño gráfico Photoshop Cs6.
Todas imagenes son de mi autoria capturadas en pantalla durante mi proceso del tutoria.
Traducido al ingles por: https://www.deepl.com/es/translator
CREDITS: .
- Video recorded with my cell phone "Motog8 Power lite" and edited with the InShot application for android.
- Screen recording from my computer with Icecream Screen Recorder 7 application.
- Video presentation intro, welcome banner, thank you banner and language separators were designed by me in Photoshop Cs6 graphic design software.
- All images are my own, captured on screen during my tutorial process.
- Translated to English by: https://www.deepl.com/es/translator.

Show more
Tags :
Woo!
This creator can upvote comments using 3speak's stake today because they are a top performing creator!
Leave a quality comment relating to their content and you could receive an upvote
worth at least a dollar.
Their limit for today is $0!
Their limit for today is $0!

5 views
a year ago
$

1 views
a year ago
$

16 views
2 years ago
$

29 views
2 years ago
$

7 views
2 years ago
$
More Videos

9 views
2 years ago
$

2 views
5 years ago
$

12 views
8 months ago
$

0 views
3 years ago
$

3 views
4 years ago
$

3 views
5 years ago
$

8 views
4 months ago
$

1 views
5 years ago
$

7 views
2 years ago
$


3 views
4 years ago
$

3 views
3 years ago
$

21 views
2 years ago
$

1 views
a year ago
$
26 views
2 years ago
$

1 views
3 years ago
$

11 views
2 years ago
$

14 views
2 years ago
$

24 views
a year ago
$

2 views
a year ago
$

5 views
4 years ago
$

2 views
5 months ago
$
8 views
5 years ago
$

21 views
3 years ago
$
@theycallmedan: 4.2025
@threespeak: 2.0027
@ecency: 0.5562
@alpha: 0.4382
@blocktrades: 0.3752
@solominer: 0.2780
@aliento: 0.2732
@aliento.love: 0.2690
@netaterra: 0.2401
@threespeak: 2.0027
@ecency: 0.5562
@alpha: 0.4382
@blocktrades: 0.3752
@solominer: 0.2780
@aliento: 0.2732
@aliento.love: 0.2690
@netaterra: 0.2401
Comments:
Reply:
To comment on this video please connect a HIVE account to your profile: Connect HIVE Account