Cómo editar audio 🎤 y agregar efectos ✨ fácilmente en Premiere Pro [ESP | ENG]
26
About :

Hola hiver! 🤗
Fuente: Captura de mi pantalla
Hasta ahora hemos estado muy enfocados en hablar sobre como editar la parte visual, que es súper importante ya que en muchas ocasiones las personas reproducen vídeos sin sonido. De ahí la importancia, que los vídeos publicitarios siempre estén subtitulados.
El audio puede ser una música con personas cantando, una música instrumental, una voz a capella, o una reunión de 2 ó más personas.
Este tema es muy extenso como estarás notando, así que trataré de ser breve, este tutorial es básico, no entraremos en definiciones técnicas y para que sirve cada uno de los efectos que nos ofrece el programa.

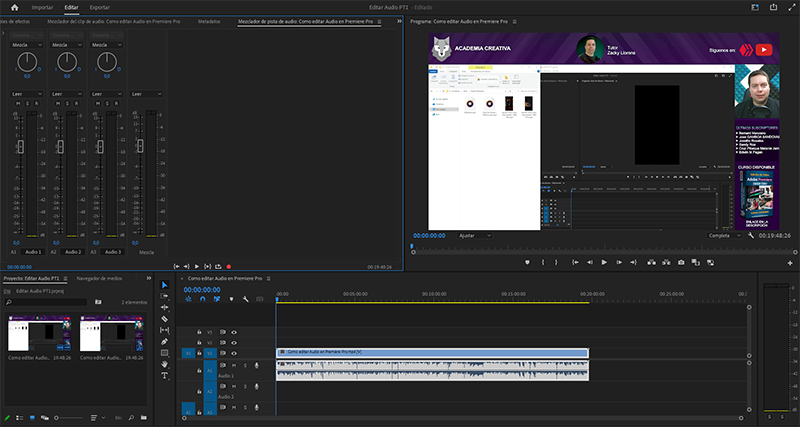
Edición multipista

Fuente: Captura de mi pantalla
A diferencia de algunos programas, Premiere Pro nos permite añadir una gran cantidad de pistas y si por alguna razón quieres un programa dedicado a esto, tienes la opción de editar con Adobe Audition, que es de la misma marca que Premiere Pro.
Tienes un acceso directo para editar con Audition, solo debes hacer clic con el botón derecho de la pista que quieres editar y tendrás todas las posibilidades que ofrece un programa profesional solo dedicado al audio.
Nota: Audition es otro programa que se instala de manera independiente.
En este tutorial no vamos a usar Audition, nos vamos a limitar a las opciones que nos ofrece Premiere Pro, que en verdad no se quedan atrás, son bastantes y nos permitirá una gran cantidad de cosas, incluso más de las que un usuario intermedio puede llegar a necesitar.
Nota: el hecho que tengamos muchos efectos no quiere decir que tengamos que hacer uso y abuso de estos recursos
Herramientas esenciales
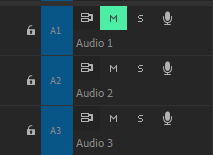
Fuente: Captura de mi pantalla
Tenemos una serie de herramientas que nos permitiran escuchar los cambios que hacemos, por ejemplo si tenemos 2 pistas, podemos silenciar una de estas con el botón "M".
Existe una variación "S" que hace lo contrario, si tenemos 10 pistas de audio y no queremos silenciar 9 pistas haciendo clic uno por uno, podemos usar la "S" para que solamente suene la pista que nos interesa, es decir esta opción es especialmente útil cuando tenemos muchas pistas distintas.
Nota: para que funcione cada sonido debe estar en un nivel, si pones todas las grabaciones o música, una al lado de la otra, simplemente no funciona, te recomiendo que veas el vídeo si este punto no te queda claro.
Edición de voz

Fuente: Freepik
Comentarte que lo ideal es que cada voz se edite por separado, si se quiere obtener buenos resultados, por ejemplo para eliminar ruído de fondo lo ideal es tener tu voz sola en esa grabación y que el microfono esté lo más cercano que se pueda a tu boca.
Si se trata de una entrevista intenta colocar el micrófono en medio de los dos y que ustedes deben estar cercanos al mismo, para que este pueda tener un registro lo más nítido que se pueda, evita en lo posible que hayan ruídos externos.
Efectos
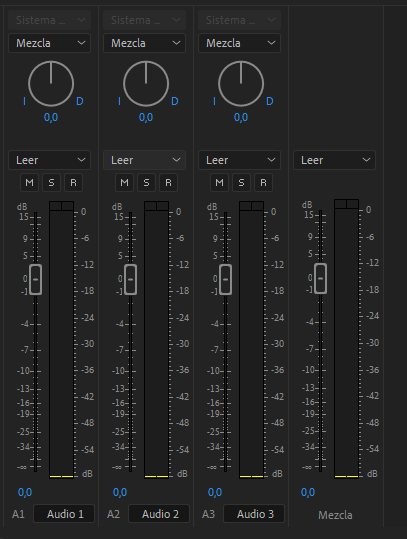
Fuente: Captura de mi pantalla
Aquí el más común y útil desde mi punto de vista serían:
✅ Eliminar ruidos
✅ Ecualizador
Por supuesto que también hay otros muy útiles como por ejemplo:
✅ Limitador
✅ Compresor
Sin embargo no vamos a abarcar esos últimos 2, ni el resto de la lista que en realidad son bastantes.
En el vídeo te explico como es posible habilitar el panel de edición y como agregar los efectos.
Añadir efectos es bastante sencillo, por lo que si te interesa probar con algunos y ver que resultado te ofrecen, puedes hacerlo, no hay peligro si quieres aventurarte.

Hello Hiver! 🤗
Fuente: Captura de mi pantalla
Until now we have been very focused on talking about how to edit the visual part, which is super important since on many occasions people play videos without sound. Hence the importance, that advertising videos are always subtitled.
The audio can be music with people singing, instrumental music, a cappella voice, or a meeting of 2 or more people.
This topic is very extensive as you will be noticing, so I will try to be brief, this tutorial is basic, we will not go into technical definitions and what each of the effects that the program offers us is for.
Multitrack editing
Fuente: Captura de mi pantalla
Unlike some programs, Premiere Pro allows us to add a large number of tracks and if for some reason you want a program dedicated to this, you have the option of editing with Adobe Audition, which is from the same brand as Premiere Pro.
You have a shortcut to edit with Audition, you just have to right-click on the track you want to edit and you will have all the possibilities offered by a professional program dedicated only to audio.
Note: Audition is another program that is installed separately.
In this tutorial we are not going to use Audition, we are going to limit ourselves to the options that Premiere Pro offers us, which really are not far behind, there are quite a few and they will allow us a lot of things, even more than what an intermediate user can come to need.
Note: the fact that we have many effects does not mean that we have to use and abuse these resources
Essential Tools
Fuente: Captura de mi pantalla
We have a series of tools that will allow us to listen to the changes we make, for example if we have 2 tracks, we can silence one of them with the "M" button.
There is a variation "S" that does the opposite, if we have 10 audio tracks and we don't want to mute 9 tracks by clicking one by one, we can use the "S" so that only the track that interests us sounds, that is, this option is especially useful when we have many different tracks.
Note: for it to work each sound must be on one level, if you put all the recordings or music next to each other, it just doesn't work, I recommend you to watch the video if this point is not clear to you.
Voice editing
Fuente: Freepik
Comment that the ideal is for each voice to be edited separately, if you want to obtain good results, for example to eliminate background noise, the ideal is to have your voice alone in that recording and for the microphone to be as close as possible to your voice. mouth.
If it is an interview, try to place the microphone in the middle of the two and that they should be close to it, so that it can have a record as clear as possible, avoid as much as possible that there are external noises.
Effects
Fuente: Captura de mi pantalla
Here the most common and useful from my point of view would be:
✅ Eliminate noises
✅ Equalizer
Of course there are also other very useful ones such as:
✅ Limiter
✅ Compressor
However, we are not going to cover those last 2, nor the rest of the list, which are actually quite a few.
In the video I explain how it is possible to enable the editing panel and how to add the effects.
Adding effects is quite simple, so if you are interested in trying some and seeing what results they offer you, you can do it, there is no danger if you want to venture.

️ ▫️ ▫️ ▫️ ▫️ ॐ नमः शिवाय ▫️ ▫️ ▫️ ▫️
Show more
Tags :
Woo!
This creator can upvote comments using 3speak's stake today because they are a top performing creator!
Leave a quality comment relating to their content and you could receive an upvote
worth at least a dollar.
Their limit for today is $0!
Their limit for today is $0!

56 views
a year ago
$
17 views
a year ago
$

89 views
a year ago
$

62 views
a year ago
$

58 views
a year ago
$
More Videos

16 views
7 months ago
$

7 views
2 years ago
$

3 views
2 years ago
$

2 views
a year ago
$

25 views
4 weeks ago
$

11 views
3 years ago
$

1 views
3 years ago
$

7 views
8 months ago
$

17 views
a year ago
$

10 views
a year ago
$

5 views
3 years ago
$
21 views
a year ago
$
8 views
a year ago
$

31 views
2 years ago
$

25 views
4 years ago
$

8 views
3 years ago
$

24 views
7 months ago
$

36 views
3 years ago
$

9 views
a year ago
$
3 views
3 years ago
$
1 views
2 years ago
$

5 views
10 months ago
$

7 views
a year ago
$

Cómo tocar DOUBLE CHEESE & BACON en Batería (Rawayana, Irepelusa, Jambene, Veztalone, Willie DeVille
30 views
a year ago
$
31 views
a month ago
$
Comments:
Reply:
To comment on this video please connect a HIVE account to your profile: Connect HIVE Account