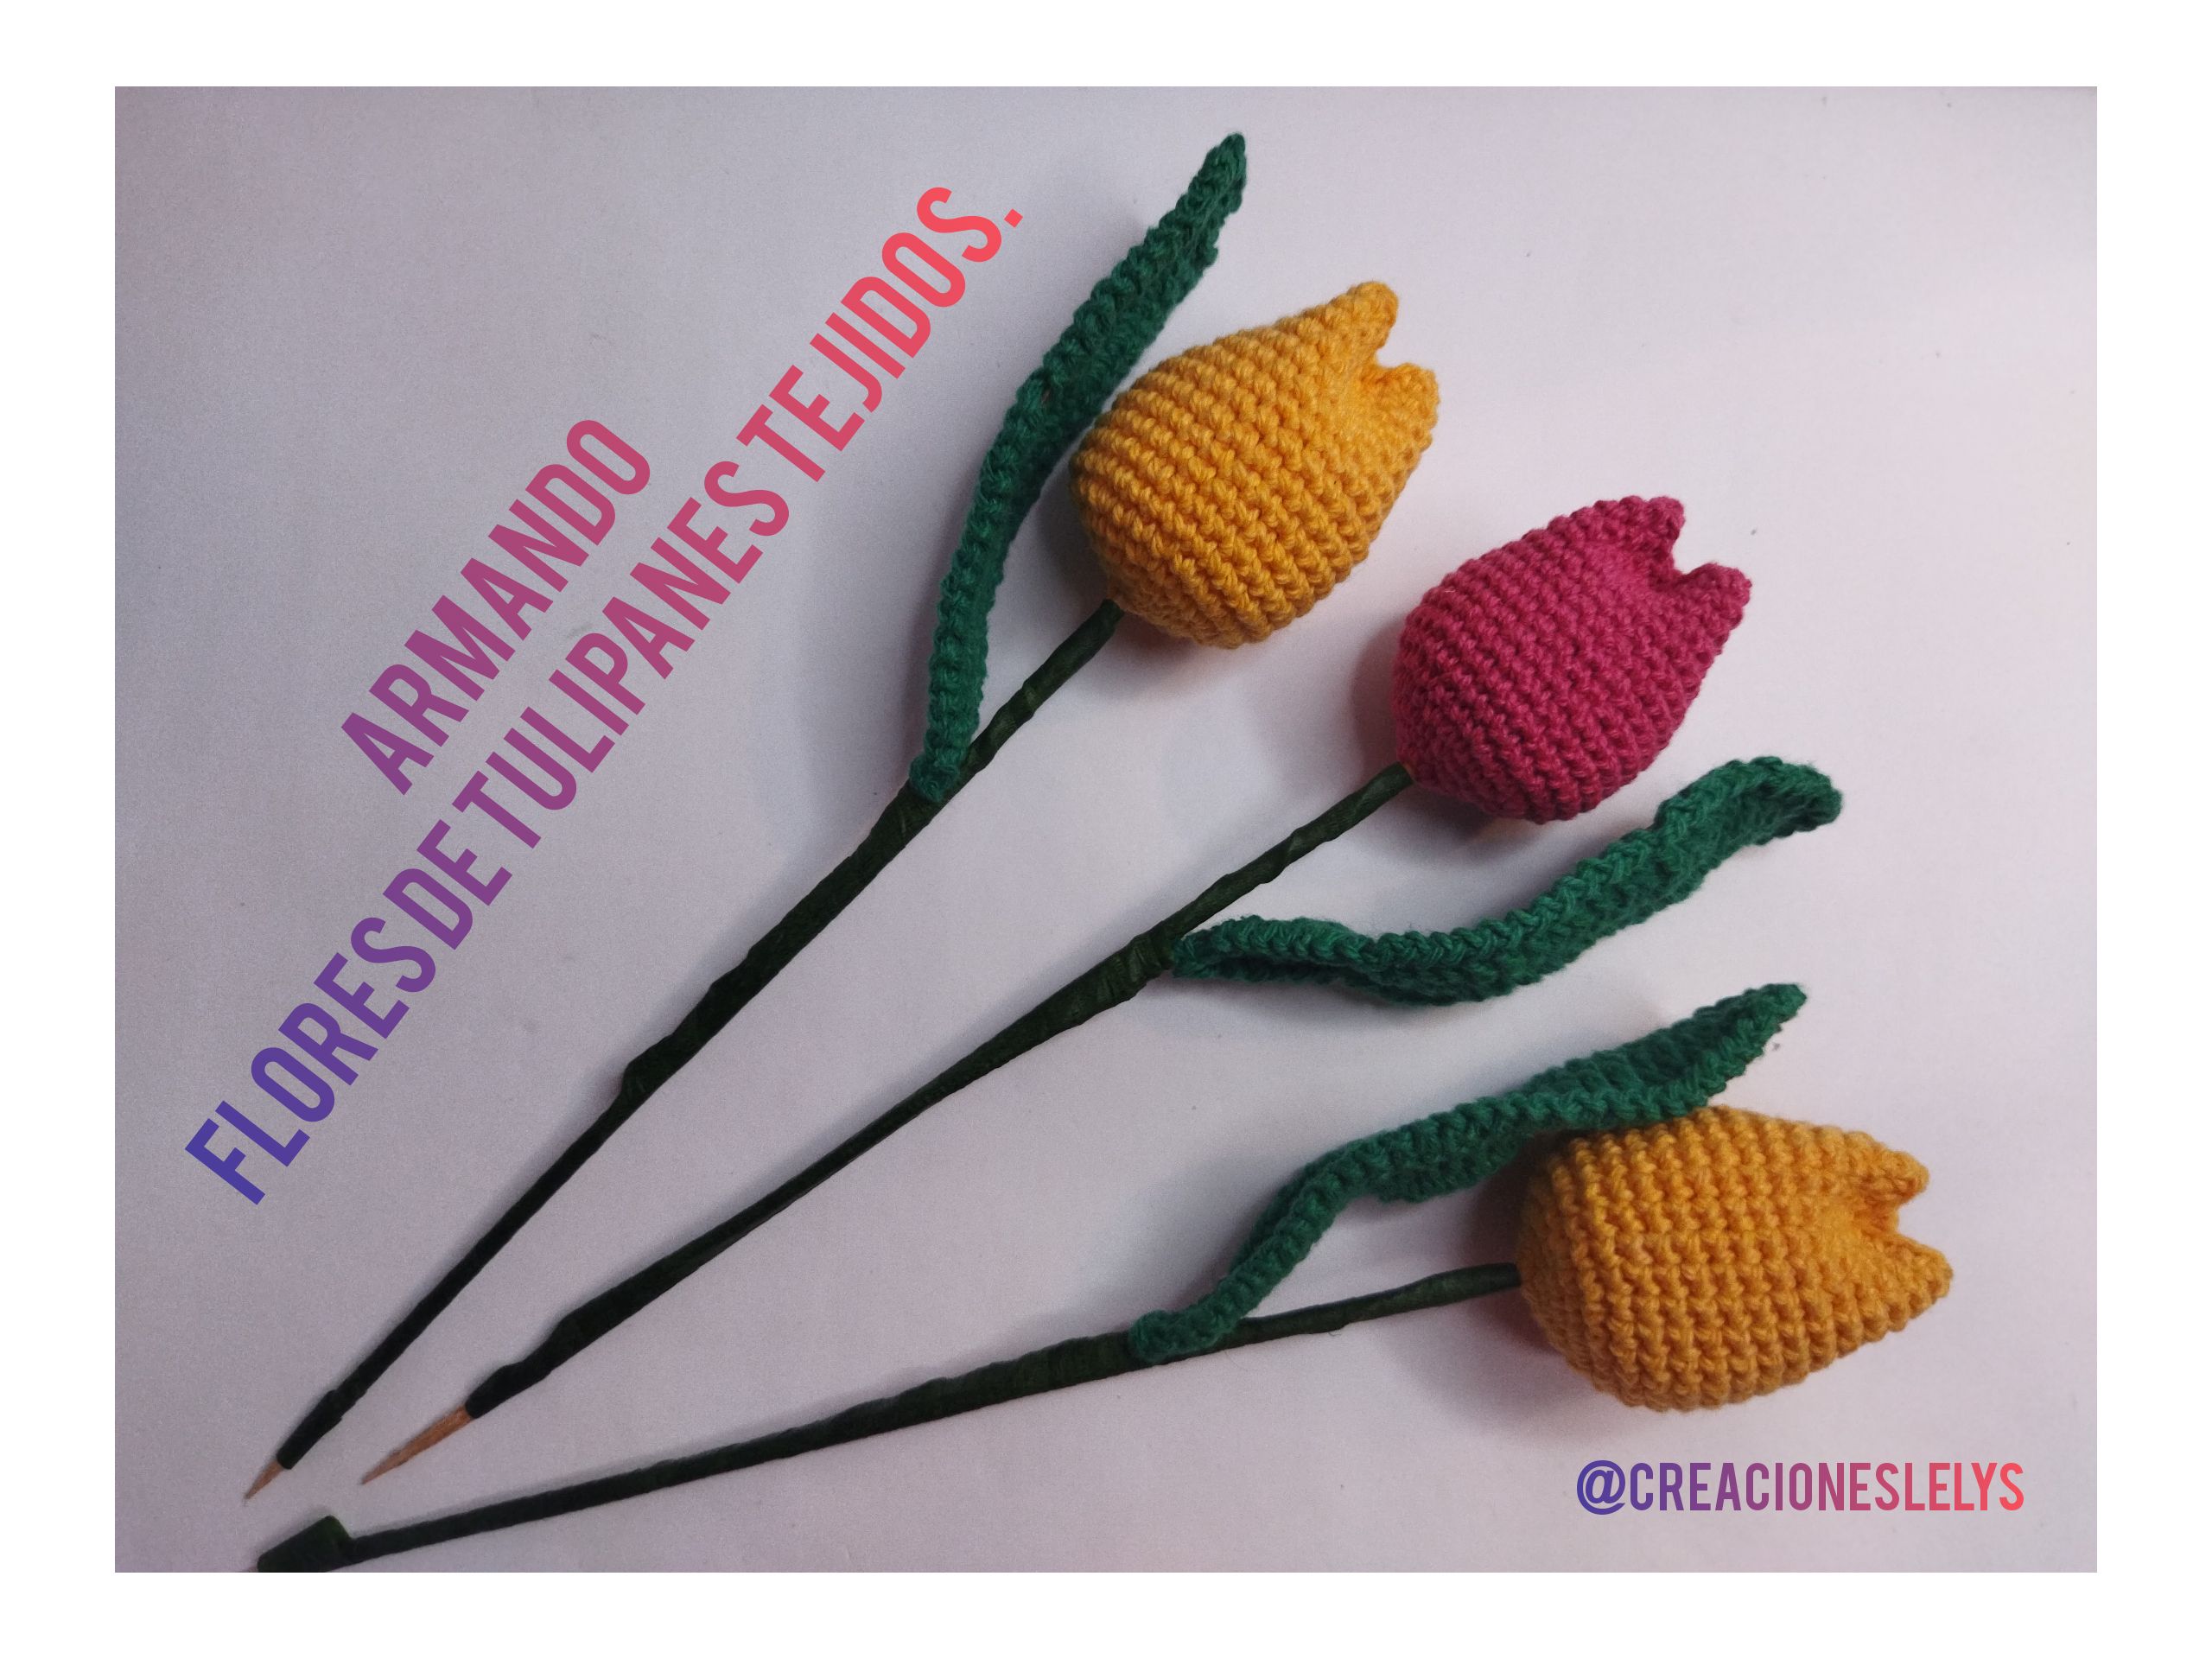
Armando Tulipanes tejidos a crochet.
10
About :
Siempre disfruto tejer flores. No puedo evitar recordar a mi madre y desear hacer muchas para ella. Hace un tiempo le regalé unos ramos pequeños de flores variadas. Ella me comentó recientemente que las colocó en un altar muy discreto que le hizo a mi padre ya fallecido.
En esta oportunidad mi emoción es superior ya que estoy realizando un ramo para mí. Además quiero tenerlo de modelo para compartir en las redes. Es posible que alguien desee tener también uno y me lo encargue.
He realizado otros modelos de tulipanes antes, la diferencia entre este y los anteriores es que voy a incorporar alambre en las hojas, el resultado me fascina. ¡Ya lo verán!
I always enjoy knitting flowers. I can't help but remember my mother and wish I could make lots of them for her. A while back I gave her some small bouquets of assorted flowers. She recently told me that she placed them on a very discreet altar she made for my late father.
This time my excitement is higher as I am making a bouquet for myself. I also want to have it as a model to share on the networks. It is possible that someone may also wish to have one and order it from me.
I have made other models of tulips before, the difference between this one and the previous ones is that I am going to incorporate wire in the leaves, the result fascinates me. You will see it!
Los últimos tulipanes que realicé fue en un orillo o puntilla tejida para la servilleta de tela que reciclé, antes de ese hice tulipanes de tela de fieltro. Para hacer este nuevo modelo necesité los siguientes materiales:
- Hilos pabilos amarillo y verde.
- Aguja de crochet de 2,25 mm.
- Aguja lanera.
- Tijeras.
- Guata o algodón para rellenar.
- Silicón o pegamento.
- Palito de altura.
- Cinta floral adhesiva.
- Alambre de floristería.
The last tulips I made were on a woven selvedge or lace for the cloth napkin I recycled, before that I made felt cloth tulips. To make this new model I needed the following materials:
- Yellow and green pabilos threads.
- Crochet needle of 2.25 mm.
- Wool needle.
- Scissors.
- Wadding or cotton for stuffing.
- Silicone or glue.
- Height stick.
- Floral adhesive tape.
- Florist's wire.

Estos días he estado algo indispuesta, sin embargo el deseo de hacer mis manualidades y compartirlas están intactas. Quise hacer algo diferente esta vez y recordé un modelo de flor que ví en una tienda y me encantó, especialmente por el tipo de hojas que tenían las flores. Estaba segura que podría hacerlas tejidas, miré algunos tutoriales para asegurar el procedimiento y puse manos a la obra.
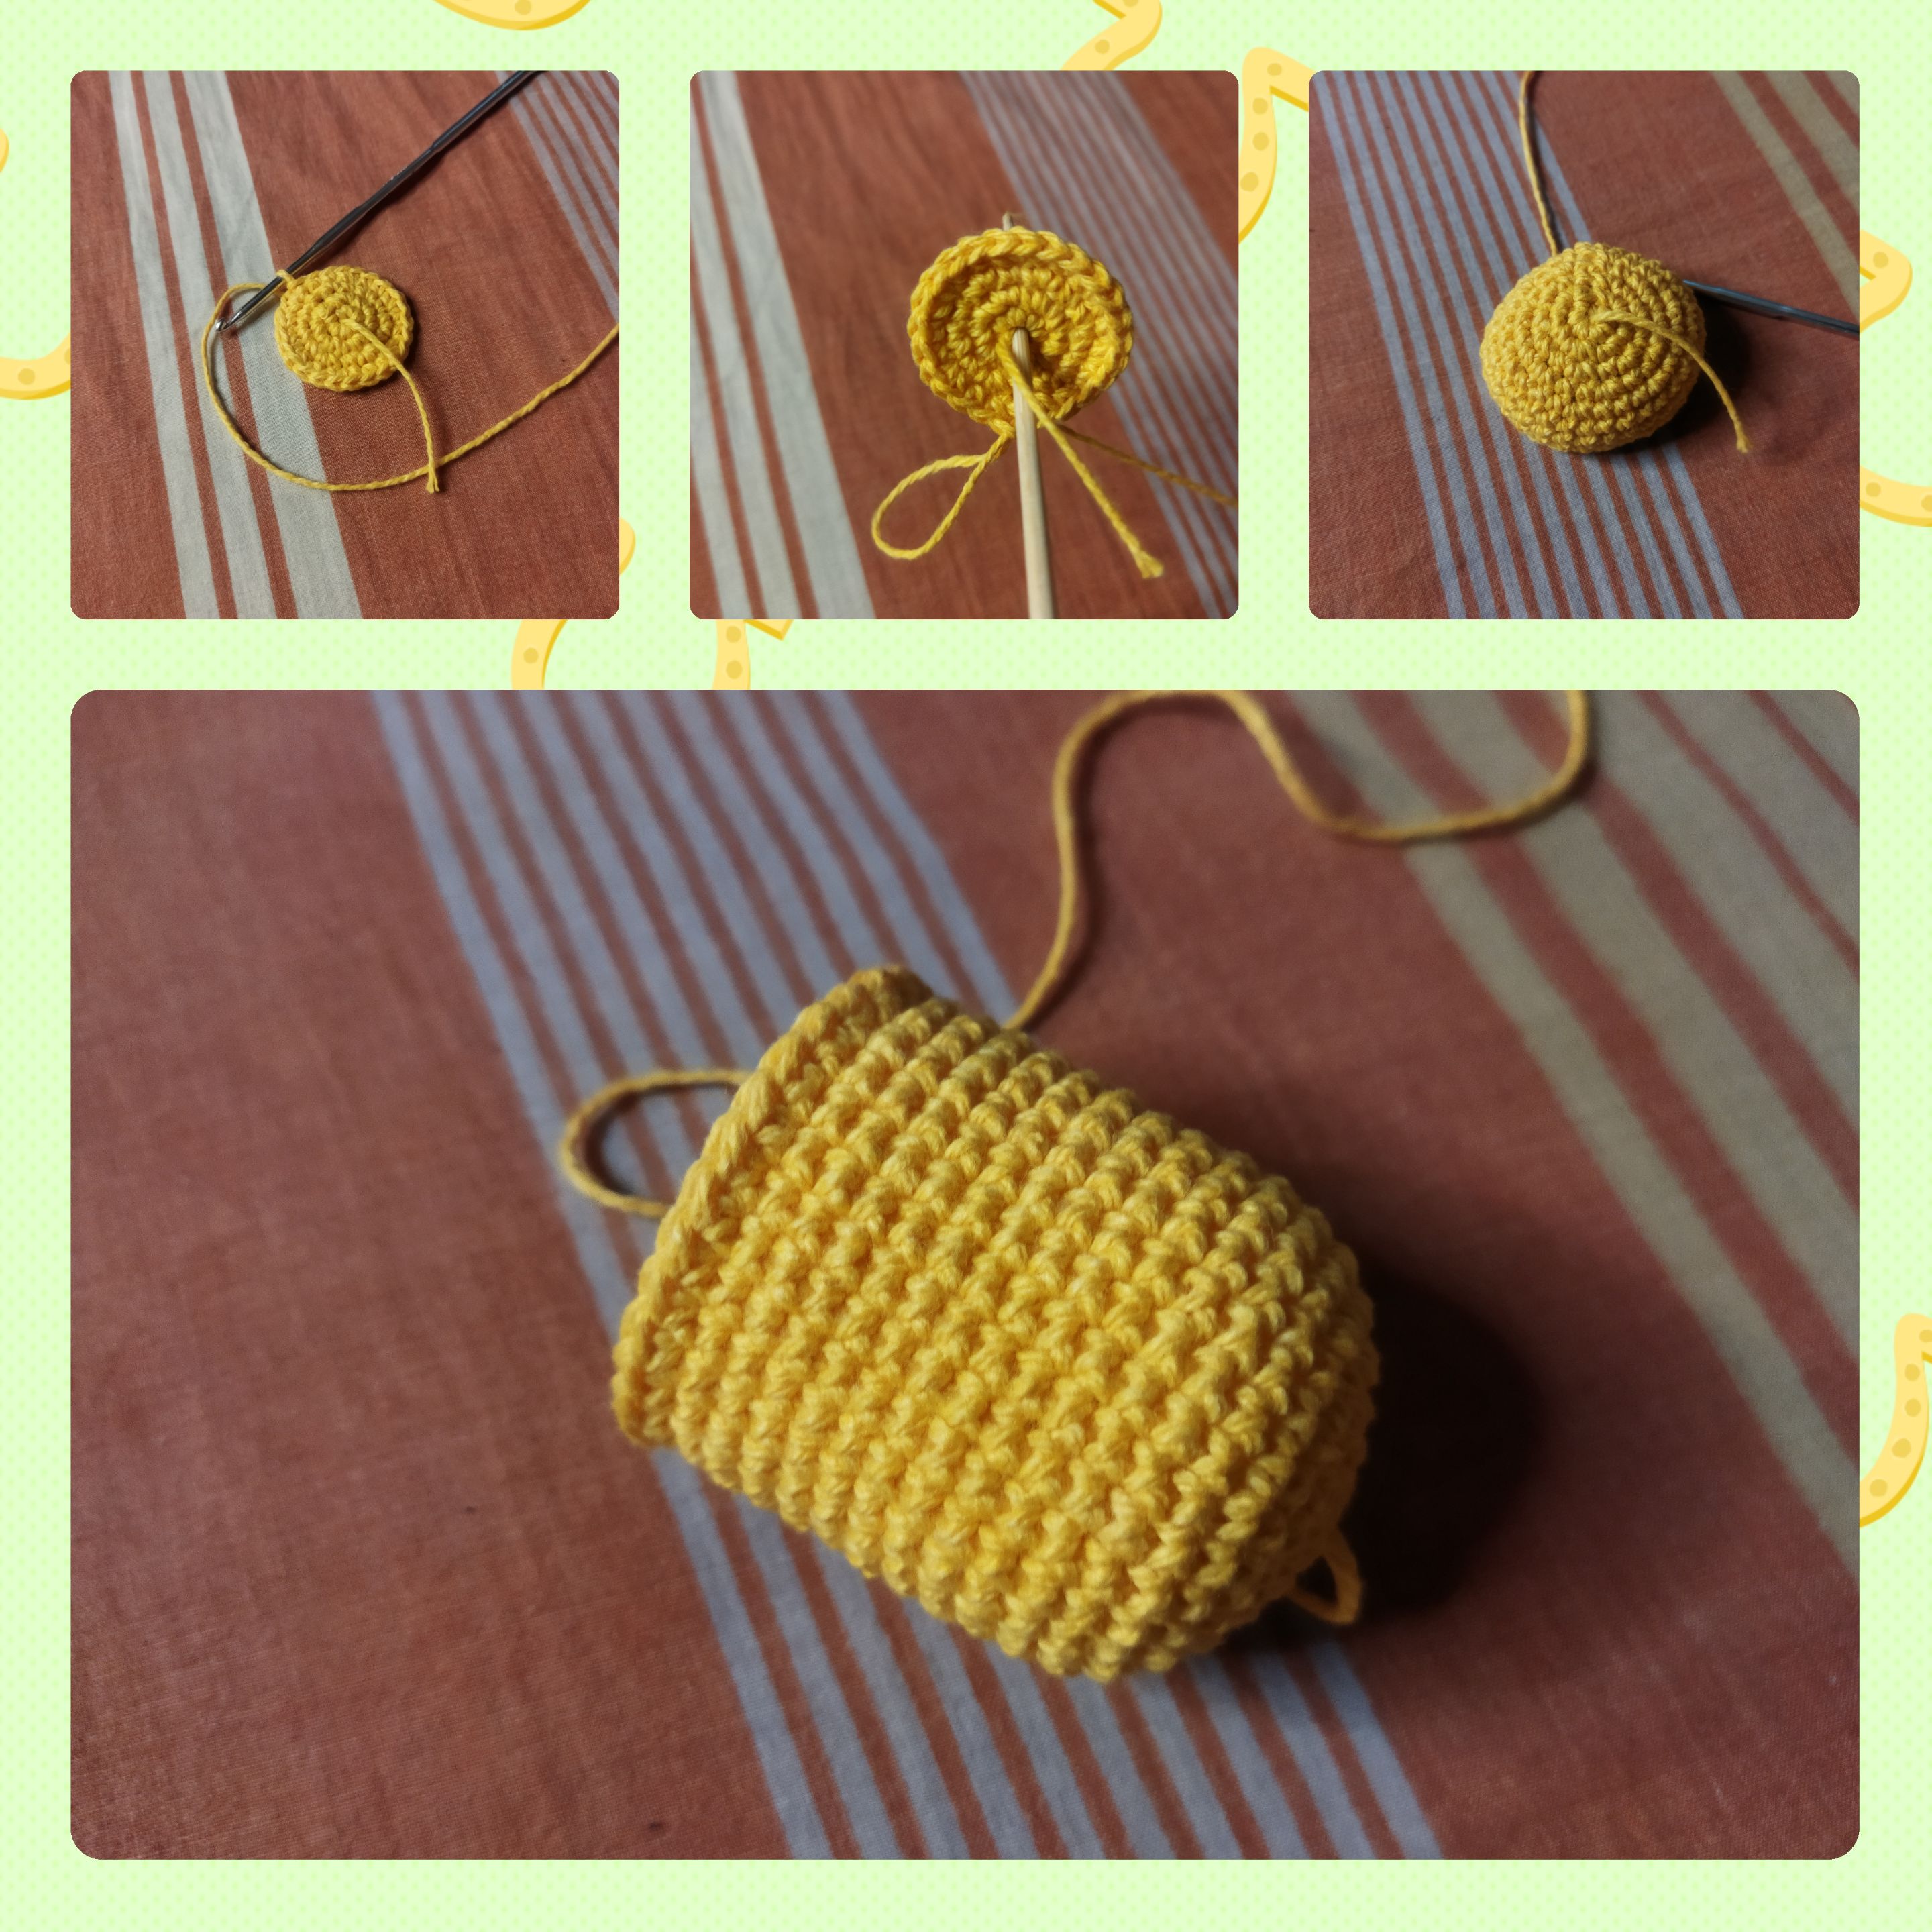
🌷 Empecé tejiendo la flor de tulipán con hilo amarillo. Se inicia con un am de 6pb. El anillo no se cierra completamente ya que por allí se meterá el palo de altura después.
En la segunda vuelta se tejen 6 aumentos de punto bajo, luego en la tercera vuelta se teje 1pb-1aum. En la cuarta vuelta se teje 2pb-1aum. En la quinta vuelta se tejen 3pb-1aum para obtener 30 pb. Desde la vuelta 6 hasta la 18 se tejen 30 pb.
These days I have been somewhat indisposed, however the desire to make my crafts and share them are intact. I wanted to do something different this time and I remembered a flower pattern I saw in a store and I loved it, especially for the type of leaves the flowers had. I was sure that I could make them woven, I looked at some tutorials to make sure of the procedure and got down to work.
🌷 I started by knitting the tulip flower with yellow yarn. It starts with a 6pb am. The ring is not completely closed as that is where the height stick will be tucked in later.
In the second row knit 6 increases of single crochet, then in the third row knit 1pb-1aum. In the fourth row, knit 2pb-1aum. In the fifth row knit 3pb-1aum to obtain 30 sts. From row 6 to 18 knit 30 sts.
🍃 Para tejer la hoja inicié con 31 puntos cadenas. En la segunda vuelta tejí 4pb-4mpa-4pa-12pad-2pa-2mpa-2pb-1cad-2pb-2mpa-2pa-12pad-4pa-4mpa-2cad-1pd.
De esta forma se teje toda la hoja. Seguidamente después del pd se levanta 1 cadena y allí se introduce el alambre. Para fijarlo en la hoja se va tejiendo 1d-1cadena por todos los puntos alrededor de la hoja. Al llegar al final se deja la hebra larga para enrollarla en el alambre sobrante.
🍃 To knit the leaf I started with 31 chain stitches. In the second round I knit 4pb-4mpa-4pa-4pa-12pad-2mpa-2mpa-2pb-1cad-2pb-2mpa-2mpa-2pa-12pad-4pa-4mpa-2cad-1pd.
In this way the whole leaf is knitted. Then, after the pd, 1 chain is lifted and the wire is introduced there. To fix it to the leaf, we weave 1d-1chain through all the stitches around the leaf. When you reach the end, leave the long strand to wrap it around the remaining wire.

🌷🍃🌷 En el siguente paso armaremos la flor. ¡Es la parte más divertida! Necesitaremos:
- El tulipán tejido.
- La hoja tejida y fijada en el alambre.
- Palito de altura.
- Pegamento.
- Cinta adhesiva de floristería.
- Guata o algodón para rellenar.
🌷🍃🌷 In the next step we will assemble the flower - it's the fun part! We will need:
- The woven tulip.
- The woven leaf and attached to the wire.
- Stick height.
- Glue.
- Florist's adhesive tape.
- Wadding or cotton for stuffing.

🌷 Empecé colocando desde el am el palito de altura. Medí fijandome que dentro del tulipán no sobresalga mucho el palo. Luego coloqué un poco de pegamento en la parte del palo que quedaría dentro del anillo mágico.
Después coloqué un poco de relleno y cosí con hilo amarillo sobrante del tulipán dando forma a la flor.
🌷 I started by placing the height stick from the am. I measured by checking that inside the tulip the stick does not protrude too much. Then I placed some glue on the part of the stick that would be inside the magic ring.
Then I put some stuffing and sewed with yellow thread left over from the tulip giving shape to the flower.
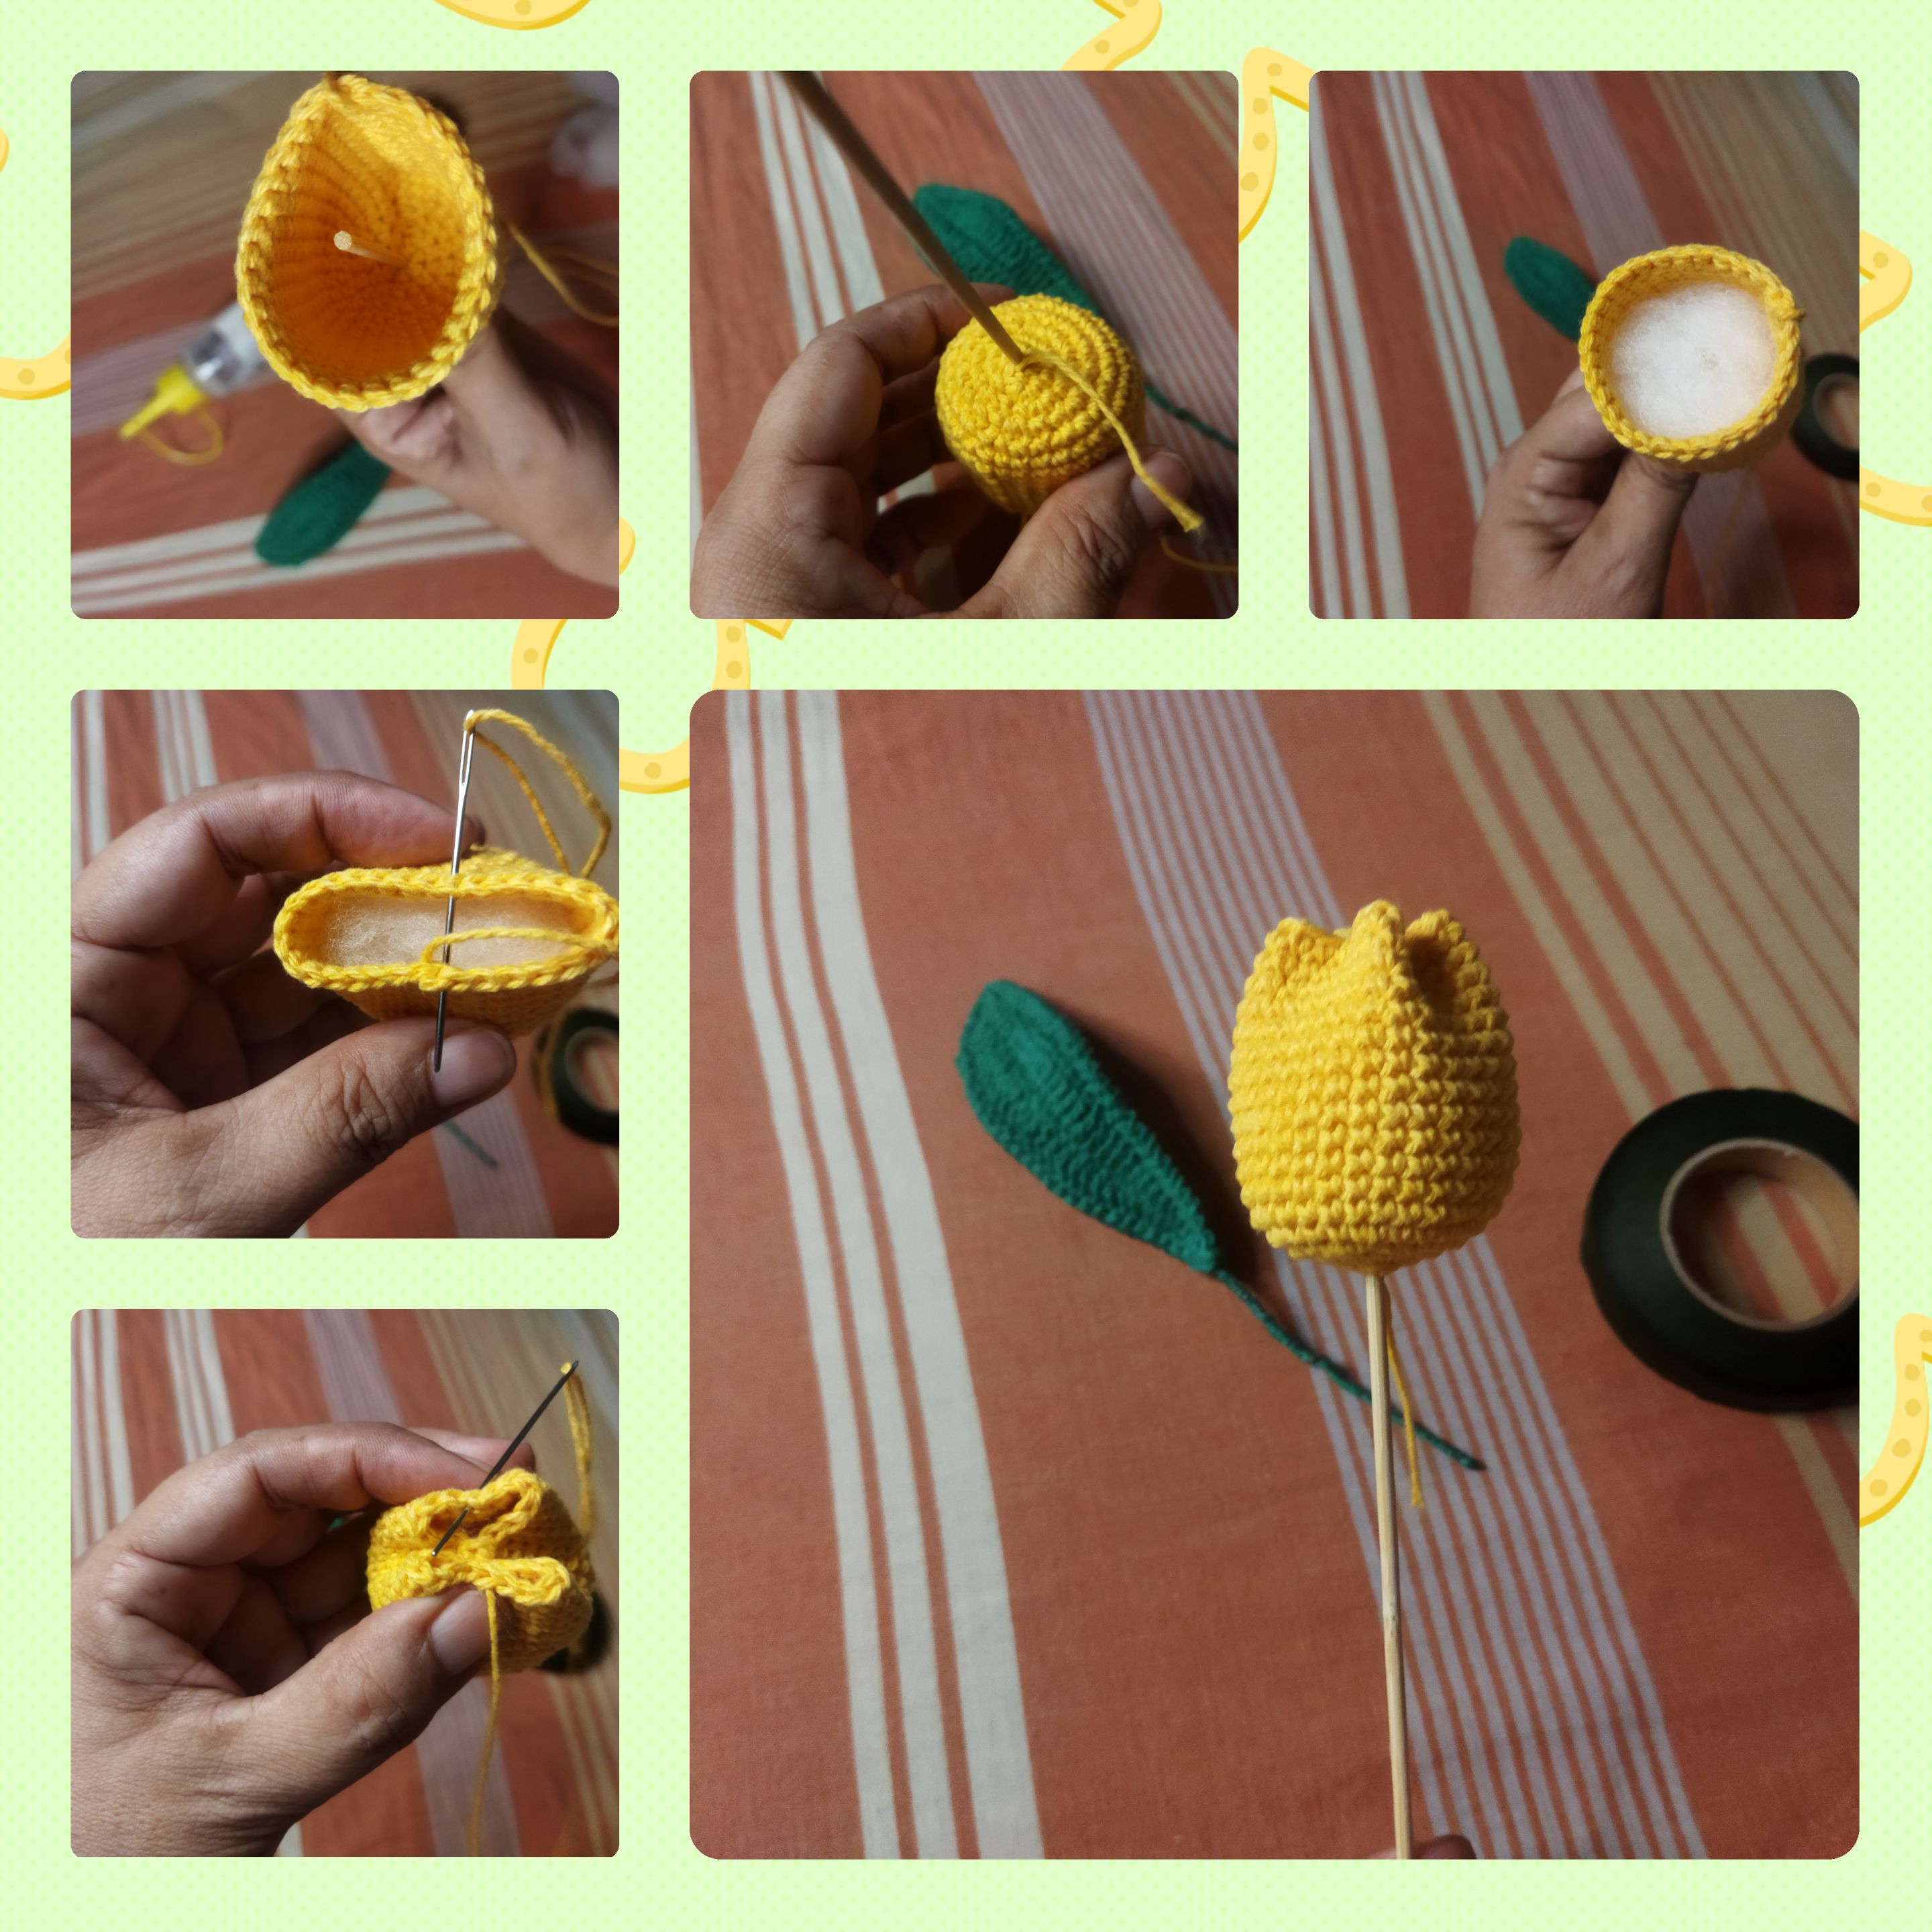
🍃 Tomé la hoja tejida y la coloqué casi en el medio del palo para definir la posición en la que la fijaría.
Empecé a cubrir con cinta verde de floristería el palo de altura desde la parte baja del tulipán. Cuando llegué a la parte donde va la hoja la fijé allí y fui envolviendo con la cinta, haciendo un poco de presión para que quede bien sujeta.
🍃 I took the woven leaf and placed it almost in the middle of the stick to define the position where I would attach it.
I started to cover with green florist tape the height stick from the bottom of the tulip. When I got to the part where the leaf goes, I fixed it there and wrapped the tape around it, applying a little pressure to hold it in place.
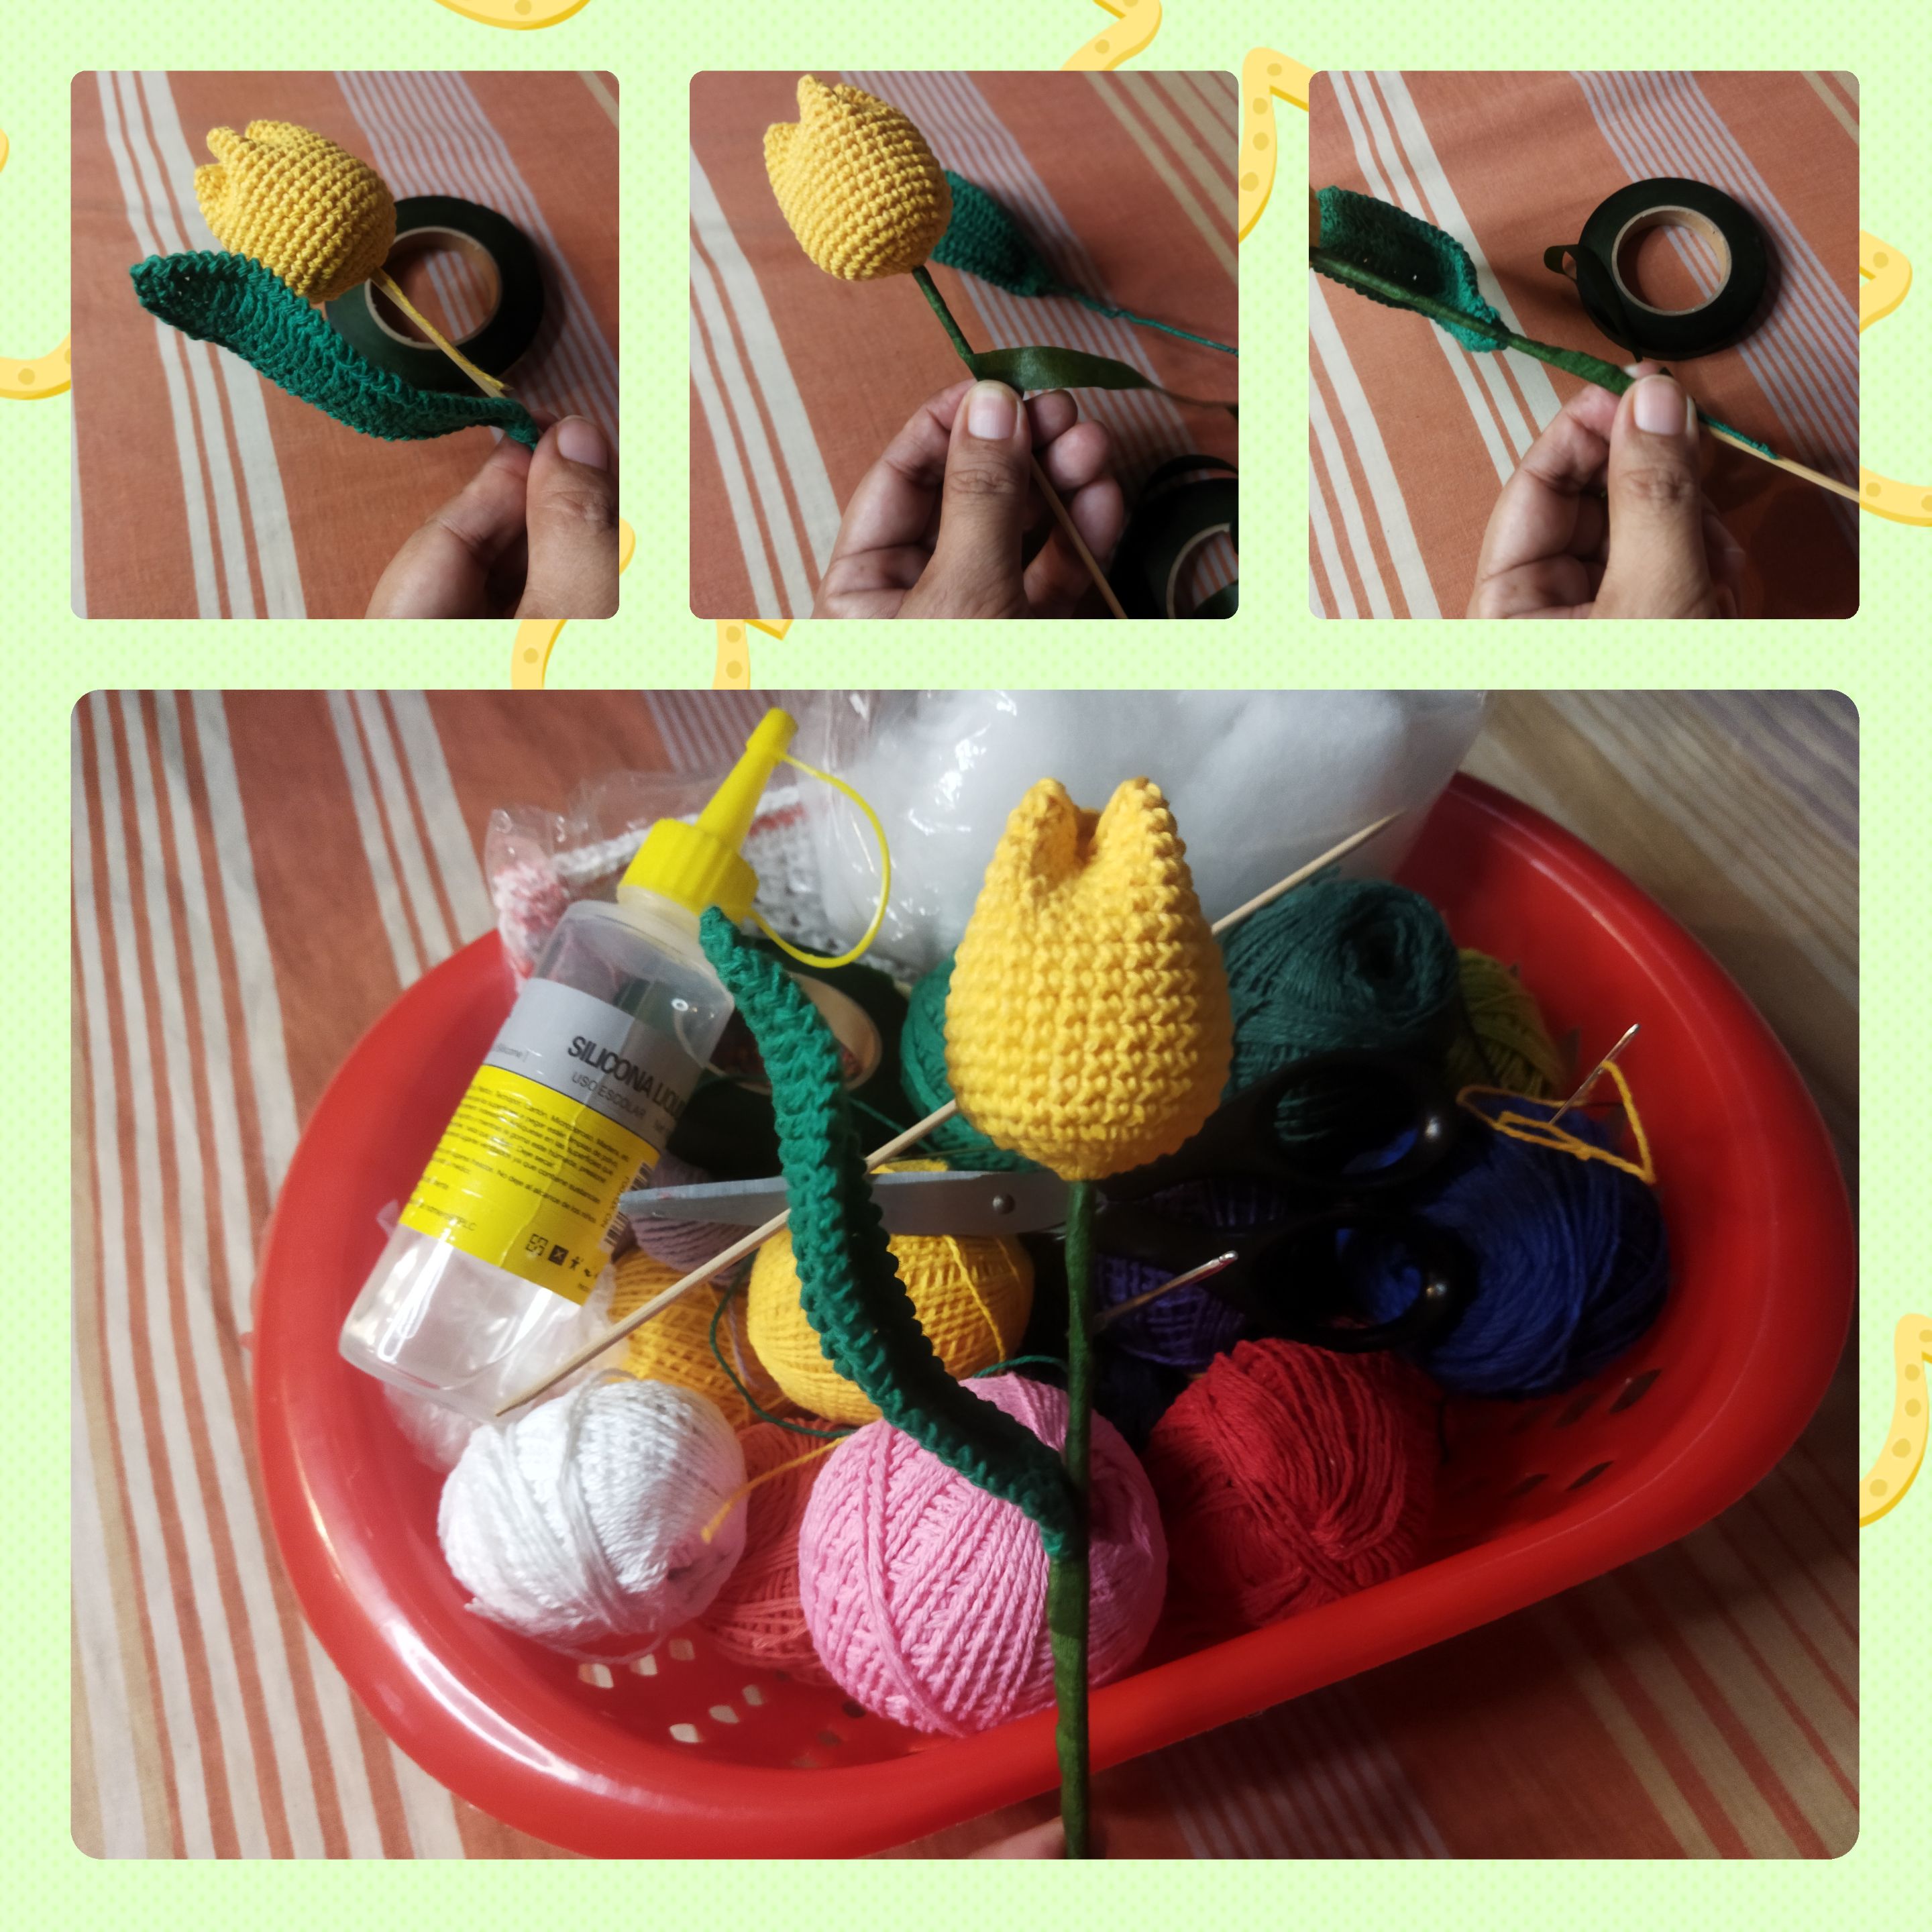
🌷🍃🌷 Así queda terminada esta lindísima flor. Miren que bien se ve con esta hermosa hoja fijada en alambre. Podemos dar la forma que queramos a la hoja. Recuerden colocarla con el lado derecho hacia afuera y el revés hacia dentro. Iré a terminar mis otras flores para armar el ramo. Espero que este modelo de flor les haya gustado. Para reforzar el tutorial he dejado para ti el paso a paso en video del armaje de la flor. ¡Disfrútalo!
Todas las fotos son de mi propiedad. Video grabado con mi teléfono POCO M3 de Xiaomi. Edité con Inshot. Usé el traductor de Deelp. Para comprimir el vídeo usé PANDA. Gracias por tu apoyo total. Hasta pronto. Bendiciones.
🌷🍃🌷 This is how this beautiful flower is finished. Look how nice it looks with this beautiful leaf fixed on wire. We can give the leaf any shape we want. Remember to place it with the right side facing out and the back side facing in. I will go finish my other flowers to make the bouquet. I hope you liked this flower model. To reinforce the tutorial I have left for you the step by step video of the flower assembly. Enjoy it!
All photos are my property. Video recorded with my Xiaomi POCO M3 phone. I edited with Inshot. I used Deelp translator. To compress the video I used PANDA. Thanks for your full support. See you soon. Blessings.

Show more
Tags :
Woo!
This creator can upvote comments using 3speak's stake today because they are a top performing creator!
Leave a quality comment relating to their content and you could receive an upvote
worth at least a dollar.
Their limit for today is $0!
Their limit for today is $0!

13 views
a year ago
$

5 views
a year ago
$

9 views
a year ago
$

57 views
11 months ago
$

13 views
2 years ago
$
More Videos

0 views
2 years ago
$

37 views
a year ago
$

12 views
a year ago
$

26 views
2 years ago
$

2 views
2 years ago
$

24 views
2 months ago
$

4 views
a year ago
$

6 views
4 months ago
$

11 views
11 months ago
$

18 views
8 months ago
$
8 views
2 years ago
$

5 views
2 years ago
$

4 views
6 months ago
$

11 views
2 years ago
$

5 views
3 years ago
$

40 views
a year ago
$

46 views
2 years ago
$

35 views
10 months ago
$

37 views
a year ago
$

41 views
a month ago
$

5 views
2 years ago
$

6 views
a year ago
$

5 views
a year ago
$

6 views
a year ago
$
Comments:
Reply:
To comment on this video please connect a HIVE account to your profile: Connect HIVE Account