PASO A PASO MAQUILLAJE COLORIDO [ESP][ENG] STEP BY STEP COLORFUL MAKEUP
10
About :
ESPAÑOL.
💜Hola amigos de HIVE💜
Espero se encuentren muy bien, que estén cumpliendo sus sueños y que logren alcanzar sus metas.
Nuevamente nos vemos por acá en mi post, para realizarles un lindo video sobre un pequeño tutorial de maquillaje muy creativo y colorido.
Espero les guste mi paso a paso de este maquillaje.
¡¡EMPEZAMOS!!
PASO#1 Cejas
Como observan en el video, lo que hago es realizar una línea delgada en la parte superior y luego otra en la parte superior, para así lograr rellenar toda la ceja y tratar de dibujar unas pequeñas líneas en toda la punta de la ceja para que se vea más real. Luego de eso lo que hago es aplicarme corrector en base, en todo el rededor de las cejas, para así tratar de que queden limpias y sin ningún defecto.
PASO#2 Bases y contornos
Para este paso, trato primero de aplicarme la base de corrector de ojeras, y luego me aplico una base de rostro, para que así quede con más cubrimiento. Para el contorno lo que utilizó es una sombra especial para contornos, me aplico el color más claro. En la zona de los pómulos y en la nariz, y trato de difuminar bien con la brocha para que quede más compacto.
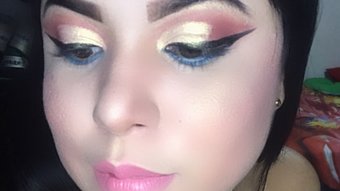
PASO#3 sombras
Para las sombras, utilice colores muy vivos. Con la sombra que mas trabajo es con la que les enseño en el video, ya que son efecto NEÓN y dan un acabado muy bueno y muy bonito. En esta ocasión utilice el color morado tratando de hacer delineado en cada ojo, para luego rellenar con un color azul neón.
PASO #4 Delineados
Para este paso use dos delineadores, en color blanco y color negro. Como observan en el video utilice la mitad del parpado en color blanco y para el acabado en color negro.
PASO #5 PESTAÑAS Y LABIAL
Para el ultimo paso, utilizo pestañas. Ya que siento que al hacer maquillajes, nos dan un acabado mas profundo.
Y para el labial utilizo un rojo translucido y un brillo.
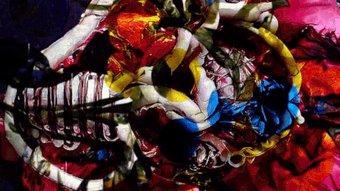
Y ESTE FUE MI RESULTADO FINAL!!!!
Espero les guste, realice un video con mucho amor y dedicación para ustedes... Sin mas nada que agregar hasta el siguiente post.


ENGLISH
💙Hello friends of HIVE💙
I hope you are doing well, that you are fulfilling your dreams and achieving your goals.
Once again we meet here in my post, to make you a nice video about a small makeup tutorial very creative and colorful.
I hope you like my step by step of this makeup tutorial.
LET'S GET STARTED!!!
STEP#1 Eyebrows
As you can see in the video, what I do is to make a thin line on the top and then another one on the top, so I can fill in the whole eyebrow and try to draw some small lines on the whole tip of the eyebrow to make it look more real. After that, what I do is to apply concealer in base, all around the eyebrows, to try to make them clean and without any defect.
STEP#2 Base and contouring
For this step, I try to first apply the under eye concealer base, and then I apply a face base, so that it has more coverage. For contouring I use a special contouring shadow, I apply the lightest color. On the cheekbone area and on the nose, and I try to blend it well with the brush to make it more compact.
STEP#3 shadows
For the shadows, use very bright colors. The shadows I work with the most are the ones I show you in the video, as they have a NEON effect and give a very nice and beautiful finish. This time I used the color purple trying to do eyeliner on each eye, and then fill in with a neon blue color.
STEP #4 Eyeliner
For this step I used two eyeliners, white and black. As you can see in the video I used half of the eyelid in white and for the finish I used black.
STEP #5 EYELASHES AND LIPSTICK
For the last step, I use eyelashes. I feel that when doing makeup, they give us a deeper finish.
And for the lipstick I use a translucent red and a gloss.
AND THIS WAS MY FINAL RESULT!!!!
I hope you like it, I made a video with a lot of love and dedication for you .... Nothing more to add until the next post.
Show more
Tags :
Woo!
This creator can upvote comments using 3speak's stake today because they are a top performing creator!
Leave a quality comment relating to their content and you could receive an upvote
worth at least a dollar.
Their limit for today is $0!
Their limit for today is $0!
5 views
2 years ago
$
More Videos

10 views
3 days ago
$

16 views
6 months ago
$

3 views
2 years ago
$

0 views
2 years ago
$

4 views
a year ago
$

9 views
a month ago
$

1 views
2 years ago
$

4 views
2 years ago
$

18 views
2 years ago
$

3 views
4 years ago
$

10 views
a year ago
$

14 views
3 years ago
$

5 views
2 years ago
$

5 views
4 months ago
$

5 views
a year ago
$

0 views
7 months ago
$

3 views
9 months ago
$

21 views
a year ago
$

8 views
3 years ago
$

14 views
5 months ago
$
20 views
8 months ago
$
6 views
a year ago
$

0 views
4 years ago
$
15 views
a year ago
$

6 views
2 years ago
$
Comments:
Reply:
To comment on this video please connect a HIVE account to your profile: Connect HIVE Account