Costruisco una Gallina "Furiosa"🐔 (ITA/ENG) I build a "Furious" Chicken
7
About :
👉ITA VERSION👈
Ciao amici,
oggi come ieri piove e quindi si esce poco, anzi non si esce affatto, il mio cucciolo odia la pioggia e io pure ma in casa mi annoio alla morte e quindi che fare?
Guardo tra il mio materiale che utilizzo per sperimentare nuove forme di "arte" e mi accorgo di avere tutto l'occorrente per costruire delle galline.
"delle galline?" penserete... ebbene si delle Galline :-) ma non galline qualuncue ma delle galline furiose!! come quelle del nostro gioco preferito @splinterlands, o quasi :-)
Inizio subito con il citare il mio amico @libertycrypto27 che apprezza queste cose e penso possa realizzarle in momenti di noia con la sua bambina e ppassare dieci minuti piacevoli.
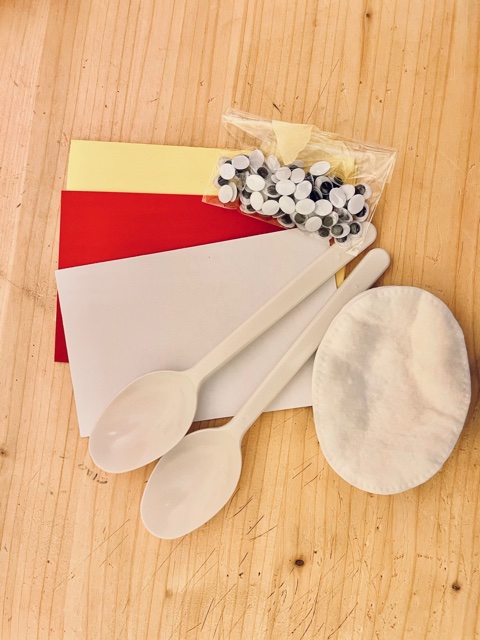
Ed ecco cosa ci serve per realizzarle:
- Cartoncino giallo
- Cartoncino rosso
- Cartoncino bianco
- un cucchiaio di plastica
- due dischetti struccanti
- occhi finti (in assenza si possono disegnare)
- colla e un pennarello nero.

Partiamo con il realizzare la nostra gallina!
STEP 1
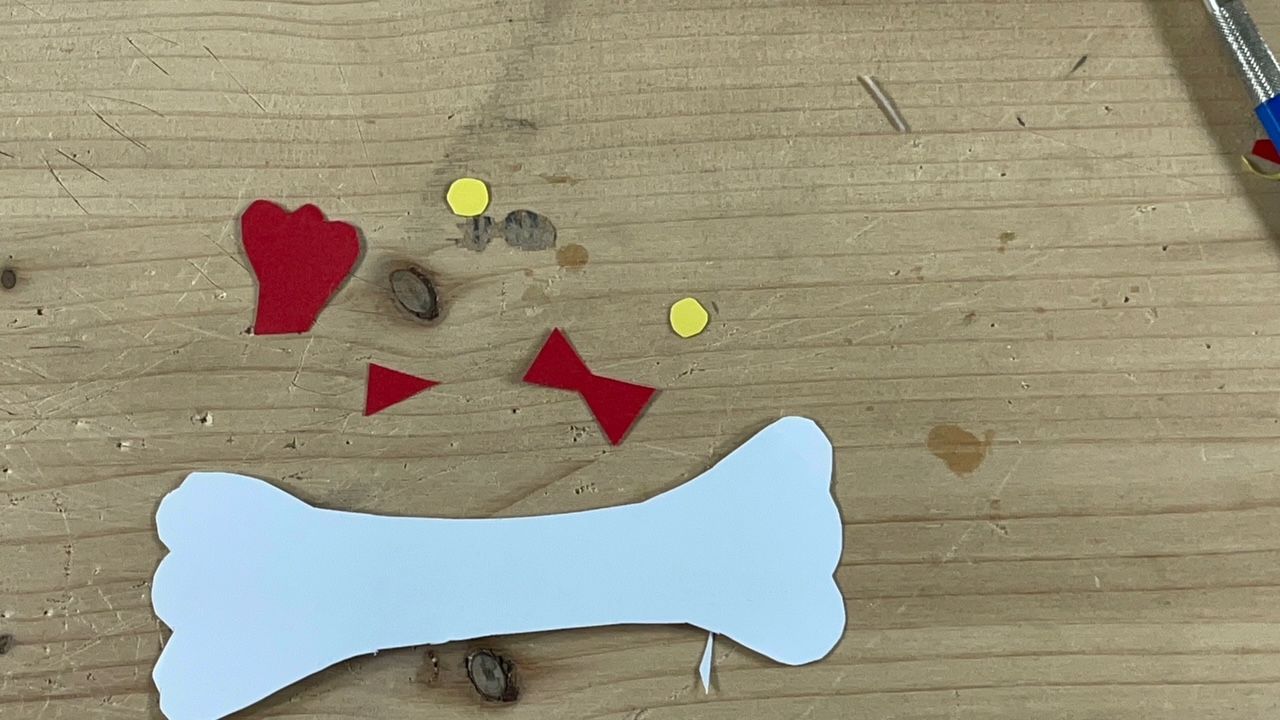
Dal cartoncino rosso ritagliamo una cresta da gallina, un becco triangolare e un Papillon, in foto potete vedere come le ho realizzate io sicuro che voi farete di meglio :)
Con il cartoncino giallo facciam due bottoni che serviranno esattamente come bottoni per il vestito della nostra gallina.
Con il cartoncino bianco facciamo una specie di osso, saranno le ali della gallina e potete misurare la giusta lunghezza appoggiando sopra il cartoncino il dischetto struccante e disegnare le ali in modo che risultino proporzionate.
STEP 2
Prendiamo un dischetto struccante incolliamoci sopra il cucchiaio lasciando la parte superiore totalemnte fiori come in figura, incolliamo il nostro osso... volevo dire ali sopra alcucchiaio e chiudiamo il tutto con un secondo dischetto struccante.
STEP 3
Incolliamo il papillon alla base del cucchiaio dove in teoria, inpratica, ci sarà il collo della gallina e attacchiamo i due bottoni gialli uno in prossimità del papillon l'altro appena sotto.
(potete sbizzarire la vostra fantasia non è una regola?
STEP 4
Eccoci arrivati all'ultima parte della nostra gallina, la testa!
Prendiamo la cresta rossa fatta precedentemente e incolliamola all'apice del cucchiaio
Se siete riusciti a reperire gli occhi di plastica incolliamoli sotto la cresta, se non li avete con un pennarello nero basterà disegnarli.
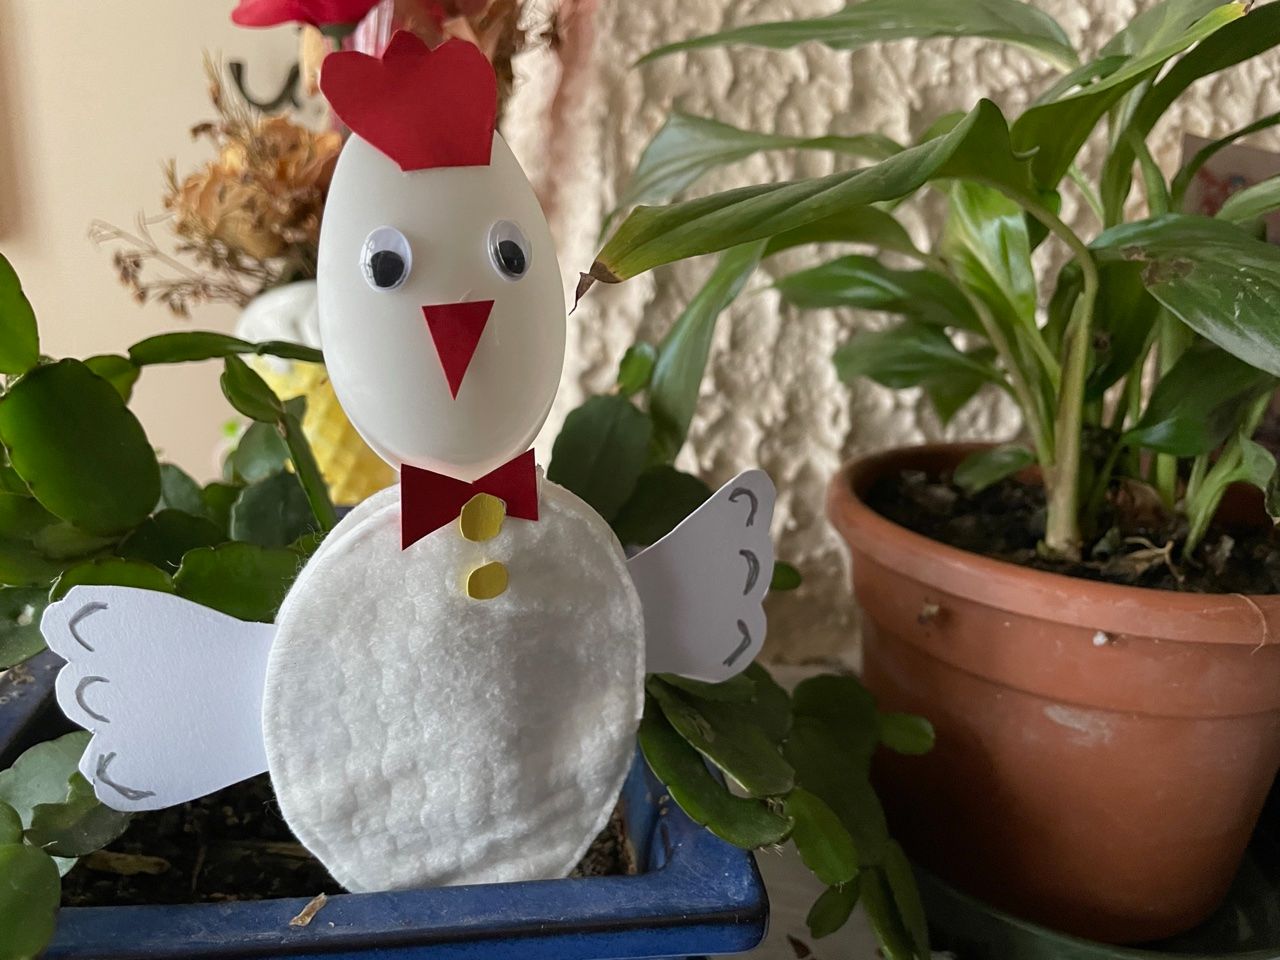
E in fine recuperiamo il triangolo rosso che diventerà il becco della gallina, incolliamolo sotto gli occhi ed ecco pronta la nostra Gallina "Furiosa" non proprio uguale ma divertente e facile da realizzare, bastano dieci minuti e si può utilizzare in vari modi io l'ho infilata come decorazione dentro un vaso, le altre fatte per le mie nipotine volano di qua e di là a suon di risate e salti! :-)
Nel video registrato e montato da me c'è tutto il procedimento in versione integrale, la musica è quella campione dell'applicazione ed è free music, mentre le immagini sono tutte dell'autore.
Buon divertimento e se trovate il tempo di realizzarle è gradita la vostra gallina nei commenti!
Alla prossima avventura!

👉ENG VERSION👈
Hello friends,
today like yesterday it rains and therefore you go out little, indeed you do not go out at all, my puppy hates the rain and I too but at home, I am bored to death and so what to do?
I look through the material that I use to experiment with new forms of "art" and I realize that I have everything I need to build chickens.
"of the chickens?" you will think ... well yes of the chicken 🐓 :-) but not some hens but some furious hens !! like those of our favourite game @splinterlands, or almost :-)
I immediately start by mentioning my friend @ libertycrypto27 who appreciates these things and I think he can realize them in moments of boredom with his little girl and spend ten pleasant minutes.
And here's what we need to make them:
- Yellow card
- Red card
- White cardboard
- a plastic spoon
- two make-up remover pads
- googly eyes (in absence they can be drawn)
- glue and a black marker.
Let's start with making our hen!
STEP 1
From the red cardboard, we cut out a hen's crest, a triangular beak and a bow tie, in the photo you can see how I made them sure that you will do better :)
With the yellow cardboard, we will make two buttons that will serve exactly as buttons for our hen's dress.
With the white card, we make a kind of bone, they will be the hen's wings and you can measure the right length by placing the make-up remover disk on the card and draw the wings so that they are proportionate.
STEP 2
We take a make-up remover disk, glue the spoon on top, leaving the upper part of the flowers as shown in the figure, glue our bone ... I meant wings over the spoon and close it all with a second make-up remover disk.
STEP 3
We glue the bow tie to the base of the spoon where in theory, in practice, there will be the neck of the hen and we attach the two yellow buttons one near the bow tie the other just below.
(you can indulge your imagination isn't it a rule)
STEP 4
Here we are at the last part of our hen, the head!
We take the red crest made previously and glue it to the apex of the spoon
If you managed to find the plastic eyes, glue them under the crest, if you don't have them with a black marker, just draw them.
And finally, we recover the red triangle that will become the beak of the hen, glue it under the eyes and here is ready our "Furiosa" hen not the same but fun and easy to make, ten minutes are enough and you can use it in various ways. I slipped into a vase as decoration, the others made for my granddaughters fly here and there to the sound of laughter and jumps! :-)
In the video recorded and edited by me, there is the whole procedure in full version, the music is the sample of the application and is free music, while the images are all by the author.
Have fun and if you find the time to make them your hen is welcome in the comments!
See your next adventure!
Show more
Tags :
Woo!
This creator can upvote comments using 3speak's stake today because they are a top performing creator!
Leave a quality comment relating to their content and you could receive an upvote
worth at least a dollar.
Their limit for today is $0!
Their limit for today is $0!
9 views
3 years ago
$

33 views
4 years ago
$

13 views
3 years ago
$

15 views
4 years ago
$
20 views
4 years ago
$
More Videos
16 views
5 years ago
$

11 views
2 years ago
$

3 views
3 years ago
$
4 views
4 years ago
$

6 views
5 years ago
$
2 views
5 years ago
$

2 views
11 months ago
$

12 views
a year ago
$
10 views
a year ago
$

13 views
3 years ago
$

0 views
3 years ago
$

9 views
3 years ago
$

5 views
a year ago
$

20 views
2 years ago
$
36 views
5 years ago
$

15 views
3 years ago
$

32 views
2 years ago
$

25 views
a year ago
$

2 views
5 years ago
$

8 views
3 years ago
$

8 views
2 years ago
$

6 views
4 years ago
$

@threespeak: 5.8424
@fedesox: 2.4206
@tipu: 1.2339
@libertycrypto27: 0.1852
@joshmansters: 0.1176
@ace108: 0.1114
@bscrypto: 0.0795
@claudio83: 0.0771
@onealfa: 0.0752
@fedesox: 2.4206
@tipu: 1.2339
@libertycrypto27: 0.1852
@joshmansters: 0.1176
@ace108: 0.1114
@bscrypto: 0.0795
@claudio83: 0.0771
@onealfa: 0.0752
Comments:
Reply:
To comment on this video please connect a HIVE account to your profile: Connect HIVE Account