[ESP-ENG]Como hacer una pulsera de flores con la técnica de macramé/How to make a flower bracelet wi
1
About :
Hola amigos de hive! Espero tengan un feliz domingo.
Hoy les traigo el paso a paso de cómo hacer otro modelo de pulsera tejida con la técnica de macramé. Ya anteriormente les había enseñado hacer el tejido completo, pero en esta oportunidad vamos alternar con mostacillas y formar unas lindas flores, pueden realizarlas con mostacillas del mismo color o combinar mostacillas de diferentes colores.
Para realizar una pulsera necesitarás:
Mostacillas del color que desees, en este caso gusta este tono que es un gris plomo y negro.
Hilo de cuero o también el hilo llamado piel de serpiente del más fino
Hilo chino rojo y dorado
Cinta métrica ó regla
Encendedor
Tijeras
Gancho
Un pedazo de cartón.
Hello hive friends! I hope you have a happy Sunday.
Today I bring you the step by step of how to make another model of bracelet woven with the macrame technique. Previously I had already taught you how to make the complete weaving, but this time we are going to alternate with beads and form some pretty flowers, you can make them with beads of the same color or combine beads of different colors.
To make a bracelet you will need:
Beads of the color you want, in this case I like this tone that is a lead gray and black.
Leather thread or also the finest snakeskin thread.
Red and gold Chinese thread
Measuring tape or ruler
Lighter
Scissors
Hook
A piece of cardboard

Paso 1
Medir el contorno de tu muñeca y agregarle 6 cm más ( yo corte 30 cm) para la base de nuestra pulsera. Toma el cordón de cuero dorado y corta 30 cm y realiza un nudo en uno de los extremos de la pulsera que será nuestra base tomando en cuenta los cm extras que le dimos. Fija al cartón con el gancho el hilo de cuero, para que puedas trabajar con mayor comodidad.
Step 1
Measure the contour of your wrist and add 6 cm more (I cut 30 cm) for the base of our bracelet. Take the gold leather cord and cut 30 cm and tie a knot at one end of the bracelet that will be our base taking into account the extra cm we gave. Fix the leather thread to the cardboard with the hook, so you can work more comfortably.

Paso 2
Pasa el hilo rojo por debajo del hilo principal.
Step 2
Pass the red thread under the main thread.
Paso 3
El extremo derecho lo pasas por encima del cordón principal.
Step 3:
Thread the right end over the top of the main thread.

Paso 4
el extremo izquierdo del hilo rojo lo pasas por encima del principal y lo metes por el orificio del lado derecho, estirando ambos extremos para armar la base del tejido.
Step 4
Pass the left end of the red thread over the main thread and thread it through the hole on the right side, stretching both ends to form the base of the fabric.


Paso 5
luego el lado derecho del hilo rojo lo pasas por debajo del hilo principal y el extremo izquierdo por encima y lo metes por el orificio del lado derecho.
Step 5:
Then pass the right end of the red thread under the main thread and the left end over the main thread and thread it through the hole on the right side.

Paso 6
luego repites el procedimiento del lado izquierdo, pasándolo por debajo del hilo principal y el lado derecho por encima del hilo principal y luego por el orificio del lado izquierdo.
Y así vas alternando el mismo procedimiento de un lado a otro hasta tener 6 pasadas. ( ver video)
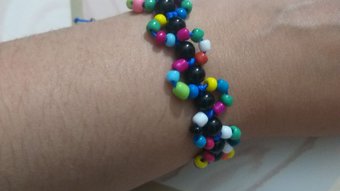
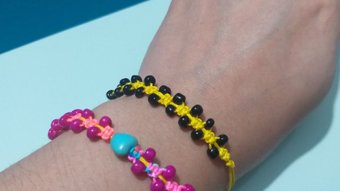
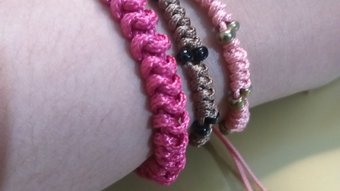
Luego, colocas una mostacilla en el hilo principal y tres mostacillas de lado y lado del hilo rojo. Trata de fijar muy bien las mostacillas y repites el procedimiento alternando el lado derecho e izquierdo hasta las 6 pasadas y en la sexta colocas las mostacillas para formar la flor y continuas. Trata de que el tamaño de las mostacillas sean todas iguales para que se forme bien la flor en mi caso, algunas mostacillas negras eran muy pequeñas y no se ven del mismo tamaño; pero en la segunda pulsera que hice eran casi todas del mismo tamaño y se ve mucho mejor la flor.
Una vez tengas varias flores realizadas mide con el contorno de tu muñeca, al tener la última flor haces 6 tejidos y luego haces un nudo, cortas y quemas los extremos del hilo rojo.


Para realizar el broche, pasas una mostacilla por cada extremo del cordón dorado y colocas una mostacilla fijándolas con un nudo. Luego, unes ambos extremos y pasas el hilo rojo por debajo con ambos extremos del lado derecho, pasas el que queda en la parte superior por encima del otro extremo rojo y luego por debajo de los dos hilos más gruesos y el extremo lo pasas por el orifico que queda del lado izquierdo. luego el hilo rojo del lado derecho lo pasas por encima del hilo principal (cordón grueso) y el extremo izquierdo del hilo dorado lo pasas por debajo de hilo principal y lo metes por el orificio del lado derecho.


De igual, forma les deje un video para que puedan guiarse y realizar las pulseras.
Como siempre les digo, una vez que dominen la técnica pueden realizar muchos diseños con este tejido, combinar colores de hilos y materiales, realizar llaveros, collares, tobilleras. Cuéntame en los comentarios Si ya realizaste este tejido y con qué tipo de materiales.

Las fotos y videos fueron tomados por mí.
Step 6
then repeat the procedure on the left side, passing it under the main thread and the right side over the main thread and then through the hole on the left side.
And so you alternate the same procedure from one side to the other until you have 6 passes. (see video)
Then, place a bead on the main thread and three beads on each side of the red thread. Try to fix the beads very well and repeat the procedure alternating the right and left side until you have 6 passes and in the sixth pass you place the beads to form the flower and continue. Try that the size of the beads are all the same so that the flower is well formed in my case, some black beads were very small and do not look the same size, but in the second bracelet I made were almost all the same size and looks much better flower.
Once you have made several flowers measure with the contour of your wrist, when you have the last flower you make 6 weaves and then tie a knot, cut and burn the ends of the red thread.

To make the brooch, pass a bead through each end of the golden cord and place a bead fixing them with a knot. Then, join both ends and pass the red thread underneath with both ends on the right side, pass the one on the top over the other red end and then under the two thicker threads and pass the end through the hole on the left side. Then pass the red thread on the right side over the main thread (thicker cord) and pass the left end of the golden thread under the main thread and put it through the hole on the right side.


Likewise, I left a video so you can guide you and make the bracelets.
As I always tell you, once you master the technique you can make many designs with this fabric, combine colors of threads and materials, make key chains, necklaces, anklets. Tell me in the comments if you have already made this weaving and with what kind of materials.
The photos and videos were taken by me.
Show more
Tags :
Woo!
This creator can upvote comments using 3speak's stake today because they are a top performing creator!
Leave a quality comment relating to their content and you could receive an upvote
worth at least a dollar.
Their limit for today is $0!
Their limit for today is $0!
2 views
11 months ago
$

3 views
9 months ago
$
[ESP- ENG] Como hacer Pulseras con tejido macramé y mostacillas / How to make bracelets with macramé
11 views
a year ago
$
6 views
a year ago
$

5 views
a year ago
$
More Videos

9 views
a year ago
$

1 views
2 years ago
$

19 views
a year ago
$

3 views
2 years ago
$

11 views
2 months ago
$

3 views
2 years ago
$
6 views
7 months ago
$

13 views
2 years ago
$

2 views
2 years ago
$

10 views
2 years ago
$

HIVE OPEN MIC Week 134 (ENG/ESP) Theme: Perdon (Sorry/Forgiveness) - "(Sorry) Ms Jackson" by Outkast
24 views
a year ago
$

6 views
a year ago
$

52 views
3 years ago
$

2 views
a year ago
$

2 views
2 years ago
$

6 views
a year ago
$

9 views
a year ago
$

3 views
2 years ago
$

1 views
2 years ago
$

8 views
2 years ago
$

3 views
2 years ago
$
Comments:
Reply:
To comment on this video please connect a HIVE account to your profile: Connect HIVE Account