Te muestro en menos de 1 min como reparar tus mandos de consola (ES/EN)
5
About :
Hola amigos de Hive, hoy quiero hacerle un aporte a toda la comunidad gamer, que espero les sirva a muchos para que puedan seguir disfrutando de los videojuegos que más les gustan. No les ha pasado que un botón o varios de su mando dejan de funcionar, no solamente los mandos de consolas, esto también les servirá para los controles de televisión, puede que ya muchos sepan esto pero para quienes no, a continuación les muestro como reparar sus mandos en menos de 1 minuto.
Hello friends of Hive, today I want to make a contribution to the entire gamer community, which I hope will serve many of you so you can continue to enjoy the video games you love. It has not happened to you that a button or several of your controller stop working, not only the console controllers, this will also serve for television controllers, many may already know this but for those who do not, then I show you how to repair your controllers.
Paso 1 / Step 1
Por supuesto lo primero que tenemos que hacer es retirar cada uno de los tornillos externos del mando para poder destaparlo, si el mando es bastante viejo o ya ha sido destapado podrías encontrar alguna dificultad, como tornillos aislados, asegúrate de tener varios destornilladores para lidiar con eso.
Of course the first thing we have to do is to remove each of the external screws of the controller in order to uncover it, if the controller is quite old or has already been uncovered you might encounter some difficulty, such as isolated screws, make sure you have several screwdrivers to deal with that.
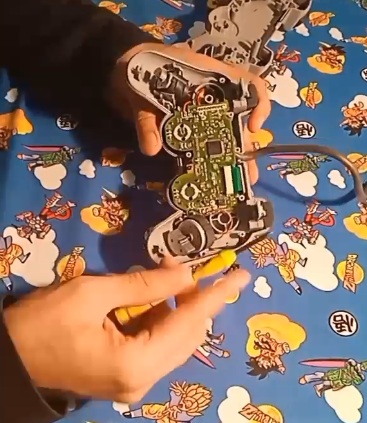
Paso 2 / Step 2
Una vez hayas abierto el mando te conseguirás con seguridad con más tornillos, observa bien y retíralos si es necesario para desprender la placa, dependiendo del mando encontraras otros dispositivos como vibradores , que pueden estar atornillados o ajustados a presión, ten mucho cuidado para liberar todo de forma segura, recuerda que si forzas las piezas puedes partirlas y luego no hay vuelta atrás y es más difícil, tener un mando 100% funcional.
Once you have opened the controller you will surely get more screws, observe well and remove them if necessary to detach the plate, depending on the controller you will find other devices such as vibrators, which may be screwed or press-fitted, be very careful to release everything safely, remember that if you force the parts you can split them and then there is no way back and it is more difficult to have a 100% functional controller.
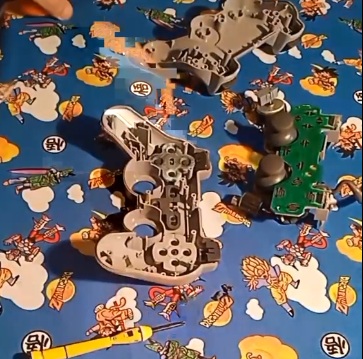
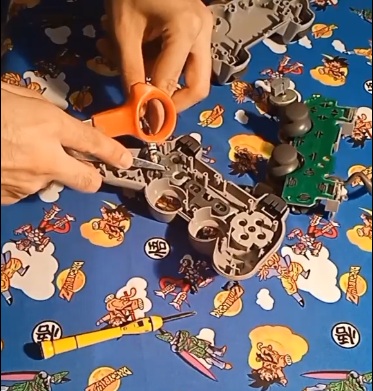
Paso 3 / Step 3
Una vez que hayas desprendido la placa tendrás acceso a las gomas que presionan la placa, lo que sucede es que la propiedad conectiva que tienen estas gomas ha desaparecido y debes restituirla, Hacerlo es muy fácil, solo tienes que buscar un lápiz de grafito, una tijera o algo filoso como una hojilla, y raspar un poco de grafito justo encima del circulo negro de la goma, una vez que la ralladura está sobre la pieza expándela, puede ser con el borrador del lápiz o cualquier otra cosa que se vea funcional. Asegúrate de que el grafito no invada otras zonas dela goma si es asi límpialo, porque esto podría hacer que no funcione.
Once you have detached the plate you will have access to the rubbers that press the plate, what happens is that the connective property that these rubbers have is missing and you must restore it, Doing it is very easy, just find a graphite pencil, a scissors or something sharp like a blade, and scrape a little graphite just above the black circle of the rubber, once the scratch is on the piece expand it, it can be with the pencil eraser or anything else that looks functional. Make sure that the graphite does not invade other areas of the eraser if it does, clean it off, because this could make it not work.
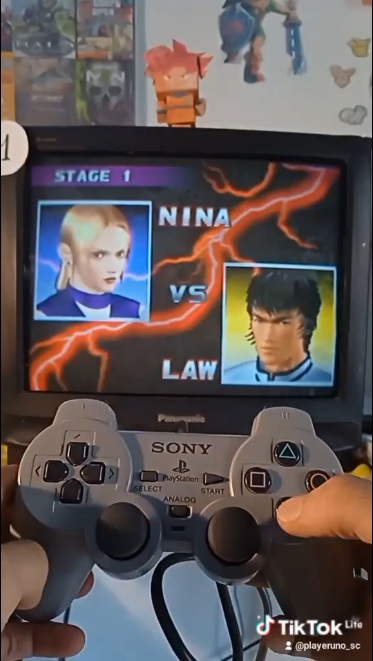
Paso 4 / Step 4
Y eso es todo ahora solo tienes que cerrar el control, por cierto cuando lo desatapes asegúrate de ubicar cada tornillo de forma segura, no tienen idea de cuantos tornillos he perdido reparando controles, Prueba el control, antes de atornillarlo, si ha funcionado coloca los tornillos, si no, puedes intentarlo de nuevo, también sirve colocar circulitos de papel aluminio entre la gomita y la placa, pero a veces suelen desprenderse y descolocarse. Espero les haya gustado esta información.
And that's all now you just have to close the control, by the way when you untie it make sure to place each screw securely, you have no idea how many screws I have lost repairing controls, Try the control before screwing it, if it worked place the screws, if not, you can try again, also serves to place circles of aluminum foil between the rubber band and the plate, but sometimes they tend to come off and unplaced. I hope you liked this information.
Muchas gracias por su atención
Thank you very much
Todas las imagenes y videos son de mi autorìa, realizadas incialmente para reel de instagram de mi cuenta PLAYER UNO
Show more
Tags :
Woo!
This creator can upvote comments using 3speak's stake today because they are a top performing creator!
Leave a quality comment relating to their content and you could receive an upvote
worth at least a dollar.
Their limit for today is $0!
Their limit for today is $0!

9 views
a year ago
$

8 views
3 months ago
$

1 views
3 months ago
$

3 views
8 months ago
$

3 views
a month ago
$
More Videos

44 views
a year ago
$

7 views
4 months ago
$

9 views
3 months ago
$

6 views
2 years ago
$

4 views
a year ago
$

5 views
3 years ago
$

1 views
a year ago
$

1 views
a year ago
$

3 views
3 years ago
$

3 views
4 years ago
$

5 views
a year ago
$

19 views
6 months ago
$

45 views
9 months ago
$

29 views
2 years ago
$

7 views
3 years ago
$

5 views
2 years ago
$

1 views
a year ago
$

21 views
a week ago
$

3 views
3 years ago
$

2 views
a year ago
$

24 views
a year ago
$

30 views
2 years ago
$

4 views
2 years ago
$
Comments:
Reply:
To comment on this video please connect a HIVE account to your profile: Connect HIVE Account