VID_20220201_233312 Te enseño 3 cosas y YA puedes hacer tu Colección de Zarcillos/I teach you 3 thin
8
About :
Hola a toda la Comunidad **Hive Blog.** Así es, en esta publicación te muestro 3 cosas básicas, las primeras y las mas fáciles para que desde ya, puedas hacer tu Primera Colección de Bisutería, con la **Técnica del Alambrismo,** que consiste en la manipulación del alambre para crear **Joyería Artesanal.**.

La Técnica del Alambrismo la aprendí hace varios años, ya que quería diseñar mis propias piezas de fantasía para combinar con los diferentes outfits para trabajar o salir a pasear.
En el Alambrismo no usamos ni soldadura, ni pegamento; solo utilizamos nuestras manos y herramientas para hacer las formas del alambre y las piedras, acrílicos, dijes, etc. que necesitamos en el diseño que queremos crear.
Las herramientas básicas que usaremos son: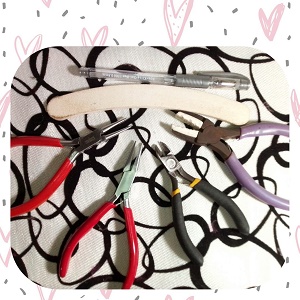
Pinza redonda
Pinza plana
Pinza de corte (al igual que las tijeras de tela, tienes que tenerlas escondidas de todos en la casa, porque te la pueden dañar)
Pinza de silicón para alisar el alambre
También debemos disponer de una lima o lija, para redondear las puntas del alambre cuando se requiera.
Un lápiz o bolígrafo que usaremos en lugar del Mandril, que es una herramienta hermosa que aún no tengo.
El alambre que necesitamos para crear los diseños que propongo en esta publicación, es el **Alambre Calibre 20,** pero yo no disponía de él. Sin embargo, mi consejo es que no te detengas si te falta algo, a veces hay que improvisar y usar lo que tenemos, lo importante es crear. Posteriormente, debemos procurar tener los insumos recomendados y de calidad, porque esto eleva sustancialmente la calidad de nuestras piezas.
Las piedras, acrílicos, dijes, etc. depende de lo que quieras diseñar. Yo usé las piedras que tenía guardadas.
Bueno, ahora si... las 3 cosas básicas que te sirven para hacer tu Colección de Zarcillos:
1.- Argollas o aros para conectar las piezas
2.- Preparar las piedras con el Alambre
3.- Ganchos para colgar los zarcillos
Comencemos:
1.- Argollas o aros para conectar las piezas
Con nuestra pinza redonda, tomamos un lugar de la pinza para hacer el tamaño de la argolla, yo la uso como por la mitad. Tomamos el alambre sin cortar y comenzamos a enrollar.
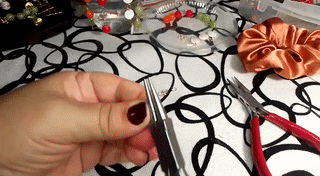
Debe verse así como un resorte. Lo vamos enrollando en la pinza, haciendo un poco de presión con nuestros dedos para que conserve su forma mientras lo hacemos.
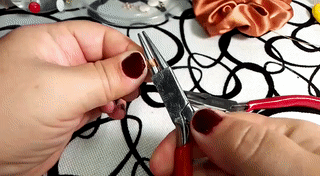
Luego lo sacamos de la pinza, y con nuestra Pinza de Corte, vamos cortando desde la punta hacia el siguiente arito, y ya se van desprendiendo nuestras argollas para conectar las piezas. Se ven hermosas.
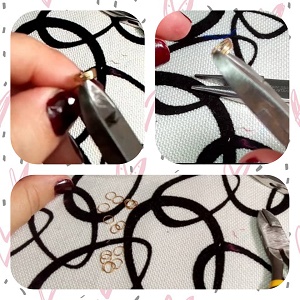
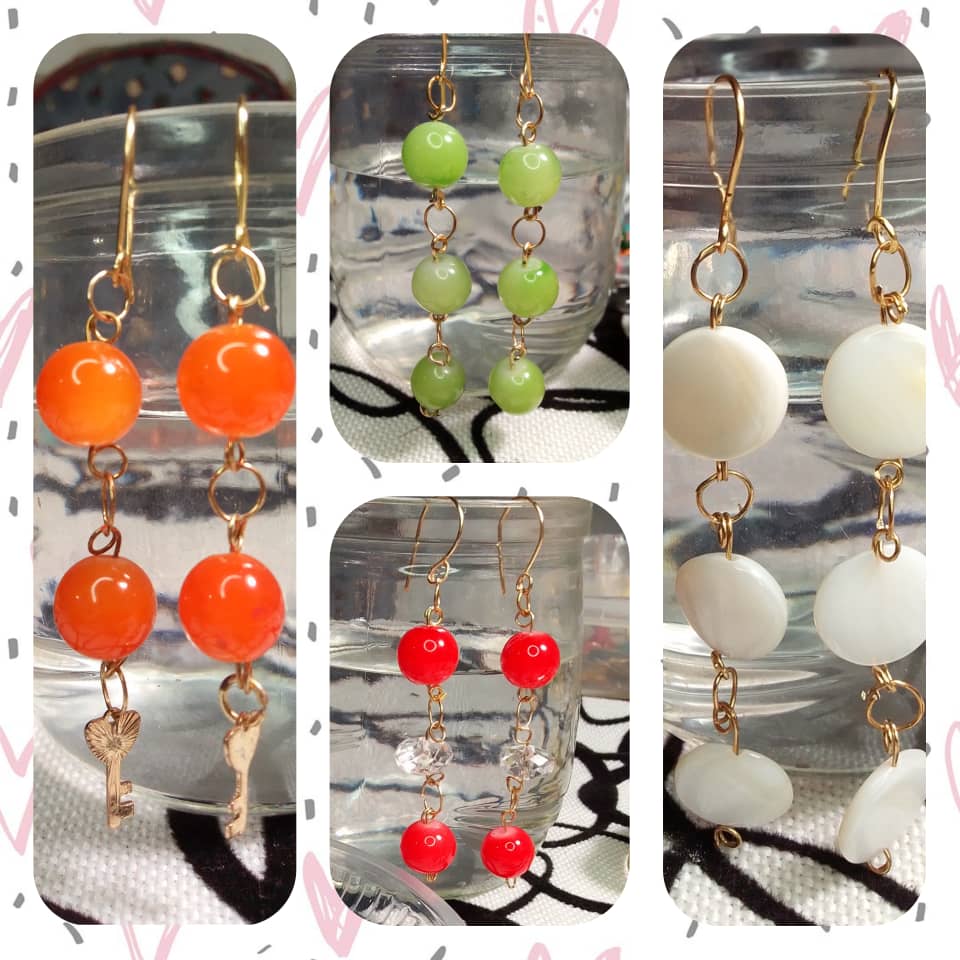
2.- Preparar las Piedras con el Alambre
Esto va a lo haremos con todas las piedras igual. Son pasos sencillos, ve esta secuencia con las piedras naranja:
- Con el alambre sin cortar, metemos la piedra
- Sacamos el borde del alambre y formamos un arito
- En el otro extremo corto el alambre tomando como referencia el espacio que ocupa mi dedo meñique.
- Hacemos un arito nuevamente con ese extremo.
Y listo, la pieza está preparada. Fíjate en esta otra secuencia con dos piedras rojas y una transparente, todo se hace igual:
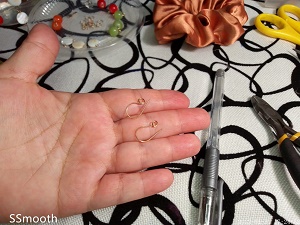
3.- Ganchos de Alambrismo (para colgar el zarcillo)
Corto dos pedazos de alambre de 4,5cms. Con mi pinza redonda formo un arito en uno de los extremos. Los dos deben quedar igual.
Luego con un mandril o si no tienes uno, utiliza un lapicero o un marcador delgado, colocar el alambre y rodeas el lapicero con el; así se formará la forma del gancho.
Es importante, que con la pinza plana doblemos un poquito el borde de la punta y también que le quitemos el filo con una lima o lija suave; para no lastimarnos al usarlo.
Bueno, llegamos a nuestro objetivo, tenemos los tres elementos para hacer nuestros zarcillos: Las argollas, Las Piedras preparadas y los Ganchos. Ahora que ya tenemos todo, tenemos que hacer que las cosas pasen... Vamos a armar los Diseños que tenemos en nuestra mente o imaginación.
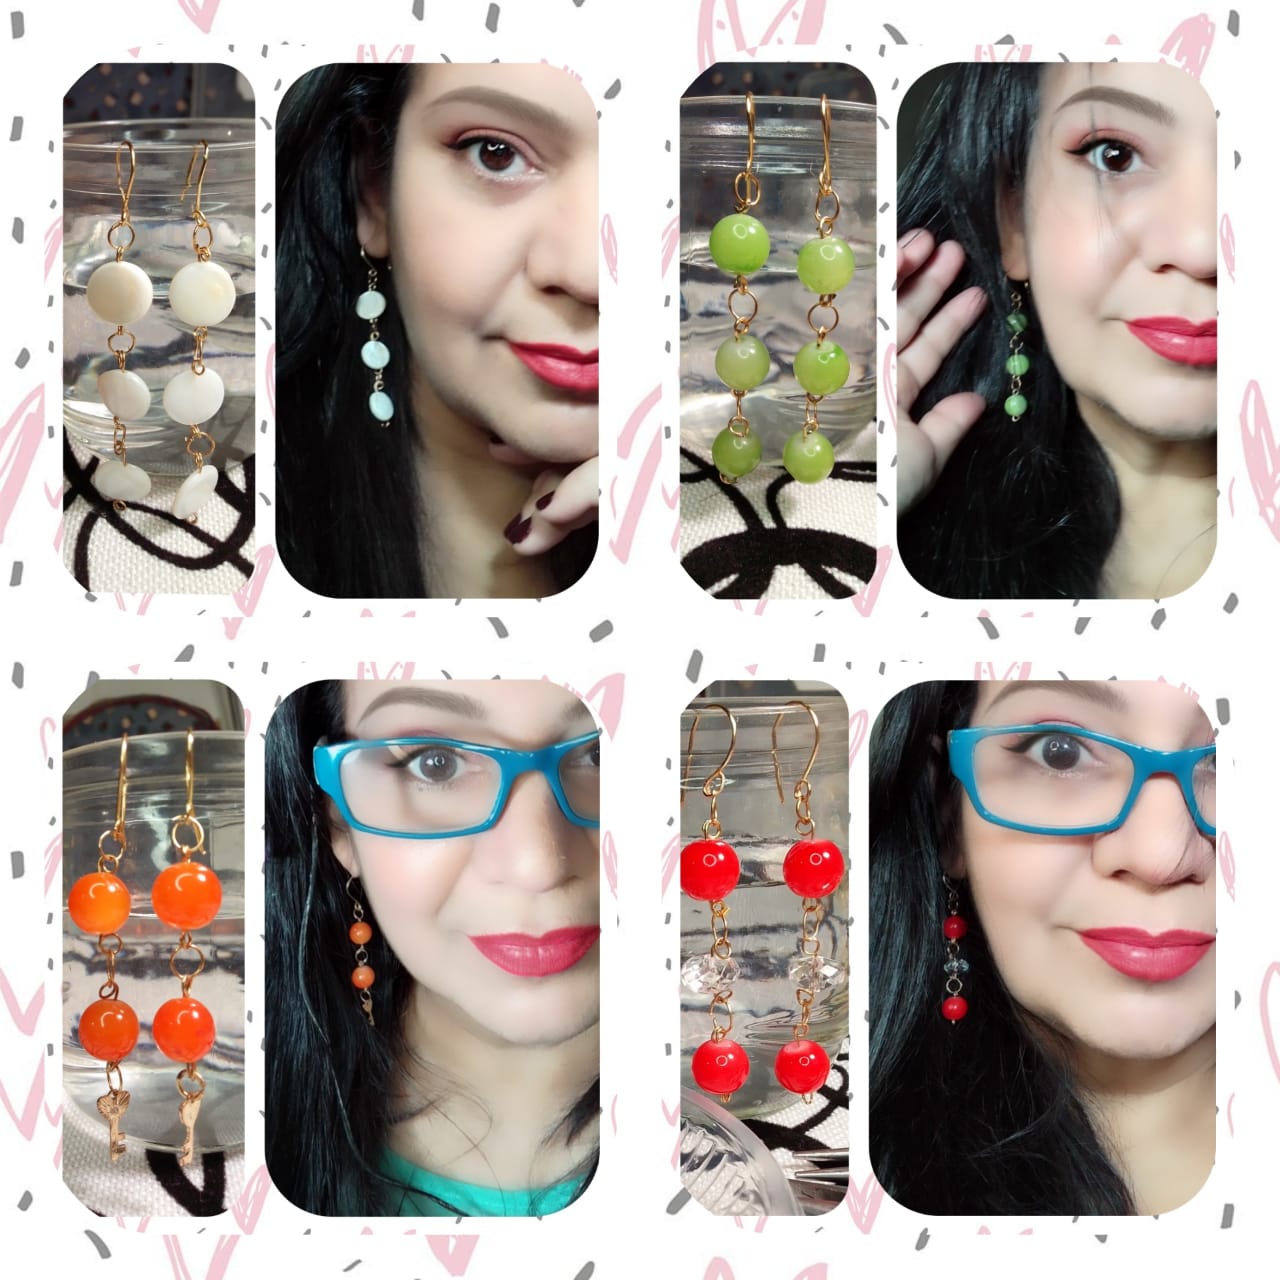
Arriba tienes el video del Armado del Diseño de los Zarcillos Verdes, son tres piedras mas argolla, lucen muy elegantes.
En realidad todos lucen muy bien.
Ahora te dejo un Collage de Apreciación de los Diseños de esta pequeña Colección para Principiantes, es hermoso:
Deseo que esta publicación te inspire a entrar al mundo del Alambrismo y el Diseño de Joyas Artesanales. Para hacer un curso sobre este tema se necesita mas estructura, mas tiempo, mas clases y practicas. Mi objetivo con esta publicación es que te animes y empieces con lo que puedas, y si descubres que te gusta y te interesa, puedas entonces tomar el siguiente paso.
Eventualmente, continuaré publicando mas de lo que hago sobre este y otros temas.
La publicación y video las realicé con Peakd y 3Speakd
Las fotos y videos con mi teléfono Smooth 6.5
Los collage con Photo Collage Maker
Para los gif utilicé ezgif.com
Traducción con el Traductor Google
Hello to the entire **Hive Blog Community.** That's right, in this post I show you 3 basic things, the first and the easiest so that from now on, you can make your First Collection Jewellery, with the **Alambrismo Technique,** which consists of manipulating the wire to create **Artisan Jewelry.**.
I learned the Wire Rope Technique several years ago, since I wanted to design my own fantasy pieces to combine with the different outfits to work or go for a walk.
In wire rope we do not use solder or glue; We only use our hands and tools to make the shapes of the wire and the stones, acrylics, charms, etc. that we need in the design that we want to create.
The basic tools that we will use are:
round clamp
flat clamp
Cutting pliers (like fabric scissors, you have to keep them hidden from everyone in the house, because they can damage it)
Silicone tweezers to straighten the wire
We must also have a file or sandpaper, to round the ends of the wire when required.
A pencil or pen that we will use instead of the Mandrel, which is a beautiful tool that I don't have yet.
The wire we need to create the designs I propose in this post is **20 Gauge Wire,** but I didn't have it. However, my advice is not to stop if you are missing something, sometimes you have to improvise and use what you have, the important thing is to create. Later, we must try to have the recommended and quality supplies, because this substantially raises the quality of our pieces.
Stones, acrylics, charms, etc. It depends on what you want to design. I used the stones that I had saved.
Well, now yes... the 3 basic things that help you to make your Tendrils Collection:
1.- Rings or hoops to connect the pieces
2.- Prepare the stones with the Wire
3.- Hooks to hang the earrings
Let's start:
1.- Rings or hoops to connect the pieces
With our round pliers, we take a place on the pliers to make the size of the ring, I use it in about half. We take the uncut wire and begin to wind.
It should look like a spring. We are rolling it in the clip, making a little pressure with our fingers so that it retains its shape while we do it.
Then we take it out of the clamp, and with our Cutting Clamp, we cut from the tip to the next earring, and our rings are coming off to connect the pieces. You look beautiful.
2.- Prepare the Stones with the Wire
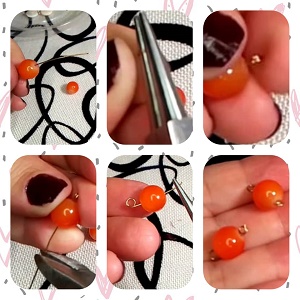
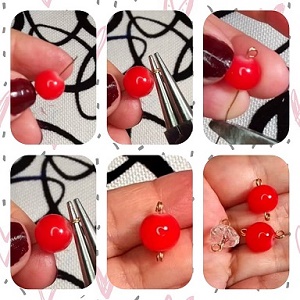
We will do this with all the stones the same. They are simple steps, see this sequence with the orange stones:
- With the wire uncut, we put the stone
- We remove the edge of the wire and form a ring
- At the other end I cut the wire taking as a reference the space occupied by my little finger.
- We make a ring again with that end.
And voila, the piece is ready. Look at this other sequence with two red stones and one transparent, everything is done the same:
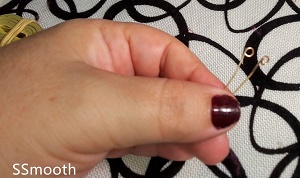
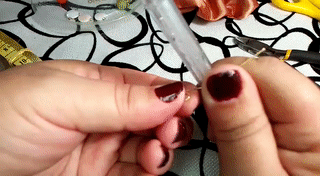
3.- Wire Hooks (to hang the tendril)
I cut two pieces of wire of 4.5cms. With my round pliers I form a ring at one end. Both should be the same.
Then with a mandrel or if you don't have one, use a pen or a thin marker, place the wire and surround the pen with it; this will form the shape of the hook.
It is important that with the flat pliers we bend the edge of the tip a little and also that we remove the edge with a file or soft sandpaper; so as not to hurt ourselves when using it.
Well, we reached our goal, we have the three elements to make our tendrils: The rings, The prepared Stones and the Hooks. Now that we have everything, we have to make things happen... Let's put together the Designs that we have in our mind or imagination.
Above you have the video of the Arming of the Green Tendrils Design, they are three stones plus a ring, they look very elegant.
Actually they all look really good.
Now I leave you a Collage of Appreciation of the Designs of this small Collection for Beginners, it is beautiful:
I hope that this publication inspires you to enter the world of Wire Rope and Handmade Jewelry Design. To do a course on this subject, more structure, more time, more classes and practices are needed. My goal with this post is to encourage you to start with what you can, and if you find that you like it and are interested in it, then you can take the next step.
Eventually, I will continue to post more of what I do on this and other topics.
I made the publication and video with Peakd and 3Speakd
The photos and videos with my phone Smooth 6.5
Collage them with Photo Collage Maker
For the gifs I used ezgif.com
Translation with Google Translate
Pinza redonda
Pinza plana
Pinza de corte (al igual que las tijeras de tela, tienes que tenerlas escondidas de todos en la casa, porque te la pueden dañar)
Pinza de silicón para alisar el alambre
También debemos disponer de una lima o lija, para redondear las puntas del alambre cuando se requiera.
Un lápiz o bolígrafo que usaremos en lugar del Mandril, que es una herramienta hermosa que aún no tengo.
El alambre que necesitamos para crear los diseños que propongo en esta publicación, es el **Alambre Calibre 20,** pero yo no disponía de él. Sin embargo, mi consejo es que no te detengas si te falta algo, a veces hay que improvisar y usar lo que tenemos, lo importante es crear. Posteriormente, debemos procurar tener los insumos recomendados y de calidad, porque esto eleva sustancialmente la calidad de nuestras piezas.
Las piedras, acrílicos, dijes, etc. depende de lo que quieras diseñar. Yo usé las piedras que tenía guardadas.
Bueno, ahora si... las 3 cosas básicas que te sirven para hacer tu Colección de Zarcillos:
1.- Argollas o aros para conectar las piezas
2.- Preparar las piedras con el Alambre
3.- Ganchos para colgar los zarcillos
Comencemos:
1.- Argollas o aros para conectar las piezas
Con nuestra pinza redonda, tomamos un lugar de la pinza para hacer el tamaño de la argolla, yo la uso como por la mitad. Tomamos el alambre sin cortar y comenzamos a enrollar.
Debe verse así como un resorte. Lo vamos enrollando en la pinza, haciendo un poco de presión con nuestros dedos para que conserve su forma mientras lo hacemos.
Luego lo sacamos de la pinza, y con nuestra Pinza de Corte, vamos cortando desde la punta hacia el siguiente arito, y ya se van desprendiendo nuestras argollas para conectar las piezas. Se ven hermosas.
2.- Preparar las Piedras con el Alambre
Esto va a lo haremos con todas las piedras igual. Son pasos sencillos, ve esta secuencia con las piedras naranja:
- Con el alambre sin cortar, metemos la piedra
- Sacamos el borde del alambre y formamos un arito
- En el otro extremo corto el alambre tomando como referencia el espacio que ocupa mi dedo meñique.
- Hacemos un arito nuevamente con ese extremo.
Y listo, la pieza está preparada. Fíjate en esta otra secuencia con dos piedras rojas y una transparente, todo se hace igual:
3.- Ganchos de Alambrismo (para colgar el zarcillo)
Corto dos pedazos de alambre de 4,5cms. Con mi pinza redonda formo un arito en uno de los extremos. Los dos deben quedar igual.
Luego con un mandril o si no tienes uno, utiliza un lapicero o un marcador delgado, colocar el alambre y rodeas el lapicero con el; así se formará la forma del gancho.
Es importante, que con la pinza plana doblemos un poquito el borde de la punta y también que le quitemos el filo con una lima o lija suave; para no lastimarnos al usarlo.
Bueno, llegamos a nuestro objetivo, tenemos los tres elementos para hacer nuestros zarcillos: Las argollas, Las Piedras preparadas y los Ganchos. Ahora que ya tenemos todo, tenemos que hacer que las cosas pasen... Vamos a armar los Diseños que tenemos en nuestra mente o imaginación.
Arriba tienes el video del Armado del Diseño de los Zarcillos Verdes, son tres piedras mas argolla, lucen muy elegantes.
En realidad todos lucen muy bien.
Ahora te dejo un Collage de Apreciación de los Diseños de esta pequeña Colección para Principiantes, es hermoso:
Deseo que esta publicación te inspire a entrar al mundo del Alambrismo y el Diseño de Joyas Artesanales. Para hacer un curso sobre este tema se necesita mas estructura, mas tiempo, mas clases y practicas. Mi objetivo con esta publicación es que te animes y empieces con lo que puedas, y si descubres que te gusta y te interesa, puedas entonces tomar el siguiente paso.
Eventualmente, continuaré publicando mas de lo que hago sobre este y otros temas.
La publicación y video las realicé con Peakd y 3Speakd
Las fotos y videos con mi teléfono Smooth 6.5
Los collage con Photo Collage Maker
Para los gif utilicé ezgif.com
Traducción con el Traductor Google
Hello to the entire **Hive Blog Community.** That's right, in this post I show you 3 basic things, the first and the easiest so that from now on, you can make your First Collection Jewellery, with the **Alambrismo Technique,** which consists of manipulating the wire to create **Artisan Jewelry.**.
I learned the Wire Rope Technique several years ago, since I wanted to design my own fantasy pieces to combine with the different outfits to work or go for a walk.
In wire rope we do not use solder or glue; We only use our hands and tools to make the shapes of the wire and the stones, acrylics, charms, etc. that we need in the design that we want to create.
The basic tools that we will use are:
round clamp
flat clamp
Cutting pliers (like fabric scissors, you have to keep them hidden from everyone in the house, because they can damage it)
Silicone tweezers to straighten the wire
We must also have a file or sandpaper, to round the ends of the wire when required.
A pencil or pen that we will use instead of the Mandrel, which is a beautiful tool that I don't have yet.
The wire we need to create the designs I propose in this post is **20 Gauge Wire,** but I didn't have it. However, my advice is not to stop if you are missing something, sometimes you have to improvise and use what you have, the important thing is to create. Later, we must try to have the recommended and quality supplies, because this substantially raises the quality of our pieces.
Stones, acrylics, charms, etc. It depends on what you want to design. I used the stones that I had saved.
Well, now yes... the 3 basic things that help you to make your Tendrils Collection:
1.- Rings or hoops to connect the pieces
2.- Prepare the stones with the Wire
3.- Hooks to hang the earrings
Let's start:
1.- Rings or hoops to connect the pieces
With our round pliers, we take a place on the pliers to make the size of the ring, I use it in about half. We take the uncut wire and begin to wind.
It should look like a spring. We are rolling it in the clip, making a little pressure with our fingers so that it retains its shape while we do it.
Then we take it out of the clamp, and with our Cutting Clamp, we cut from the tip to the next earring, and our rings are coming off to connect the pieces. You look beautiful.
2.- Prepare the Stones with the Wire
We will do this with all the stones the same. They are simple steps, see this sequence with the orange stones:
- With the wire uncut, we put the stone
- We remove the edge of the wire and form a ring
- At the other end I cut the wire taking as a reference the space occupied by my little finger.
- We make a ring again with that end.
And voila, the piece is ready. Look at this other sequence with two red stones and one transparent, everything is done the same:
3.- Wire Hooks (to hang the tendril)
I cut two pieces of wire of 4.5cms. With my round pliers I form a ring at one end. Both should be the same.
Then with a mandrel or if you don't have one, use a pen or a thin marker, place the wire and surround the pen with it; this will form the shape of the hook.
It is important that with the flat pliers we bend the edge of the tip a little and also that we remove the edge with a file or soft sandpaper; so as not to hurt ourselves when using it.
Well, we reached our goal, we have the three elements to make our tendrils: The rings, The prepared Stones and the Hooks. Now that we have everything, we have to make things happen... Let's put together the Designs that we have in our mind or imagination.
Above you have the video of the Arming of the Green Tendrils Design, they are three stones plus a ring, they look very elegant.
Actually they all look really good.
Now I leave you a Collage of Appreciation of the Designs of this small Collection for Beginners, it is beautiful:
I hope that this publication inspires you to enter the world of Wire Rope and Handmade Jewelry Design. To do a course on this subject, more structure, more time, more classes and practices are needed. My goal with this post is to encourage you to start with what you can, and if you find that you like it and are interested in it, then you can take the next step.
Eventually, I will continue to post more of what I do on this and other topics.
I made the publication and video with Peakd and 3Speakd
The photos and videos with my phone Smooth 6.5
Collage them with Photo Collage Maker
For the gifs I used ezgif.com
Translation with Google Translate
Show more
Tags :
Woo!
This creator can upvote comments using 3speak's stake today because they are a top performing creator!
Leave a quality comment relating to their content and you could receive an upvote
worth at least a dollar.
Their limit for today is $0!
Their limit for today is $0!
22 views
a year ago
$
7 views
2 years ago
$

3 views
a year ago
$

5 views
a year ago
$

18 views
a year ago
$
More Videos

1 views
2 years ago
$

1 views
8 months ago
$

14 views
a year ago
$

15 views
2 years ago
$

3 views
2 years ago
$

4 views
a year ago
$

2 views
2 years ago
$

17 views
3 years ago
$

8 views
2 months ago
$

10 views
7 months ago
$

4 views
3 years ago
$

7 views
2 years ago
$

22 views
4 years ago
$

29 views
2 years ago
$
6 views
a year ago
$

30 views
2 years ago
$

0 views
3 years ago
$

28 views
a year ago
$

1 views
3 years ago
$

6 views
3 years ago
$

4 views
3 years ago
$

6 views
a month ago
$

19 views
2 years ago
$
Comments:
Reply:
To comment on this video please connect a HIVE account to your profile: Connect HIVE Account