[ESP-ENG] Pulsera Tejida Paso a paso / Woven Bracelet step by step (Video)
4
About :
Hola amigos de la comunidad Hive Diy!!!
Me tome unos días para descansar y por eso no había publicado por acá. Hoy les traigo un tutorial para realizar una linda pulsera tejida y súper fácil de hacer. En esta ocasión, utilicé cordón piel de serpiente las hice para dama pero este tejido puede hacerse con cordones de cuero o con cordón paracord para un modelo deportivo. Sí, no tienen los materiales y quieren practicar pueden hacerlo con cordones de zapatos.
Para su realización vamos a necesitar:
2.50 metros de Cordón piel de serpiente color amarillo fosforescente
50 centímetros de cordón piel de serpiente color fucsia y turquesa
Tijeras
Regla
Encendedor
Hello friends of the Hive diy community!!!!
I took a few days to rest and that's why I had not posted here. Today I bring you a tutorial to make a nice woven bracelet and super easy to make. This time, I used snakeskin cord, I made them for ladies but this weaving can be done with leather cords or with paracord cord for a sporty model. If you don't have the materials and want to practice, you can do it with shoelaces.
For its realization we will need:
2.50 meters of phosphorescent yellow snakeskin cord.
50 centimeters of fuchsia and turquoise snakeskin lace
Scissors
Ruler
Lighter
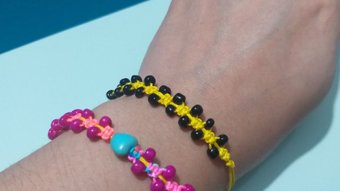
Para comenzar vamos a medir del cordón amarillo 60 cm y vamos a doblar a la mitad y hacer un nudo sencillo dejando 2 cm para lo que será nuestro cierre o broche (ver imagen).
To begin we will measure 60 cm of the yellow cord and we will fold it in half and make a simple knot leaving 2 cm for what will be our clasp or brooch (see image).
Cortamos 50 cm de cordón turquesa y amarillo y una vez los tengamos cortados lo unimos a una cartón con un gancho (ver imagen).
We cut 50 cm of turquoise and yellow cord and once we have them cut we attach it to a cardboard with a hook (see image).
Comenzamos a tejer con el cordón turquesa formamos una S, la cual va pasando sobre los dos cordones del centro y con el cordón amarillo del lado derecho lo pasamos por encima de la S y por debajo del cordón del centro (ver imágenes)
We begin to weave with the turquoise cord we form an S, which goes over the two cords in the center and with the yellow cord on the right side we pass it over the S and under the cord in the center (see images).
El extremo del cordón amarillo lo introducimos por el agujero que se forma de la S del lado derecho (ver imágenes) .
The end of the yellow cord is inserted through the hole formed by the S on the right side (see images).
Ajustamos bien y repetimos el procedimiento formando una S con el cordón turquesa, que va pasando sobre los dos cordones del centro y con el cordón amarillo del lado derecho lo pasamos por encima de la S y por debajo del cordón del centro. El extremo del cordón amarillo lo introducimos por el agujero que se forma de la S del lado derecho (ver imágenes).
We adjust well and repeat the procedure forming an S with the turquoise cord, passing it over the two cords of the center and with the yellow cord on the right side we pass it over the S and under the cord of the center. The end of the yellow cord is inserted through the hole formed by the S on the right side (see images).
Como siempre les dejaré un video para que puedan ver como es el tejido.
Van repitiendo el procedimiento anterior hasta que hayan completado el contorno de su muñeca; en este caso 17 centímetros (Ver imágenes).
As usual I will leave you a video so you can see how the weaving is.
Repeat the above procedure until you have completed the outline of your wrist; in this case 17 centimeters (See images).
Luego, cortan el cordón sobrante de los extremos queman las puntas con el encendedor para que quede más prolijo (ver imagen).
Then, cut the excess cord from the ends and burn the ends with a lighter to make it neater (see image).
Para el broche, van hacer un nudo sencillo con las dos puntas del cordón central (ver imágenes)
For the brooch, they will make a simple knot with the two ends of the central cord (see images).
Si es necesario, cortan lo que les quede sobrante del cordón y también pueden hacer un doble nudo. Y Lista nuestra pulsera!
If necessary, cut off the excess cord and make a double knot. And our bracelet is ready!
Como ven es muy sencilla de realizar, pueden combinar colores o cordones, para hombres queda excelente en cuero o con cordón paracord. En otro post les hare algunos modelos para caballeros.
¡Cualquier duda pueden realizarla en los comentarios!!
Las fotografías y video fueron tomados por mi.
As you can see it is very easy to make, you can combine colors or cords, for men it is excellent in leather or with paracord cord. In another post I will make some models for men.
Any doubt you can ask in the comments!!!
The pictures and video were taken by me.
Show more
Tags :
Woo!
This creator can upvote comments using 3speak's stake today because they are a top performing creator!
Leave a quality comment relating to their content and you could receive an upvote
worth at least a dollar.
Their limit for today is $0!
Their limit for today is $0!

3 views
9 months ago
$
[ESP- ENG] Como hacer Pulseras con tejido macramé y mostacillas / How to make bracelets with macramé
11 views
a year ago
$
2 views
11 months ago
$

3 views
2 years ago
$
6 views
a year ago
$
More Videos

2 views
7 months ago
$

1 views
2 years ago
$

22 views
a year ago
$

13 views
a year ago
$

37 views
a year ago
$

3 views
a year ago
$

AFRI-TUNES WEEK #8 || AFROBEAT FREESTYLE AND IMPROVISATION (In the Style of Felá and Burna Boy) | By
18 views
2 years ago
$

5 views
10 months ago
$

16 views
3 years ago
$

11 views
2 years ago
$

20 views
6 days ago
$

7 views
a year ago
$

11 views
4 years ago
$

14 views
2 years ago
$

12 views
2 days ago
$

7 views
a year ago
$

1 views
4 months ago
$

9 views
2 years ago
$

10 views
a year ago
$

19 views
a year ago
$

18 views
a year ago
$
1 views
2 years ago
$

7 views
2 months ago
$

23 views
2 years ago
$
Comments:
Reply:
To comment on this video please connect a HIVE account to your profile: Connect HIVE Account