Maquillaje Lollipop - MakeUp Lollipop [ESP-ENG]
12
About :
Los colores neón son sin duda una tendencia que nos encanta y que nunca pasan de moda, ideales para fiestas y eventos, donde tu mirada será protagonista. Así que te invito a que te atrevas a utilizar estas tonalidades y combinarlas sin miedo.
Aquí en este video les mostraré mi maquillaje llamado Lollipop, me encanta sumergirme en el mundo de los caramelos además que los colores me atrapan y me hipnotizan.

Cosméticos a utilizar:
✔️ Sombras Neón de la marca Salomé
✔️ Primer marca Amuse 14k gold
✔️ Base en crema marca Mac
✔️ Corrector en crema de Salomé n. 2
✔️ Corrector en crema de Salomé n. 1.50
✔️ Paleta en crema óleo tonalidad amarillo
✔️ Polvo compacto Naylen n.2
✔️ Pincel angular para ojos
✔️ Brocha angular para rostro
✔️ Pincel para difuminar ojos
✔️ Pincel plano pequeño
✔️ Brocha angular para difuminar
✔️ Esponja para difuminar
✔️ Pincel para delinear ojos
✔️ Pincel Abanico
✔️ Iluminador L'oréal Paris
✔️ Pestañas
✔️ Pega Duo
✔️ Pedrería
Tutorial

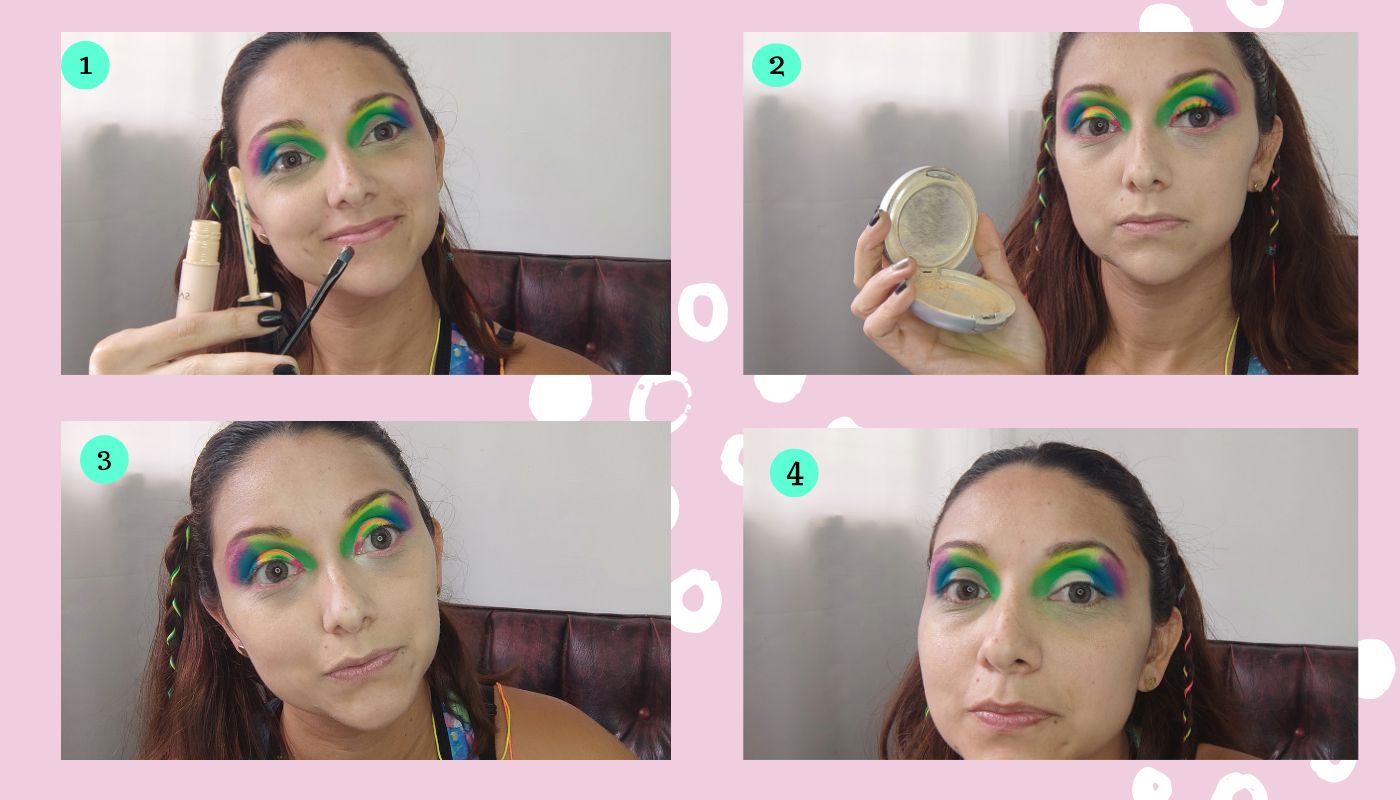
Lo primero que debemos hacer es hidratar nuestro rostro con una crema, utilicé la marca Living que es para todo tipo de piel, adicional apliqué el primer de la marca Amuse Gold es excelente para cubrir los poros en la zona T del rostro. El corrector de la marca salomé sub-tono amarillo es ideal para las ojeras con tonalidad moradas, luego apliqué el corrector salomé según mi tonalidad de piel. Es importante aplicarlo en los párpados para que las sombras pigmenten bien, asi que para este procedimiento utilicé una brocha lengua de gato.
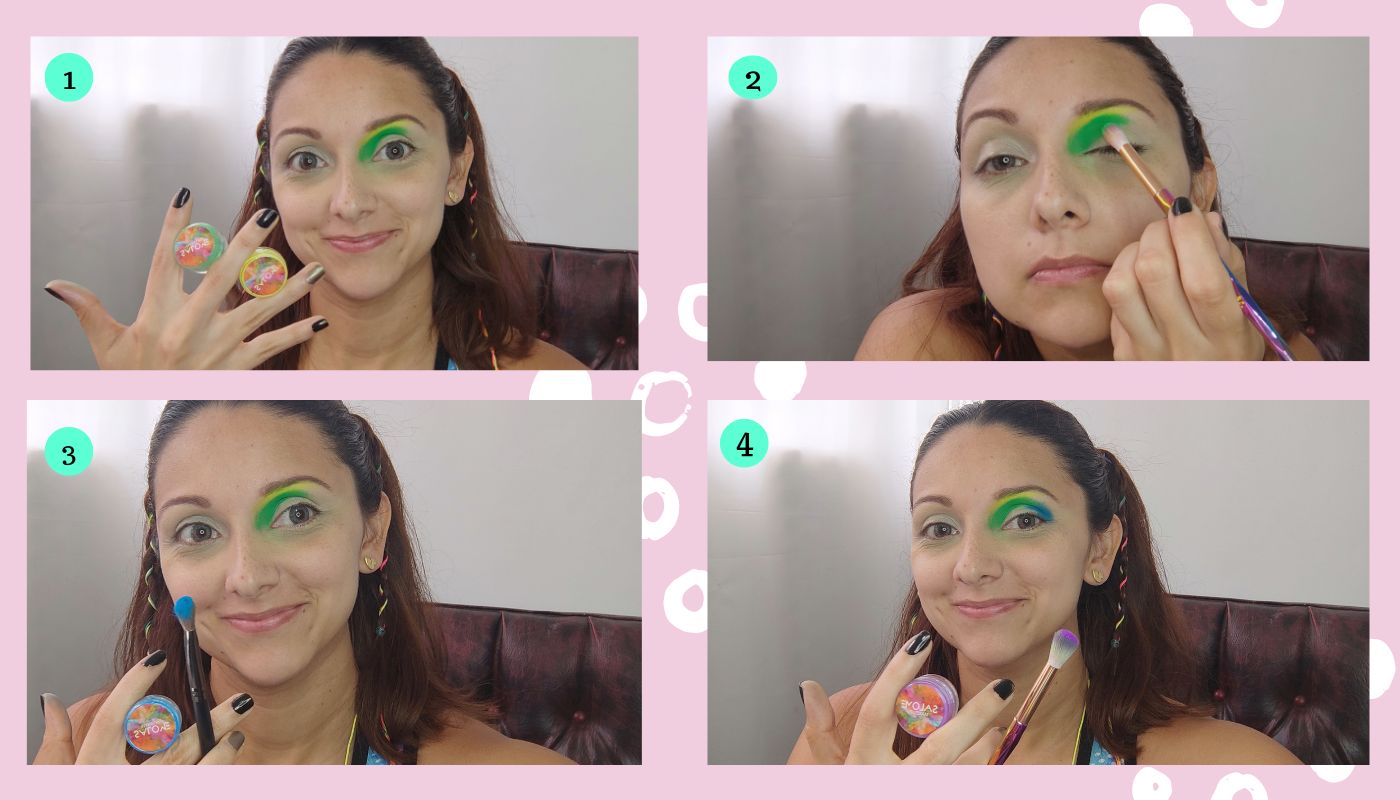
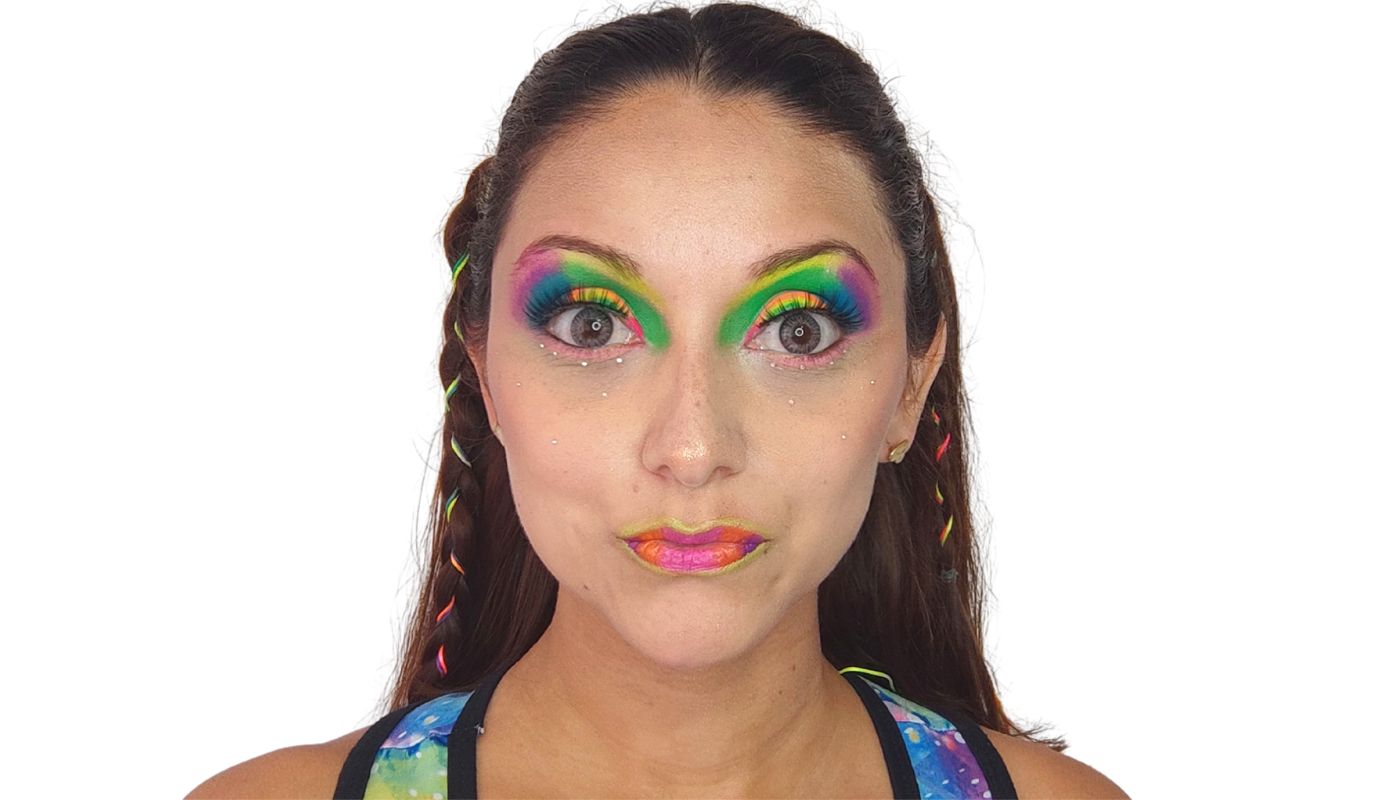
Apliqué sombras Neón con un pincel para difuminar, comencé con el tono verde desde el lagrimal subiendo por la cuenca, luego amarillo en el párpado fijo, azul por la v externa del ojo. es importa difuminar muy bien con una brocha limpia.
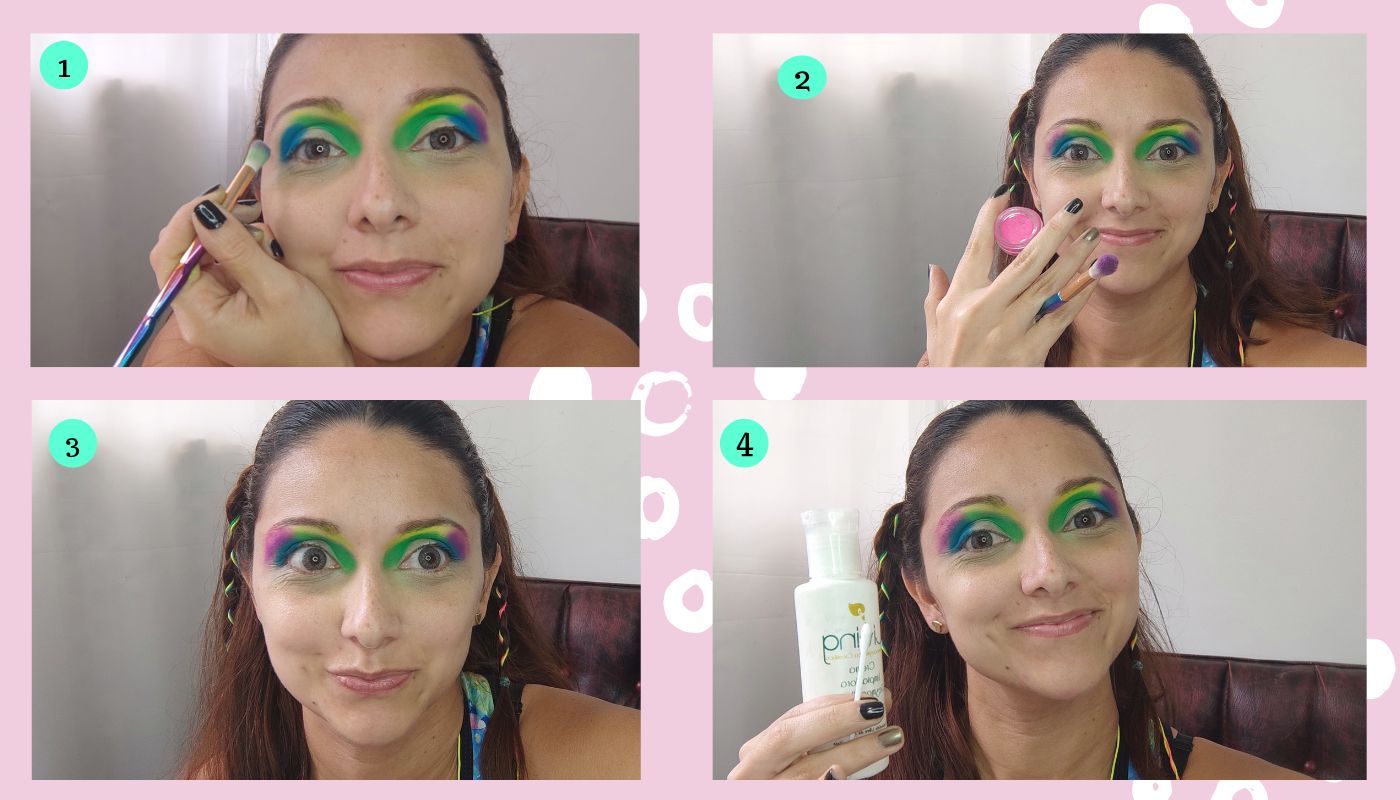
Continue con la sombra morada la cual apliqué en el párpado fijo, justo en el extremo del ojo, finalicé las tonalidades con el fucsia que apliqué en el arco de cejas, procedí a retirar los restos de sombras que quedaron en el párpado móvil con un desmaquillante muy bueno de la marca living.
El próximo paso que realicé fue aplicar corrector en el párpado móvil con una brocha lengua de gato pequeña, fui aplicando con mucho cuidado, este paso es para empezar a maquillar con las demás tonalidades los párpados móviles, comencé con el naranja, es importante tener un pincel de punta fina para tener control.
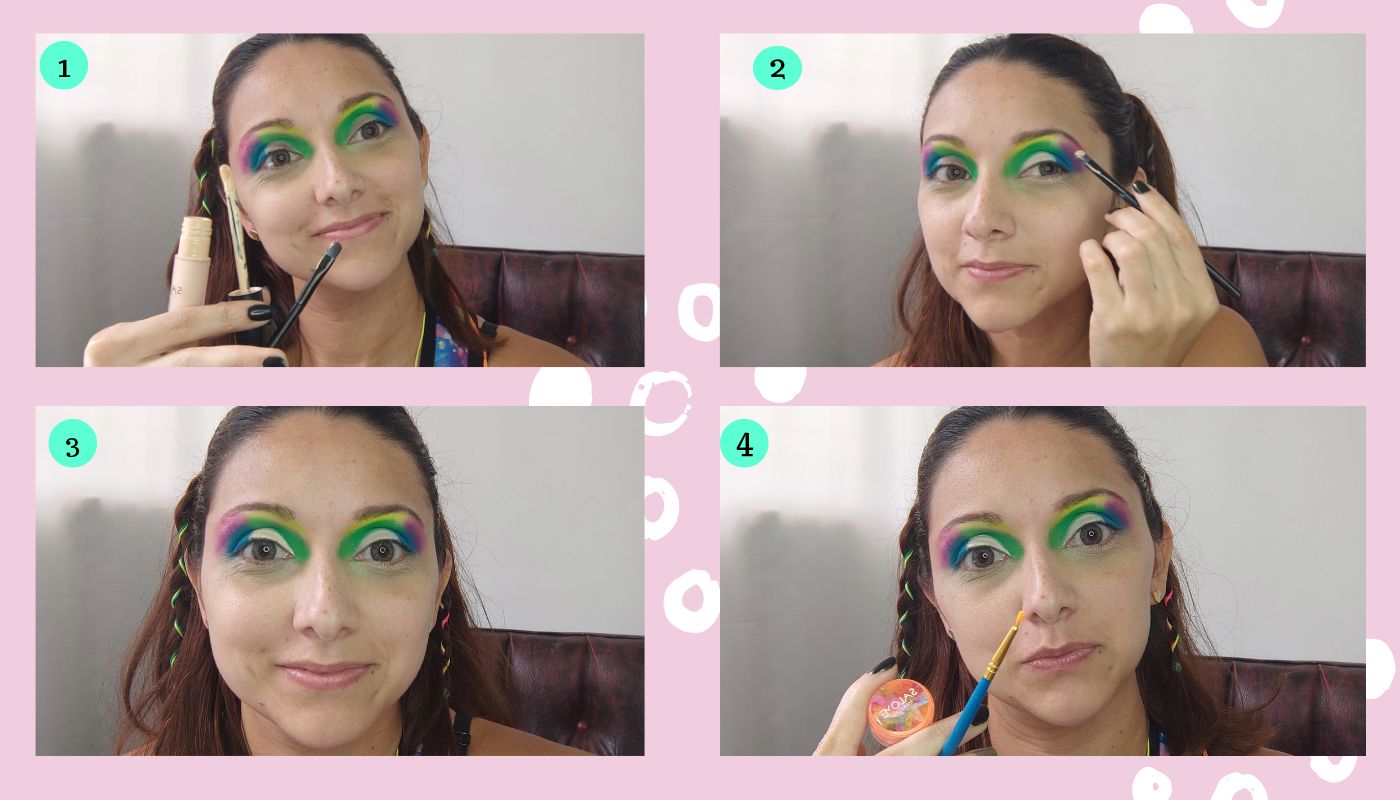
Es importante cubrir nuestras ojeras y quitar todo el resto de sombra que cayó en nuestro rostro, luego aplicamos polvo compacto del color de nuestra piel con una brocha suave hasta que quede bien sellada.
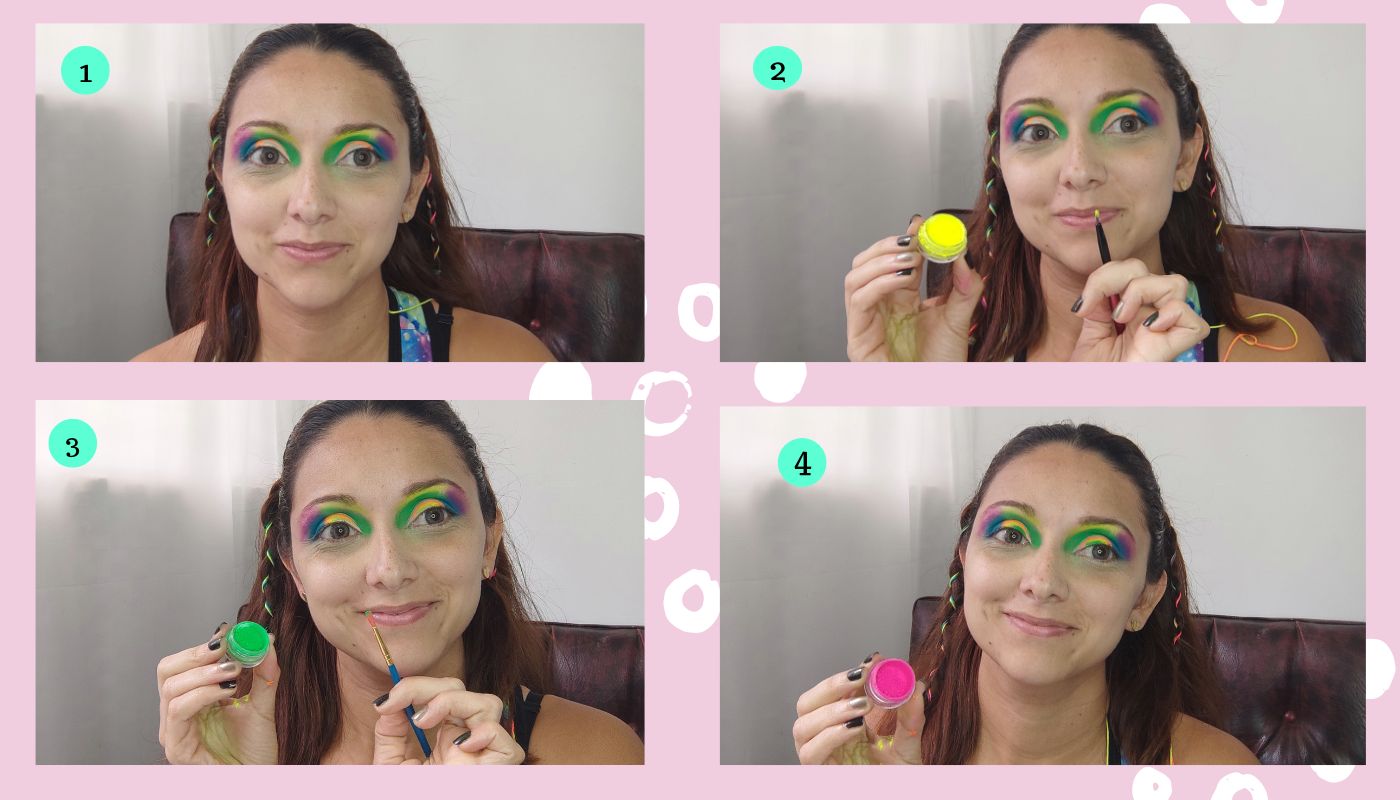
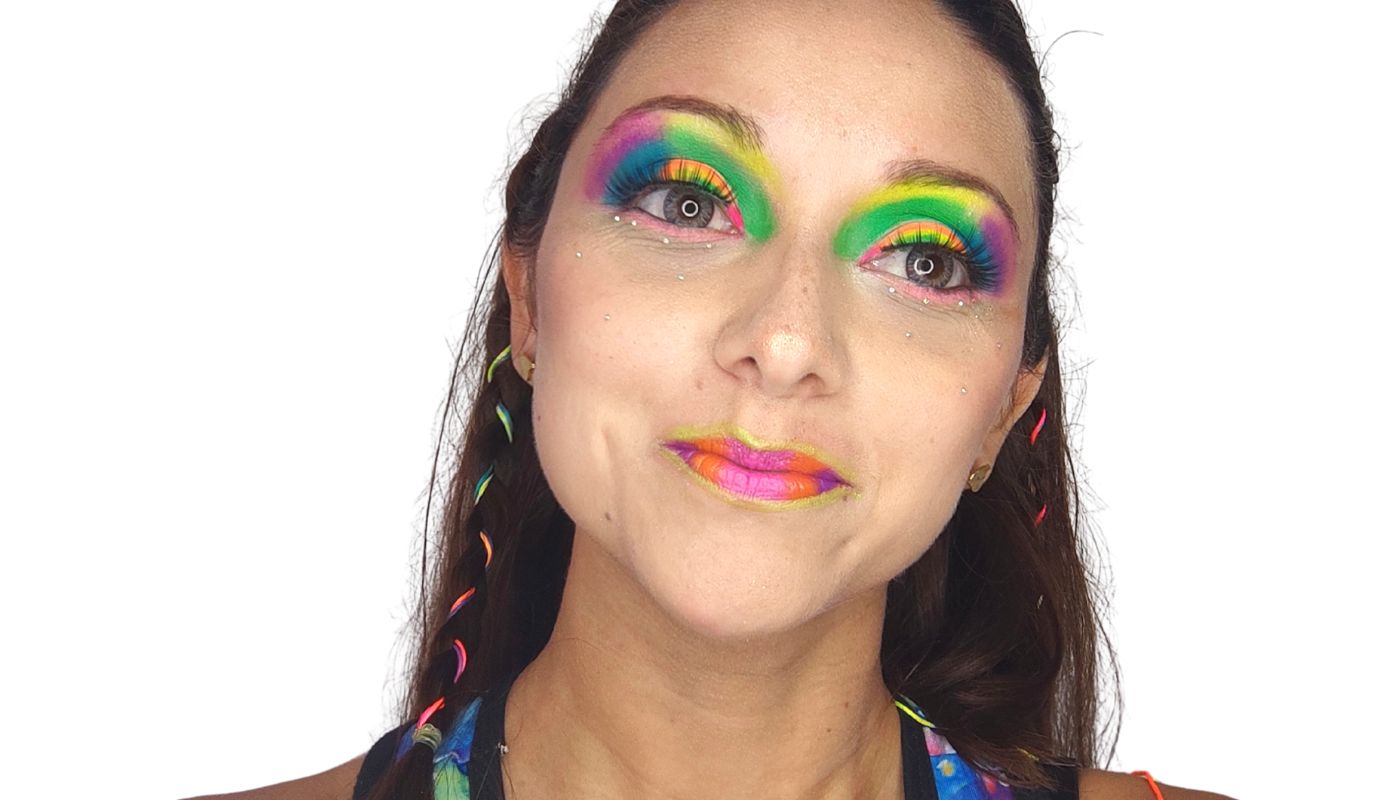
Seguidamente apliqué amarillo, luego verde y por ultimo fucsia, con mucho cuidado fui colocando las tonalidades hasta terminar el color cerca de la linea de pestaña. Adicional apliqué sombra de tonalidad rosa en la linea inferior de pestaña.
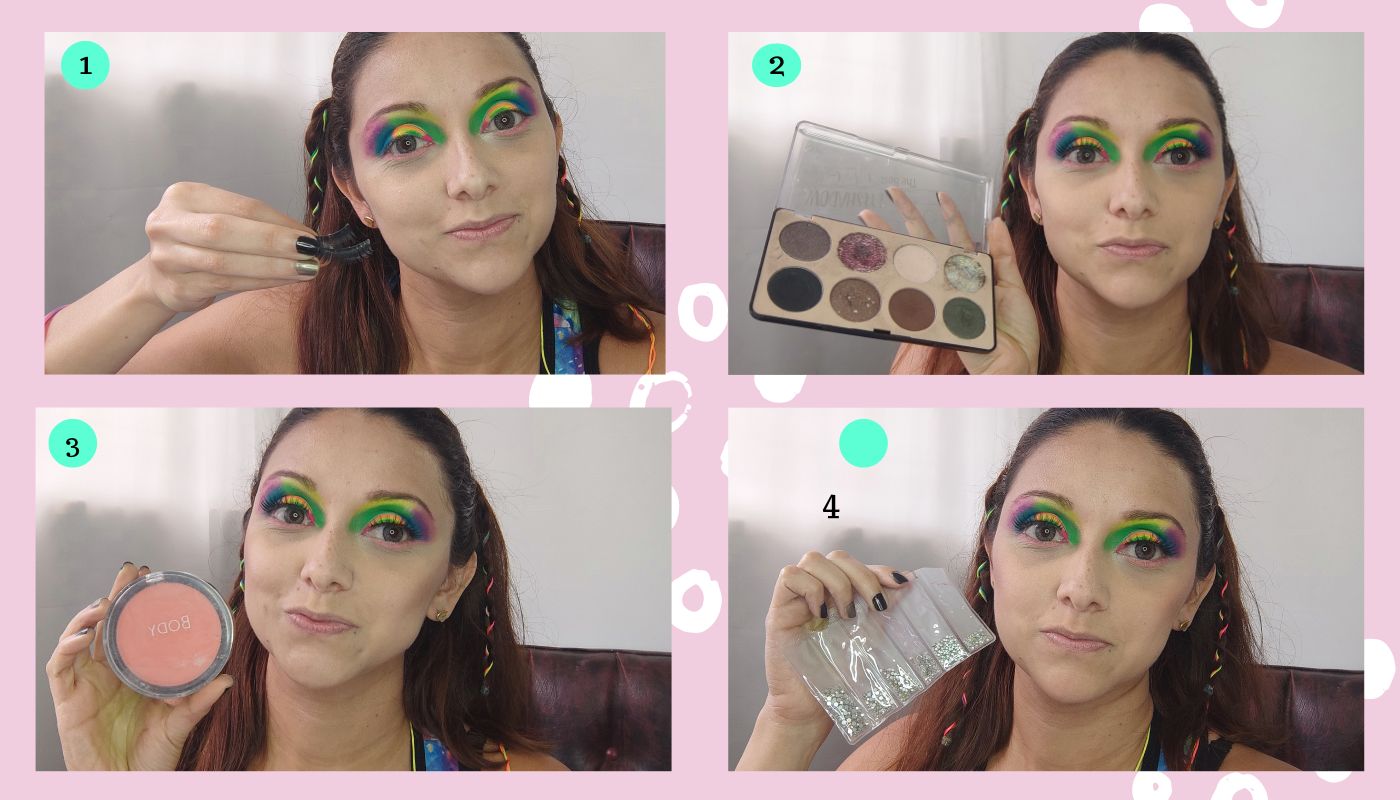
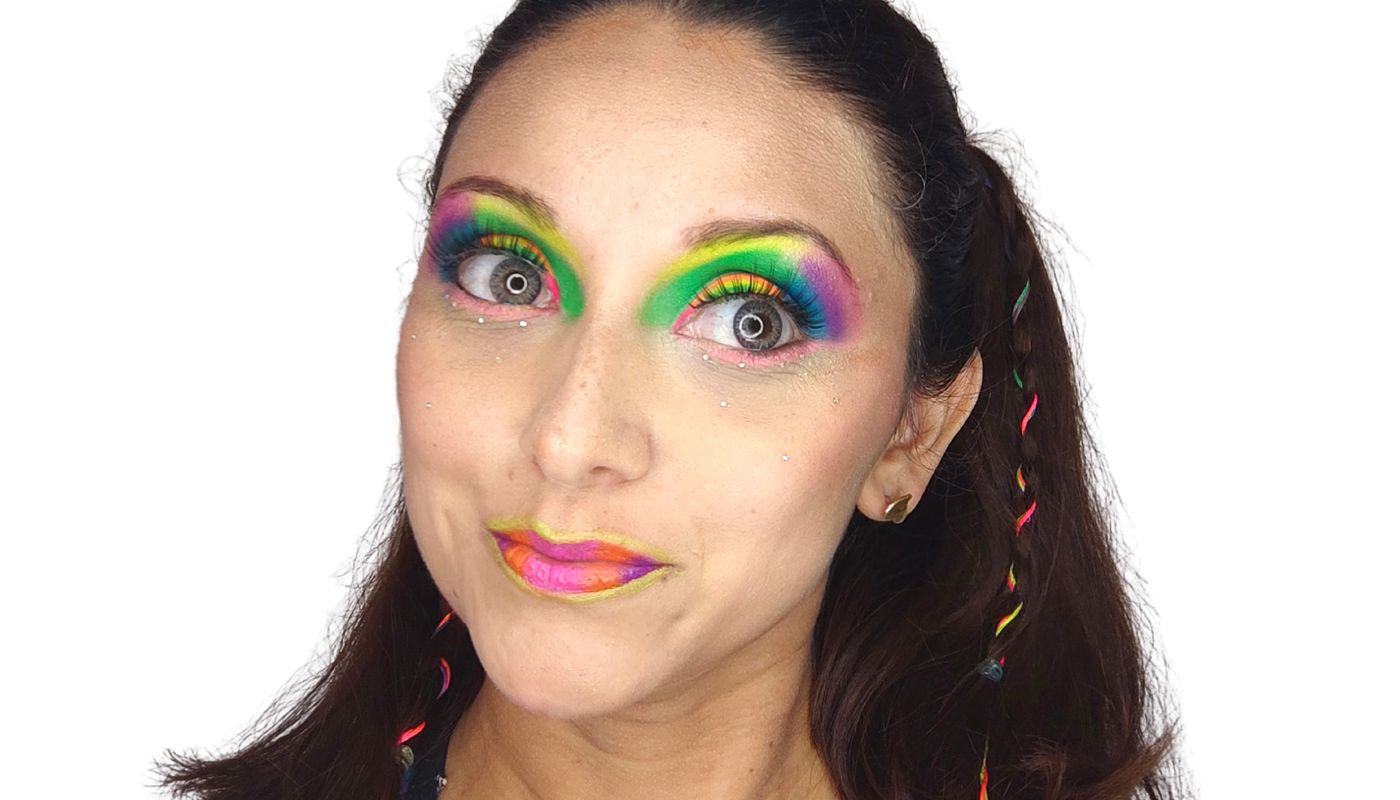
Coloqué mis pestañas corridas, con la sombra marrón realicé un contorno que comienza desde abajo de los pómulos hacia las orejas, justo donde esta el hueso lateral, luego apliqué rubor por encima del contorno, utilicé la pega duo transparente para pegar la pedrería debajo de mis ojos. Yo utilicé la parte de una punta del pincel, pero si posees un lápiz de cera es magnifico. En el video pueden visualizar como se realizó.
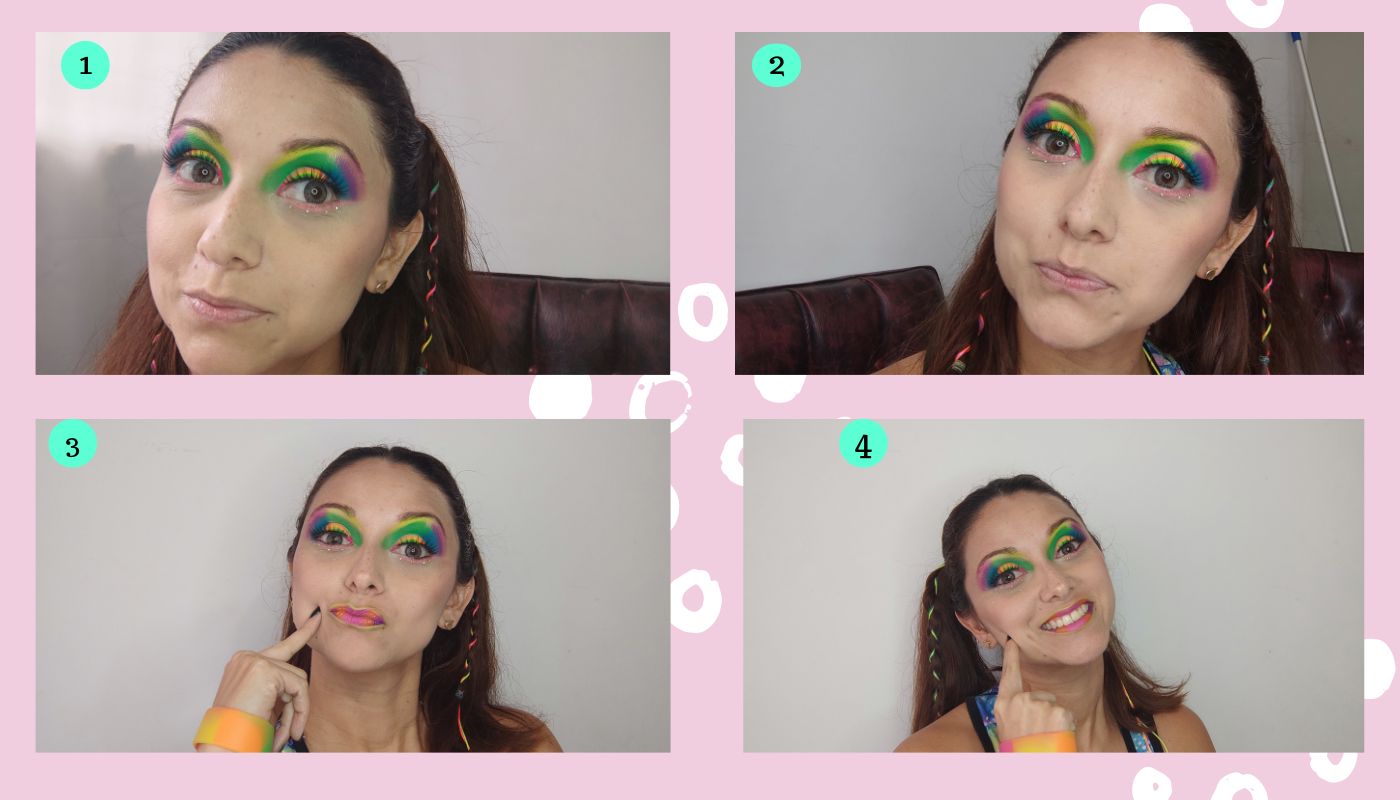
Finalmente y para darle un toque final, pinté mis labios, con la paleta de óleo en crema y utilicé colores de la paleta óleo, morado claro, morado oscuro, naranja, en el borde coloqué amarillo neón. Me encanta utilizar iluminador L'oréal Paris es excelente para darle un toco de brillo a nuestro rostro, se debe aplicar en el arco de cejas, pómulos, punta de la nariz, arco de cupido.
𝘚𝘦𝘱𝘢𝘳𝘢𝘥𝘰𝘳 𝘺 𝘣𝘢𝘯𝘯𝘦𝘳: 𝘥𝘪𝘴𝘦ñ𝘢𝘥𝘰 𝘱𝘰𝘳 @𝘢𝘺𝘭𝘦𝘦𝘯𝘳 𝘦𝘯 𝘊𝘢𝘯𝘷𝘢 || 𝘾𝙤𝙡𝙡𝙖𝙜𝙚: 𝙧𝙚𝙖𝙡𝙞𝙯𝙖𝙙𝙤 𝙚𝙣 𝘊𝘢𝘯𝘷𝘢 || 𝘐𝘮á𝘨𝘦𝘯𝘦𝘴: 𝘗𝘳𝘰𝘱𝘪𝘢𝘴 𝘦𝘥𝘪𝘵𝘢𝘥𝘢𝘴 𝘦𝘯 𝘊𝘢𝘯𝘷𝘢 || 𝘍𝘰𝘵𝘰𝘨𝘳𝘢𝘧𝘪𝘢 𝘵𝘰𝘮𝘢𝘥𝘢 𝘱𝘰𝘳: @𝘢𝘺𝘭𝘦𝘦𝘯𝘳 𝘶𝘵𝘪𝘭𝘪𝘻𝘢𝘯𝘥𝘰 𝘶𝘯 𝘢𝘳𝘰 𝘥𝘦 𝘭𝘶𝘻 || 𝘛𝘳𝘢𝘥𝘶𝘤𝘵𝘰𝘳: 𝘋𝘦𝘦𝘱𝘓 || 𝘝𝘪𝘥𝘦𝘰 𝘦𝘥𝘪𝘵𝘢𝘥𝘰 𝘦𝘯 𝘐𝘯𝘴𝘩𝘰𝘵 ||𝘔ú𝘴𝘪𝘤𝘢: 💥MUSICA Sin Copyright para Tutoriales de Maquillaje 💋 Libres De Derechos De Autor 💯%| ANAIDMAKEUPS || 𝘓𝘰𝘤𝘢𝘭𝘪𝘻𝘢𝘤𝘪ó𝘯: 𝘌𝘯 𝘮𝘪 𝘢𝘱𝘢𝘳𝘵𝘢𝘮𝘦𝘯𝘵𝘰 𝘶𝘣𝘪𝘤𝘢𝘥𝘰 𝘦𝘯 𝘊𝘢𝘳𝘢𝘤𝘢𝘴-𝘝𝘦𝘯𝘦𝘻𝘶𝘦𝘭𝘢.
ℕ𝕆𝕎 𝕀ℕ 𝔼ℕ𝔾𝕃𝕀𝕊ℍ
ℕ𝕆𝕎 𝕀ℕ 𝔼ℕ𝔾𝕃𝕀𝕊ℍ
Neon colors are undoubtedly a trend that we love and never go out of fashion, ideal for parties and events, where your look will be the protagonist. Así que te invito a que te atrevas a utilizar estas tonalidades y combinarlas sin miedo.
Here in this video I will show you my makeup called Lollipop, I love to immerse myself in the world of candy and the colors catch me and hypnotize me.
Cosmetics to be used:
✔️ Salomé brand Neon Shadows
✔️ Amuse brand primer 14k gold
✔️ Cream foundation brand Mac
✔️ Salome cream concealer n. 2
✔️ Salomé cream concealer n. 1.50
✔️ Oil cream palette yellow shade.
✔️ Naylen compact powder n.2
✔️ Angled Eye Brush
✔️ Angled Face Brush
✔️ Eye Blending Brush
✔️ Small Flat Brush
✔️ Smudge Brush
✔️ Blending Sponge
✔️ Eye liner brush
✔️ Fan brush
✔️ Illuminator L'oréal Paris
✔️ Eyelashes
✔️ Duo Paste
✔️ Rhinestones
Tutorial
The first thing we must do is moisturize our face with a cream, I used the Living brand which is for all skin types, in addition I applied the Amuse Gold primer which is excellent to cover the pores in the T-zone of the face. The Salome yellow undertone concealer is ideal for dark circles under the eyes with purple tones, then I applied the Salome concealer according to my skin tone. It is important to apply it on the eyelids so that the shadows pigment well, so for this procedure I used a cat tongue brush.
I applied Neon shadows with a blending brush, I started with the green shade from the tear trough up to the eye socket, then yellow on the fixed eyelid, blue on the outer corner of the eye. it is important to blend very well with a clean brush.
Continue with the purple shadow which I applied on the fixed eyelid, just at the end of the eye, I finished the shades with the fuchsia which I applied on the eyebrow arch, I proceeded to remove the remains of shadows that remained on the mobile eyelid with a very good makeup remover of the brand living.
The next step I did was to apply concealer on the mobile eyelid with a small cat tongue brush, I applied it very carefully, this step is to start applying the other shades on the mobile eyelids, I started with orange, it is important to have a fine tip brush to have control.
It is important to cover our dark circles and remove all the rest of the shadow that fell on our face, then we apply compact powder of the color of our skin with a soft brush until it is well sealed.
Next I applied yellow, then green and finally fuchsia, carefully placing the shades until I finished the color near the lash line. Additionally I applied pink shadow on the lower lash line.
I placed my eyelashes, with the brown shadow I made a contour starting from below the cheekbones towards the ears, just where the lateral bone is, then I applied blush on top of the contour, I used the transparent duo glue to stick the rhinestones under my eyes. I used the tip part of the brush, but if you have a wax pencil it's great. In the video you can see how it was done.
Finally and to give it a final touch, I painted my lips, with the oil cream palette and used colors from the oil palette, light purple, dark purple, orange, on the edge I placed neon yellow. I love to use L'oréal Paris illuminator is excellent to give a touch of brightness to our face, it should be applied in the arch of eyebrows, cheekbones, tip of the nose, cupid's bow.
𝘚𝘦𝘱𝘢𝘳𝘢𝘵𝘰𝘳 𝘢𝘯𝘥 𝘉𝘢𝘯𝘯𝘦𝘳 : 𝘥𝘪𝘴𝘦ñ𝘢𝘥𝘰 𝘱𝘰𝘳 @𝘢𝘺𝘭𝘦𝘦𝘯𝘳 𝘢𝘵 𝘊𝘢𝘯𝘷𝘢 || 𝘾𝙤𝙡𝙡𝙖𝙜𝙚: 𝘮𝘢𝘥𝘦 𝘢𝘵 𝘊𝘢𝘯𝘷𝘢](𝘩𝘵𝘵𝘱𝘴://𝘸𝘸𝘸𝘸.𝘤𝘢𝘯𝘷𝘢.𝘤𝘰𝘮/) || 𝘐𝘮𝘢𝘨𝘦𝘴: 𝘖𝘸𝘯 𝘦𝘥𝘪𝘵𝘦𝘥 𝘢𝘵 𝘊𝘢𝘯𝘷𝘢 || 𝘗𝘩𝘰𝘵𝘰 𝘢𝘯𝘥 𝘷𝘪𝘥𝘦𝘰 𝘵𝘢𝘬𝘦𝘯 𝘣𝘺 @𝘢𝘺𝘭𝘦𝘦𝘯𝘳 𝘶𝘴𝘪𝘯𝘨 𝘢 𝘭𝘪𝘨𝘩𝘵 𝘳𝘪𝘯𝘨 || 𝘛𝘳𝘢𝘯𝘴𝘭𝘢𝘵𝘰𝘳: 𝘋𝘦𝘦𝘱𝘓 || 𝘝𝘪𝘥𝘦𝘰 𝘦𝘥𝘪𝘵𝘦𝘥 𝘢𝘵 𝘐𝘯𝘴𝘩𝘰𝘵 ||𝘔𝘶𝘴𝘪𝘤: 💥MUSICA Sin Copyright para Tutoriales de Maquillaje 💋 Libres De Derechos De Autor 💯%| ANAIDMAKEUPS || 𝘓𝘰𝘤𝘢𝘵𝘪𝘰𝘯: 𝘐𝘯 𝘮𝘺 𝘢𝘱𝘢𝘳𝘵𝘮𝘦𝘯𝘵 𝘭𝘰𝘤𝘢𝘵𝘦𝘥 𝘢𝘵 𝘊𝘢𝘳𝘢𝘤𝘢𝘴-𝘝𝘦𝘯𝘦𝘻𝘶𝘦𝘭𝘢.
Show more
Tags :
Woo!
This creator can upvote comments using 3speak's stake today because they are a top performing creator!
Leave a quality comment relating to their content and you could receive an upvote
worth at least a dollar.
Their limit for today is $0!
Their limit for today is $0!

22 views
3 years ago
$

20 views
2 years ago
$

23 views
3 years ago
$
9 views
2 years ago
$
12 views
2 years ago
$
More Videos

0 views
a year ago
$

1 views
3 years ago
$
9 views
2 years ago
$
15 views
2 years ago
$

24 views
3 years ago
$

31 views
a year ago
$

61 views
3 years ago
$

19 views
8 months ago
$

38 views
2 years ago
$
1 views
2 years ago
$

11 views
11 months ago
$
4 views
2 years ago
$

0 views
2 years ago
$
18 views
a month ago
$

9 views
a year ago
$
5 views
a year ago
$

6 views
3 years ago
$

10 views
a year ago
$
1 views
2 years ago
$

9 views
7 months ago
$

[ESP-ENG] Mi presentación para la comunidad de full deportes ❤ My presentation to the full sports co
2 views
2 years ago
$

Mis ejercicios favoritos para los Isquiotibiales + 1 para Glúteos / My favorite exercises for Hamstr
24 views
11 months ago
$
3 views
2 years ago
$
Comments:
Reply:
To comment on this video please connect a HIVE account to your profile: Connect HIVE Account