[ESP-ENG] Tutorial Pulsera Tejida / Woven bracelet tutorial
1
About :
Hola amigos de hive Diy!
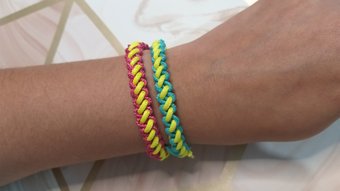
Espero se encuentren bien, hoy les traigo un tutorial super sencillo para realizar una linda pulsera tejida, la cual puedes realizar unicolor ó en la combinación de colores que más te guste, para su elaboración vamos a necesitar:
1 metro de cordón piel de serpiente color amarillo
1 metro de cordón piel de serpiente rojo
4 balines
Tijeras
Encendedor
Cinta métrica ó regla
Gancho
Cartón

Para iniciar vamos a medir y cortar 70 cm de cada uno nuestros dos cordones. Luego, medimos 10 cm y hacemos un nudo como se ve en la imagen, y aseguramos a nuestro cartón con el gancho.

Una vez tengamos el nudo vamos a comenzar a tejer pasando el cordón turquesa sobre el amarillo (ver imagen). Luego, vamos a pasar el extremo o punta del cordón turquesa por debajo del amarillo (ver imagen).


Ajustamos el nudo.

Vamos a tomar el cordón amarillo y lo pasamos sobre el cordón turquesa (ver imagen). Luego, el extremo o punta del cordón amarillo lo pasamos por debajo del color turquesa y lo metemos por el orifico que nos queda del cordón amarillo.

Ajustamos el nudo (ver imagen)

Una vez tengamos los tres primeros nudos se verá así (ver imagen)

Continuamos tejiendo pasando el cordón turquesa sobre el amarillo . Luego, vamos a pasar el extremo o punta del cordón turquesa por debajo del amarillo y lo introducimos por el orificio que nos queda del cordón amarillo (ver imagen) .
Repetimos ahora con el cordón amarillo.


Realizamos el mismo procedimiento hasta tener el contorno de nuestra muñeca, en mi caso fueron 17 cm. (Ver imagen)

Al finalizar el contorno de nuestra muñeca, realizamos un nudo sencillo. (ver imagen)

Para realizar el broche unes ambos extremos y pasas el cordón turquesa por debajo con ambos extremos del lado derecho, pasas el que queda en la parte superior por encima del otro extremo turquesa y luego por debajo de los cordones más gruesos y el extremo lo pasas por el orificio que queda del lado izquierdo ( Ver imágenes).


Luego el hilo Turquesa del lado derecho lo pasas por encima del hilo principal (cordón grueso) y el extremo izquierdo del hilo turquesa lo pasas por debajo de hilo principal y lo metes por el orificio del lado derecho. (Ver imagenes).

!( )
)
Repites el procedimiento 3 veces. Luego, cortas los extremos del cordón y quemas las puntas con el encendedor.

Para finalizar, vamos a tomar los cada uno de los balines y los vamos a introducir por los 4 extremos de la pulsera y vamos hacer un nudo y a quemar con el encendedor la punta para un trabajo más prolijo. (Ver imagen)


¡Y lista tu pulsera!! Puedes combinar colores o realizarla en cuero, cordón rabo de ratón, cordón para paracord, atrévete a utilizar cualquier material para realizar este tejido. Les aseguro que una vez que aprendes la técnica puedes ir aplicándola en cualquier otro material.
Les deje un pequeño video para que vean como es el tejido.


Cualquier duda escríbeme en los comentarios.
Las fotografías fueron tomadas por mi
Hello friends of hive Diy!
I hope you are well, today I bring you a super simple tutorial to make a nice woven bracelet, which you can make unicolor or in the combination of colors that you like, for its development we will need:
1 meter of yellow snakeskin cord
1 meter of red snakeskin cord
4 balls
Scissors
Lighter
Measuring tape or ruler
Hook
Cardboard
To start, we are going to measure and cut 70 cm of each of our two cords. Then, we measure 10 cm and make a knot as shown in the picture, and secure it to our cardboard with the hook.
Once we have the knot we are going to start weaving passing the turquoise cord over the yellow one (see image). Then, we are going to pass the end or tip of the turquoise cord under the yellow one (see image).
Tighten the knot.
We are going to take the yellow cord and pass it over the turquoise cord (see image). Then, we pass the end of the yellow cord under the turquoise cord and we put it through the remaining hole of the yellow cord.
Tighten the knot (see image)
Once we have the first three knots, it will look like this (see image)
We continue weaving passing the turquoise cord over the yellow one. Then, we are going to pass the end or tip of the turquoise cord under the yellow one and introduce it through the remaining hole of the yellow cord (see image).

Repeat now with the yellow cord
We do the same procedure until we have the contour of our wrist, in my case it was 17 cm (see image).
At the end of the contour of our wrist, we make a simple knot (see image)
To make the brooch, join both ends and pass the turquoise cord underneath with both ends on the right side, pass the one at the top over the other turquoise end and then under the thicker cords and pass the end through the hole on the left side (See images).
Then you pass the turquoise thread on the right side over the main thread (thick cord) and the left end of the turquoise thread you pass it under the main thread and put it through the hole on the right side. (See pictures).
Repeat the procedure 3 times. Then, cut the ends of the cord and burn the ends with the lighter.
To finish, we are going to take each of the balls and we are going to introduce them through the 4 ends of the bracelet and we are going to make a knot and burn with the lighter the tip for a neater work. (See image)
And your bracelet is ready! You can combine colors or make it in leather, mouse tail cord, paracord cord, dare to use any material to make this weaving. I assure you that once you learn the technique you can apply it to any other material.
I leave you a little video so you can see how the weaving is done.
If you have any questions, write me in the comments.
The pictures were taken by me
Show more
Tags :
Woo!
This creator can upvote comments using 3speak's stake today because they are a top performing creator!
Leave a quality comment relating to their content and you could receive an upvote
worth at least a dollar.
Their limit for today is $0!
Their limit for today is $0!
4 views
9 months ago
$

[ESP-ENG]Como hacer una pulsera de flores con la técnica de macramé/How to make a flower bracelet wi
1 views
a year ago
$

3 views
9 months ago
$
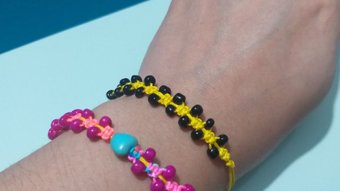
[ESP- ENG] Como hacer Pulseras con tejido macramé y mostacillas / How to make bracelets with macramé
11 views
a year ago
$

3 views
2 years ago
$
More Videos

6 views
a year ago
$

17 views
2 years ago
$

15 views
a year ago
$
24 views
2 years ago
$
18 views
a year ago
$

1 views
2 years ago
$

15 views
4 years ago
$

30 views
2 years ago
$

18 views
a year ago
$

11 views
2 years ago
$

25 views
2 months ago
$

6 views
a year ago
$

10 views
2 weeks ago
$

30 views
a year ago
$

22 views
11 months ago
$

4 views
a year ago
$

0 views
2 years ago
$

11 views
a year ago
$

4 views
5 months ago
$

2 views
3 years ago
$

5 views
a year ago
$

11 views
2 years ago
$
Comments:
Reply:
To comment on this video please connect a HIVE account to your profile: Connect HIVE Account