Página de Detalles - Rutas y Enlaces - Crea tu propia React App Parte 4
9
About :
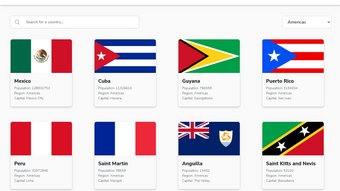
¡Hola a todos y bienvenidos al episodio final de "Creando una App de Países usando React"! El día de hoy elaboraremos la página de detalles de cada país. Una vez que accedemos al inicio podremos visualizar las banderas de todos los países del mundo, pero queremos que al darle clic a uno de ellos podamos ver detalles como su nombre oficial, idiomas que utilizan, moneda, y países adyacentes.
Para ellos utilizaremos el módulo de react-router-dom, que nos permitirá crear diferentes rutas
Si siguieron los pasos anteriores, primero creamos nuestra App básica de React utilizando el comando de consolta.
cd countries-app```

Creamos componentes para el Buscador, el menú desplegable (Select box), uno para el encabezado (Header), uno para las tarjetas (Cards) y dentro de cada tarjeta un componente Country.

Para crear un componente, creabamos una función y le pasamos como argumentos, las propiedades de dicho componente. Por ejemplo:
const Details = (props) => {
}
React tiene la ventaja de ser declarativo, en donde no le tienes que indicar explícitamente los pasos a seguir, esto simplifica mucho el desarrollo de interfaces de usuario.

A la página de detalles le pasamos el componente y las propiedades del país seleccionado y un parámetro llamado **isFetch** que indica si los datos fueron cargados correctamente.

Posteriormente, creamos la estructura del componente (la cual se puede simplificar mucho más) utilizando HTML común unido  a otros compontentes que ya hemos creado. Recuerden que en los videos anteriores creamos la hoja de estilo (CSS) en donde definimos todas las clases que harán que la página se vea mucho más atractiva y ordenada.

Para instalar el enrutador, de la biblioteca **react-router-dom**, tendrémos que escribir el siguiente comando:
```npm install react-router-dom```
o si usas el gestor de paquetes yarn:
```yarn add react-router-dom```

Para usar el enrutador, tendremos que importarlo en nuestro código:
import {
Link,
Route,
Switch,
BrowserRouter as Router,
useParams
} from "react-router-dom";
En esta línea traemos los principales componentes que haran funcionar nuestro sistema de ruta:
1. **Link**:  Muy similar a los enlaces que vemos en las páginas con la etiqueta <a>, así que todos los compontentes y etiquetas que coloquemos dentro de él adoptarán el comportamiento de un enlace.
2. **BrowserRouter:**  Este será nuestro contenedor principal, dentro de el Router colocaremos el componante **Switch**, colocaremos los demás componentes de la App. Este componente usa la API del Historial para renderizar los componentes.
3. **Route:** Representa a las rutas que tendrá nuestra aplicación, por ejemplo /about o /users, entre otros, este componente tiene el atributo path="" en donde colocamos el nombre de la ruta que crearemos.
4. **Switch:** Se utiliza para intercambiar entre las rutas, por los que los componentes **<Route>** se ubican dentro de él. Este componente funciona de la siguiente manera, recorre a través de sus  hijos **<Route>** y busca el primer componente que hace coincidencia con la URL actual. Si la URL es /users, renderiza el componente o la página de usuarios.

Por lo tanto, para utilizar el enrutador de React-Router-Dom, se utiliza una estructura como la siguiente:
import React from "react";
import {
BrowserRouter as Router,
Switch,
Route,
Link
} from "react-router-dom";
export default function App() {
return (
Inicio
Acerca de
Productos
    **<Switch>**
      <Route path="/about">
        <About />
      </Route>
      <Route path="/products">
        <Users />
      </Route>

      <Route path="/">
        <Home />
      </Route>
    **</Switch>**
  </div>
**</Router>**
);
}
function Home() {
return
Página de Inicio
;}
function About() {
return (
Página de "Acerca de"
);
}
function Products() {
return (
Página de Productos
);
}
El código anterior, muestra tres componentes, Home, About y Products(), que representan nuestras páginas y arriba tenemos la App principal, dentro de la función de la App colocamos el componentes **Router**, luego colocamos el resto de nuestros componentes. En este caso, la barra de navegación usando la etiqueta <nav>.

Más abajo, tenemos el componente **<Switch>**  y dentro de este componente se encuentras las rutas **<Route>**, los elementos <Link> en cualquier parte de la App colocan en la URL, lo que escribamos en el atributo Path de la Ruta.

En el video aprenderás como crear una página de detalles que muestre la bandera del país seleccionado y sus detalles, y abajo tendremos varios botones (Links), que nos permitirán ir a otros países.

¿Que te ha parecido este tutorial? ¿Vieron los videos anteriores y elaboraron su propia App que consume una API REST de países? Déjamelo saber en los comentarios.

¡Saludos y espero verlos pronto!

</div>

**English:**
<div class="text-justify">

Hello everyone and welcome to the final episode of "Creating a Country App using React"! Today we will elaborate the detail page for each country. Once we access the home page we will be able to see the flags of all the countries in the world, but we want that when we click on one of them we can see details such as its official name, languages they use, currency, and adjacent countries.

For them we will use the react-router-dom module, which will allow us to create different routes.

If you followed the steps above, we first create our basic React App using the consolta command.

````npx create-react-app countries-app
cd countries-app````

We created components for the Finder, the drop-down menu (Select box), one for the Header, one for the Cards and inside each card a Country component.

To create a component, we created a function and passed as arguments, the properties of that component. For example:
const Details = (props) => {
}
React has the advantage of being declarative, where you don't have to explicitly indicate the steps to follow, this simplifies a lot the development of user interfaces.

To the detail page we pass the component and the properties of the selected country and a parameter called **isFetch** that indicates if the data was loaded correctly.

Afterwards, we create the component structure (which can be simplified much more) using common HTML linked to other components that we have already created. Remember that in the previous videos we created the style sheet (CSS) where we defined all the classes that will make the page look much more attractive and orderly.

To install the router, from the **react-router-dom** library, we will have to type the following command:
```npm install react-router-dom```
or if you use the yarn package manager:
````yarn add react-router-dom```.

To use the router, we will have to import it into our code:
import {
Link,
Route,
Switch,
BrowserRouter as Router,
useParams
} from "react-router-dom";
In this line we bring the main components that will make our route system work:
1. **Link**: Very similar to the links that we see in the pages with the <a> tag, so all the components and tags that we place inside it will adopt the behavior of a link.
2. **BrowserRouter:** This will be our main container, inside the Router we will place the **Switch** component, we will place the other components of the App. This component uses the History API to render the components.
3. **Route:** Represents the routes that our application will have, for example /about or /users, among others, this component has the path="" attribute where we place the name of the route that we will create.
4. **Switch:** Used to switch between routes, so **<Route>** components are placed inside it. This component works as follows, it loops through its **<Route>** children and finds the first component that matches the current URL. If the URL is /users, render the user page or component.

Therefore, to use the React-Router-Dom router, a structure like the following is used:
import React from "react";
import {
BrowserRouter as Router,
Switch,
routes,
link
} from "react-router-dom";
export default function App() {
return (
Home
About
Products
    **<Switch>**
      <Routepath="/about">
        <About />
      </Route>
      <Routepath="/products">
        <User />
      </Route>

      <Routepath="/">
        <Home />
      </Route>
    **</Switch>**
  </div>
**</Router>**
);
}
function Home() {
return
Home Page
;}
function About() {
return (
"About" page
function Products() {
return (
Products Page
The above code shows three components, Home, About and Products(), which represent our pages and above we have the main App, inside the App function we place the **Router** components, then we place the rest of our components . In this case, the navigation bar using the <nav> tag.

Further down, we have the component **<Switch>** and within this component you will find the routes **<Route>**, the <Link> elements anywhere in the App put in the URL, whatever we write in the Path attribute of the Route.

In the video you will learn how to create a details page that shows the flag of the selected country and its details, and below we will have several buttons (Links), which will allow us to go to other countries.

What did you think of this tutorial? Have you seen the previous videos and developed your own App that consumes a REST API of countries? Let me know in the comments.

Bye and I hope to see you soon!
</div>
Show more
Tags :
Woo!
This creator can upvote comments using 3speak's stake today because they are a top performing creator!
Leave a quality comment relating to their content and you could receive an upvote
worth at least a dollar.
Their limit for today is $0!
Their limit for today is $0!
25 views
2 years ago
$

2 views
2 years ago
$
14 views
2 years ago
$
6 views
2 years ago
$

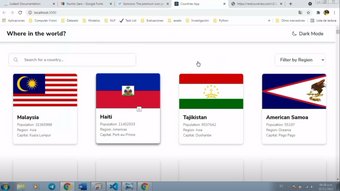
Filtrando los países por nombre y continente - REST Countries API - Crea tu propia React App Parte 3
10 views
2 years ago
$
More Videos

8 views
4 months ago
$

5 views
a month ago
$

40 views
a year ago
$

4 views
a year ago
$

16 views
a year ago
$

7 views
2 years ago
$

11 views
a year ago
$

12 views
6 months ago
$

15 views
11 months ago
$

5 views
a year ago
$

7 views
11 months ago
$

0 views
2 years ago
$

14 views
2 years ago
$

13 views
3 years ago
$

18 views
a year ago
$

19 views
a year ago
$

4 views
2 months ago
$

0 views
2 years ago
$

4 views
2 years ago
$

32 views
a year ago
$

0 views
3 years ago
$
5 views
5 months ago
$

8 views
6 months ago
$

17 views
2 years ago
$

6 views
a year ago
$
Comments:
Reply:
To comment on this video please connect a HIVE account to your profile: Connect HIVE Account