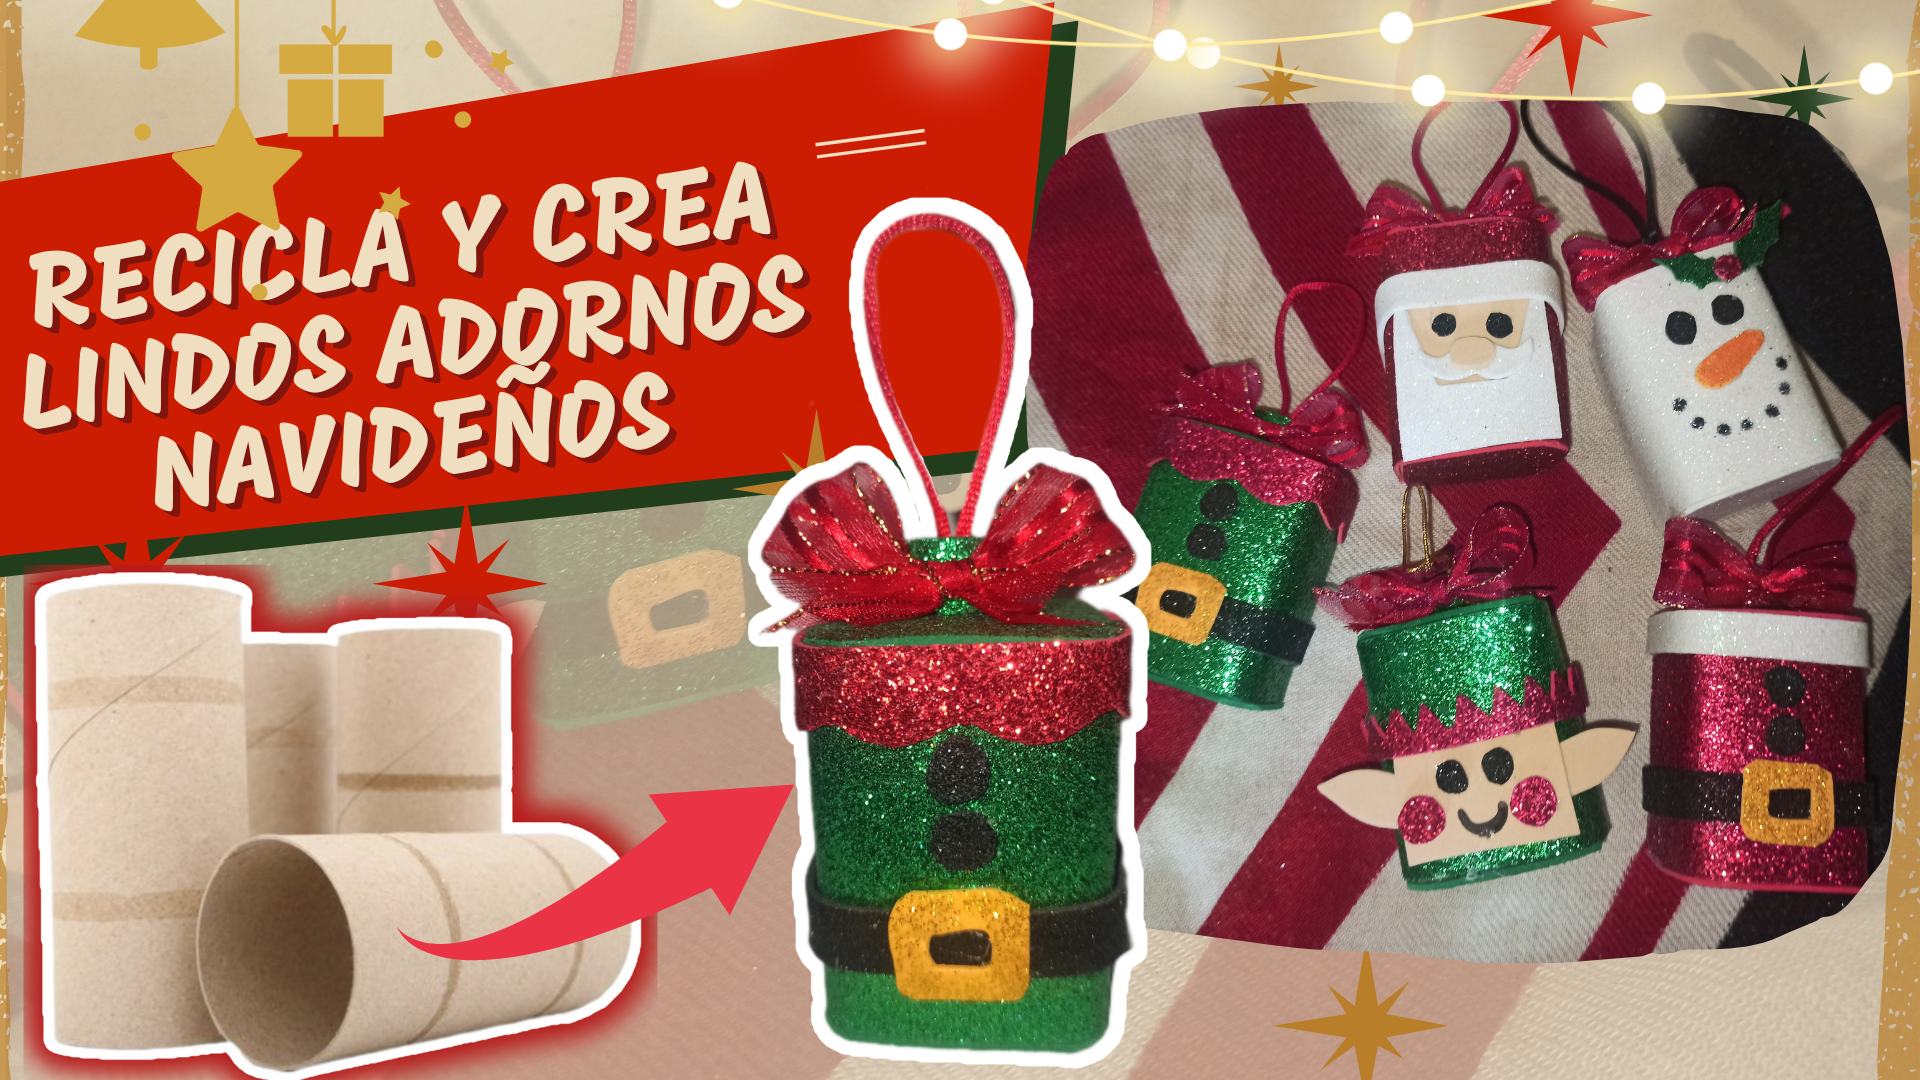
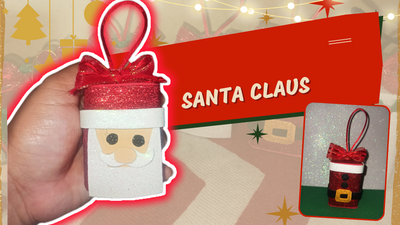
DIY- Recicla y crea lindos adornos navideños 🎄🎅[Esp-Eng]
8
About :
¡Hola amigos! ¿Cómo van? Yo sigo haciendo adornitos. Mi madre ya instaló el árbol de navidad 🙊 se había tardado, siempre lo saca a principios de octubre 🙊. Su árbol es grande, ya está un poco viejo, pero bien decorado se ve bello. Sus decoraciones también están algo viejas y algunas dañadas, por eso decidí este año hacerle muchos adornitos y unos que otros se irán a comprar. Cuando esté completamente listo se los muestro.
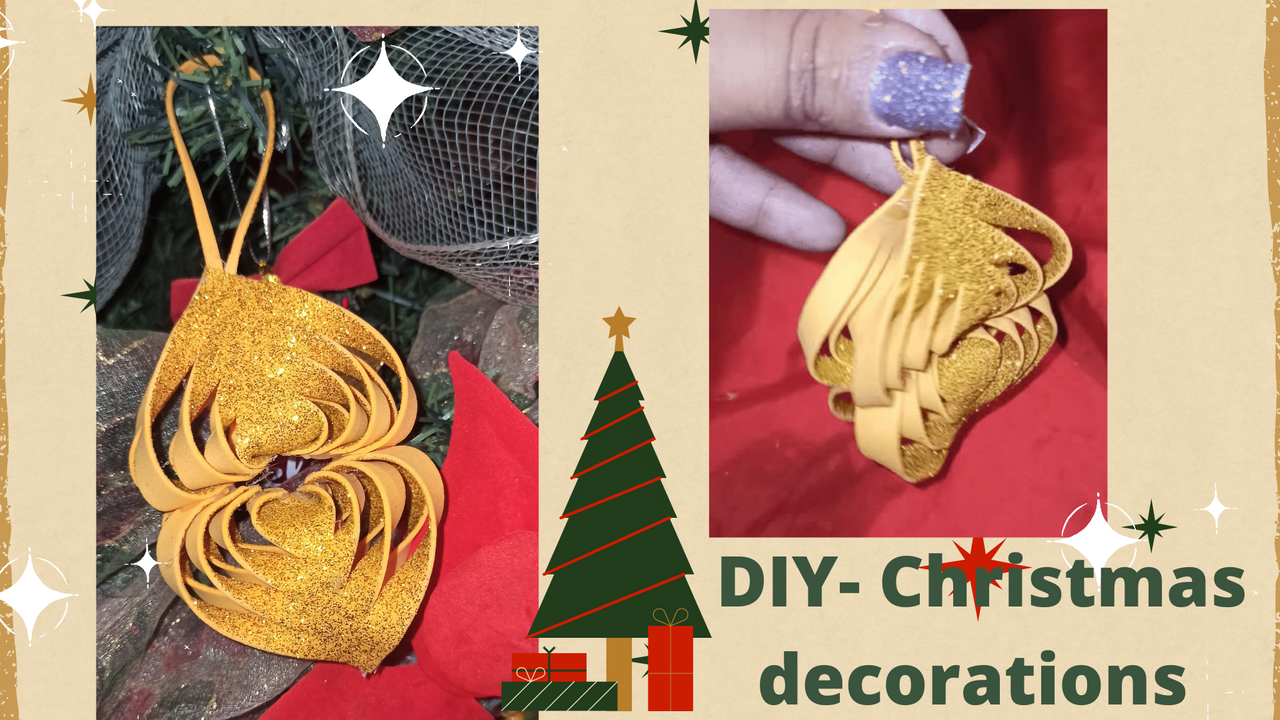
Para esta ocasión les mostraré unas decoraciones que hice con rollos de cartón, los que vienen con el papel higiénico. ¿A ustedes no les pasa que les da lástima botar ese cartón? A mí sí, cada vez que se acaba uno, estoy pensando qué hacer con él. Pues bien, hoy os doy algunas ideas para utilizarlos y hacer con ellos unos bonitos adornos navideños 🎄.
Hello friends! How are you doing? I'm still making ornaments. My mother has already installed the Christmas tree 🙊 she was late, she always takes it out at the beginning of October 🙊. Her tree is big, it's a little old now, but nicely decorated, and it looks beautiful. His decorations are also a bit old and some damaged, that's why I decided this year to make him a lot of little ornaments and some others will go to buy. When it is completely ready I will show them to you.

For this occasion, I will show you some decorations I made with cardboard rolls, the ones that come with toilet paper. Don't you feel sorry to throw away that cardboard? I do, every time one runs out, I'm thinking about what to do with it. Well, today I will give you some ideas to use them and make some nice Christmas ornaments 🎄.
🎄 5 rollos de cartón
🎅 Foamy rojo escarchado
⛄ Foamy verde escarchado
🎄 Foamy negro escarchado
⛄ Foamy Blanco escarchado
🎅 Foamy color piel
🎄 Cinta roja #3
⛄ Cinta cola de ratón rojo
🎅 Silicón
🎄 Regla
🎅 Tijera
🎄 5 cardboard rolls
🎅 Frosted red Foamy
⛄ Frosted green foamy
🎄 Frosted black foamy
⛄ Frosted white foamy
🎅 Skin-colored foamy
🎄 Red ribbon #3
⛄ Mouse tail ribbon red
🎅 Silicone
🎄 Ruler
🎅 Scissors
El proceso de la cara del Elfo, lo comparto con ustedes en un video.
I the process of the Elf's face, I share it with you in a video.

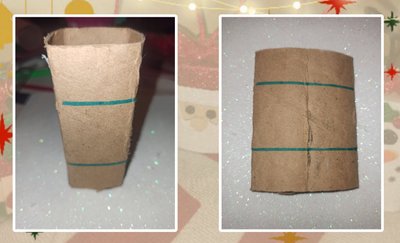
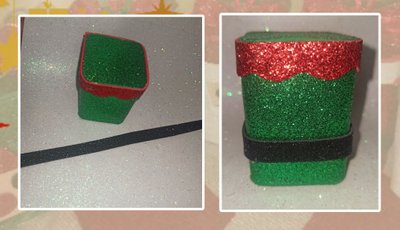
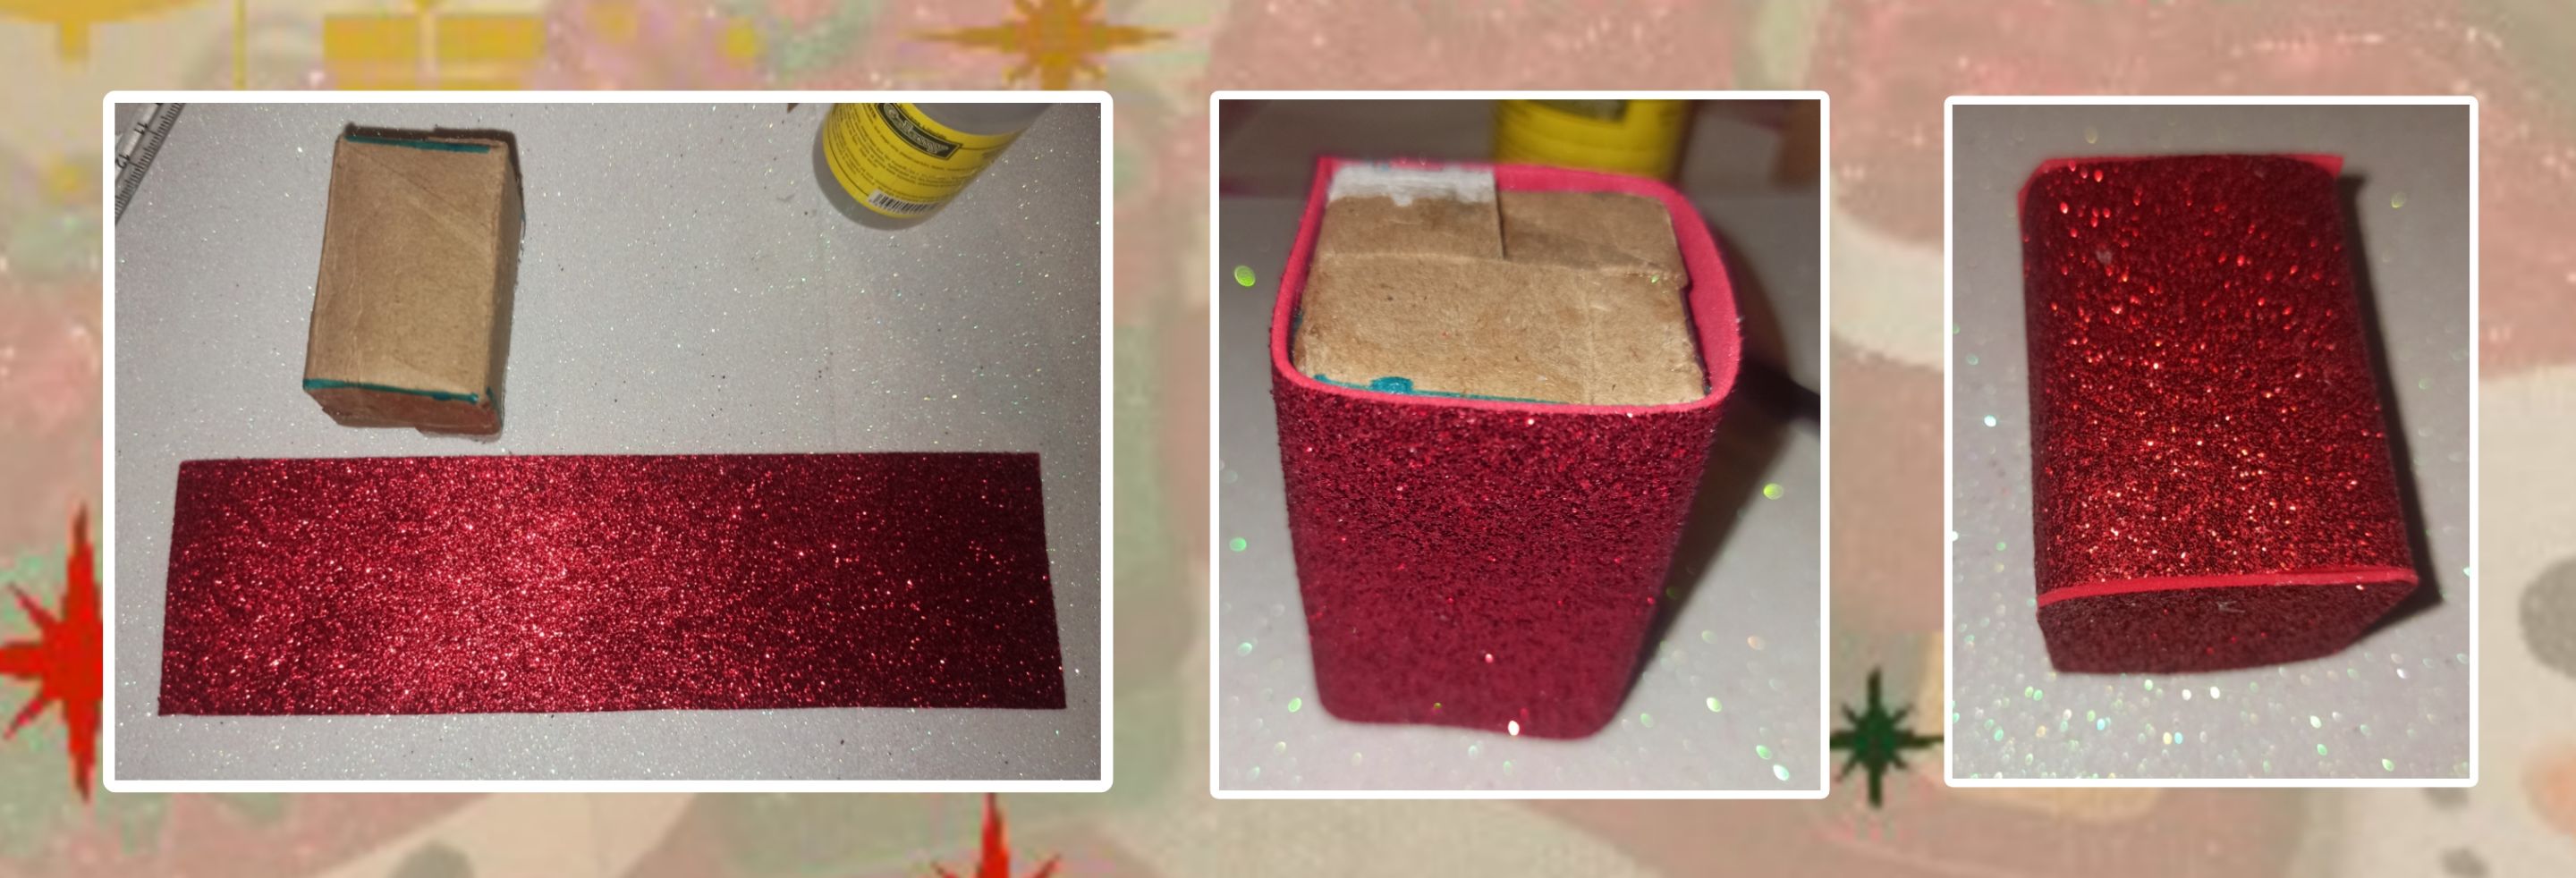
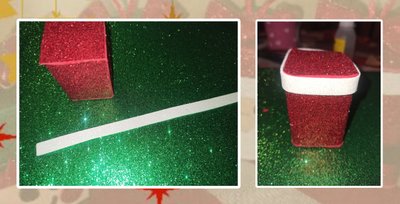
🎅 Lo primero es hacer la cajita. Para ello es el rollo de cartón, su tamaño es de 10 cm.
- Aplanamos el cartón. Con la ayuda de unas tijeras o regla marcamos bien los pliegues que se formarán.
🎅 The first thing is to make the little box. This is the cardboard roll, its size is 10 cm.

* We flatten the cardboard. With the help of scissors or a ruler, we mark well the folds that will be formed.
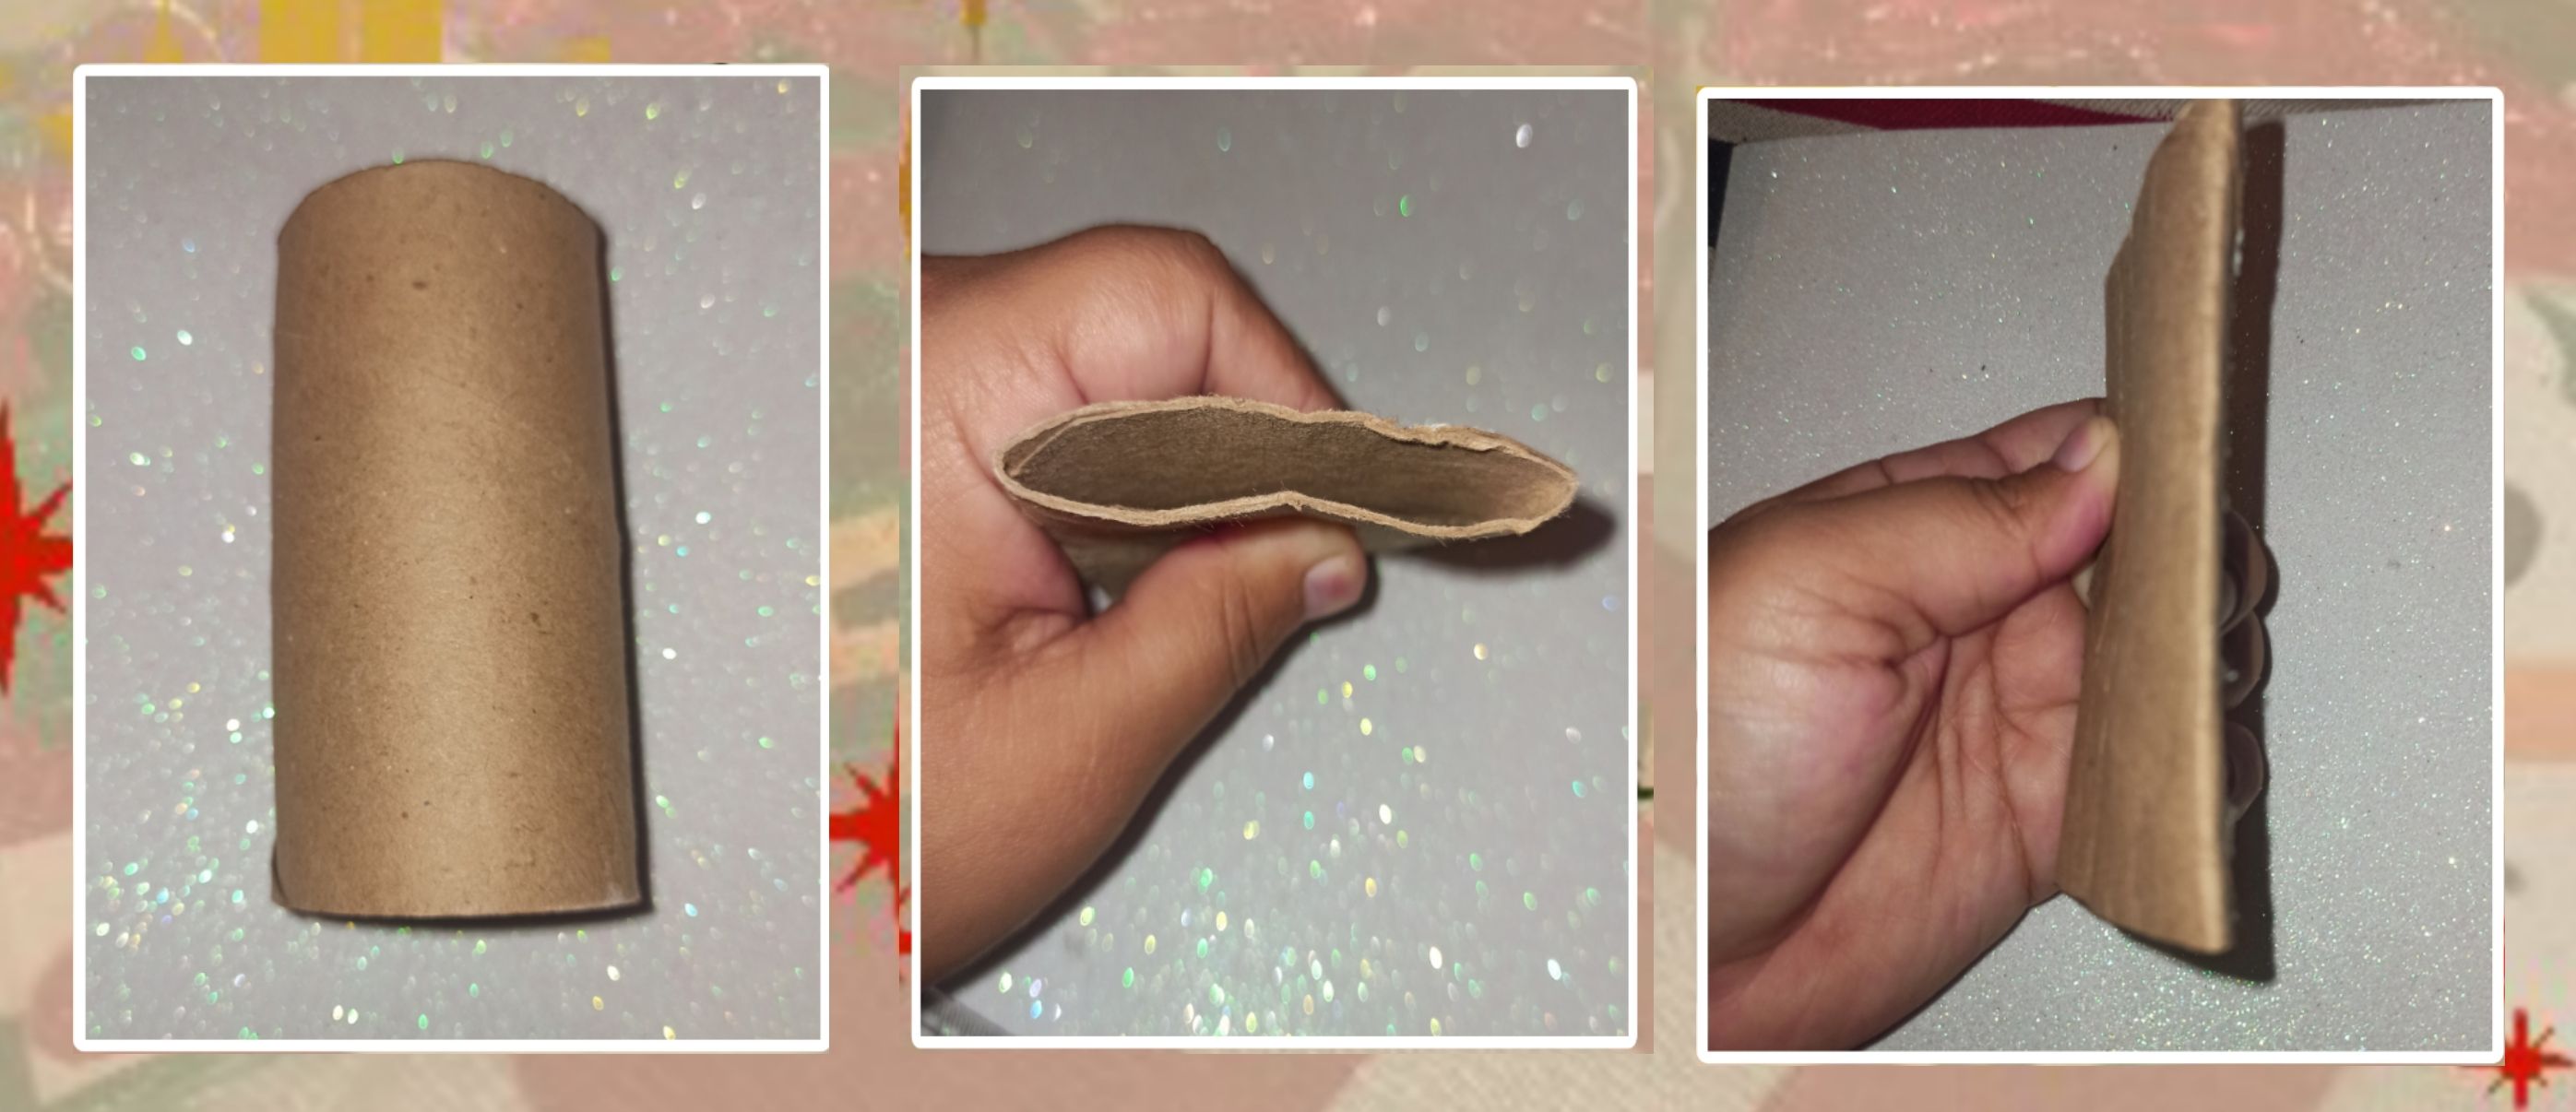
- Unimos los dos pliegues y aplanamos. Y así el rollo cilíndrico ya es cuadrado.
* We join the two folds and flatten them. And so the cylindrical roll is already square.
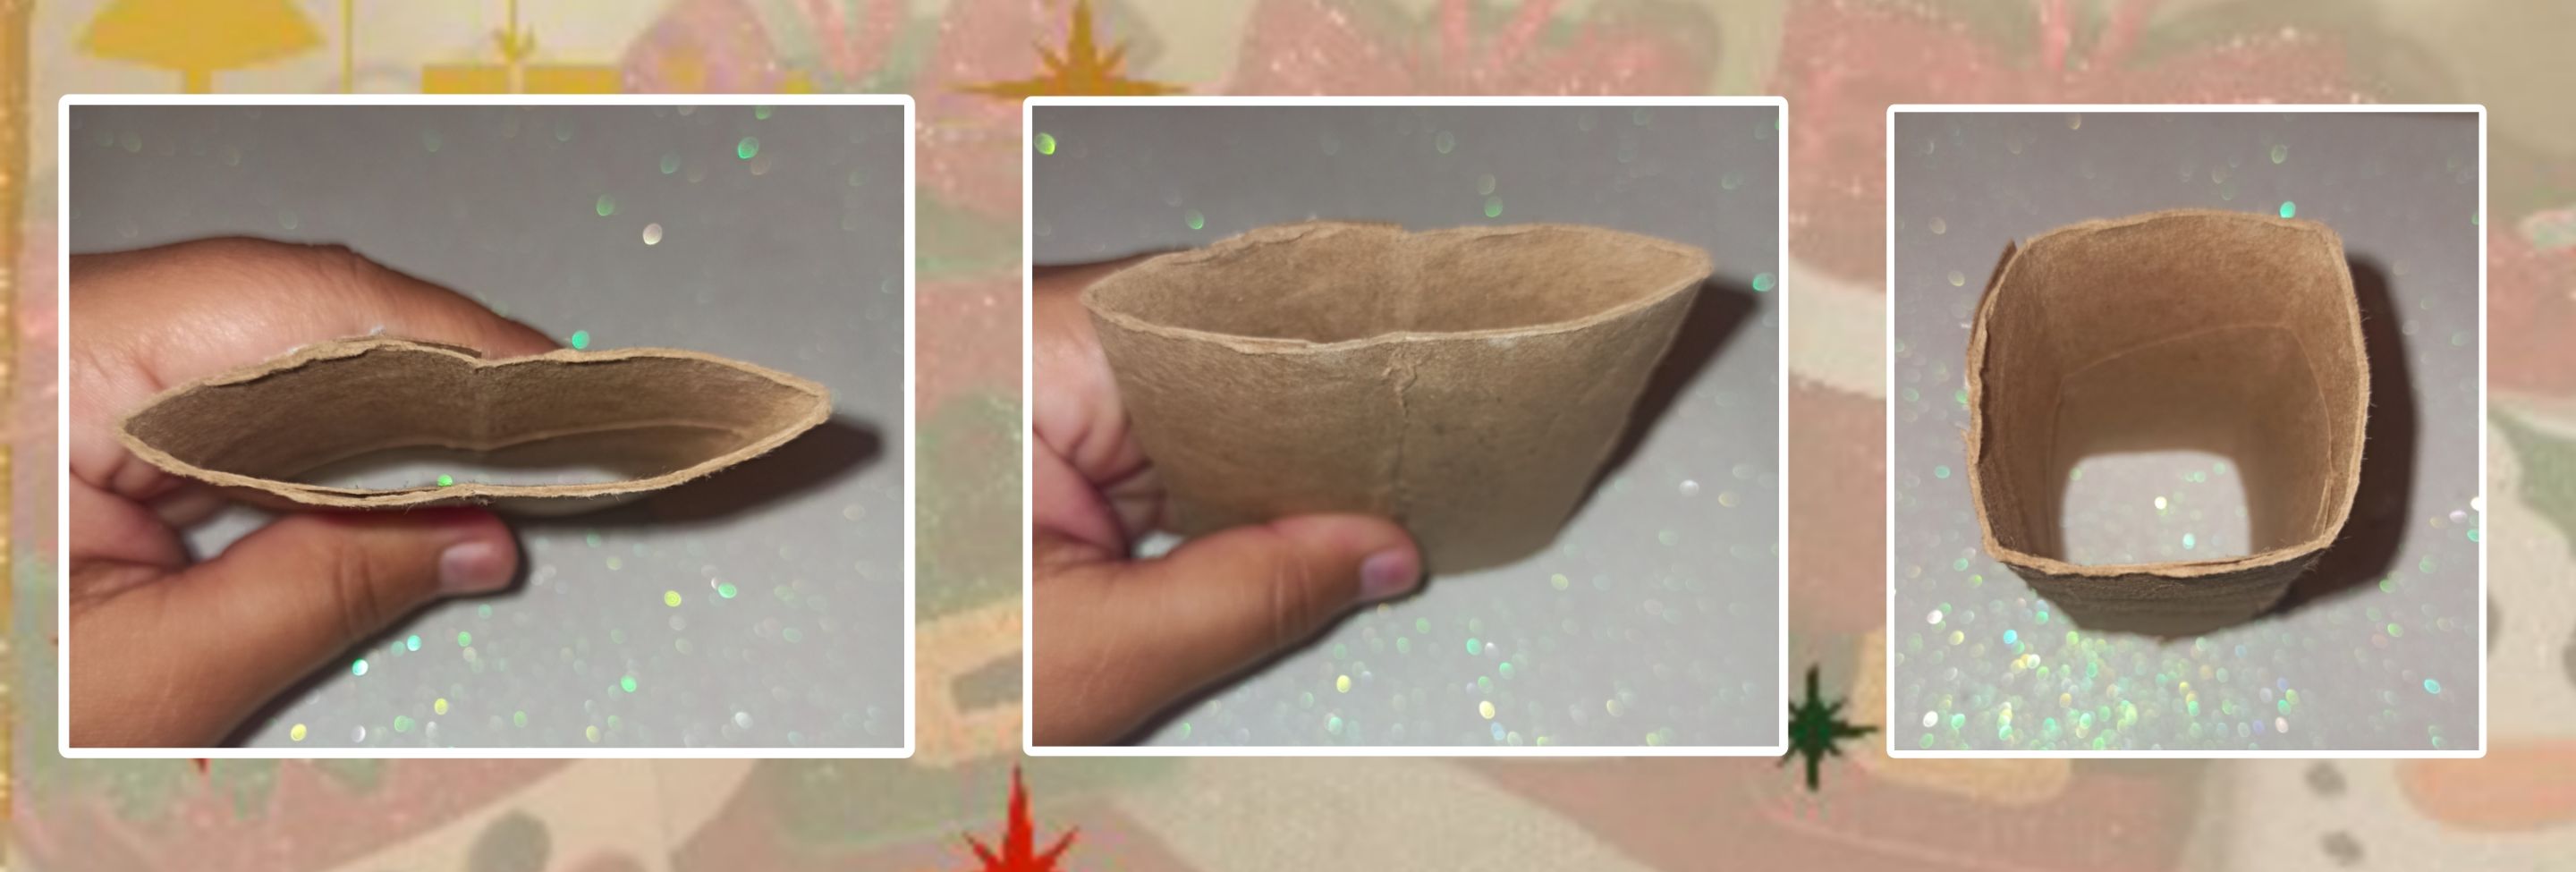
- Marcamos con una línea a una distancia de 2 cm en la parte superior e inferior.
* We mark with a line at a distance of 2 cm at the top and bottom.
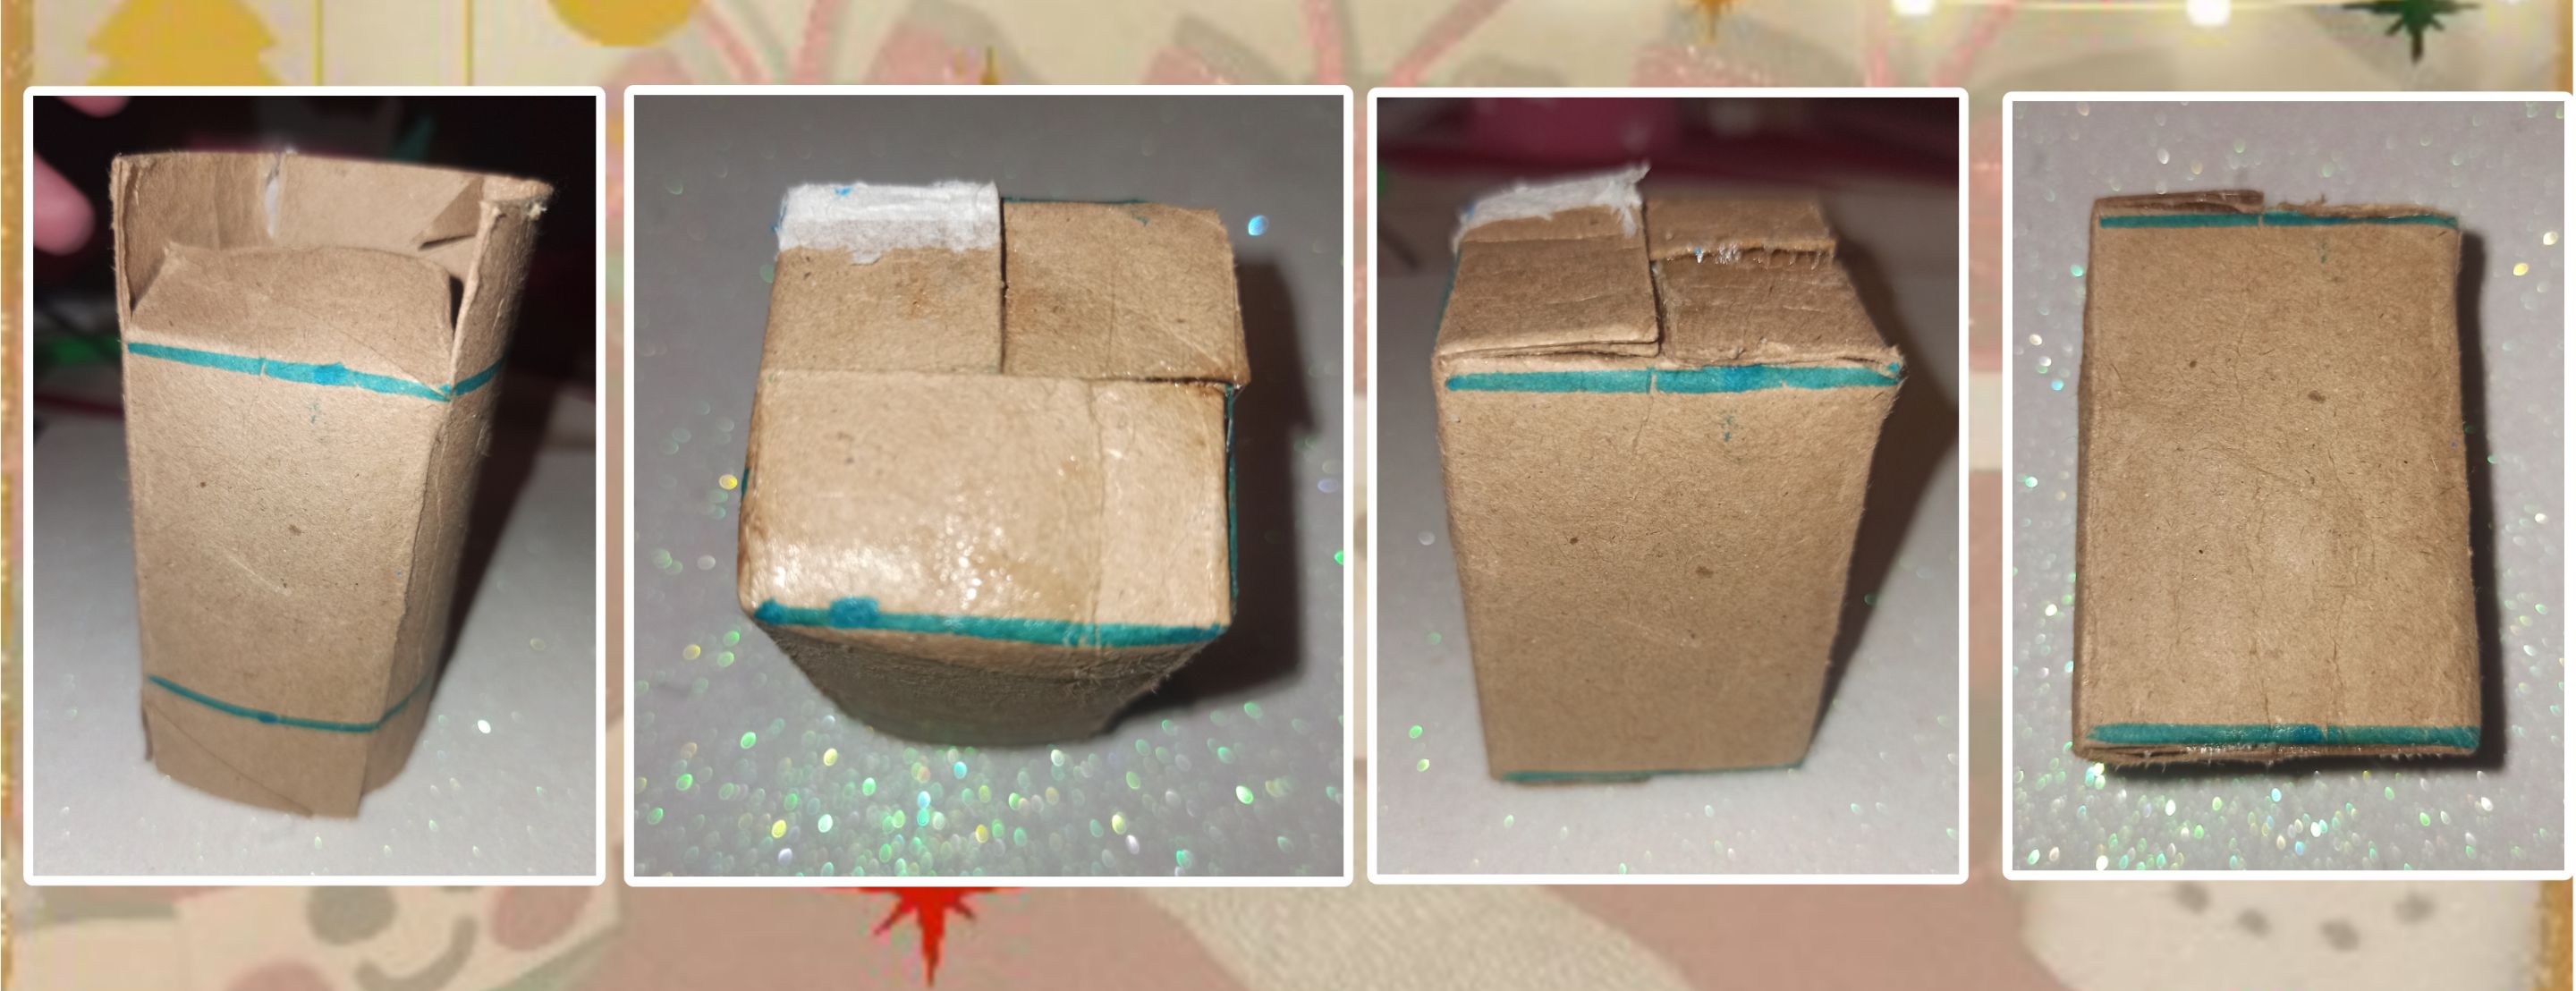
- Cortar en las cuatro esquinas de arriba y abajo , hasta la marca. Pegamos las pestañas. Estos mismos paso lo vamos a hacer con los 5 rollos.
* Cut at the four corners from top and bottom, up to the mark—Glue the tabs. We are going to do these same steps with the 5 rolls...
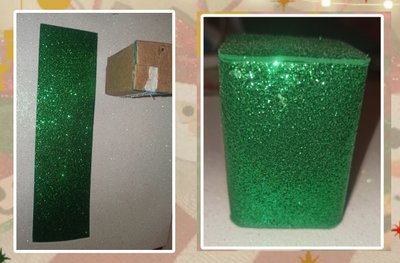
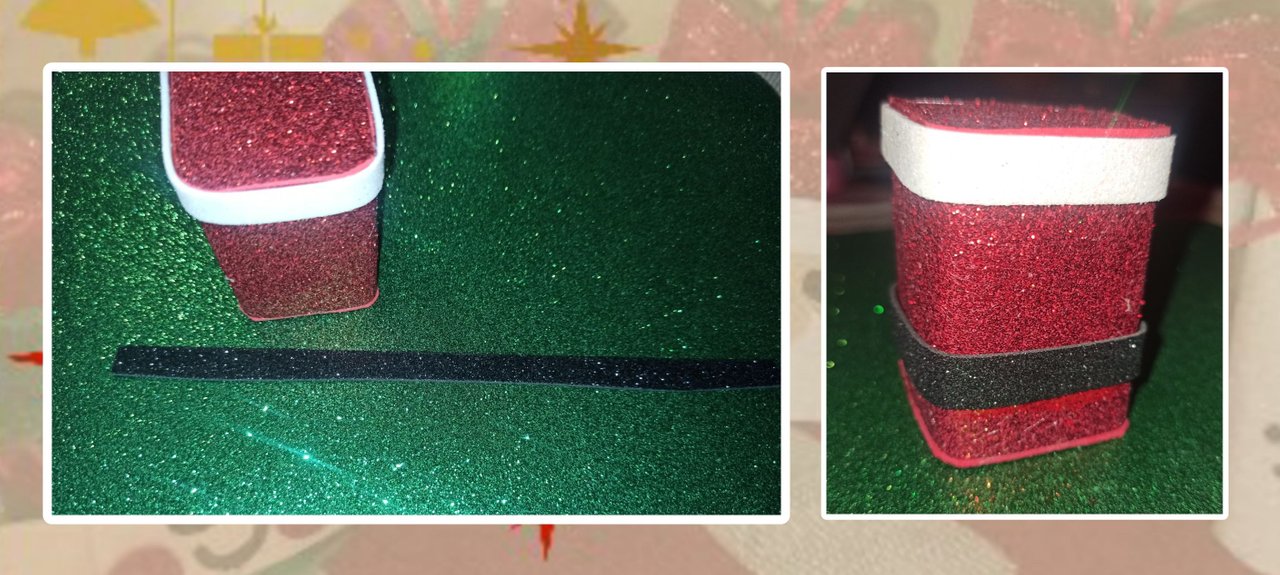
🎅 Empezamos a decorar la cajita. Cortamos foamy rojo de 17 cm x 6 cm. Agregamos silicón a toda la caja y pegamos el foamy .
🎅 We start decorating the box. We cut red foamy 17 cm x 6 cm. We add silicone to the whole box and glue the foamy.
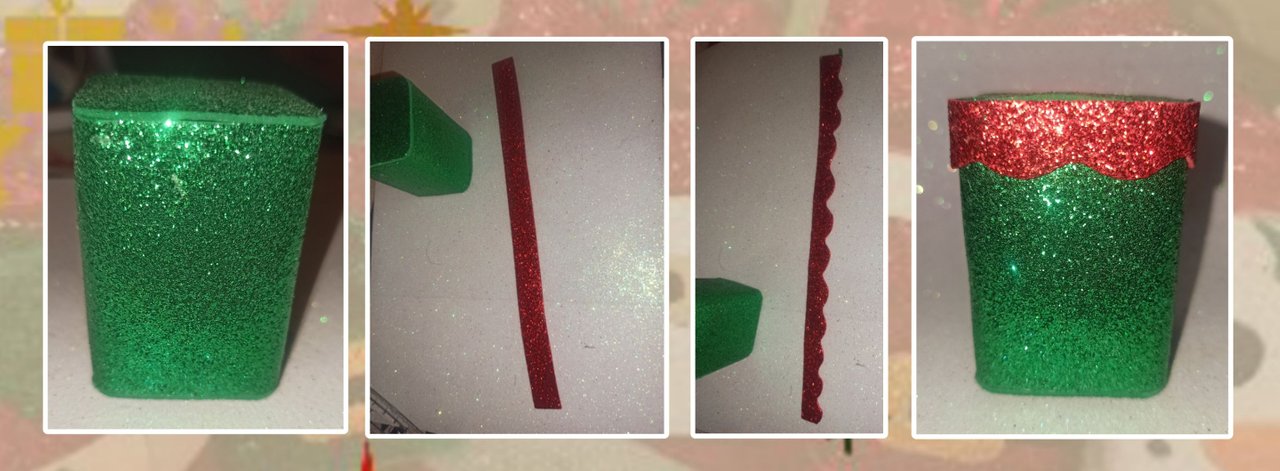
🎅 Cortamos una tira de foamy rojo de 1.5 cm x 16 cm. Cortamos haciendo ondas y pegamos en la parte superior.
🎅 Cut a strip of red foamy 1.5 cm x 16 cm. We cut and made waves and glue them on top.
🎅 Para el cinturón, cortamos una tira de foamy negro de 17 cm x 1 cm. Pegamos dejando un margen de 8 cm desde la parte superior.
🎅 For the belt, we cut a strip of black foamy 17 cm x 1 cm. We glue leaving a margin of 8 cm from the top.
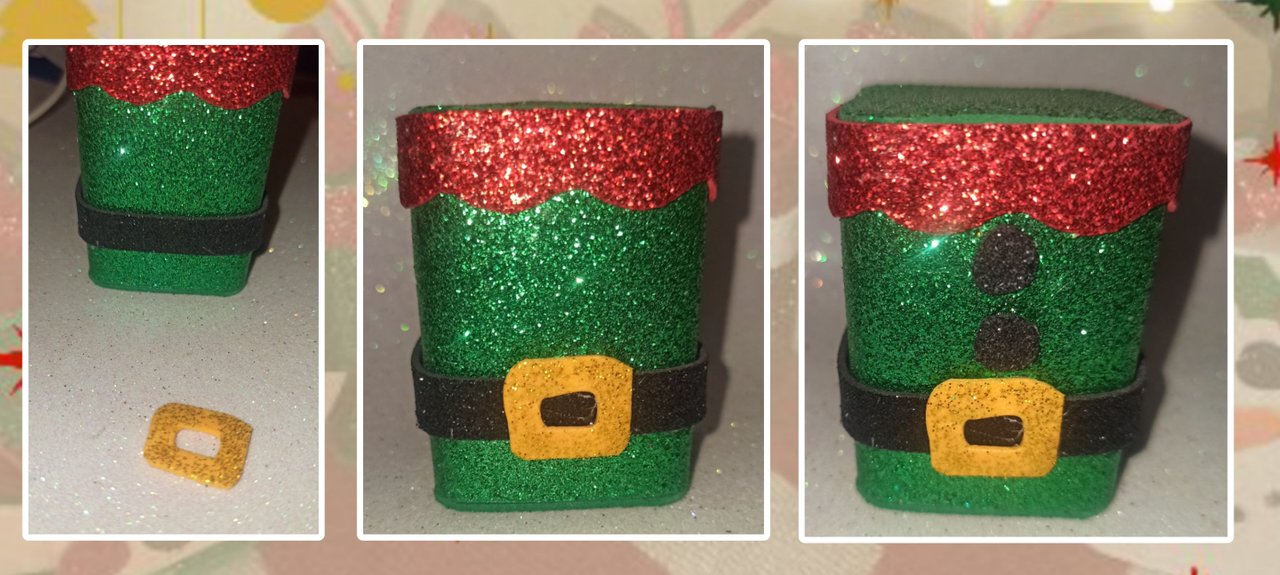
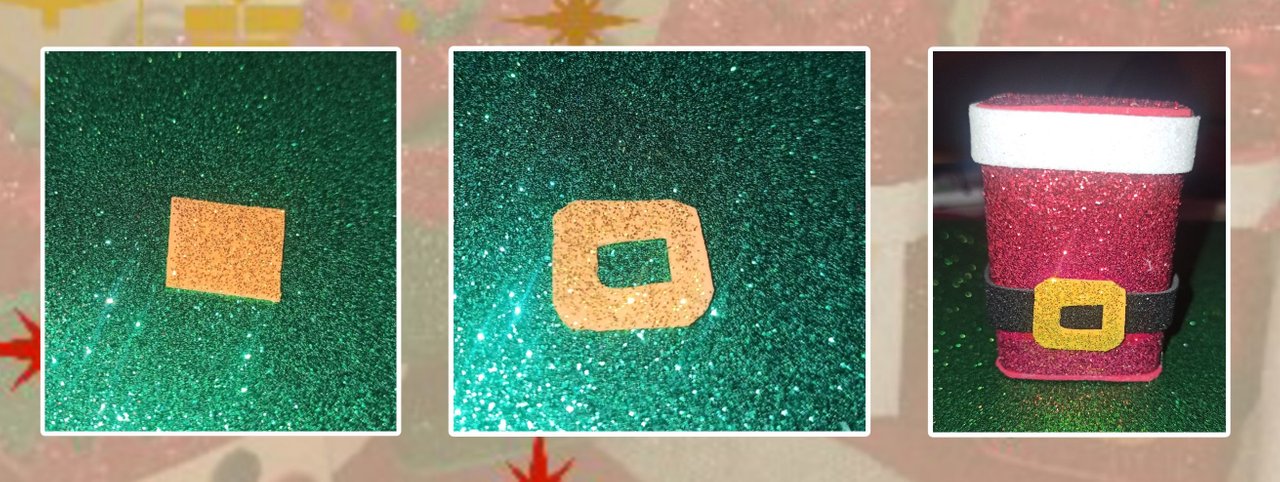
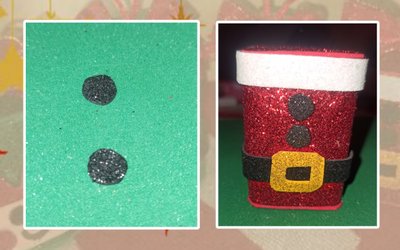
🎅 Cortamos un cuadrado de foamy amarillo escarchado. Pegamos el cinturón. Hacemos dos botones negros con foamy negro.
🎅 Cut a square of frosted yellow foamy. We glue on the belt. We make two black buttons with black foamy.
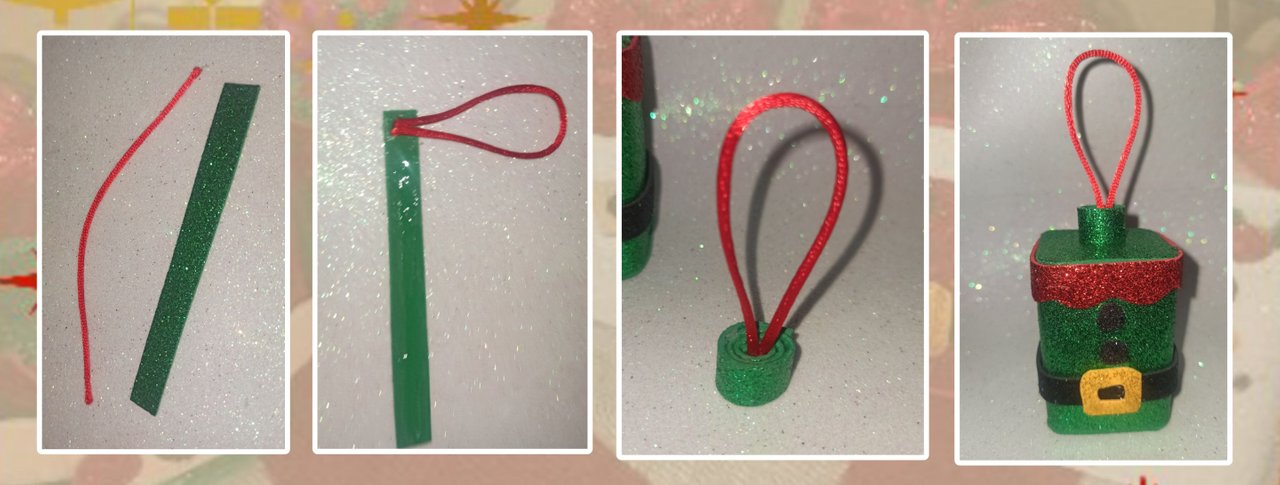
🎅 Una tira de foamy verde de 5 cm x 1 cm y una cinta de 10 cm. Pega los extremos de la cinta a un extremo del foamy, añade silicona y enrolla la tira de foamy.
🎅 A strip of green foamy of 5 cm x 1 cm and a ribbon of 10 cm. Glue the ends of the ribbon to one end of the foamy, add silicone, and roll up the foamy strip.
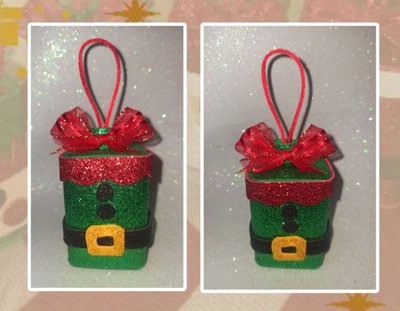
🎅 Para finalizar pegamos un lazo rojo. Tenemos listo la otra parte del Elfo.
🎅 To finish we glue a red ribbon. We have ready the other part of the Elf.
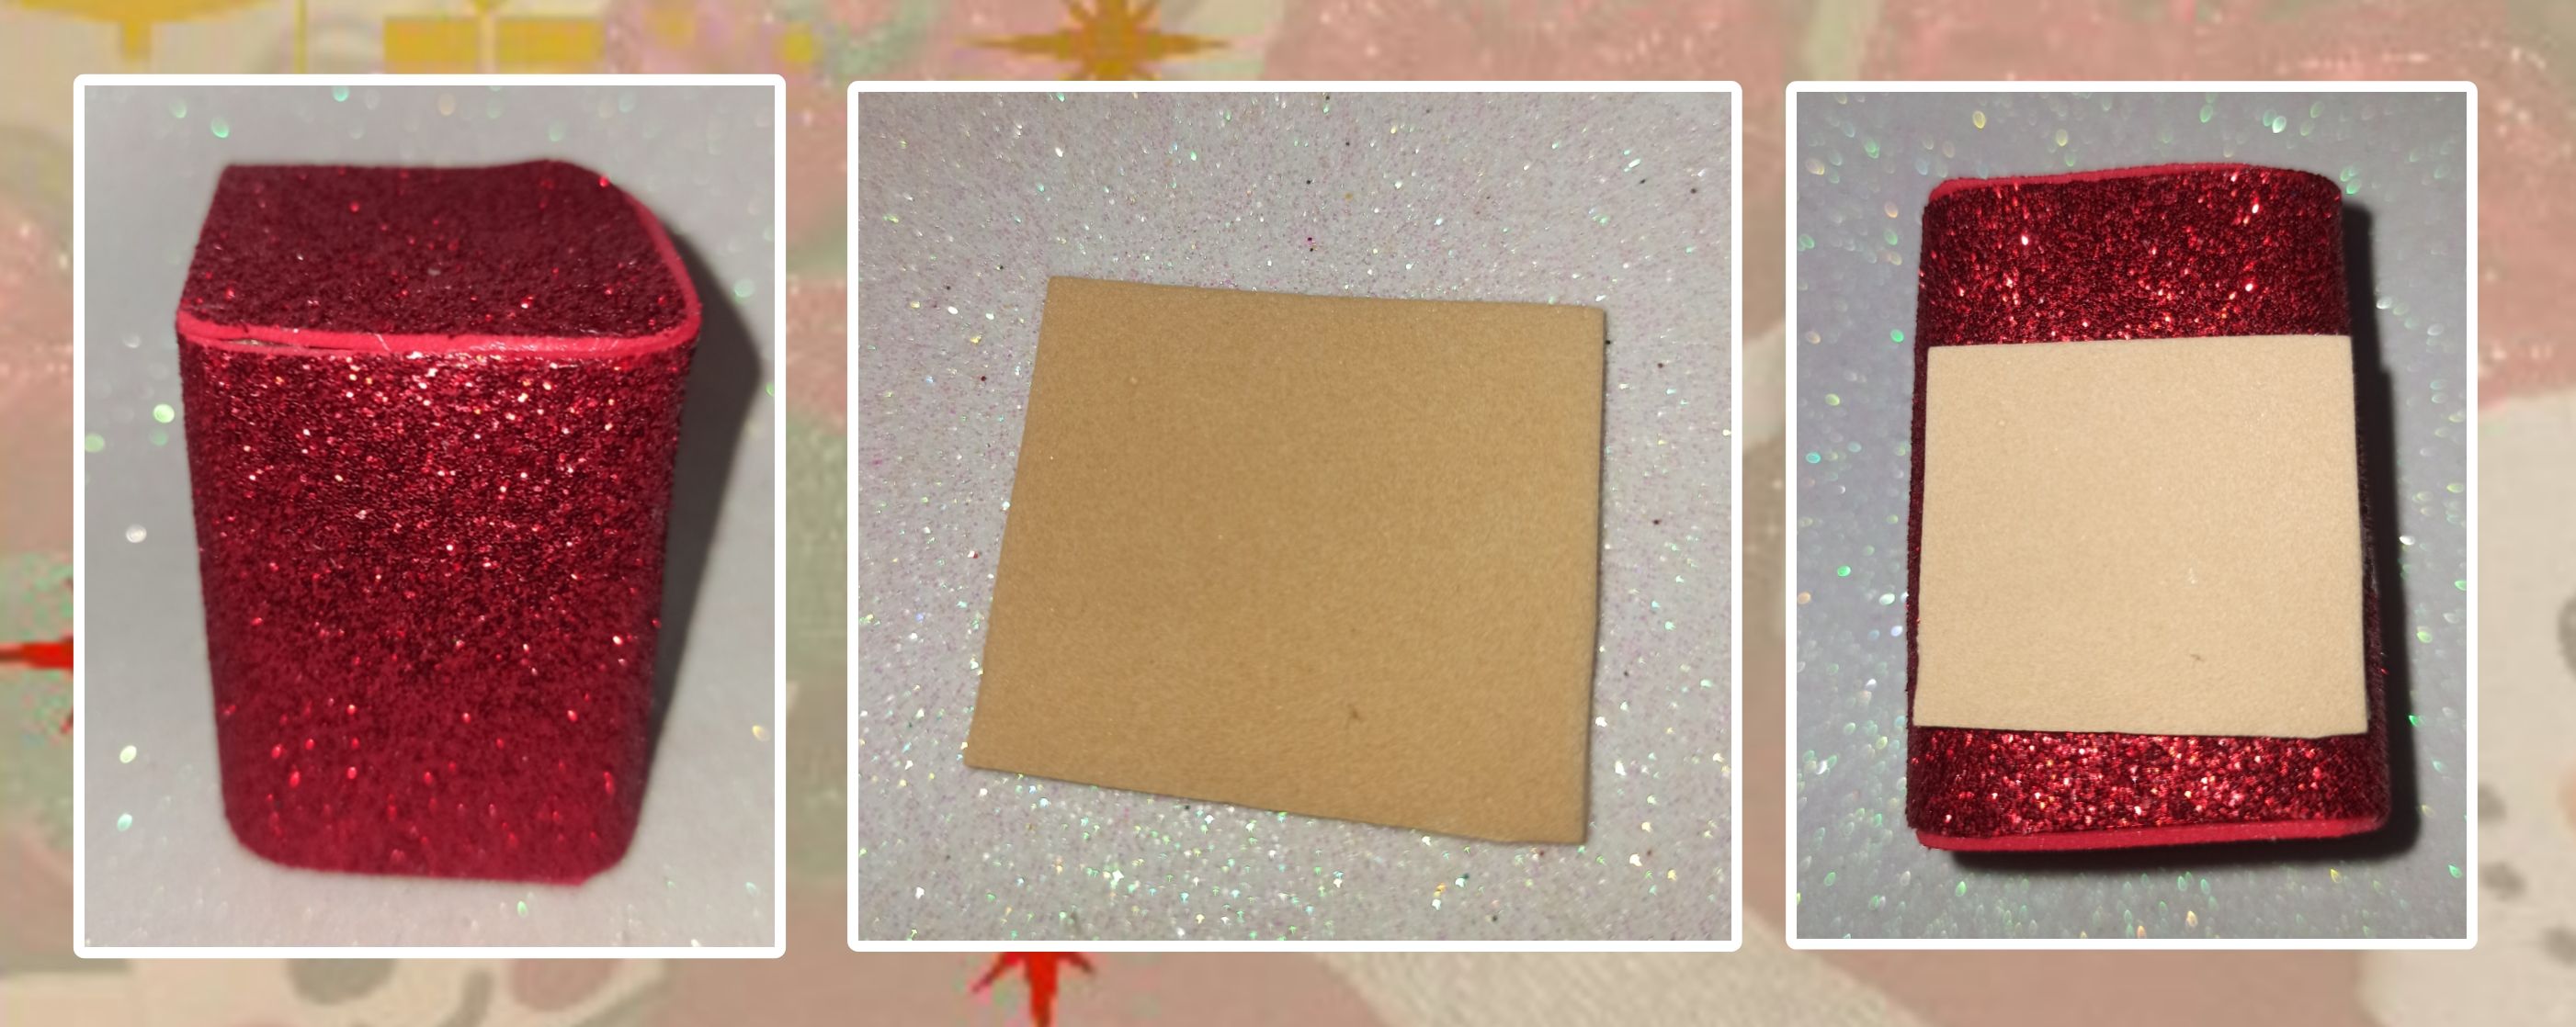
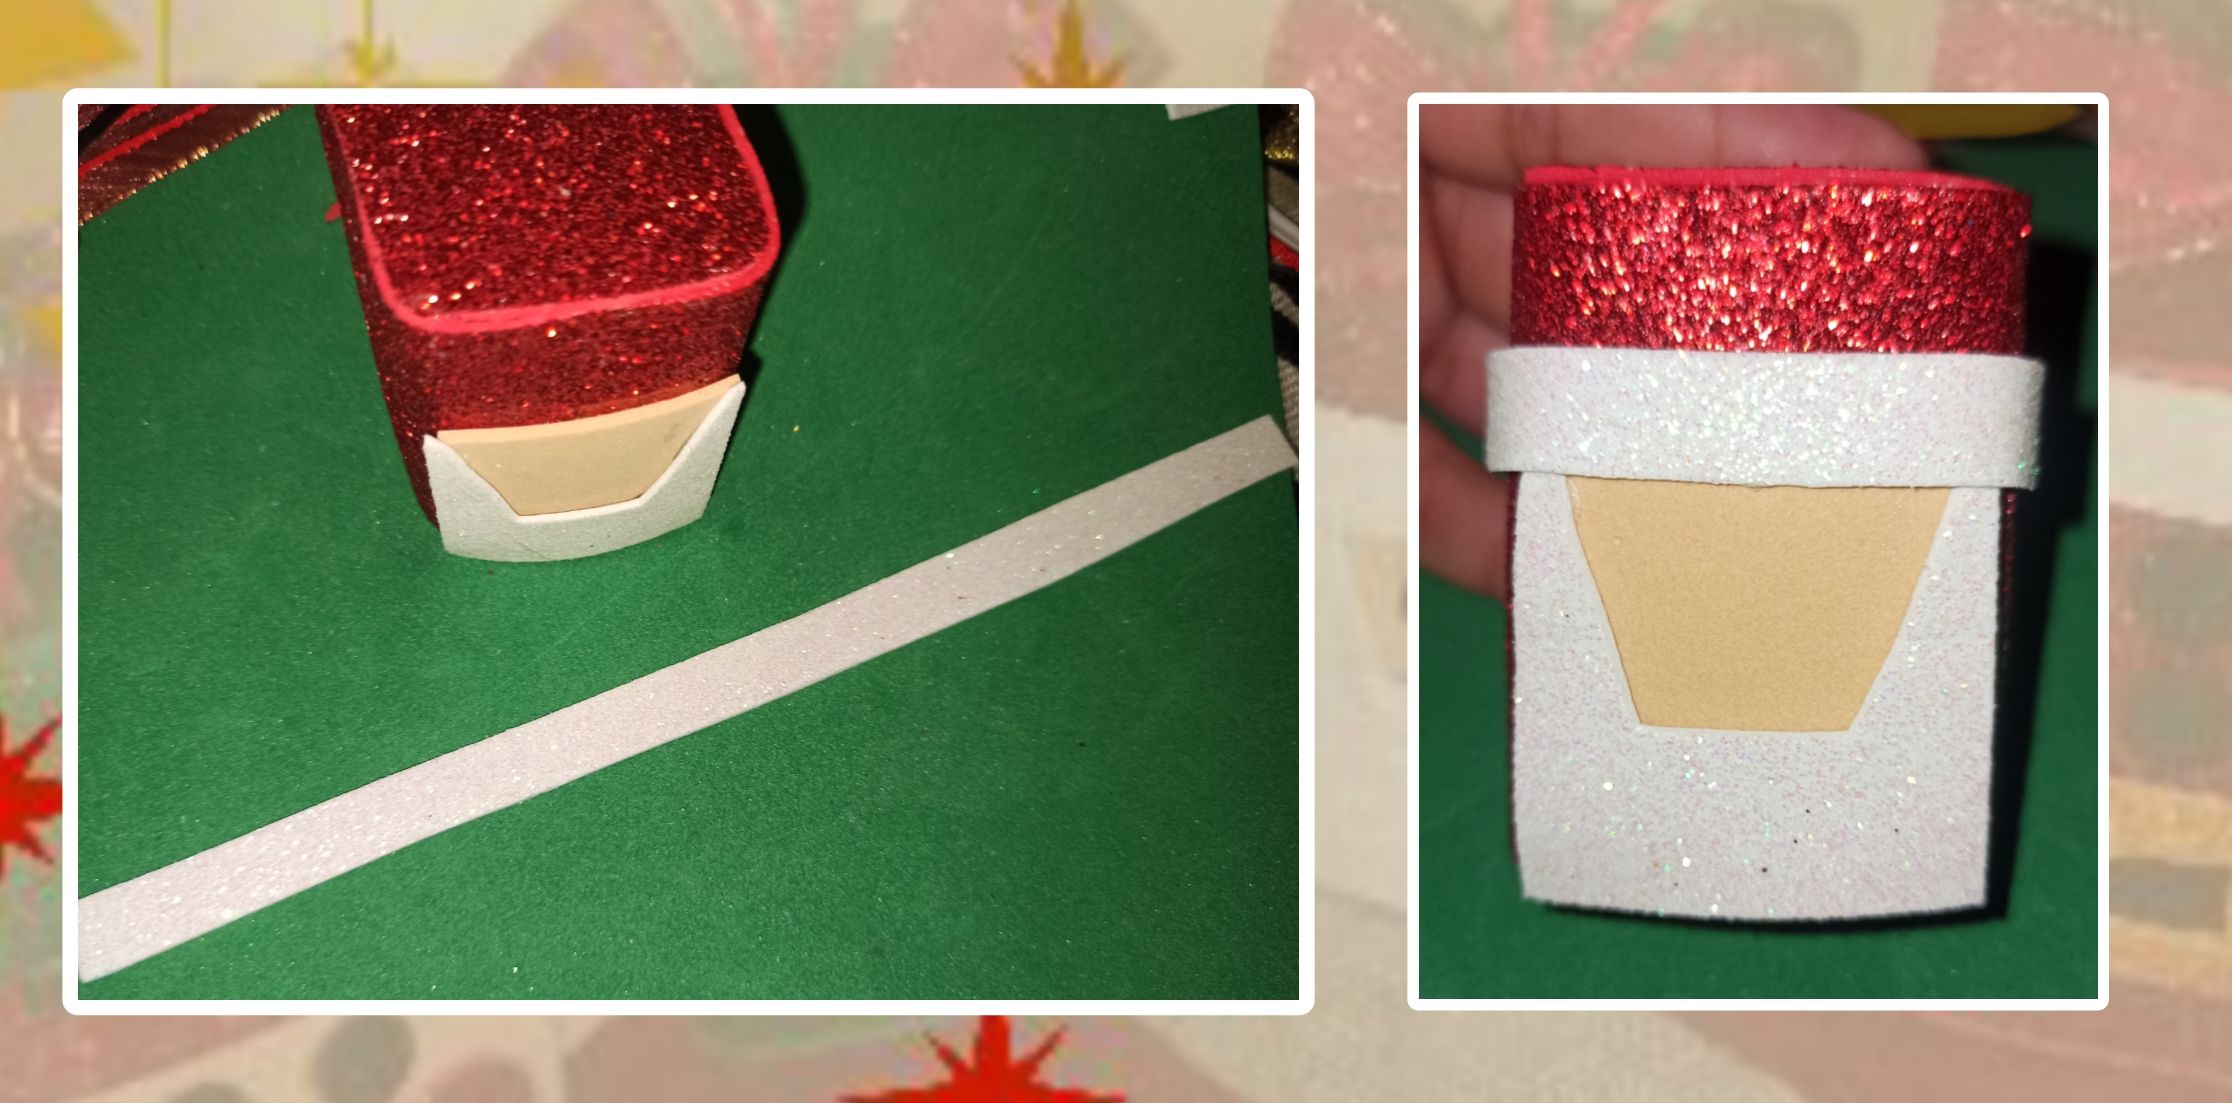
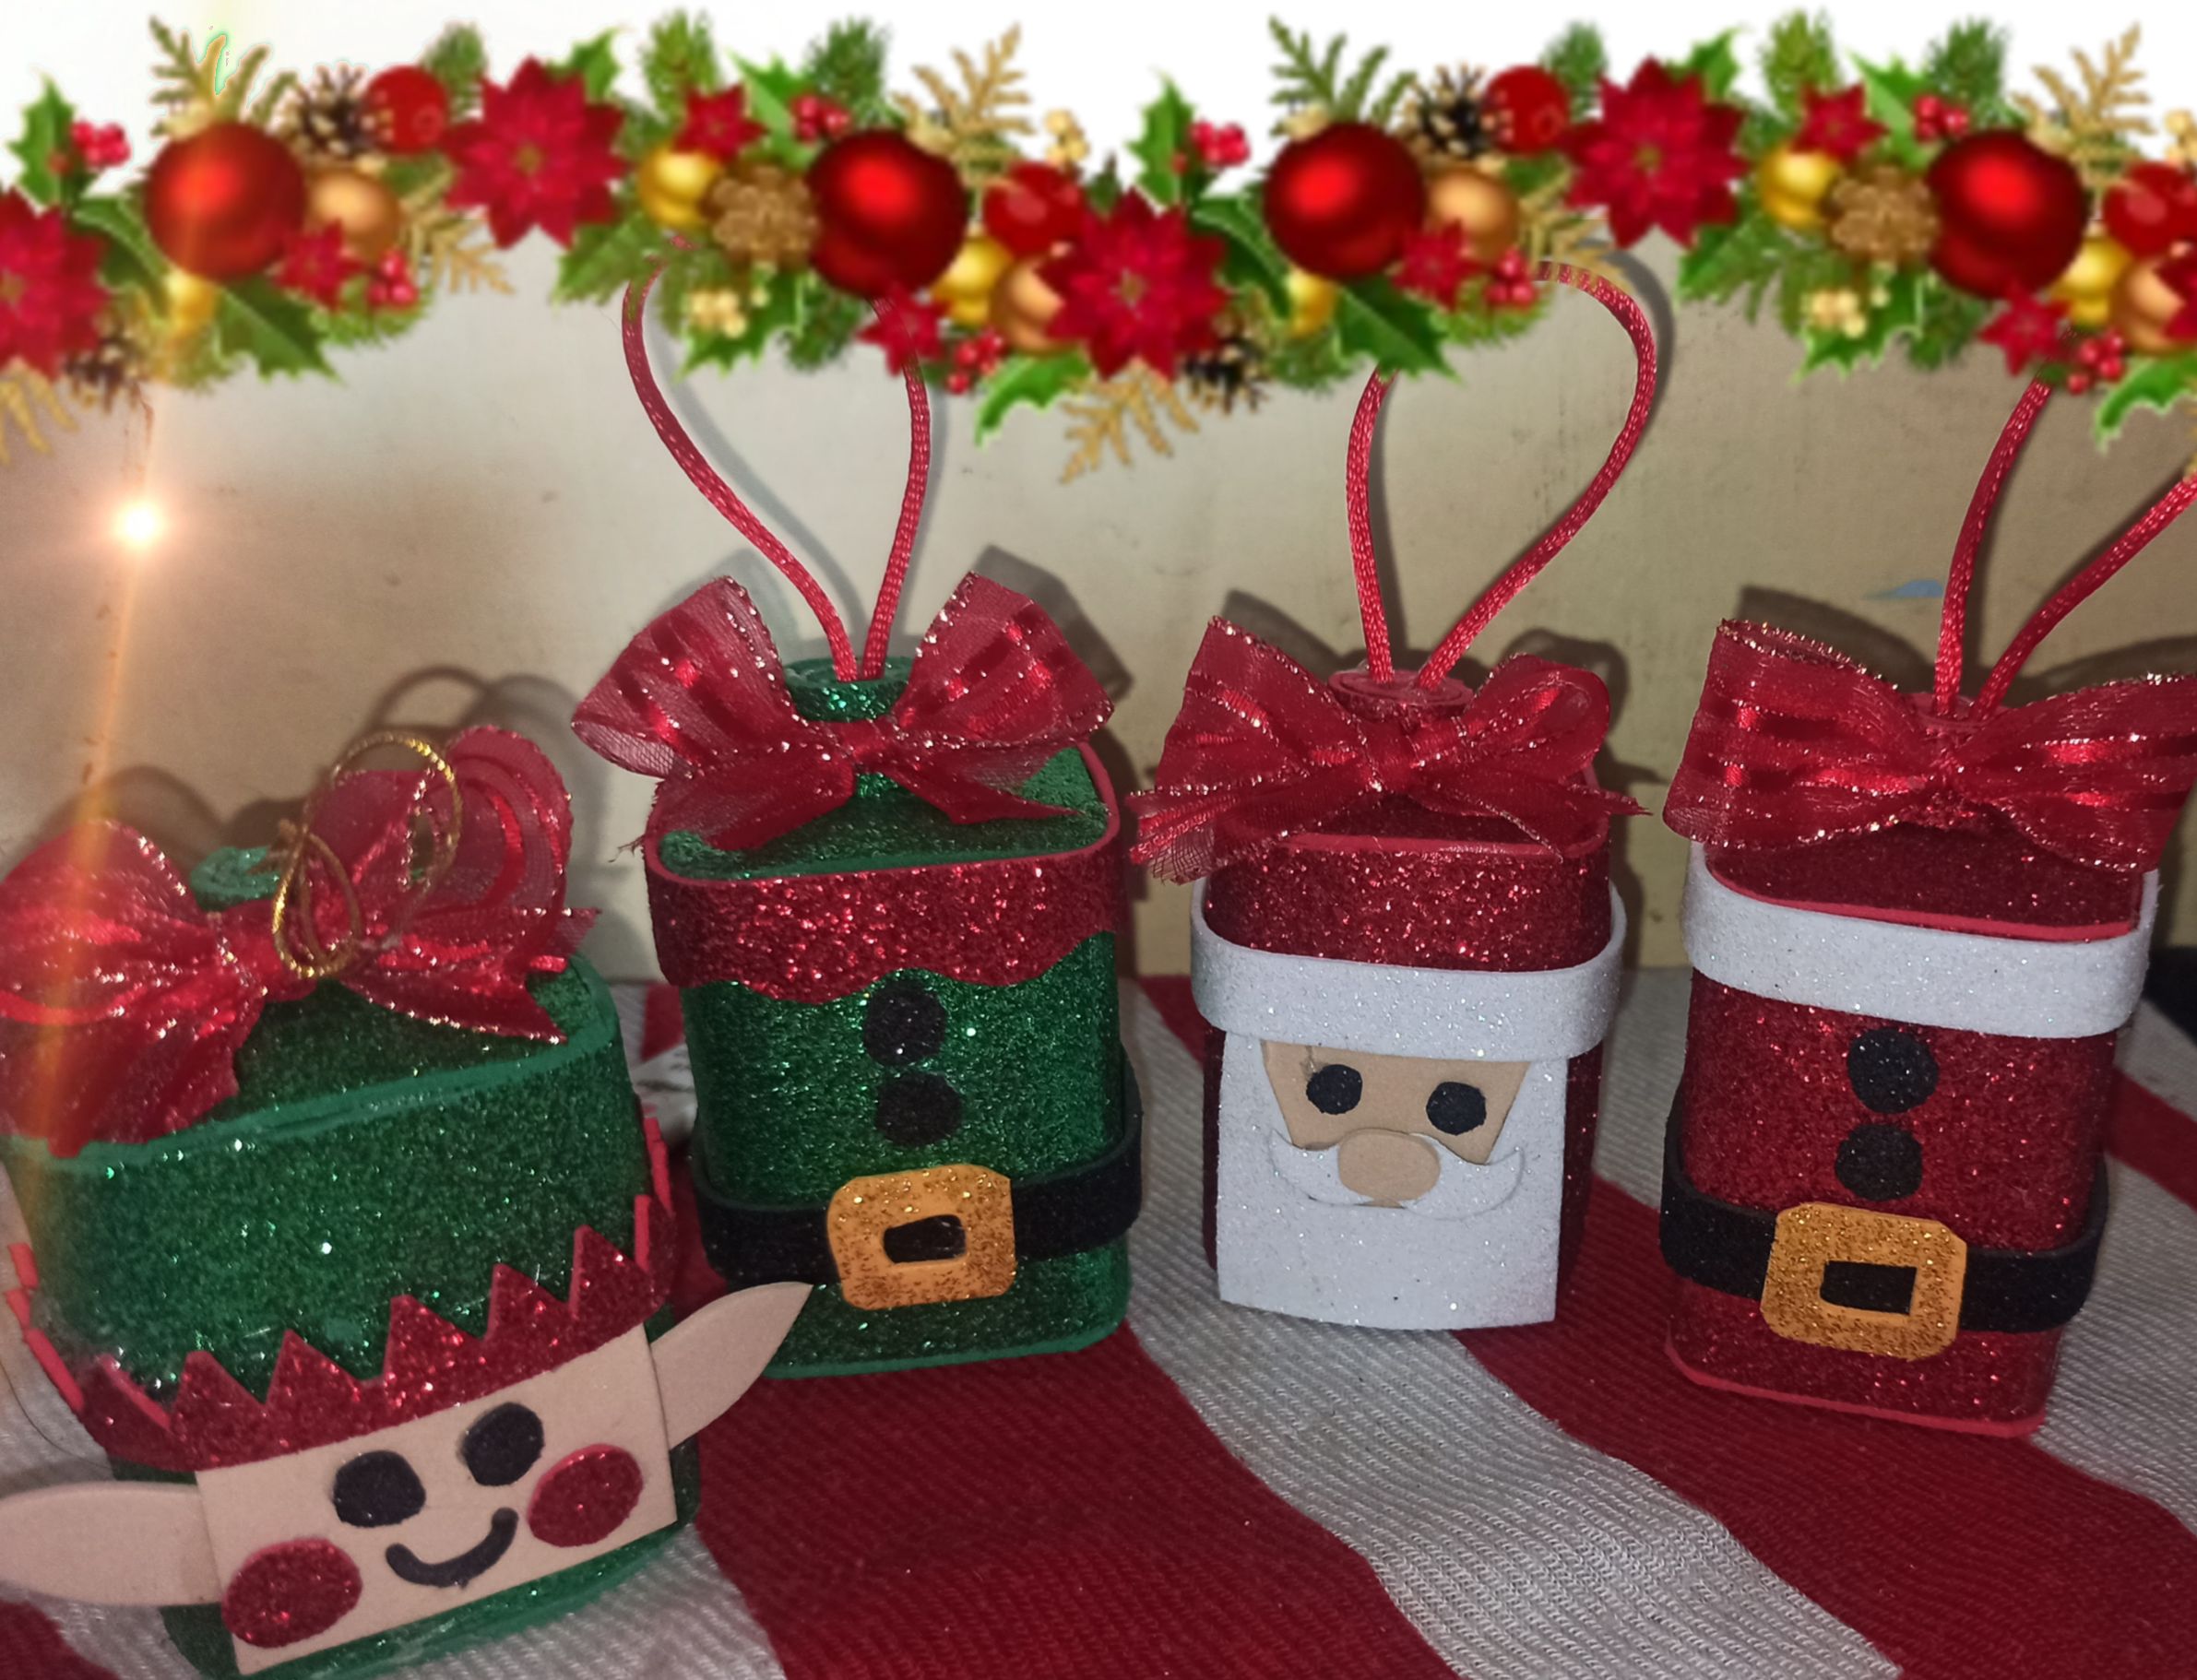
🎅 Para Santa Claus,con la caja preparada, la forramos con foamy rojo escarchado.
🎅 For Santa Claus, with the box ready, we line it with frosted red foamy.
🎅 Cortar un pedazo de foamy color piel de 4 cm x 3 cm y pegamos.
🎅 Cut a 4 cm x 3 cm piece of skin-colored foamy and glue it.
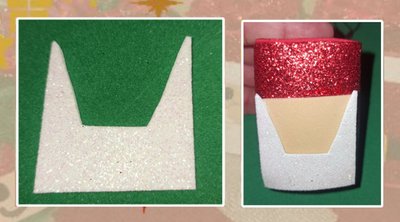
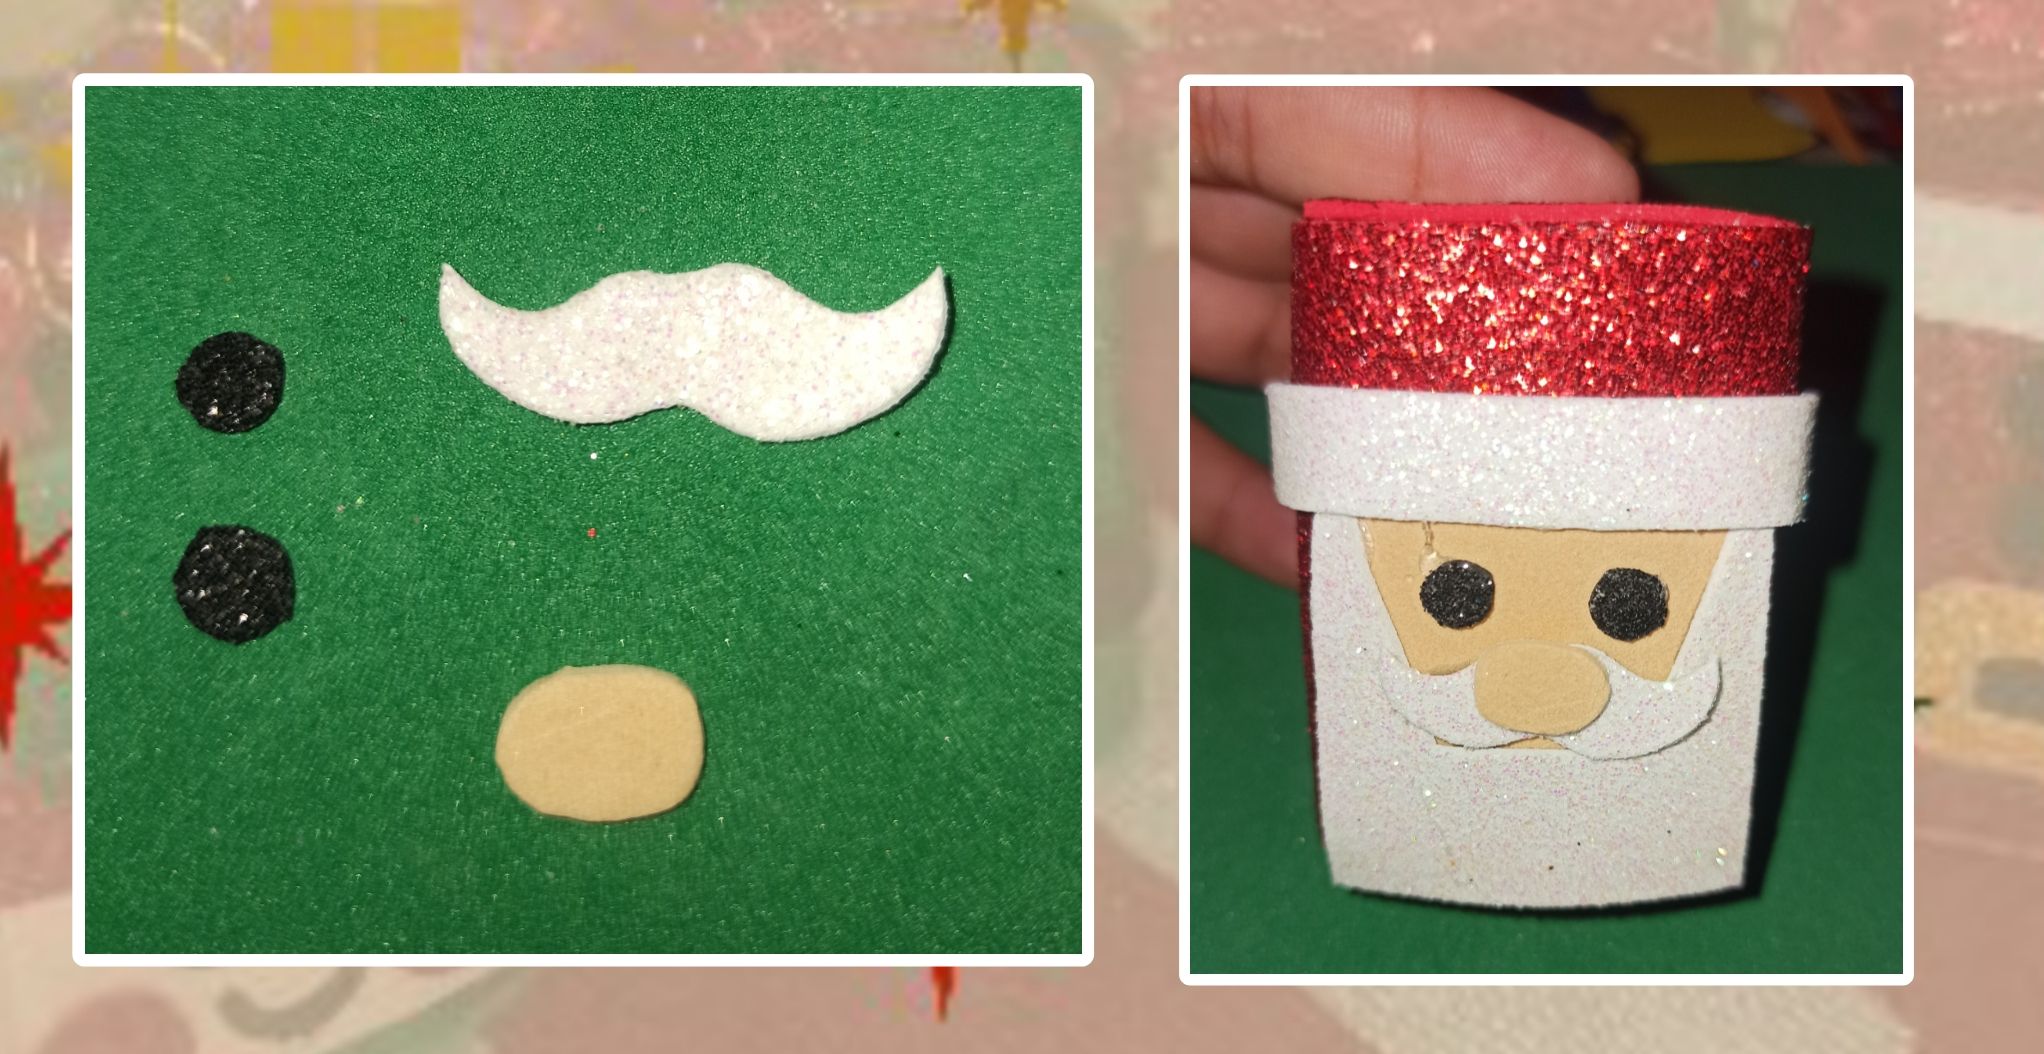
🎅 En foamy blanco hacemos la barba, en la imagen pueden apreciar la forma, muy fácil de hacer.
🎅 In white foamy we make the beard, in the image you can see the shape, very easy to make.
🎅 Cortar una tira de foamy blanco de 17 cm x 1 cm. Pegamos alrededor a la altura donde comienza la barba.
Cut a 17 cm x 1 cm strip of white foamy. We glue around it at the height where the beard begins.
🎅 Hacemos los bigotes, ojos y nariz, en la imagen pueden apreciar las formas y donde van pegados.
🎅 We make the whiskers, eyes, and nose, in the image you can see the shapes and where they are glued.
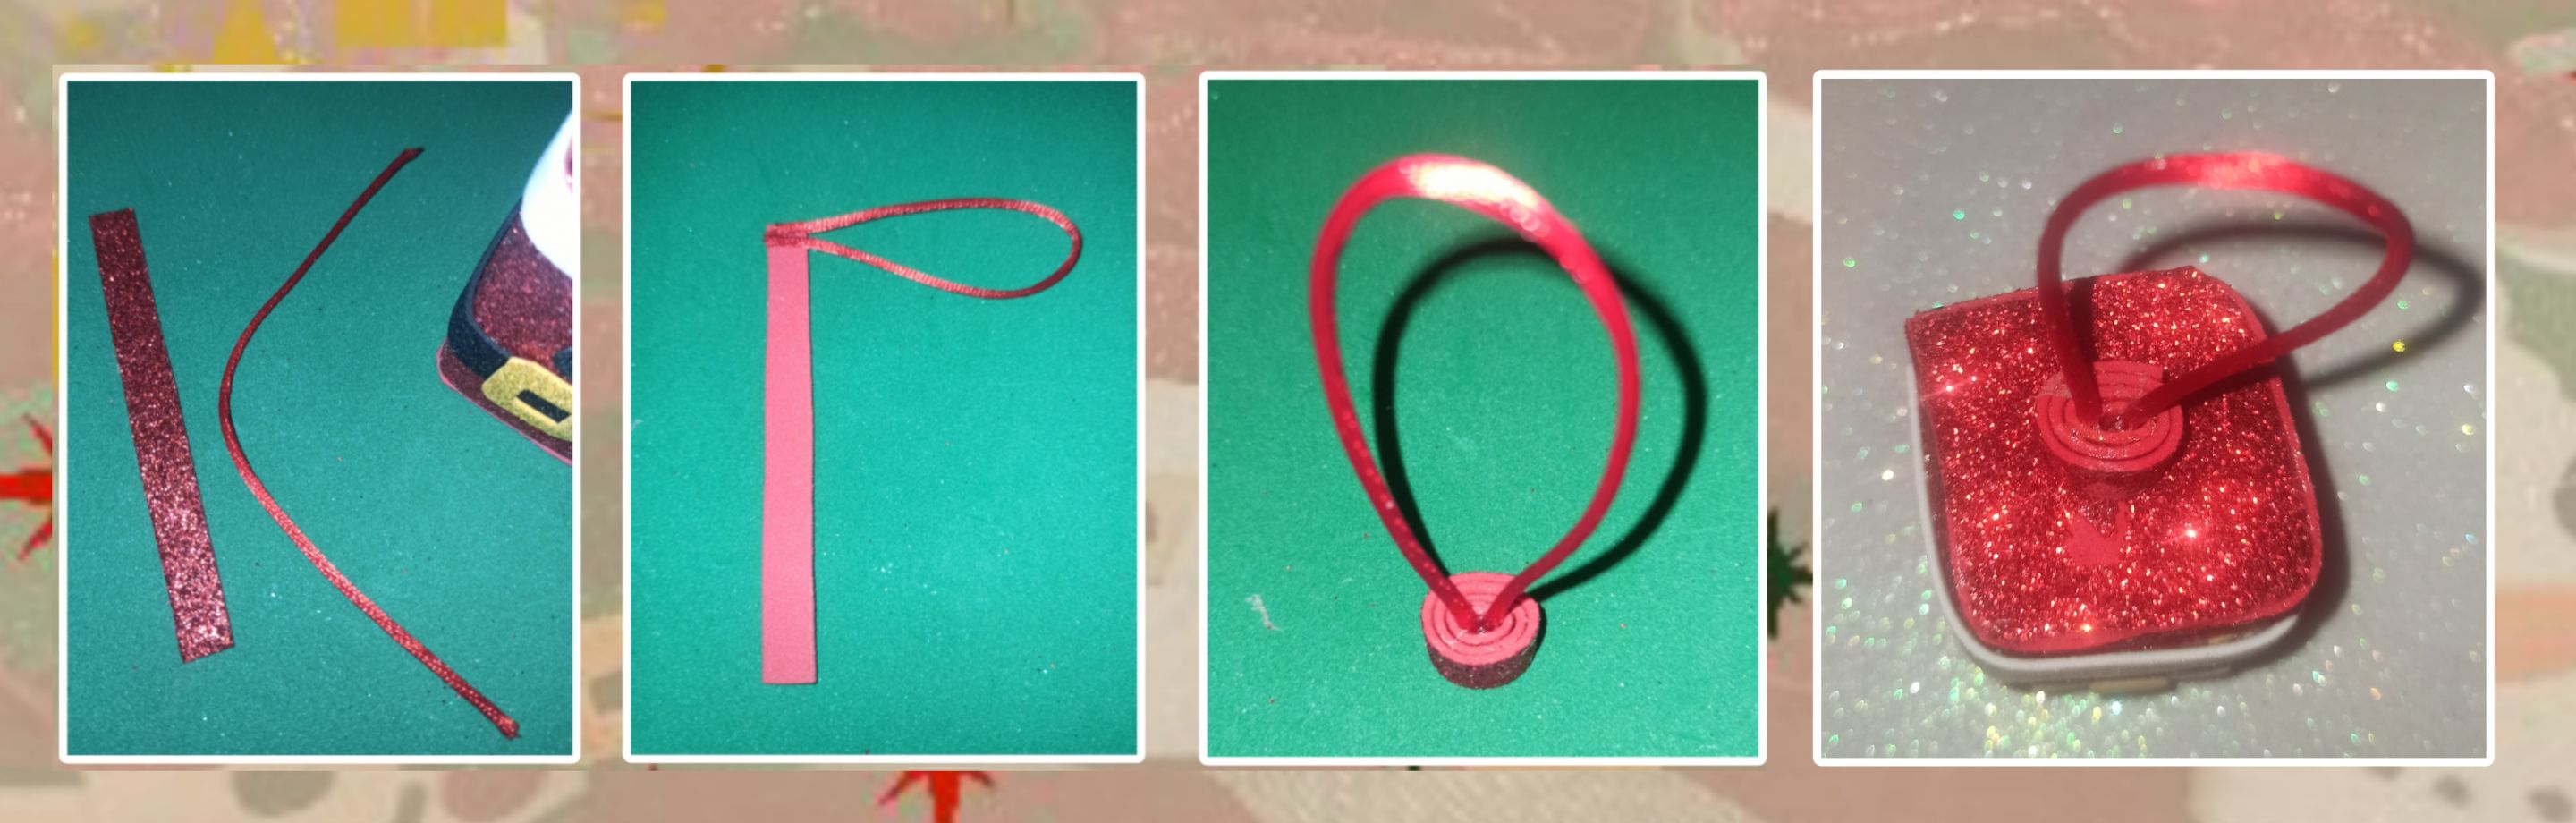
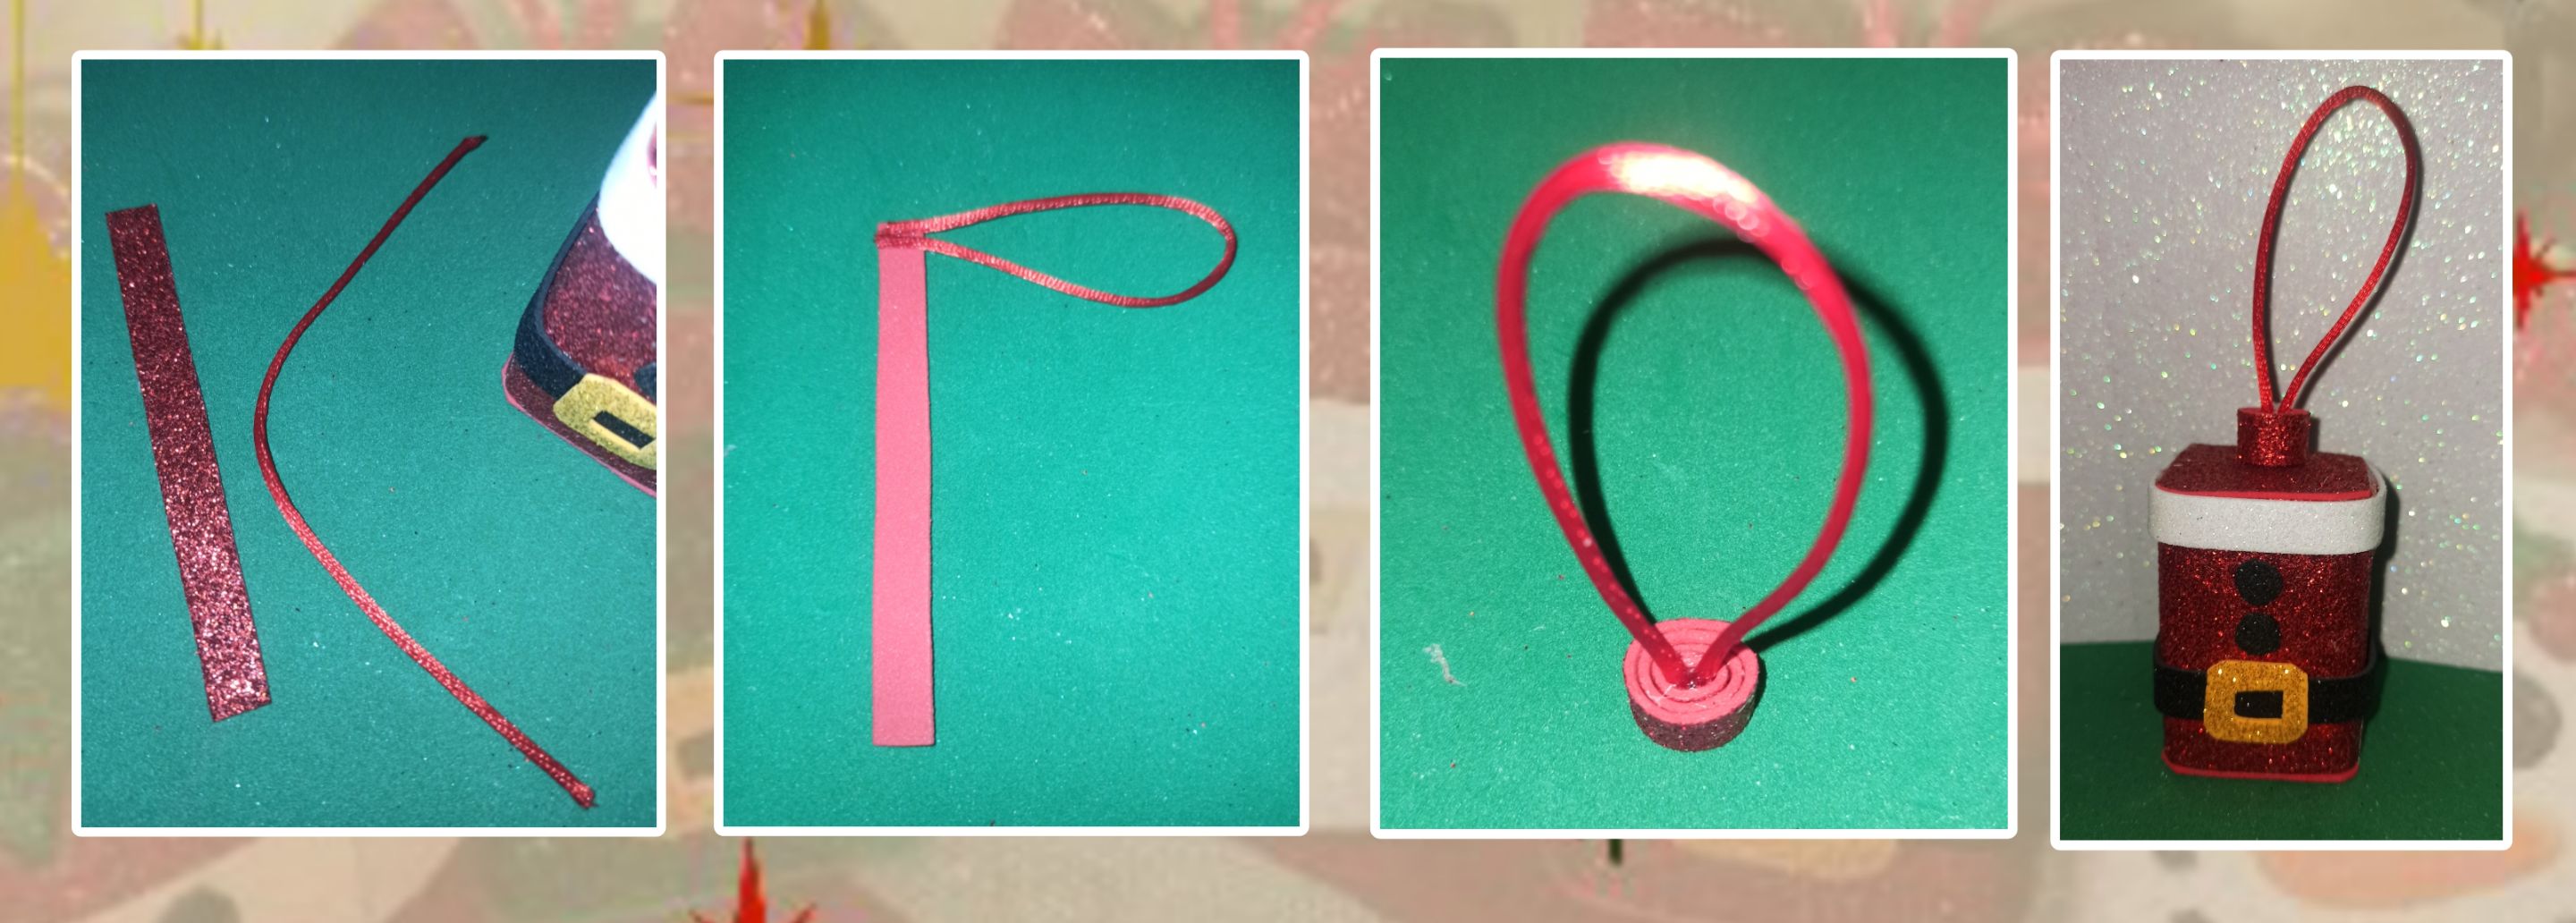
🎅 Cortar una tira de foamy de 5 cm x 1 cm. Una tira de cola de ratón de 10 cm. Pegamos las dos puntas de la cola de ratón en uno de los extremos del foamy, agregamos silicón y enrollamos la tira de foamy. Lo pegamos en la parte superior de la caja.
🎅 Cut a 5 cm x 1 cm strip of foamy. A strip of mouse tail of 10 cm. We glue the two ends of the mouse glue on one of the ends of the foamy, add silicone and roll the foamy strip. Glue it to the top of the box.
🎅 Pegamos un lazo rojo y listo.
🎅 We glue a red ribbon and that's it.

🎅 Para la otra parte de Santa Claus , forramos la caja con el foamy rojo escarchado.
🎅 For the other part of Santa Claus, we lined the box with frosted red foamy.

🎅 Cortamos una tira de foamy blanco de 17 cm x 1 cm y pegamos en la parte superior.
🎅 Cut a 17 cm x 1 cm strip of white foamy and glue it on top.
🎅 Para hacer el cinturón cortar una tira de foamy negro de 17 cm x 1 cm.
🎅 To make the belt cut a 17 cm x 1 cm strip of black foamy.
🎅 Hacemos dos botones para el traje de Santa, con foamy negro.
🎅 We make two buttons for Santa's suit, with black foamy.
🎅 Al igual que las cajas anteriores, hacemos para colgar la caja.
🎅 Just like the previous boxes, we make to hang the box.
🎅 Le pegamos el lazo y listo.
🎅 We glue the ribbon and that's it.
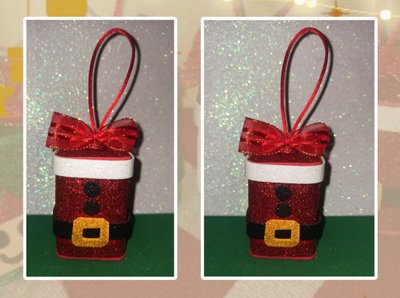
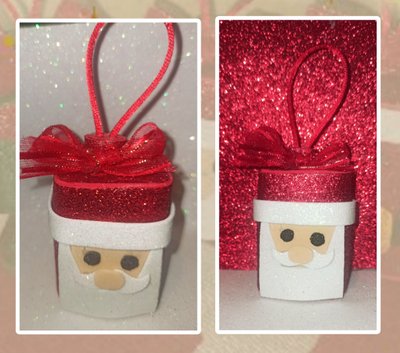
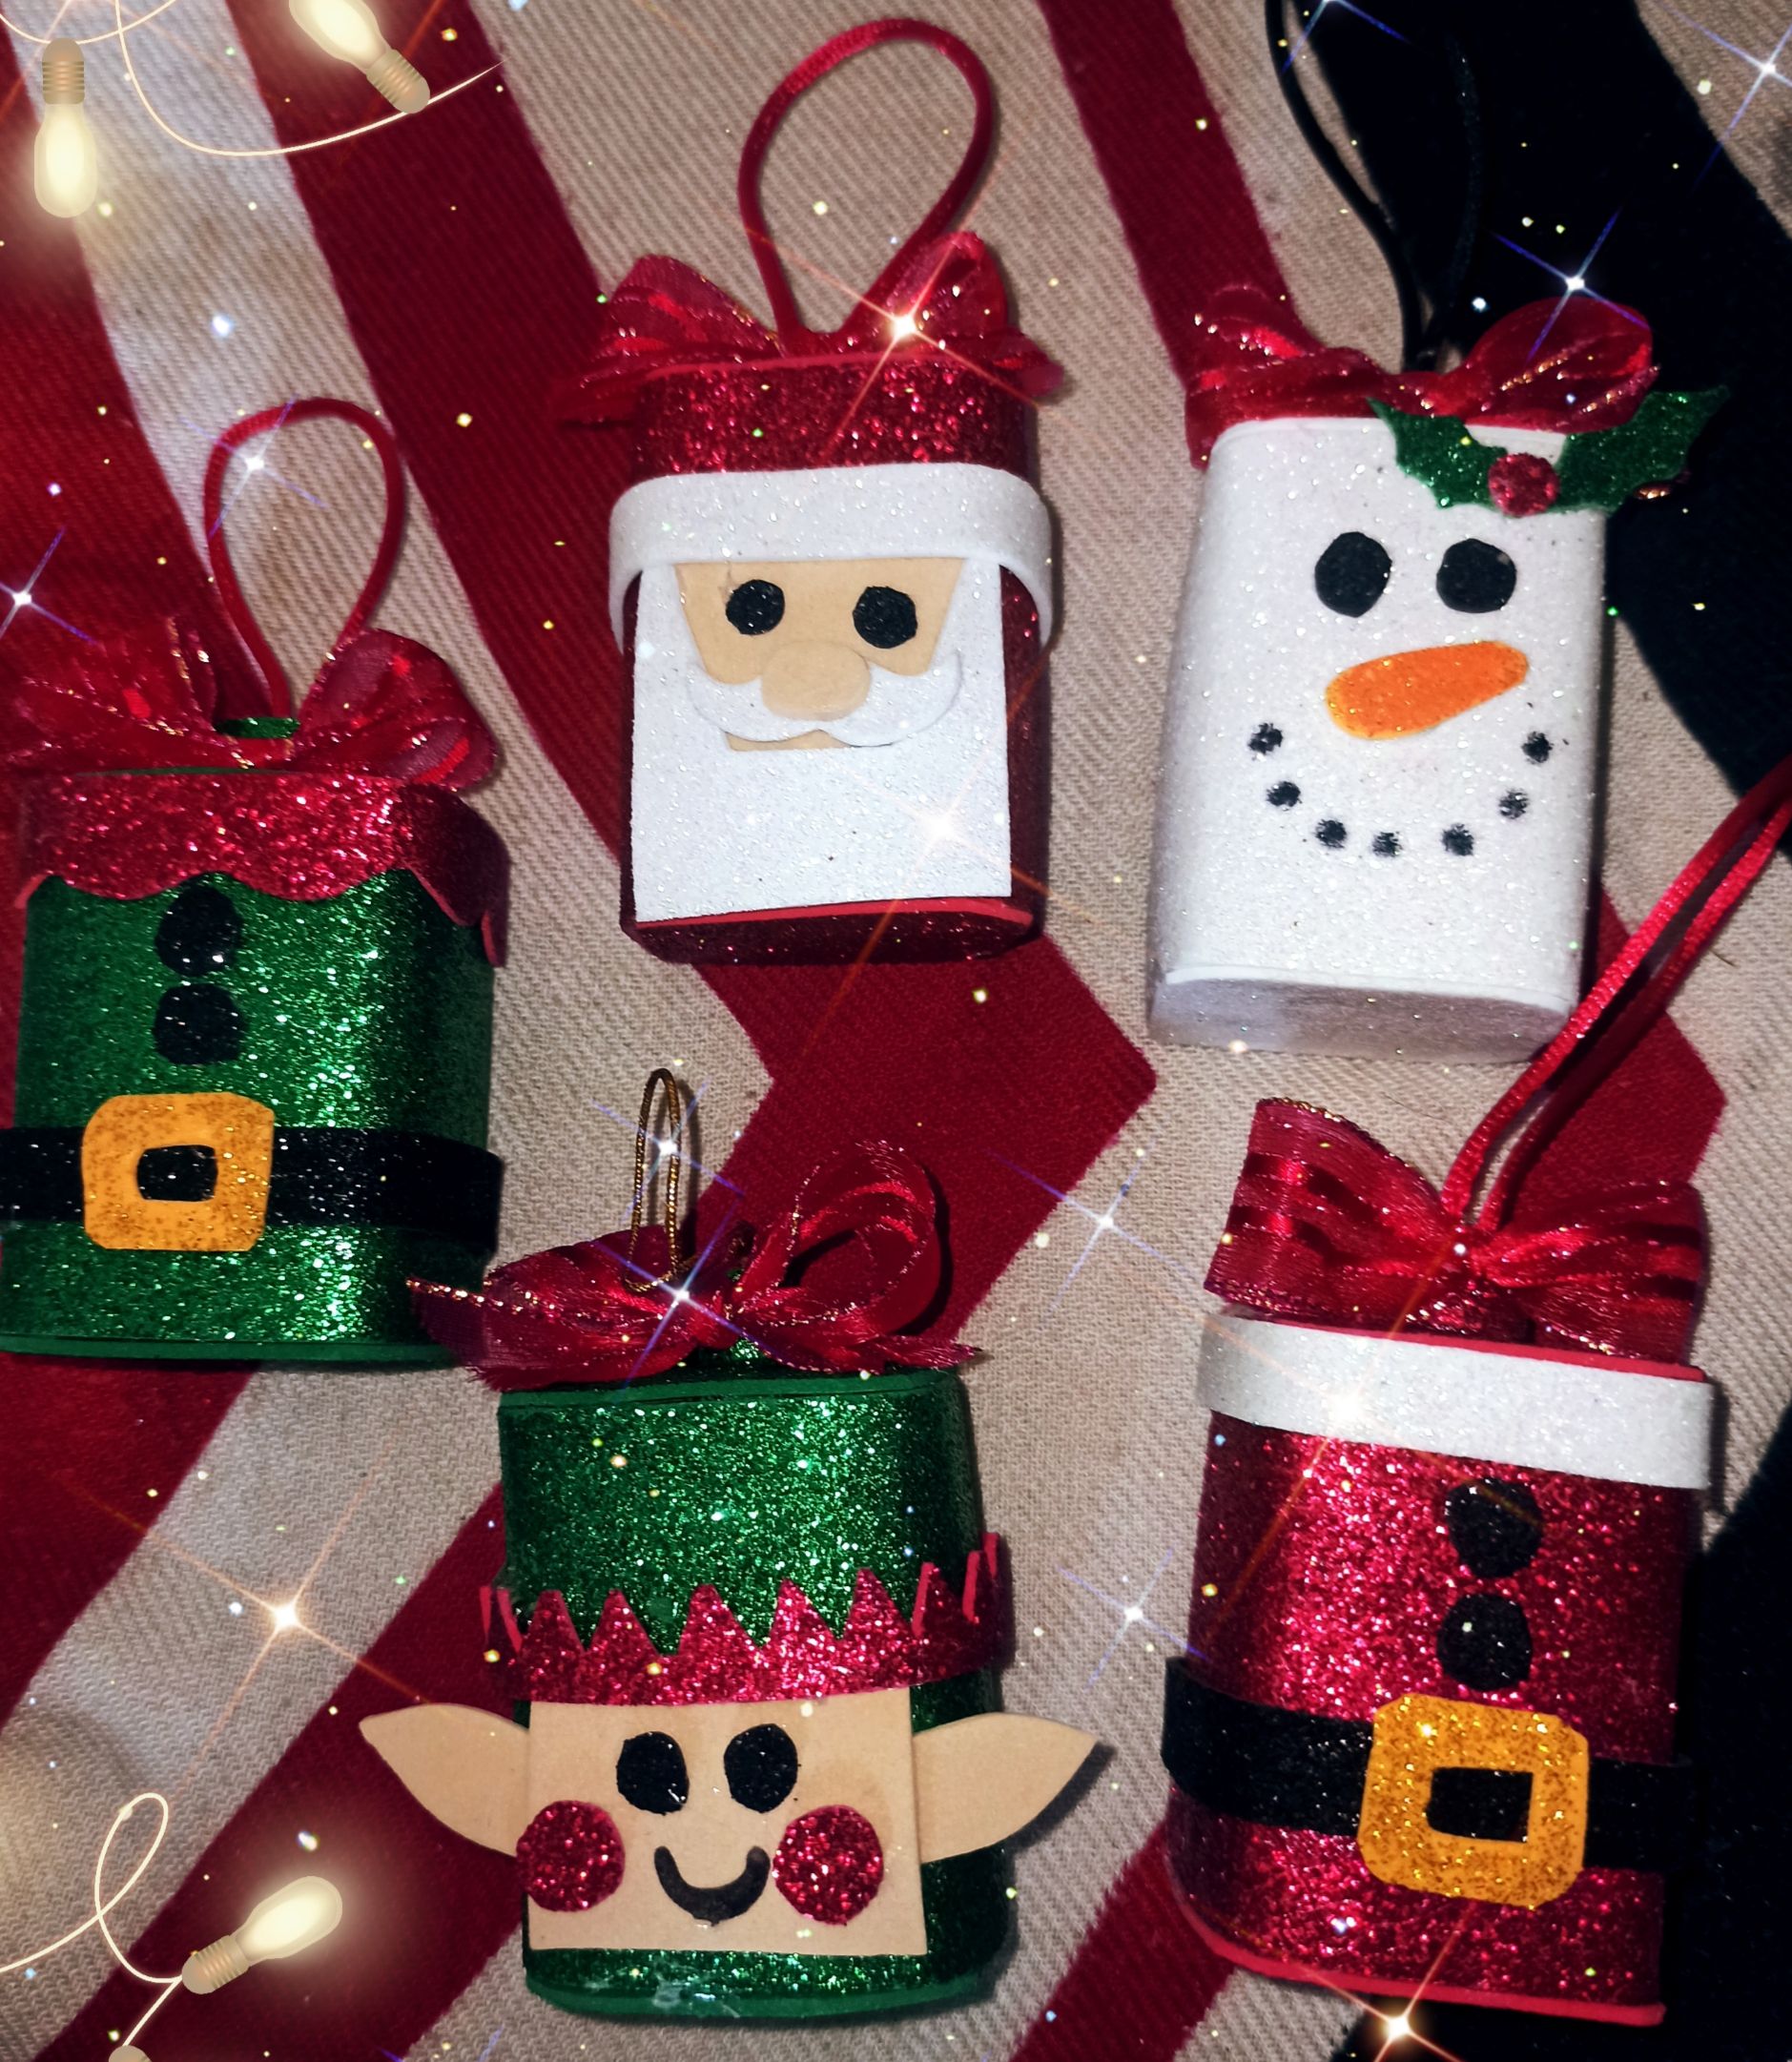
🎅 Resultado
🎅 Result.
 |  |
|---|
Estaré encantada de leer y responder a sus comentarios. Gracias totales a todos los que aprecian mi contenido, y que se toman el tiempo de leer y dejar un comentario, gracias, muchas gracias. Les deseo lo mejor.
Hasta pronto.
I will be happy to read and respond to your comments. Total thanks to all of you who appreciate my content, and who take the time to read and leave a comment, thank you, thank you very much. I wish you all the best.

See you soon.

Ideas Navideñas :
Christmas Ideas :
Fotografías de mi propiedad tomadas con el celular Redmi note 8 pro, editadas en canva
Traducción realizada con la versión gratuita del
traductor DeepL
Todos los diseños fueron creados en canva
Video editado desde mi teléfono en la App Inshop y CapCut
Música: sleigh ride
Músico: home for Christmas
Photographs of my property taken with the Redmi note 8 pro cell phone, edited in canva
Translation made with the free version of
translator DeepL
All designs were created in canva
Video edited from my phone in the Inshop App and CapCut
Música: sleigh ride
Músico: home for Christmas
Show more
Tags :
Woo!
This creator can upvote comments using 3speak's stake today because they are a top performing creator!
Leave a quality comment relating to their content and you could receive an upvote
worth at least a dollar.
Their limit for today is $0!
Their limit for today is $0!

15 views
a year ago
$
20 views
2 years ago
$
9 views
2 years ago
$

20 views
2 years ago
$

16 views
a year ago
$
More Videos

6 views
a year ago
$

5 views
2 years ago
$
10 views
10 months ago
$

13 views
4 weeks ago
$

21 views
a year ago
$

2 views
3 years ago
$

5 views
2 years ago
$

5 views
7 months ago
$

9 views
8 months ago
$

8 views
8 months ago
$

11 views
3 years ago
$

3 views
a year ago
$

4 views
a month ago
$

34 views
a year ago
$

11 views
2 years ago
$

7 views
9 months ago
$

8 views
2 years ago
$
2 views
a year ago
$

14 views
a year ago
$

25 views
5 months ago
$

3 views
a year ago
$

7 views
a year ago
$
1 views
a year ago
$
Comments:
Reply:
To comment on this video please connect a HIVE account to your profile: Connect HIVE Account