Routine to gain base strength in DELTOIDES (SHOULDERS) on the way to Straddle Planche [ESP🇻🇪/ENG🇺
7
About :
Rutina para ganar fuerza base en DELTOIDES (HOMBROS) camino a la Straddle Planche 1 [ESP🇻🇪/ENG🇺🇸]
Routine to gain base strength in DELTOIDES (SHOULDERS) on the way to Straddle Planche 1 [ESP🇻🇪/ENG🇺🇸]

Que tal familia de #HIVE y #SWC espero se encuentren todos bien. En esta ocasión quiero compartir con ustedes una rutina para ganar Fuerza base en deltoides y poder usarla en elementos de empuje como son las PLANCHAS. La rutina está enfocada en ganancia de FUERZA BASE, un poco de FUERZA EXPLOSIVA y PROPIOSEPCIÓN de TECNICA CORRECTA. Para este tipo de trabajo debemos sí o sí calentar muy bien nuestra muñecas, codos y hombros, ya que la carga que le vamos a exigir requerirá de ello. Sin más que agregar, vamos con el contenido.
Hello #HIVE and #SWC family, I hope you are all well. This time I want to share with you a routine to gain BASE STRENGTH in deltoids and to be able to use it in pushing elements such as the PLANKS. The routine is focused on gaining BASE STRENGTH, some EXPLOSIVE STRENGTH and PROPER TECHNIQUE. For this type of work, we must warm up our wrists, elbows and shoulders very well, since the load that we are going to demand will require it. Without further ado, let's go to the content.
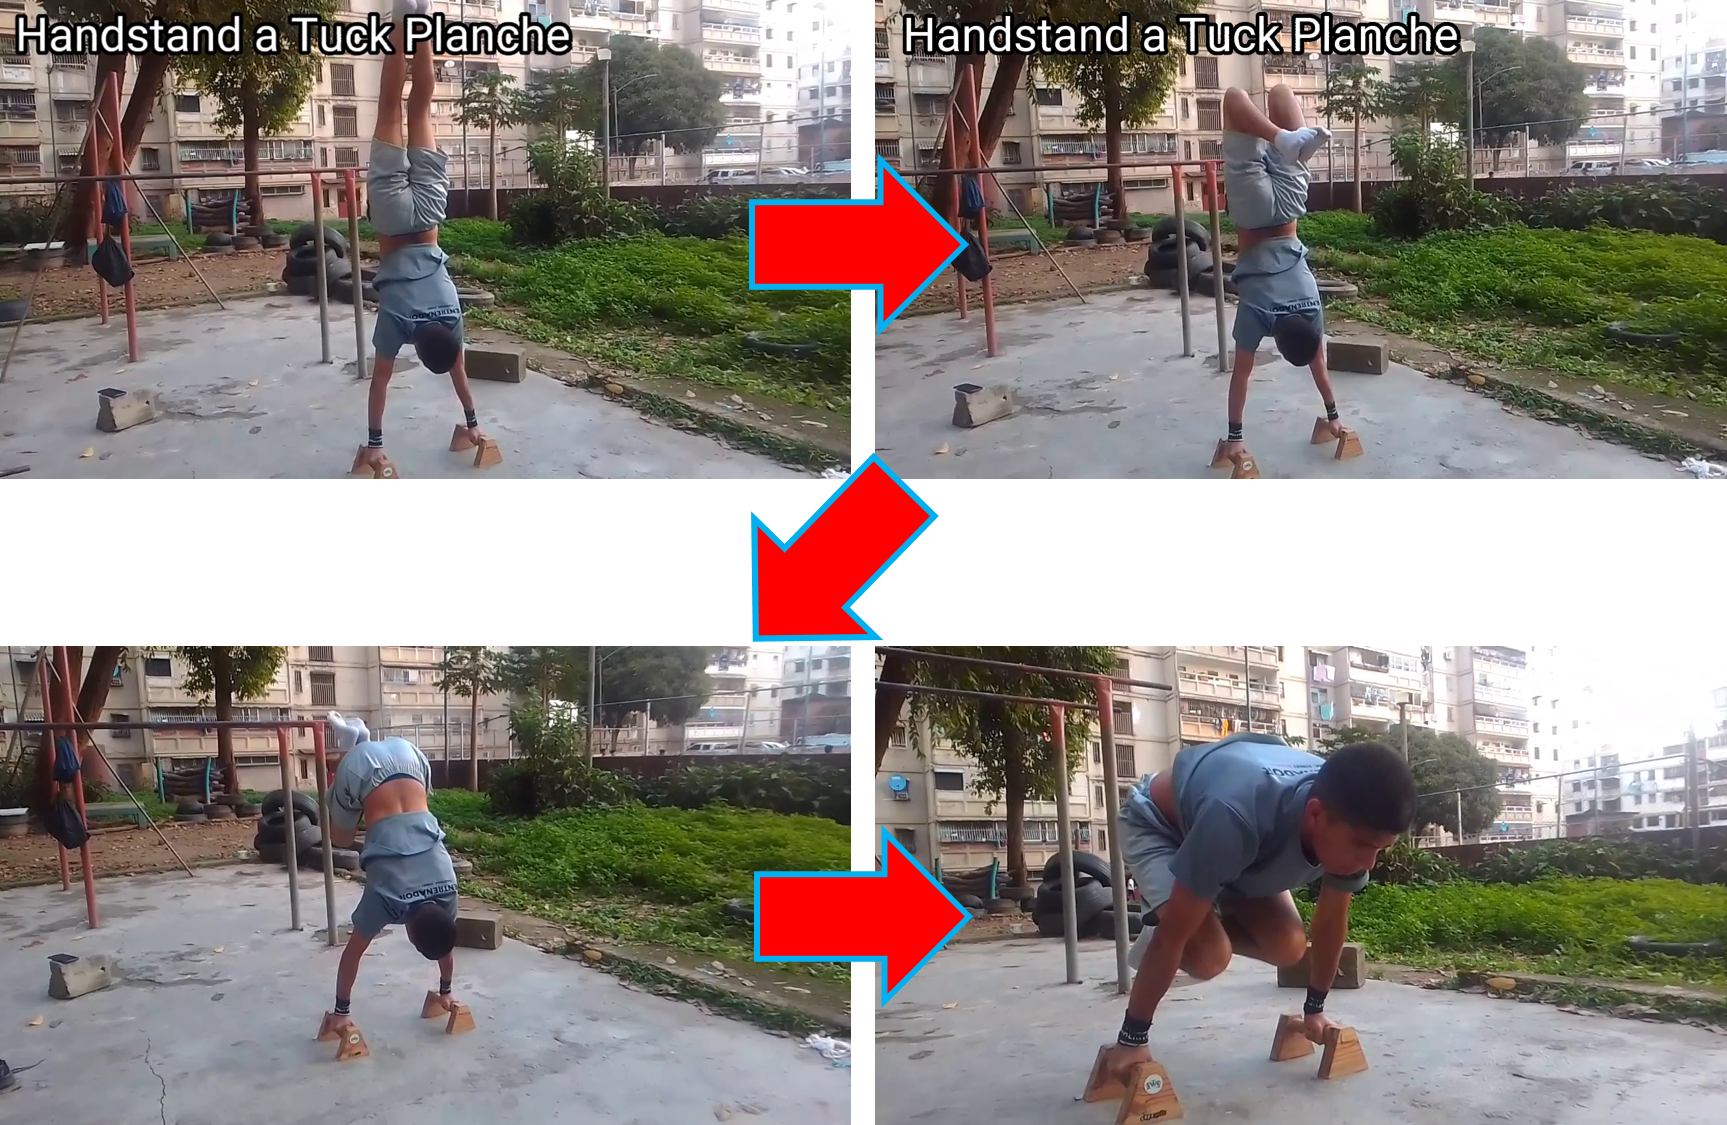
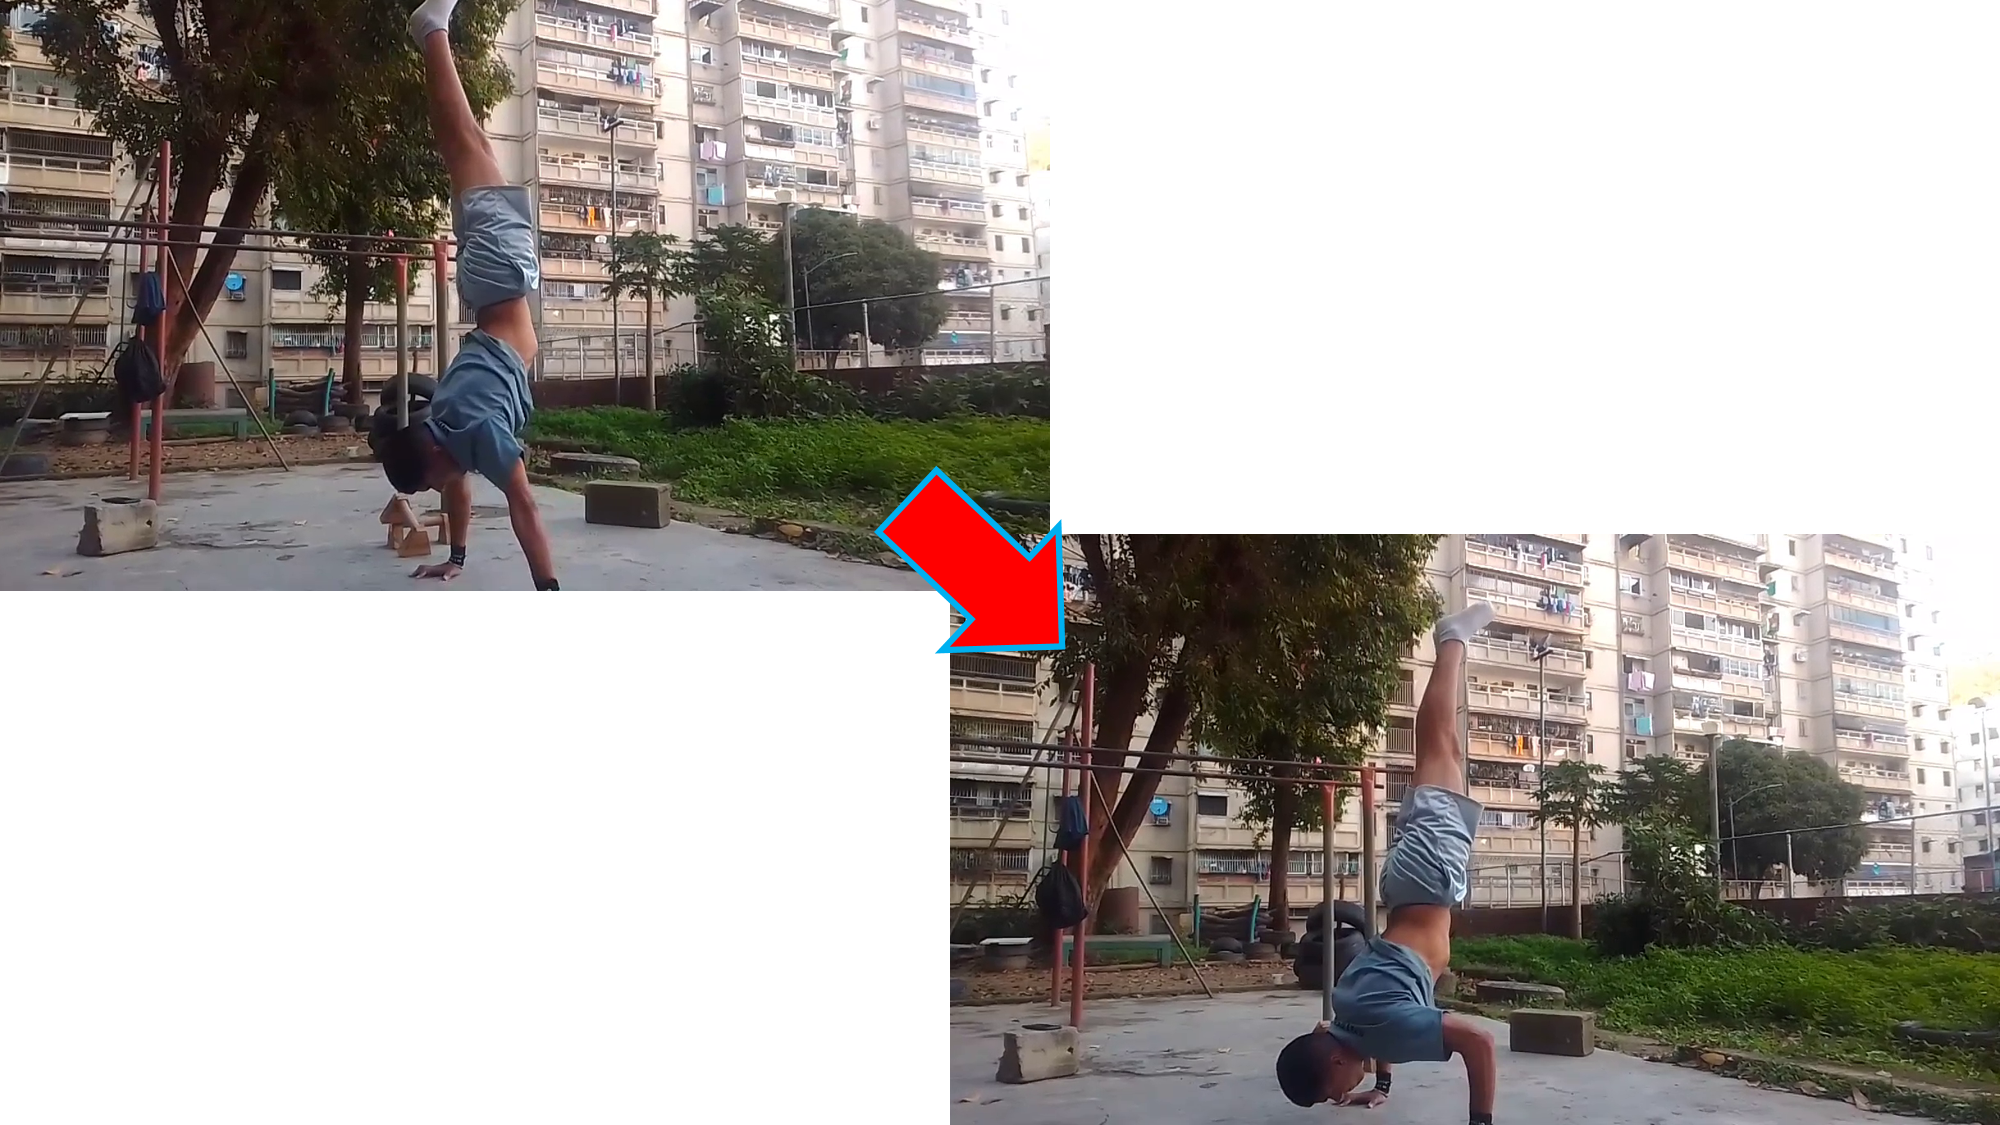
Para realizar esta progresión, vamos partir desde el HANDSTAND (cabe acotar que para poder realizar esta progresión debemos contar con un handstand sólido, así como del Tuck Planche, ya que siendo así contaremos con la fuerza necesaria para conectar ambos elementos. Y claramente, no saldrá a la primera ya que requiere una excelente propiocepción de la parte excéntrica (bajada). Ya marcado el handstand procedemos a flexionar nuestras rodillas seguido de una rotación hacia adentro de nuestra cadera apretando fuerte el abdomen, llevando nuestras rodillas hacia el pecho y coordinando lo antes dicho con la inclinación que debemos agregar en la bajada. Ya en Tuck Planche aguantamos 5segundos y terminaríamos el ejercicio.
To perform this progression, we will start from the HANDSTAND (it should be noted that to be able to perform this progression we must have a solid handstand, as well as the Tuck Planche, since this way we will have the necessary strength to connect both elements. And clearly, it will not come out the first time since it requires an excellent proprioception of the eccentric part (descent). Once the handstand is marked, we proceed to flex our knees followed by an inward rotation of our hips, tightening our abdomen, bringing our knees towards our chest and coordinating the above mentioned with the inclination that we must add in the descent. Already in Tuck Planche we hold for 5 seconds and finish the exercise.
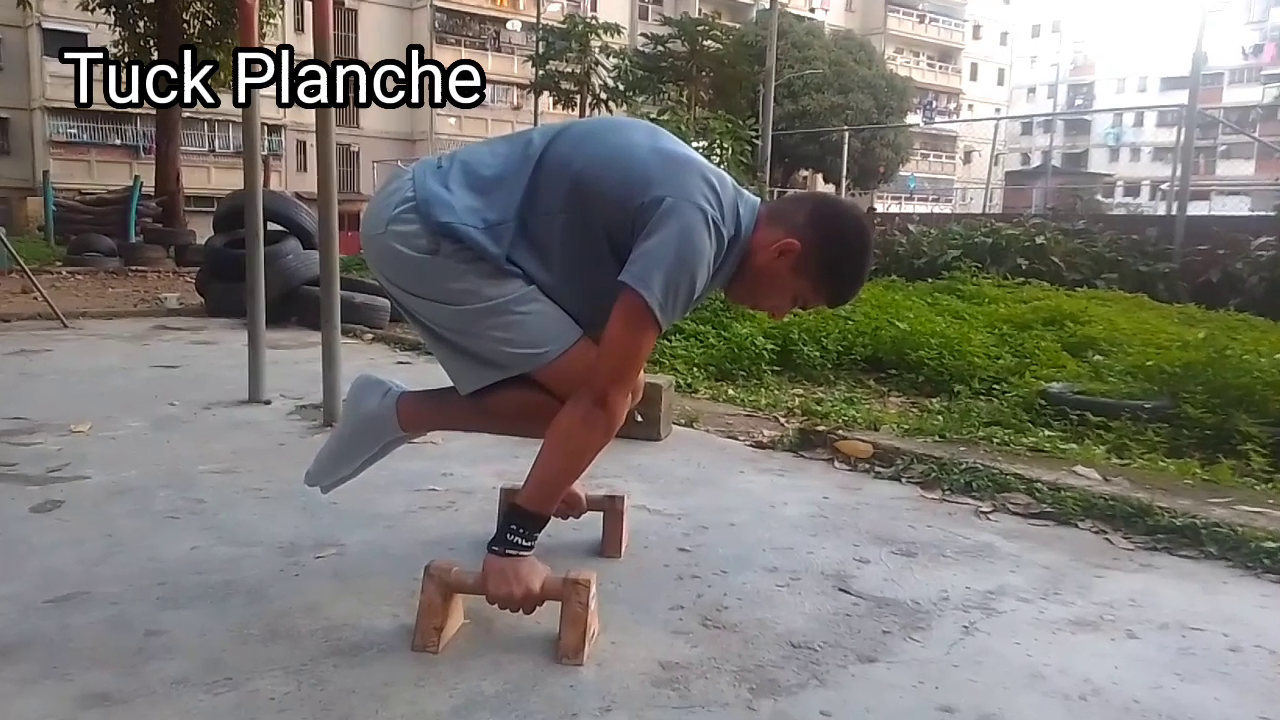
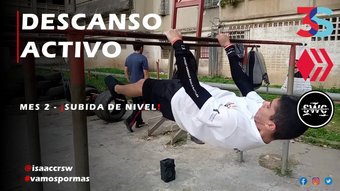
El elemento básico de planchas más preciado y por el cual todo principiante trabaja arduamente por conseguir. Consiste en una palanca leve pero potente a la vez para nuestros hombros cuando estamos comenzando. Vamos a colocar nuestro cuerpo en postura de Flexión, seguidamente llevamos nuestras rodillas al pecho he inclinamos nuestro torso hacia adelante. Por inercia y simple física de gravedad despegaremos los pies del suelo, ahora queda de nuestra parte hacer una buena activación de músculos, tendones y articulaciones para mantener esa postura.
The most precious basic element of planchas and the one that every beginner works hard to get. It consists of a light but powerful leverage for our shoulders when we are starting. We are going to place our body in Flexion posture, then we bring our knees to our chest and lean our torso forward. By inertia and simple physics of gravity we will take our feet off the ground, now it is up to us to make a good activation of muscles, tendons and joints to maintain that posture.
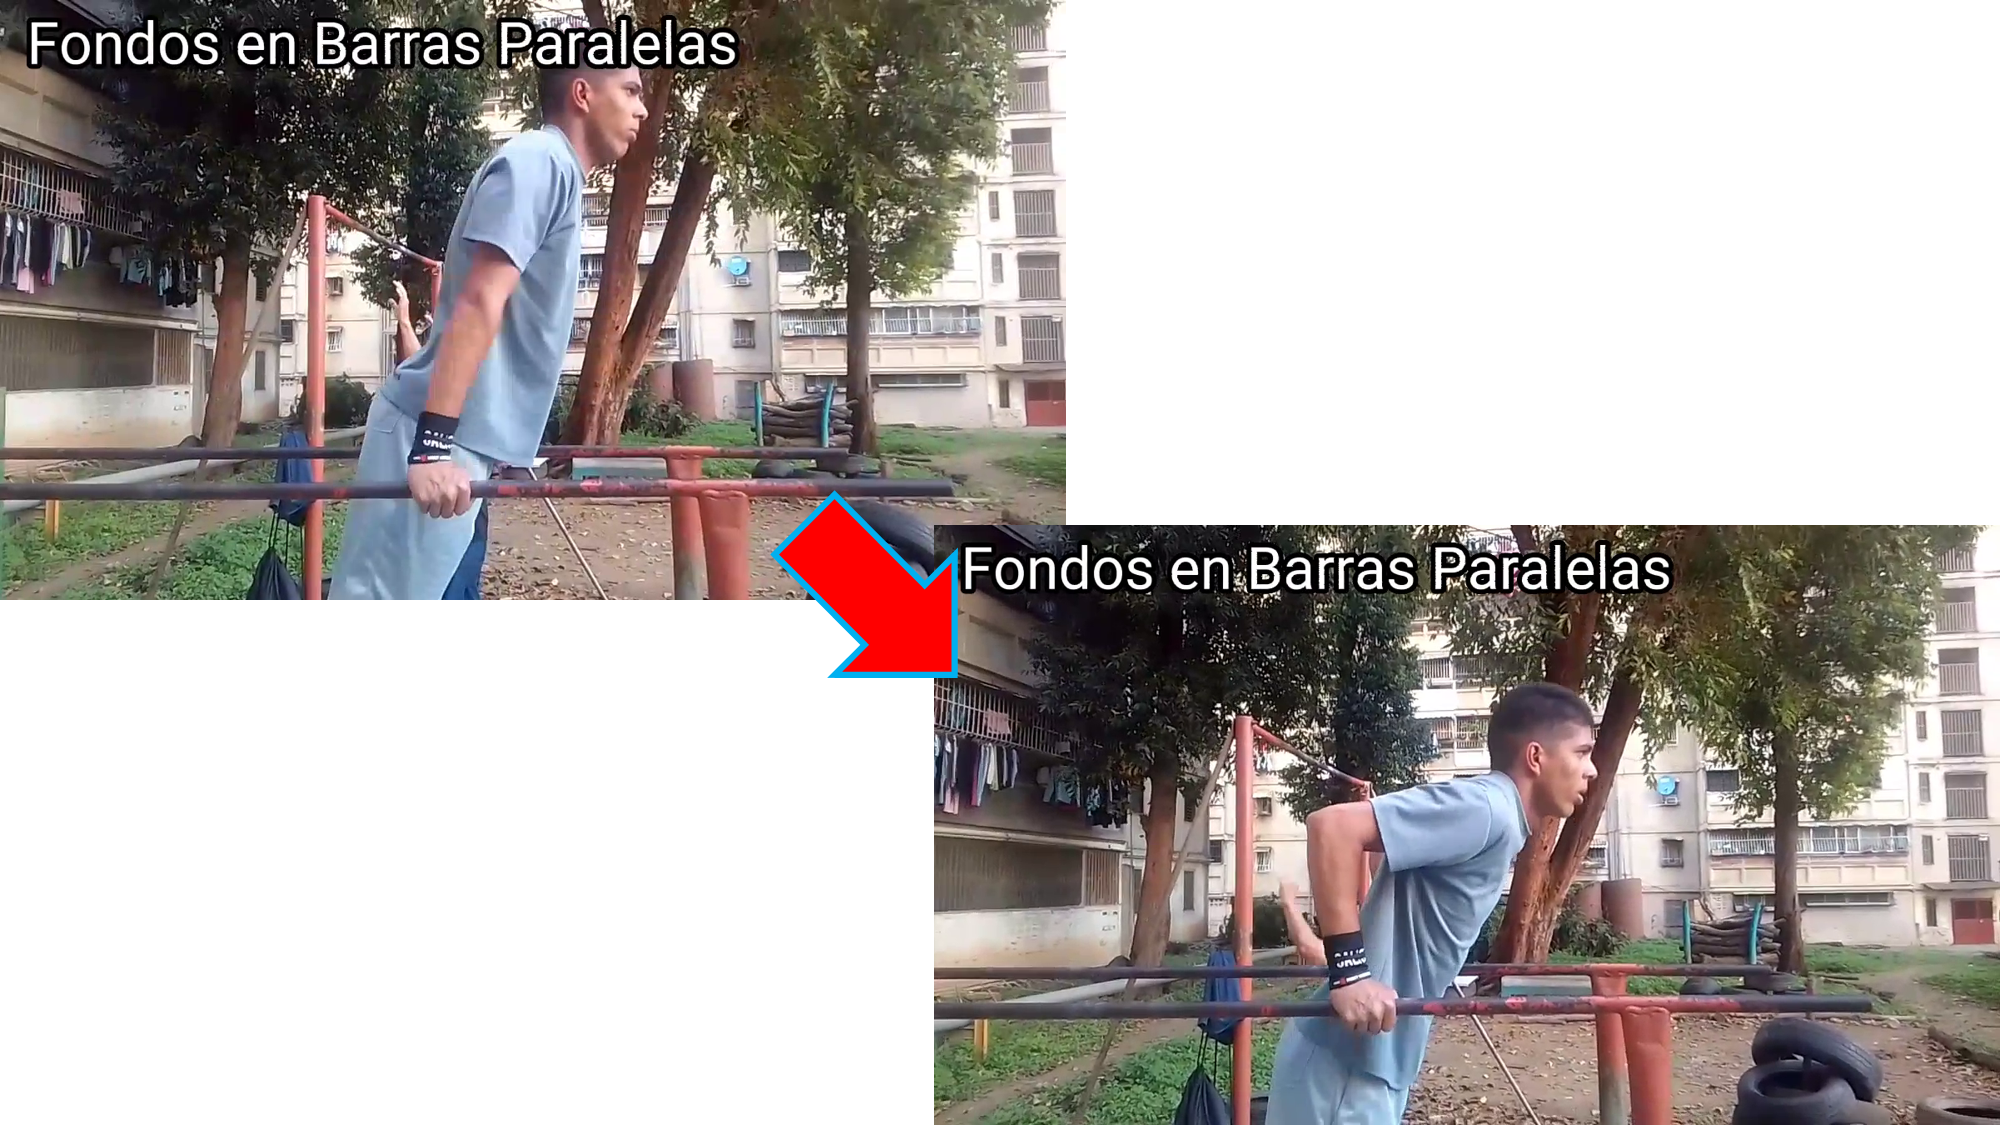
Para realizar esta progresión, debemos contar una base de fuerza en hombros y tener dominado conscientemente el handstand, (digo conscientemente porque en ocasiones he conversado con atletas que realizan el elemento, pero no saben exactamente qué es lo que están activando) ya al tener estas dos bases, procedemos a realizar el ejercicio, que tiene la misma filosofía que las Flexiones en Pike, el tronco lo más vertical posible, bajamos hasta que nuestros codos marquen un angulo de 90º y subimos.
To perform this progression, we must have a base of strength in shoulders and have consciously mastered the handstand, (I say consciously because sometimes I have talked to athletes who perform the element, but do not know exactly what they are activating) and having these two bases, we proceed to perform the exercise, which has the same philosophy as the Pike Pushups, the trunk as vertical as possible, down until our elbows mark an angle of 90 ° and go up.
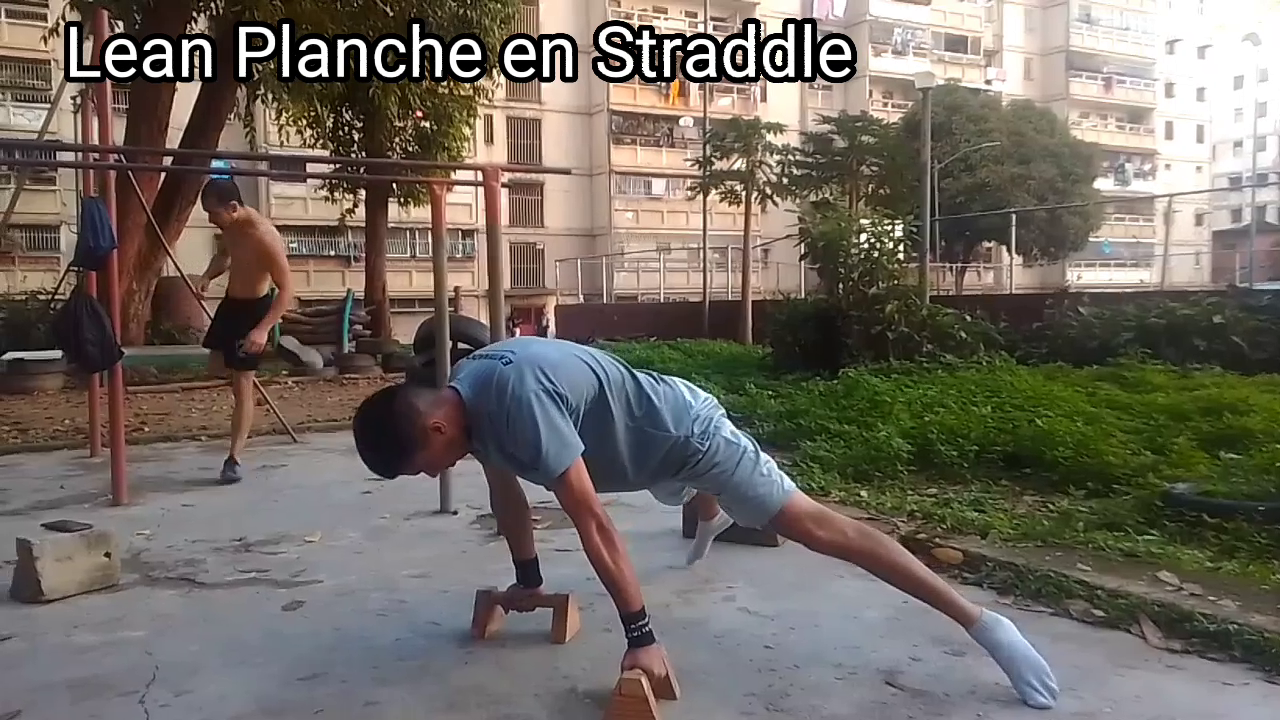
Esta progresión nos ayudara a concientizar que músculos debemos activar a la hora de realizar elementos de plancha, en este caso enfocada a la Straddle Planche. Es sencilla lo que debemos hacer es colocarnos en forma de Flexión con las piernas los mas separadas posible, y nos inclinamos hacia adelante haciendo una Protracción escapular (separar los omoplatos) y una retroversión pélvica (girar la cadera hacia adentro) y activar el core (abdomen) es decir apretar, tensionar como le quieran llamar jeje. Dicho lo anterior, mantenemos esa postura conscientemente por unos 30segundos.
This progression will help us to become aware of which muscles we should activate when performing plank elements, in this case focused on the Straddle Planche. It is simple, what we must do is to place ourselves in a push-up position with our legs as far apart as possible, and we lean forward doing a scapular protraction (separating the shoulder blades) and a pelvic retroversion (turning the hips inward) and activate the core (abdomen), that is to say, tighten, tense as you want to call it hehe. Having said that, we keep that posture consciously for about 30 seconds.
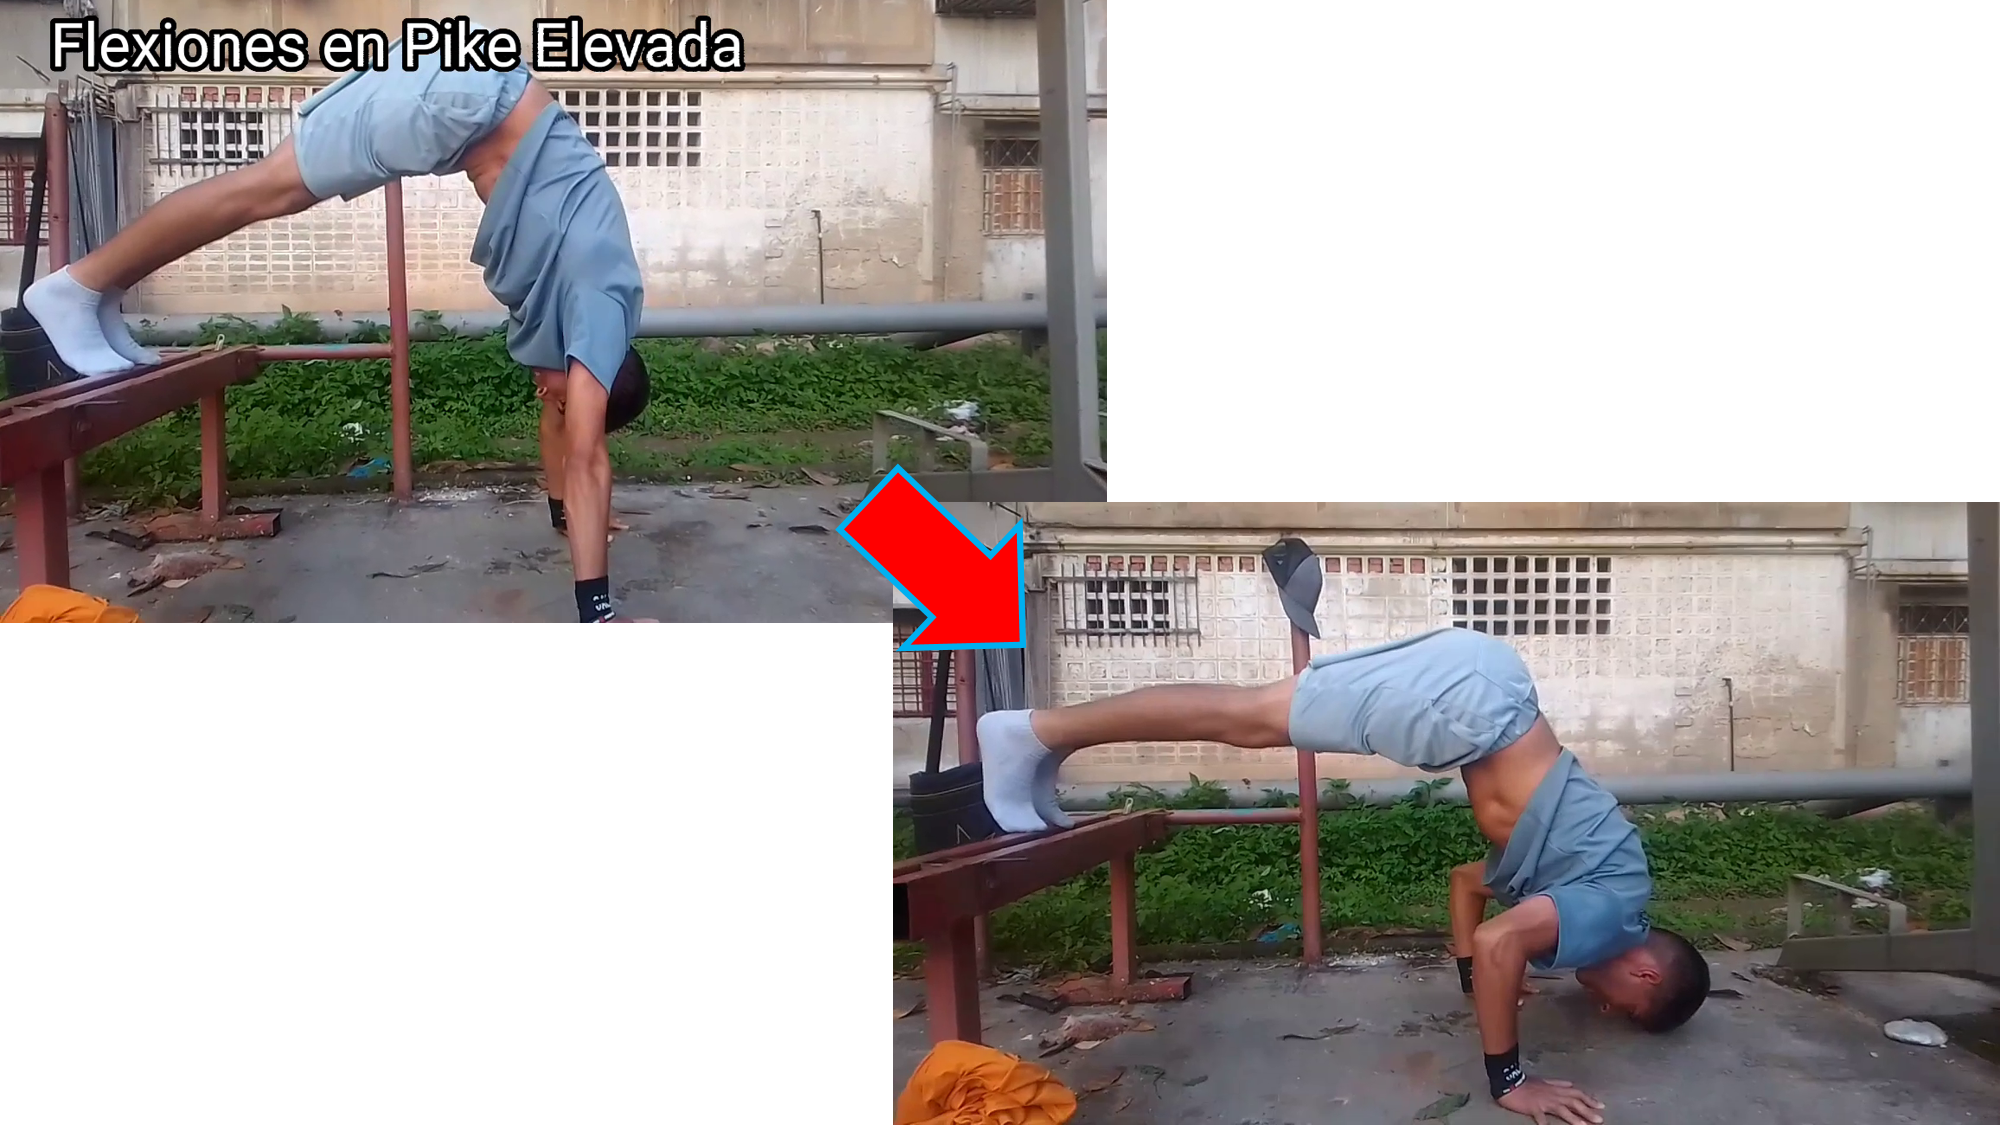
Para esta biserie solo puedo acotar que tratemos de hacer ambos ejercicios lo más estricto y correcto posible. Claro, antes de poder realizar las Flexiones en pike elevada debemos dominar conscientemente la Flexión el Pike normal, es decir en suelo.
For this biseries I can only point out that we try to do both exercises as strictly and correctly as possible. Of course, before we can perform the elevated Pike Push-Ups we must consciously master the normal Pike Push-Up, i.e. on the floor.
Sencillamente para poder realizar estos combos debemos tener dominadas las Flexiones comunes y principalmente, ser muy creativo. Claro recordando lo dos tips que di en el post anterior con respecto a cómo colocar las manos y los codos. Les recuerdo: 1ro. Manos en forma de copa al caer la flexión y dejar deslizar en el suelo (NO caer con las manos planas). 2do. Caer con la inercia, NO frenar la caída con los codos. Esto para evitar molestias y/o lesiones.
Simply to be able to perform these combos we must have mastered the common push-ups and mainly, be very creative. Of course, remembering the two tips I gave in the previous post regarding how to place the hands and elbows. I remind you: 1st. cupped hands when dropping the push-up and let it slide on the floor (DO NOT drop with your hands flat). 2nd. Fall with inertia, DO NOT break the fall with your elbows. This is to avoid discomfort and/or injury.

Sin más que agregar, espero les haya gustado el post y la rutina también. Queda de más recordar que antes de cada entrenamiento es imprescindible realizar un calentamiento de unos 20 minutos como mínimo, ya que así rendiremos aún más en cada entrenamiento. Nos vemos en un próximo post.
Without more to add, I hope you liked the post and the routine too. It remains to remember that before each training session it is essential to warm up for at least 20 minutes, since this way we will perform even better in each training session. See you in a next post.

Show more
Tags :
Woo!
This creator can upvote comments using 3speak's stake today because they are a top performing creator!
Leave a quality comment relating to their content and you could receive an upvote
worth at least a dollar.
Their limit for today is $0!
Their limit for today is $0!
3 views
5 months ago
$

3 views
6 months ago
$
15 views
a year ago
$
3 views
9 months ago
$
13 views
8 months ago
$
More Videos

7 views
a year ago
$

11 views
2 years ago
$

17 views
5 months ago
$

6 views
2 years ago
$
20 views
a year ago
$

36 views
2 years ago
$

9 views
a year ago
$

2 views
2 years ago
$

6 views
2 years ago
$

5 views
6 months ago
$

12 views
2 months ago
$

0 views
2 years ago
$

8 views
2 months ago
$

7 views
4 years ago
$

14 views
a year ago
$

23 views
2 years ago
$

3 views
a month ago
$

8 views
a year ago
$

16 views
a year ago
$

2 views
3 years ago
$

18 views
a year ago
$
1 views
6 months ago
$

4 views
2 years ago
$
Comments:
Reply:
To comment on this video please connect a HIVE account to your profile: Connect HIVE Account