Paper Umbrellas for Cocktail parties[ESP/ENG]
24
About :
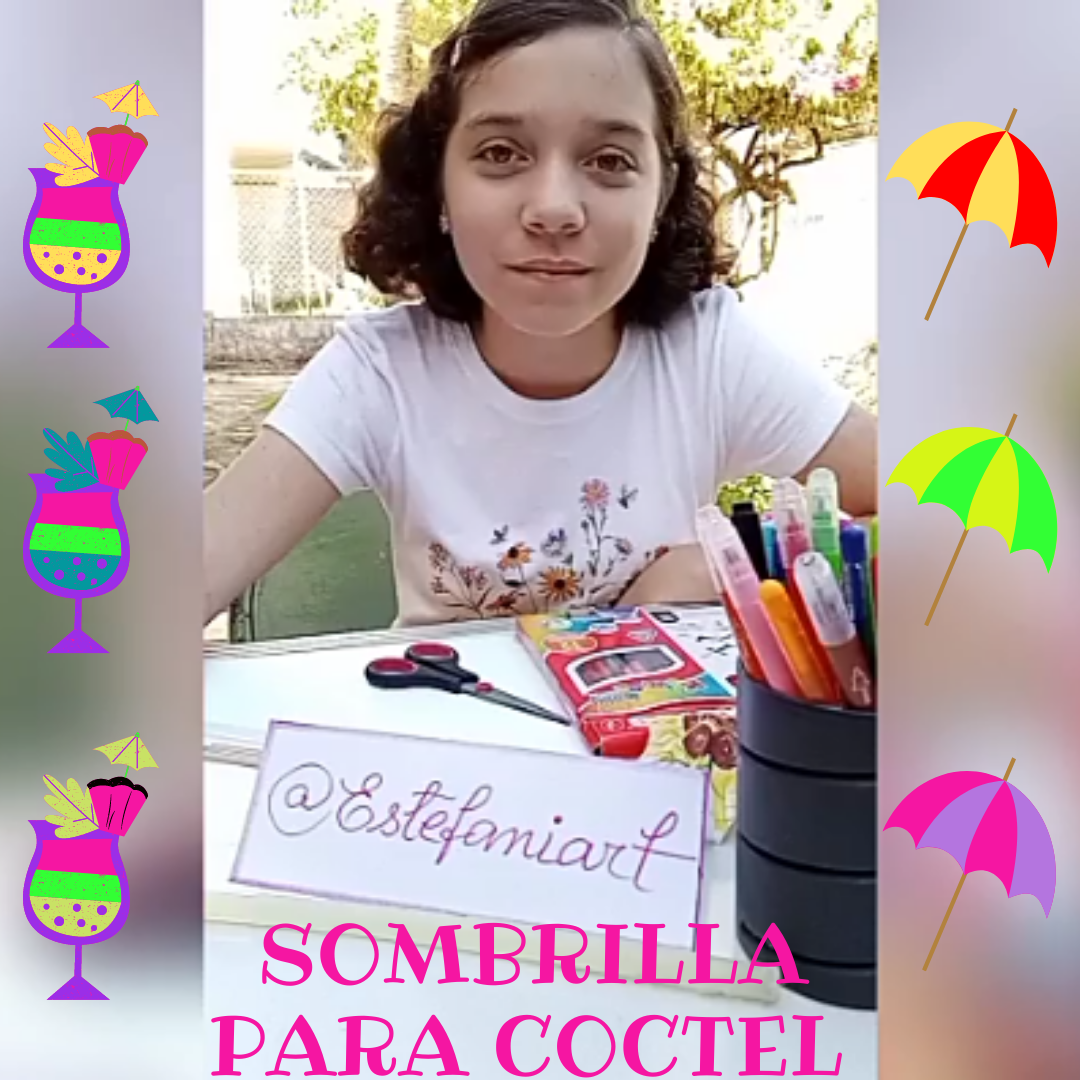
Hola 👋amigos de Hive, que tengan salud y paz☮️ en medio de estos tiempos tan 💥💔deprimentes.
Hoy estoy apoyando a mi mami que va a preparar unos cócteles🍹y me pidió que le hiciera las sombrillitas☂️ que le ponen a las copas. Les digo la verdad es la primera vez que las hago, pero me guié por unos tutoriales en internet, jajaja🤪, y creo que me salieron bien.
Fue una tarea relajante ya que me tocó decorar 🎨 el papel con mis propios dibujos.
Hice los diseños ✂️ de sombrillas ☂️ más simples, ya que hay de todo.
Los materiales que utilice son sencillos, hojas de papel Bond, lápices de colores, tijera, palillos chinos, pega blanca y canutillo.
El paso a paso es muy fácil, escogí un modelo de sombrilla básico.
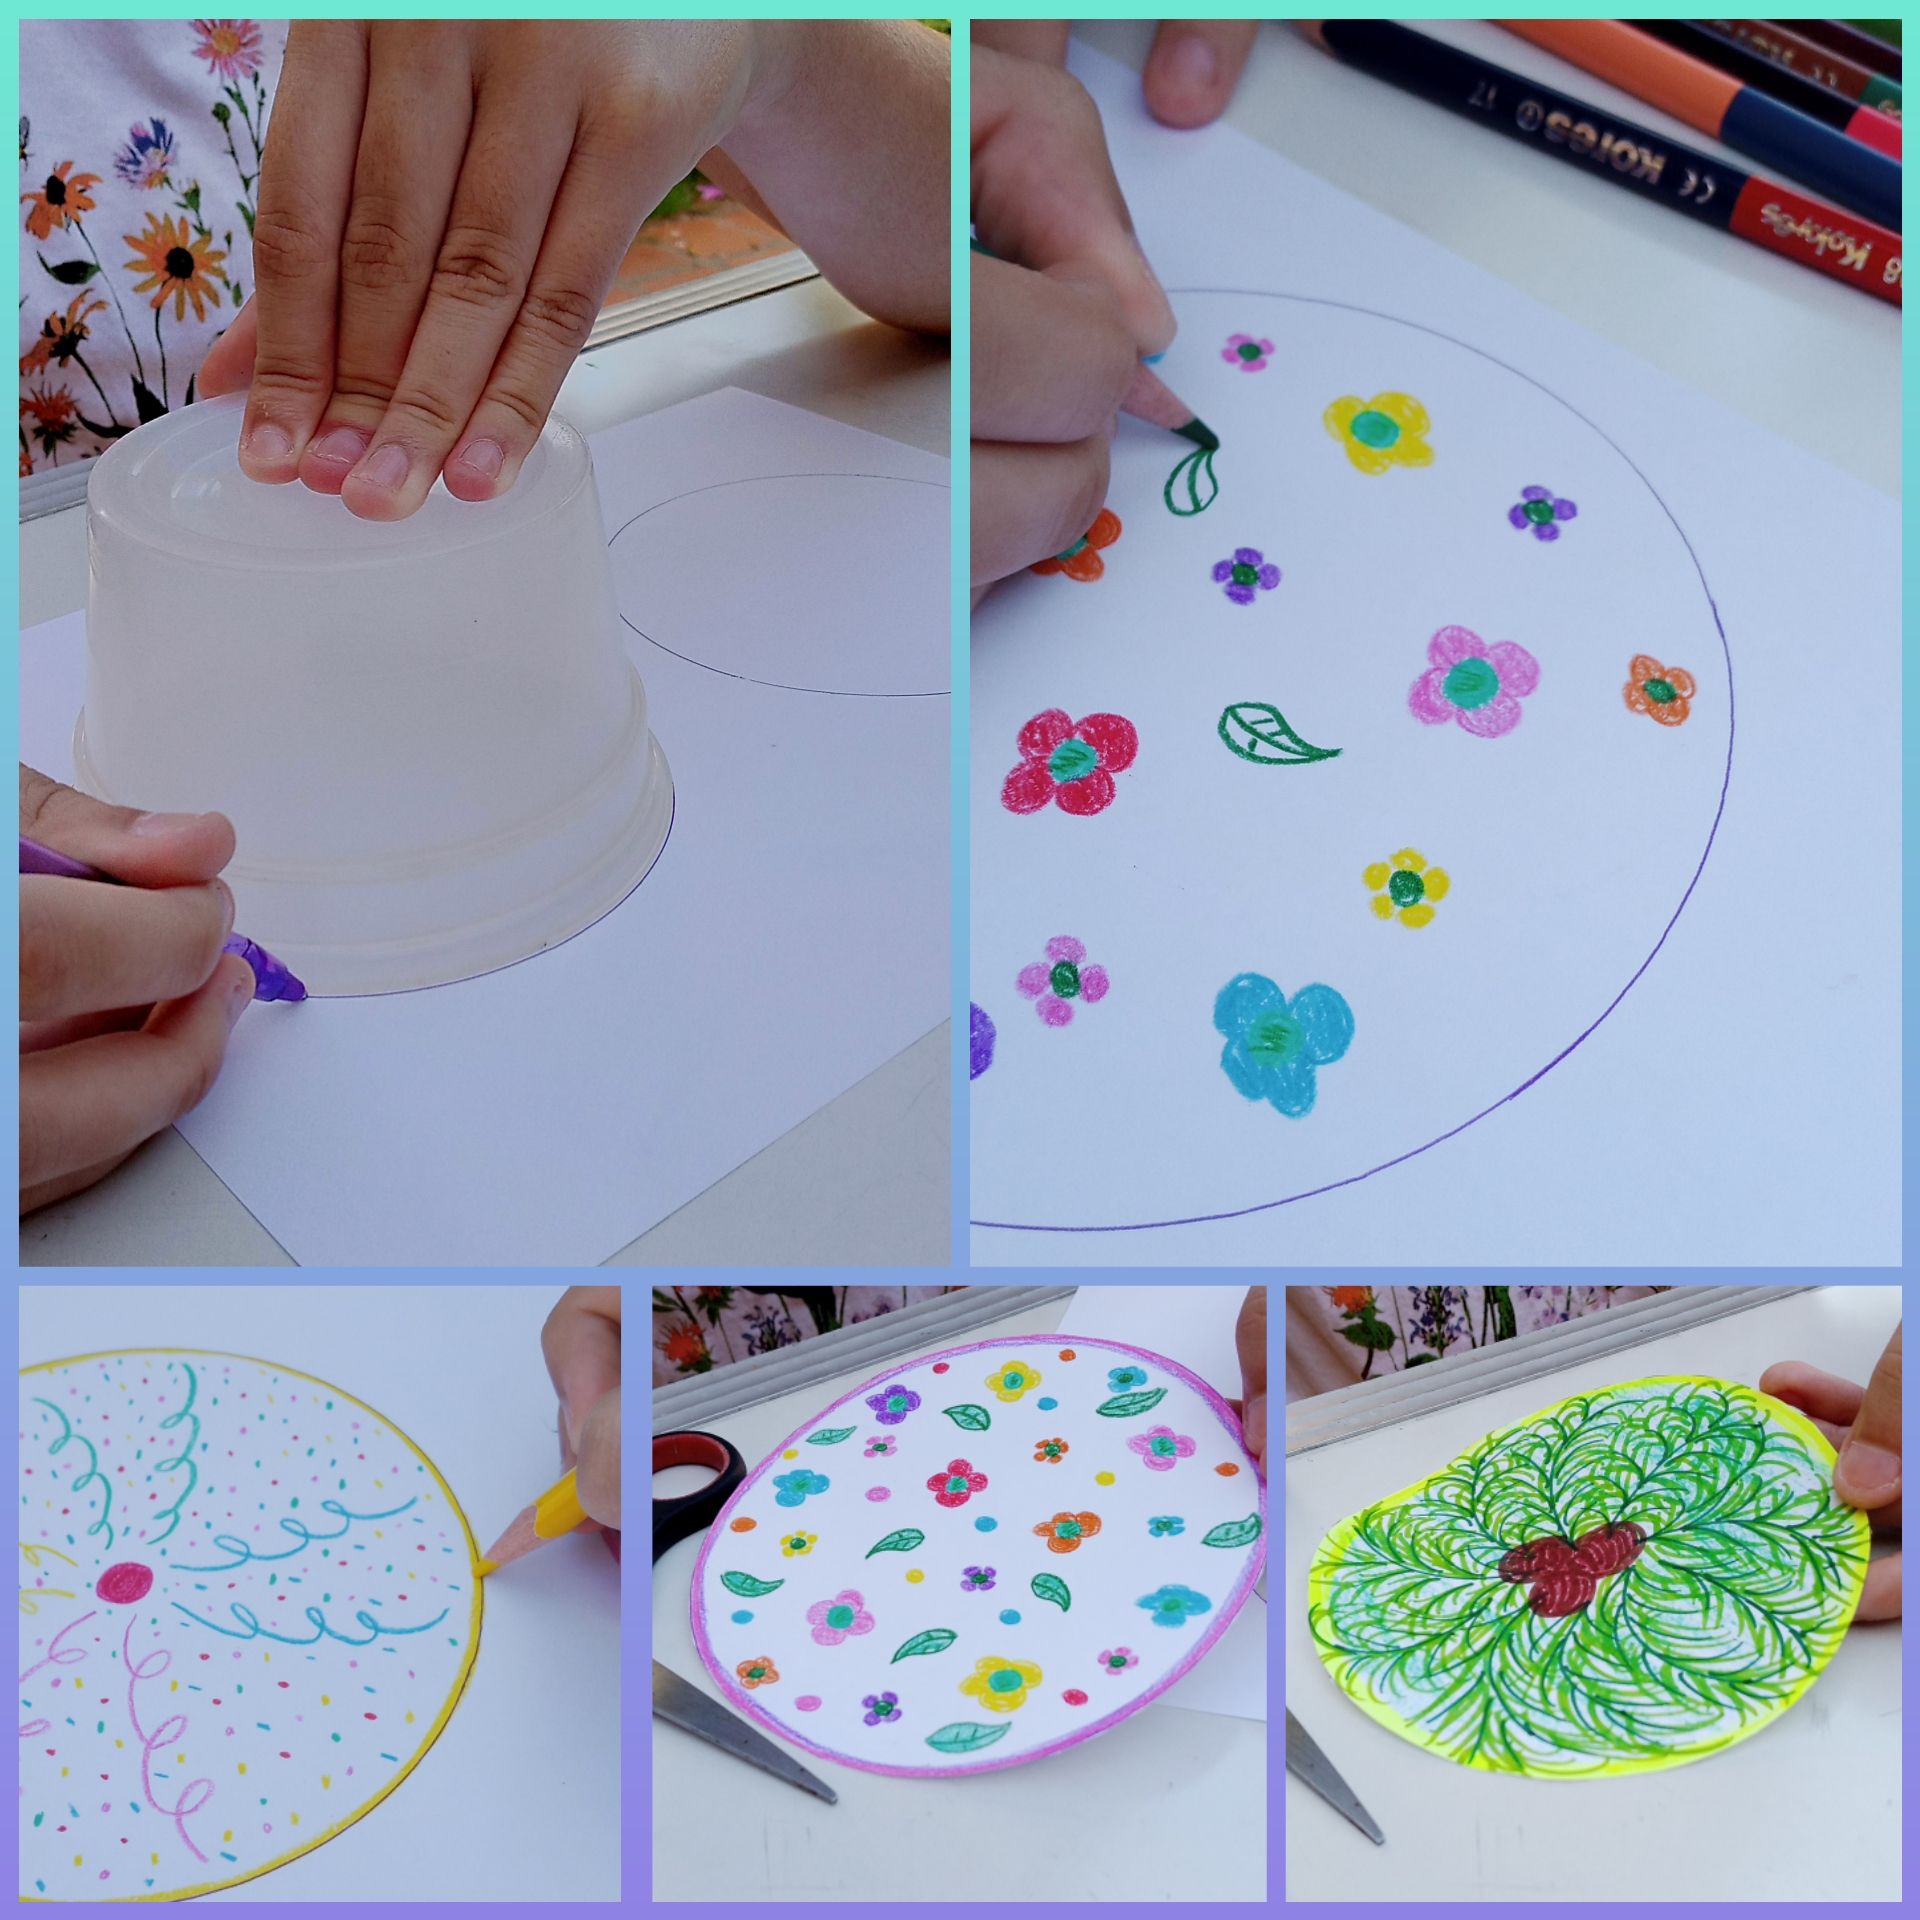
Dibuje una circunferencia de 12 cm de diámetro, y le hice mis propios dibujos y las recorte por el borde.
Luego se deben doblar exactamente a la mitad, haciendo coincidir los extremos, se doblan dos veces más uniendo extremo con extremo, y de esa manera quedan marcados en el papel los pliegos de la sombrilla.
En el último dobles se dibuja una línea curva en el extremo para recortar la forma que tienen las sombrillas.
Una forma de que se forme el cono es cortando por dónde se dibuja uno de los pliegues, pero solo hasta el centro de la circunferencia, luego se pasa uno de estos lados por encima del otro pegándolo con pega blanca.
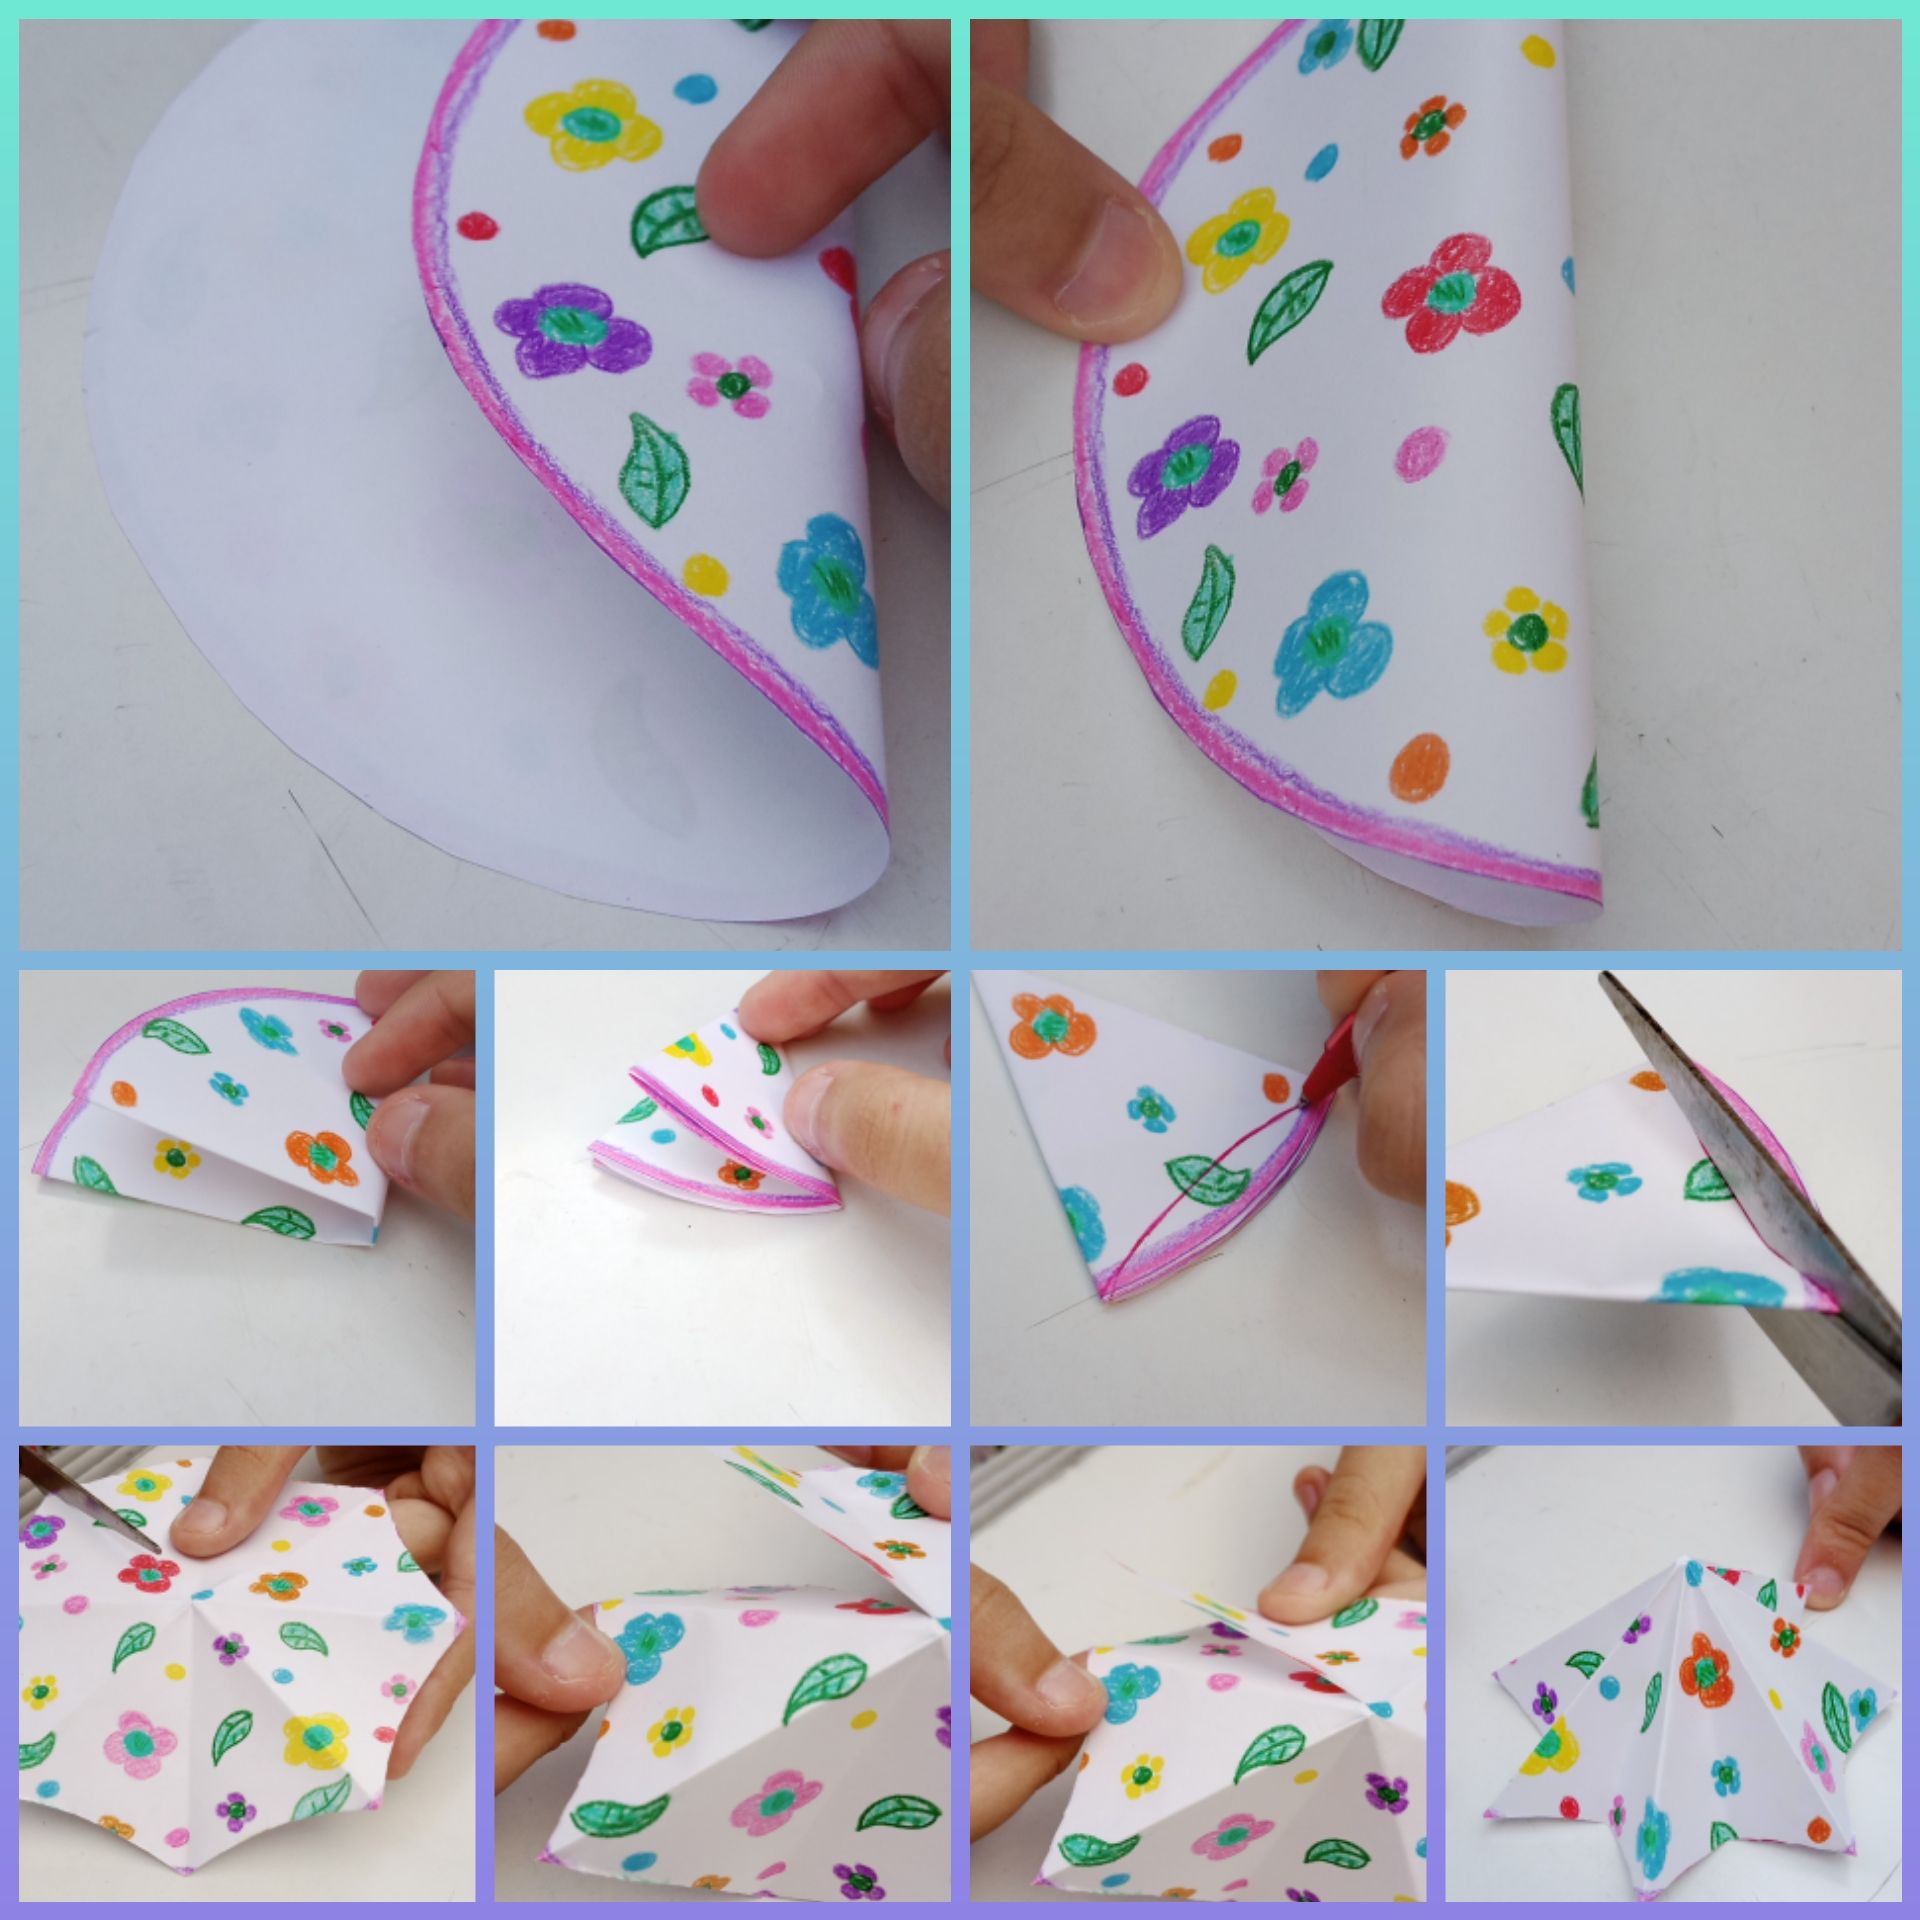
La otra forma es haciendo un pliegue interno en medio de cada pliegue. Y así se hace más la forma de cono.
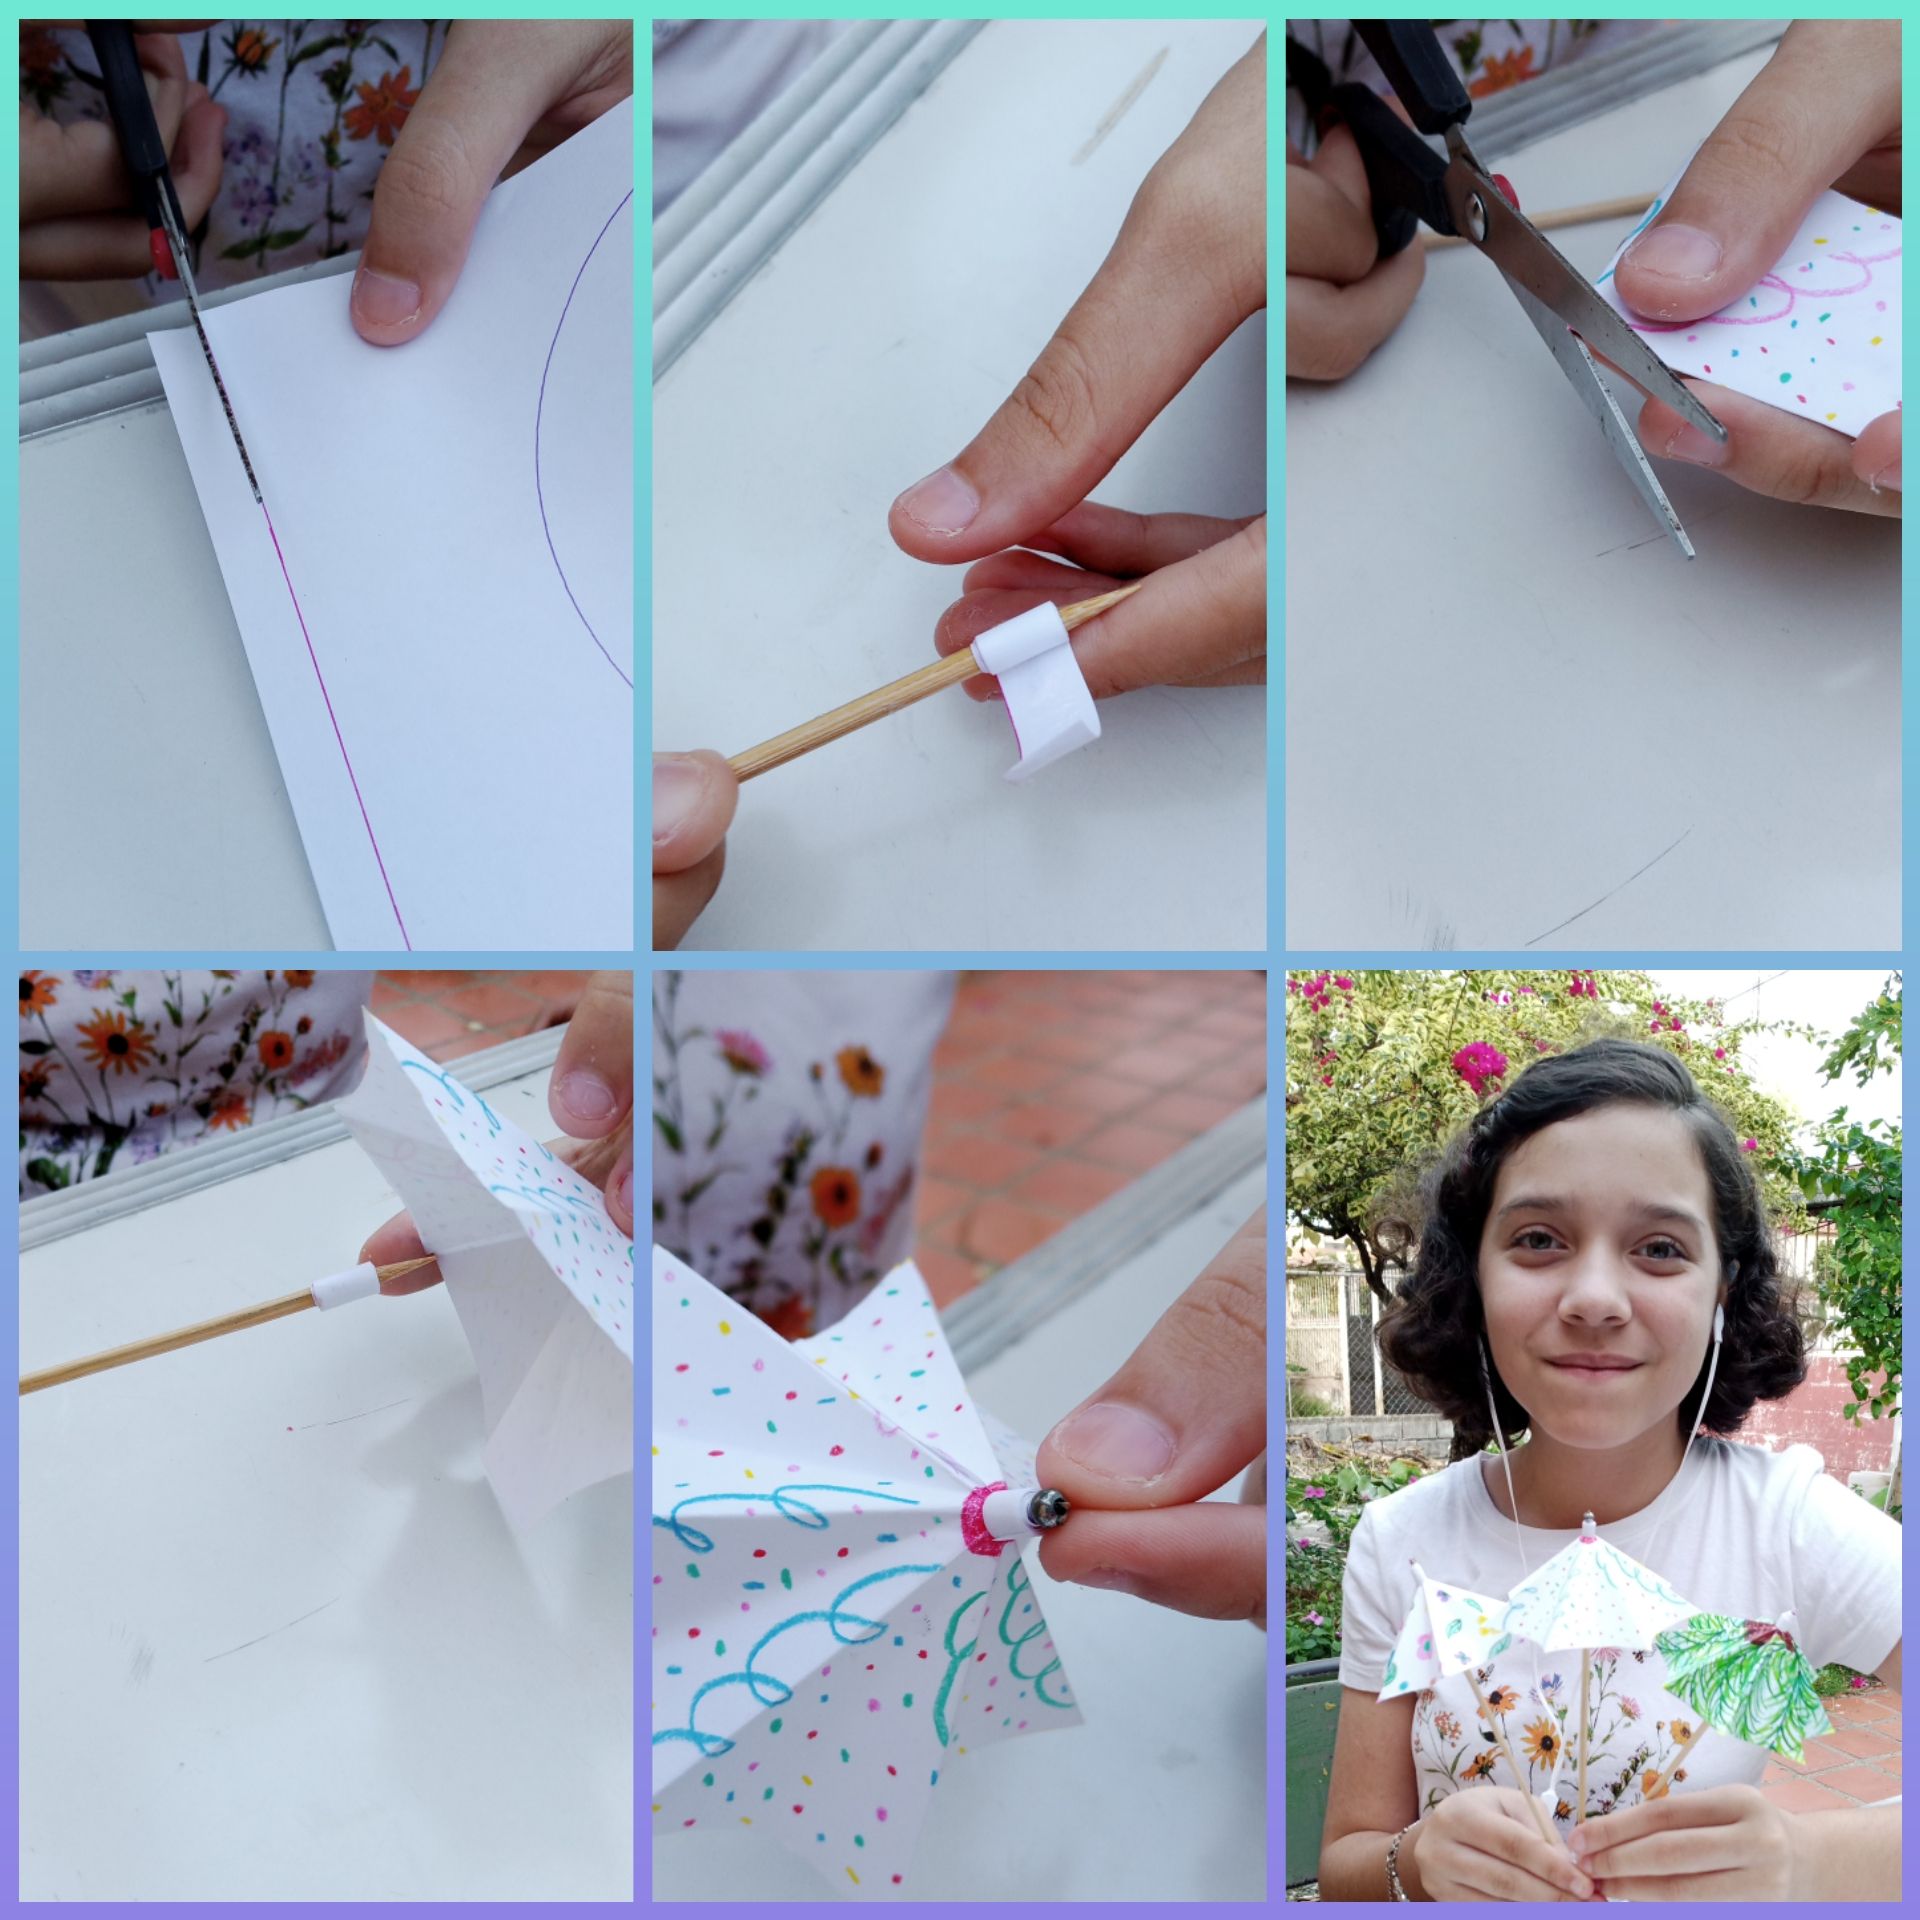
Luego se corta una tira de papel delgada y se pega enrollando en el borde del palillo chino, pero dejando libre la punta que sobresale por el cono de la sombrilla.
Se le coloca un poquito de pega y se coloca por debajo del papel plegado, a la parte que sobresale de palillo también se le coloca una cinta de papel enrollandola con pega y por último yo le puse un canutillo en la punta del palillo.
__$
Bueno solo deseo 🙏que este video les sirva de algo para cuando vayan a preparar sus cócteles, sí que quedan lindos.
Me encantaría leer sus comentarios 🤭 y por favor díganme la verdad, ya que para mi mami todo lo que hago le parece lindo jajaja 😂🤩.
Todas las fotografías y el video son de mi propiedad, los edité con la aplicación Capcut.
ENGLISH VERSION
Hello 👋friends of Hive, have health and peace☮️ in the middle of these 💥💔depressing times.
Today I am supporting my mommy who is going to prepare some cocktails🍹and she asked me to make the little umbrellas☂️ that they put on the glasses. I tell you the truth it's the first time I make them, but I was guided by some tutorials on the internet, hahaha🤪, and I think they came out well.
It was a relaxing task since it was my turn to decorate 🎨 the paper with my own drawings.
I made the simplest ✂️ designs ☂️ of umbrellas ☂️, since there is everything.
The materials I used are simple, sheets of Bond paper, colored pencils, scissors, chopsticks, white glue and comb.
The step by step is very easy, I chose a basic umbrella model.
I drew a circumference of 12 cm in diameter, and I made my own drawings and cut them around the edge.
Then fold them exactly in half, making the ends coincide, fold them twice more joining end to end, and in this way the folds of the umbrella are marked on the paper.
In the last fold, a curved line is drawn at the end to cut out the shape of the umbrellas.
One way to form the cone is to cut where one of the folds is drawn, but only up to the center of the circumference, then pass one of these sides over the other, gluing it with white glue.
The other way is to make an internal fold in the middle of each fold. And this way you make more cone shape.
Then cut a thin strip of paper and glue it by rolling it around the edge of the chopstick, but leaving free the tip that protrudes through the cone of the umbrella.
Put a little bit of glue and place it under the folded paper, the protruding part of the chopstick is also placed a paper ribbon rolled with glue and finally I put a comb on the tip of the chopstick.
Well I just hope 🙏that this video will be useful for you when you are going to prepare your cocktails, they do look nice.
I would love to read your comments 🤭 and please tell me the truth, because for my mommy everything I do looks cute hahaha 😂🤩.
All pictures and video are my property, I edited them with the Capcut app.
Translated with www.DeepL.com/Translator (free version)
Show more
Tags :
Woo!
This creator can upvote comments using 3speak's stake today because they are a top performing creator!
Leave a quality comment relating to their content and you could receive an upvote
worth at least a dollar.
Their limit for today is $0!
Their limit for today is $0!
53 views
2 years ago
$

24 views
2 years ago
$
29 views
a year ago
$
10 views
2 years ago
$
59 views
2 years ago
$
More Videos
12 views
2 months ago
$

0 views
4 years ago
$
14 views
a year ago
$
2 views
a year ago
$
26 views
a week ago
$
5 views
a year ago
$
8 views
a year ago
$

2 views
2 years ago
$
55 views
10 months ago
$

11 views
a year ago
$
2 views
2 years ago
$

9 views
11 months ago
$
8 views
a year ago
$

1 views
3 years ago
$
14 views
4 months ago
$
PukuMundo Show- PukuConcurso del PukuMundo "La Voz Cantante" Resultados y Reporte - Fecha: 1/05/2022
11 views
2 years ago
$
7 views
a year ago
$

5 views
6 months ago
$

27 views
2 weeks ago
$

5 views
2 years ago
$
18 views
3 years ago
$
23 views
8 months ago
$

Comments:
Reply:
To comment on this video please connect a HIVE account to your profile: Connect HIVE Account