Cómo hacer una miniatura para 3Speak en Canva [ESP / ENG]
26
About :

Hola Hivers! 👋
Muy buenas el día de hoy voy a enseñarte, cómo hacer una miniatura para tus vídeos, haciendo uso del programa canva, en su versión gratuita, para que estemos todos en igualdad de condiciones 🙂
Si todavía no tienes cuenta en canva, que sepas que también tengo un tutorial y voy a dejarlo al final de este artículo, para que puedas verlo si lo necesitas, ah y te explico cómo puedes tener una cuenta premium sin necesitar tarjeta de crédito.

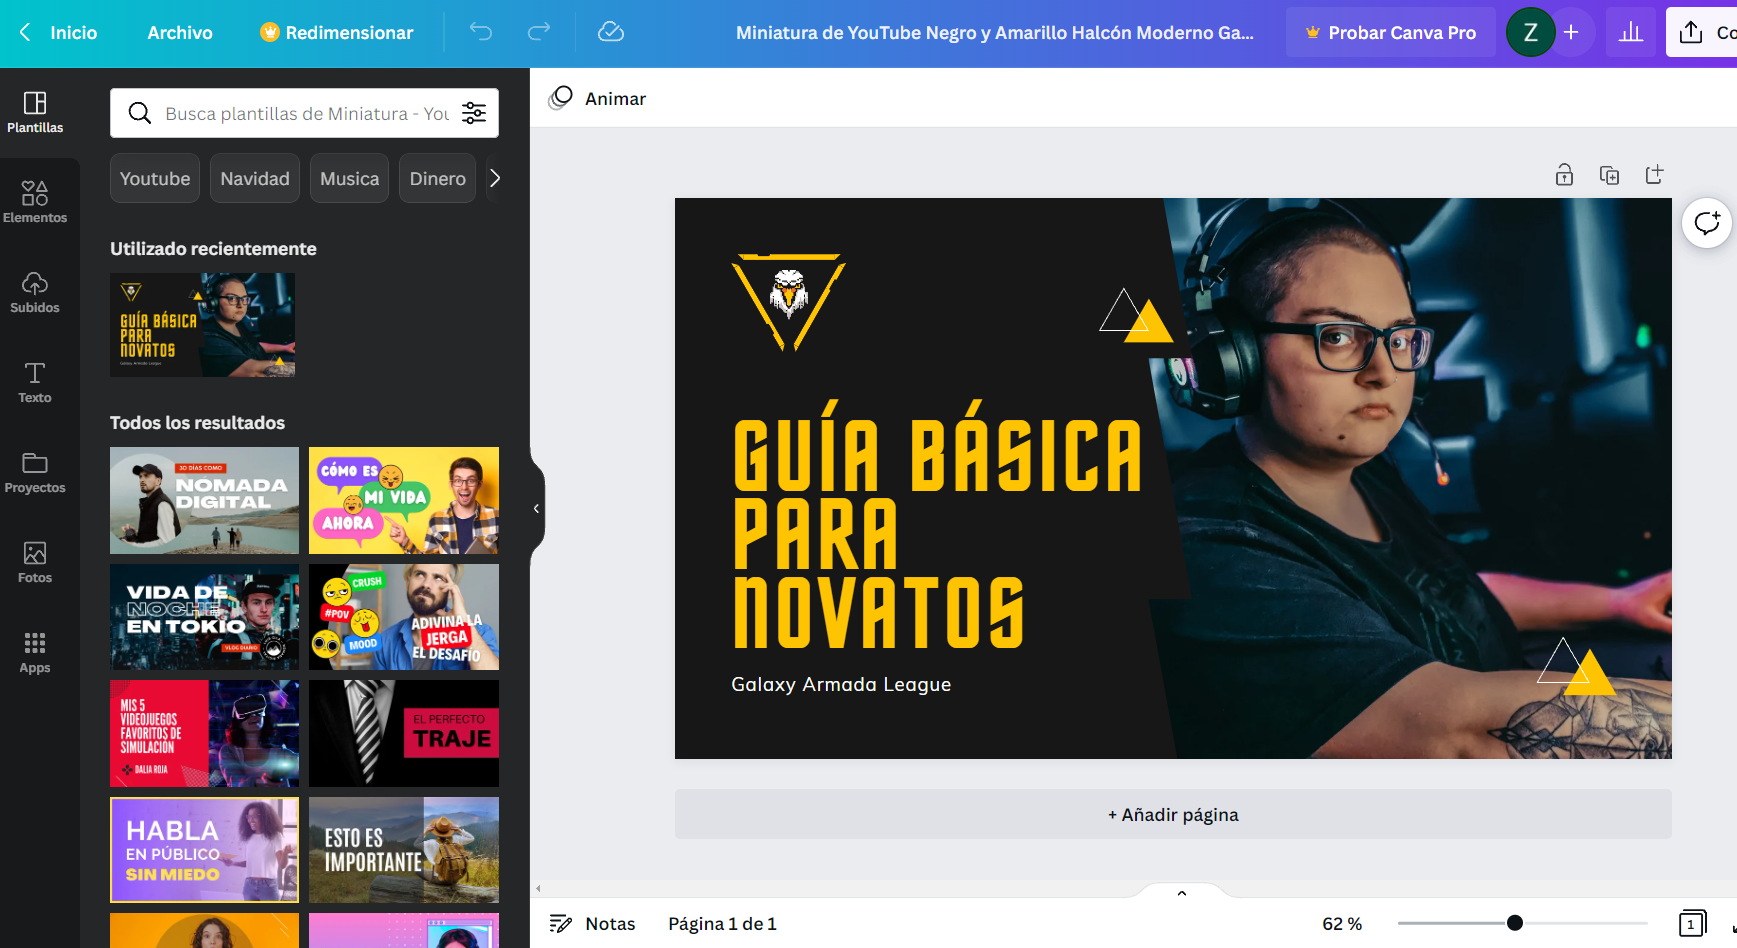
Una vez que hayas iniciado sesión en canva, vas a dirigirte al buscador que está en el centro de la pantalla, ibas a escribir la palabra miniatura. Puedes escoger la opción que dice miniatura de YouTube, puedes asegurarte antes de hacer click, que también diga las siguientes dimensiones 1280x720.

Ahora debes estar viendo, una galería llena de plantillas, en el momento que he grabado este vídeo tutorial, hay más de 14000 plantillas, del lado izquierdo tienes un filtro, que puede ayudarte a seleccionar la plantilla más adecuada para tu nicho.
Una vez que selecciones la que te gusta, automáticamente te trasladaran al modo de edición.
Ahora ya estamos listos para comenzar a editar la plantilla que hemos elegido, como podrás ver en el vídeo, ir sumamente intuitiva la interfaz, se trata básicamente de arrastrar, soltar, copiar y pegar.
Estoy seguro que no tendrás problemas en aprender, la curva de aprendizaje es mucho más corta, qué con otro tipo de programas, como por ejemplo Adobe Photoshop, que si bien es cierto que es muy potente, también requiere un mayor conocimiento, y comprender cada una de las herramientas que tiene, no quiere decir que Photoshop no funcione, sino que cada una tiene un punto fuerte, canva por ejemplo no sirve para hacer retoques de piel, pero no me quiero desviar hablando sobre comparativas, eso quedará para otro tutorial.
En este vídeo, te doy un mini repaso cómo se obtiene la fuente del recurso o imagen que necesites.
Aquí también te muestro, las posibilidades qué tienes para cambiar el color sobre algunos recursos
También explico qué algunos se pueden personalizar no solo con un color sino con hasta cinco.

Es bueno que las miniaturas siempre tengan un tamaño de letra grande, para que se pueda leer sin dificultad. Por lo general estas plantillas ya toman esto en consideración, de igual manera siempre puedes ajustar el tamaño a tu gusto.
Todos los elementos cuando los seleccionas, se marcan y aparecen unos nodos.
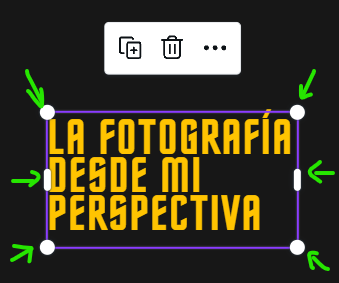
Si seleccionas uno de estos nodos haciendo click sostenido con el botón izquierdo del ratón 🖱️ y moviendo hacia dentro o hacia fuera, podrás ver cómo se agranda cómo se pone más pequeño el elemento fotografía que hayas escogido.
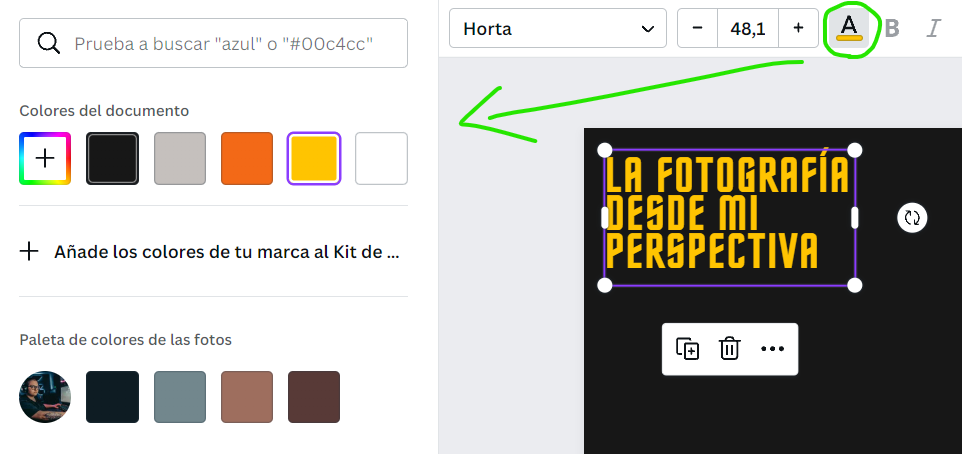
Para cambiar el color del texto o elemento, seleccionalo y fíjate en la barra superior horizontal de herramientas, ahí debe aparecer un recuadro con algún color, pinchas en este recuadro, y debe aparecer un panel del lado izquierdo, con una serie de colores que te ofrece canva. Selecciona el de tu preferencia, y ya deberías visualizar el cambio de forma automática.
Para poder comprender mejor todo lo que te estoy comentando, te invito a que veas el vídeo, y así te quedará todo mucho más claro.
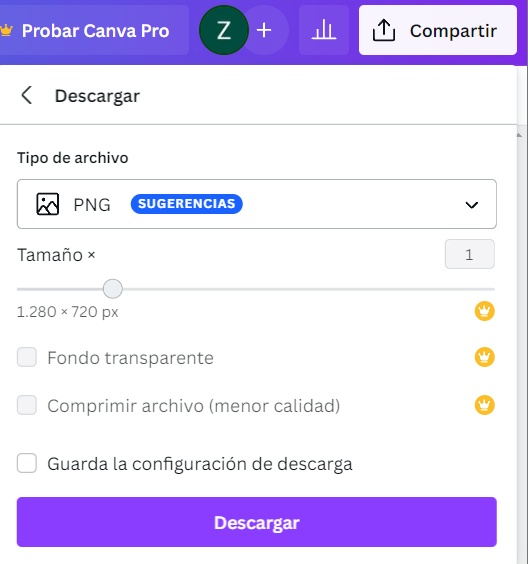
Cuando ya tengas listo tu diseño, vas a dirigirte a la parte superior derecha el botón blanco que se llama compartir, por defecto el sistema establece el valor o el formato de la imagen en PNG, esta es la resolución recomendada por el programa, pero si necesitas que la imagen tenga una compresión y que sea lo más ligera posible, quizás debas probar con el formato jpg.
No importa cuál opción escojas, de igual manera debería funcionar con la plataforma @threespeak
Si tienes alguna duda, pregunta o comentario, recuerda que puedes hacerlo al final de este artículo✍️
Muchas gracias por haber llegado hasta aquí, y nos vemos en el próximo tutorial.
🔺

🔻

Hello Hivers! 👋
Hello very good, today I am going to teach you how to make a thumbnail for your videos, using the canva program, in its free version, so that we are all on an equal footing.
If you still don't have a canva account, know that I also have a tutorial and I'm going to leave it at the end of this article, so you can see it if you need it, oh and I'll explain how you can have a premium account without needing a credit card.
Once you have logged into canva, you are going to go to the search engine that is in the center of the screen, you were going to write the word thumbnail. You can choose the option that says YouTube thumbnail, you can make sure before clicking, that it also says the following dimensions 1280x720.
Now you must be seeing a gallery full of templates, at the time I have recorded this video tutorial, there are more than 14,000 templates, on the left side you have a filter, which can help you select the most suitable template for your niche.
Once you select the one you like, you will automatically be transferred to edit mode.
Now we are ready to start editing the template we have chosen, as you can see in the video, the interface is extremely intuitive, it is basically drag, drop, copy and paste.
I am sure that you will have no problem learning, the learning curve is much shorter than with other types of programs, such as Adobe Photoshop, which, although it is true that it is very powerful, also requires more knowledge, and understanding each one of the tools that it has, does not mean that Photoshop does not work, but that each one has a strong point, canva for example is not good for doing skin retouching, but I do not want to deviate talking about comparisons, that will be left for another tutorial.
In this video, I give you a mini review of how to obtain the source of the resource or image that you need.
Here I also show you the possibilities you have to change the color on some resources
I also explain that some can be customized not only with one color but with up to five.
It is good that the thumbnails always have a large font size, so that it can be read without difficulty. Usually these templates already take this into account, but you can always adjust the size to your liking.
All the elements when you select them, they are marked and some nodes appear.
If you select one of these nodes by clicking and holding the left mouse button 🖱️ and moving it in or out, you will be able to see how the photograph element you have chosen gets smaller and larger.
To change the color of the text or element, select it and look at the upper horizontal bar of tools, there should appear a box with some color, click on this box, and a panel should appear on the left side, with a series of colors that offers canva. Select the one of your preference, and you should see the change automatically.
In order to better understand everything that I am commenting on, I invite you to watch the video, and that way everything will be much clearer.
When you have your design ready, you are going to go to the upper right part of the white button called share, by default the system sets the value or the format of the image in PNG, this is the resolution recommended by the program, but if you need the image to be compressed and as light as possible, maybe you should try the jpg format.
No matter which option you choose, it should still work with the @threespeak platform.
If you have any doubts, questions or comments, remember that you can do so at the end of this article✍️
Thank you very much for getting here, and see you in the next tutorial.
Vídeos más vistos de mi canal 🔝🔥
Most watched videos of my channel 🔝🔥

▫️ ▫️ ▫️ ▫️ 🔺 ▫️ ▫️ ▫️ ▫️
Show more
Tags :
Woo!
This creator can upvote comments using 3speak's stake today because they are a top performing creator!
Leave a quality comment relating to their content and you could receive an upvote
worth at least a dollar.
Their limit for today is $0!
Their limit for today is $0!
99 views
a year ago
$
62 views
a year ago
$
35 views
a year ago
$

16 views
a year ago
$

58 views
a year ago
$
More Videos

1 views
2 years ago
$
14 views
5 months ago
$

6 views
a year ago
$
14 views
a year ago
$

6 views
2 years ago
$
15 views
a year ago
$
1 views
2 years ago
$
1 views
2 years ago
$
3 views
a year ago
$
7 views
a year ago
$
8 views
8 months ago
$

6 views
3 years ago
$

4 views
8 months ago
$
9 views
11 months ago
$
7 views
6 months ago
$
5 views
a year ago
$

34 views
a year ago
$
19 views
a year ago
$

14 views
a year ago
$
22 views
11 months ago
$
5 views
2 years ago
$
17 views
a year ago
$

32 views
3 years ago
$
Comments:
Reply:
To comment on this video please connect a HIVE account to your profile: Connect HIVE Account