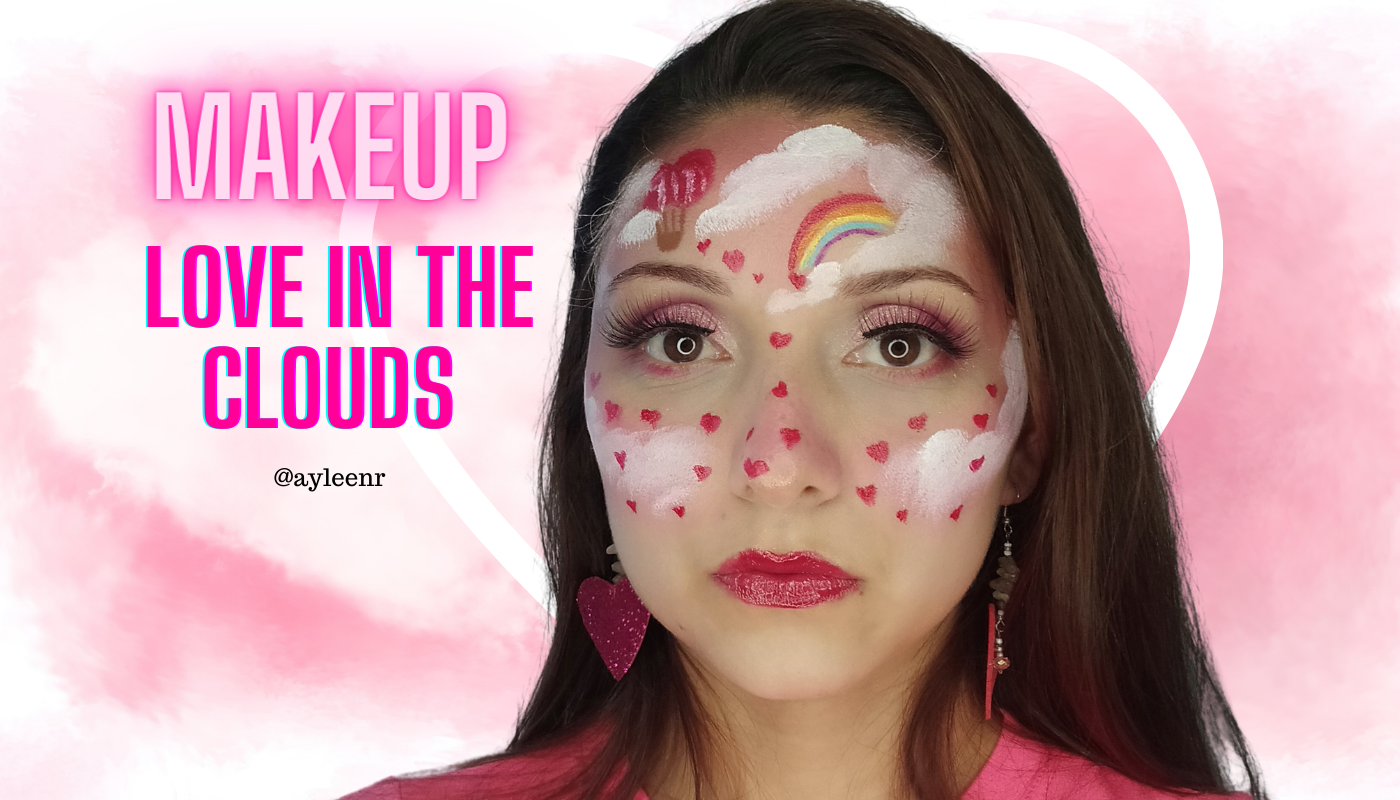
Maquillando El Amor en las Nubes / Making up Love in the Clouds
4
About :
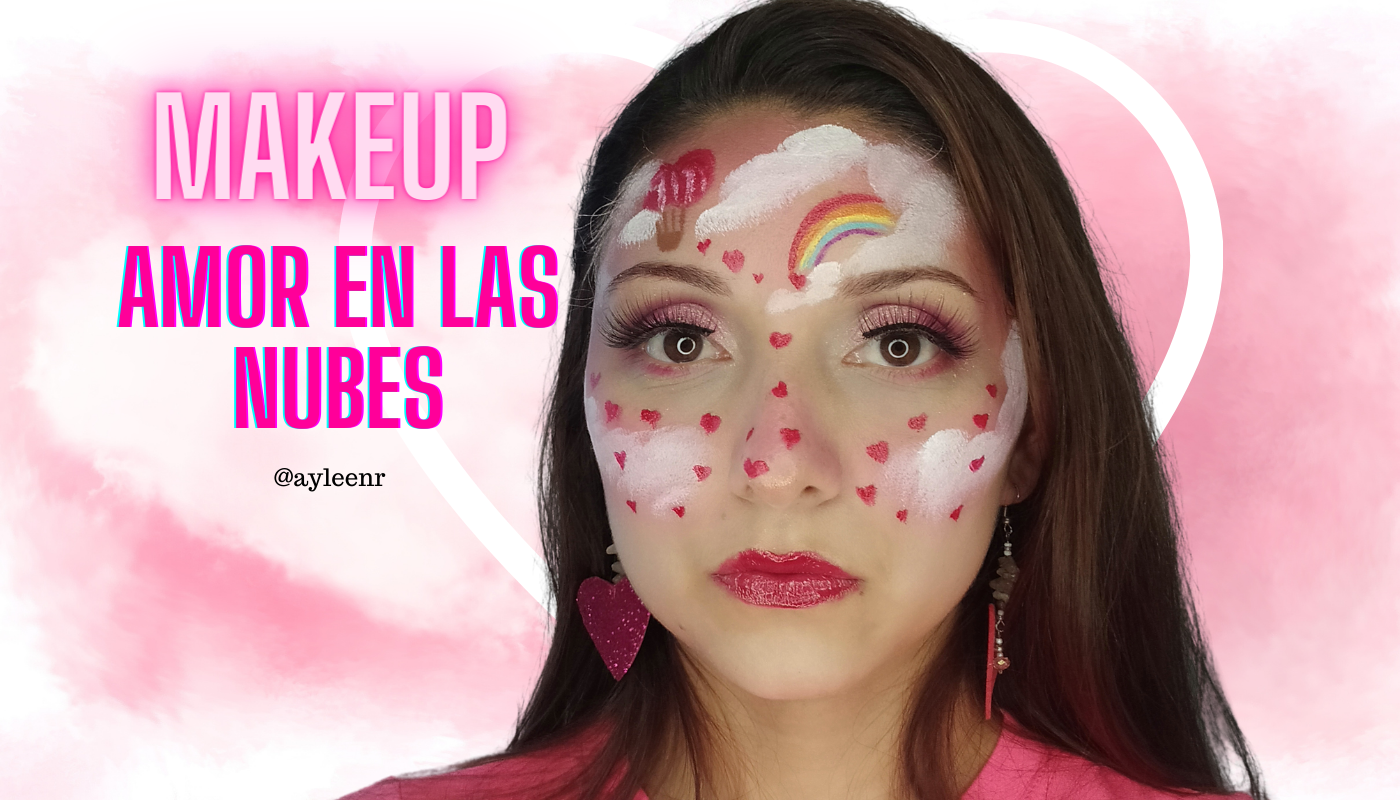
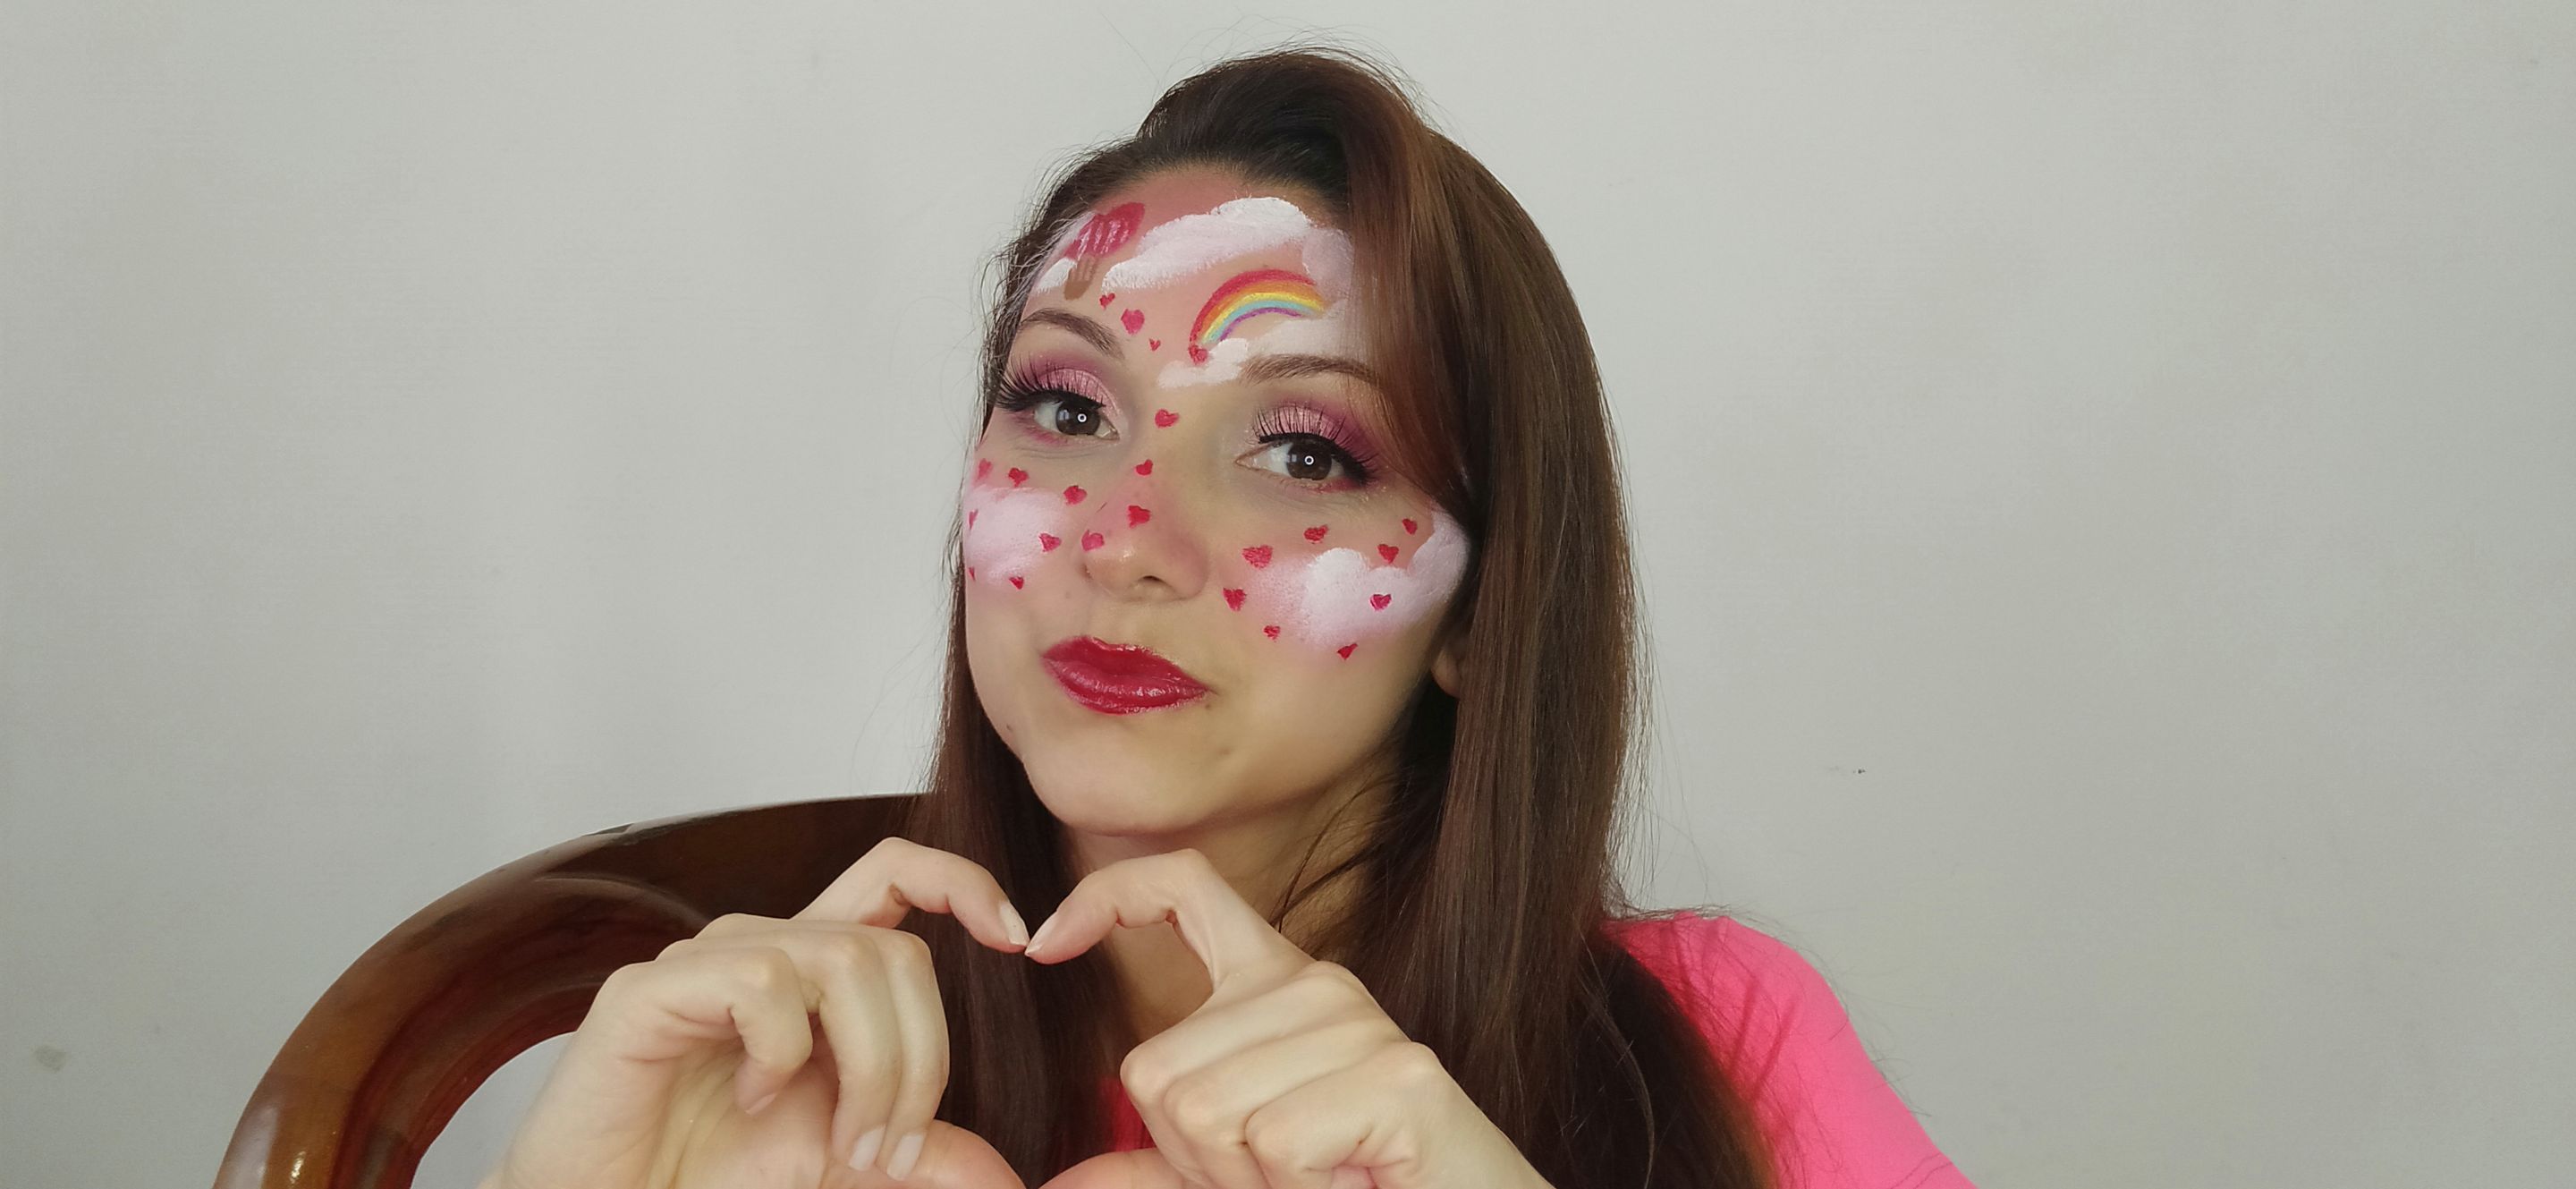
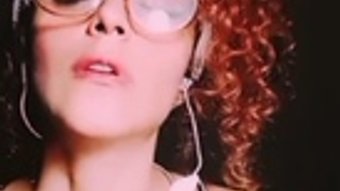
Hola amigos de Hive, espero estén muy bien, el día de hoy quiero mostrarles un tutorial a través de un video, de un maquillaje sobre El Amor en las Nubes 😍 💭, a quien no le ha sucedido que cuando nos enamoramos, nos sentimos como en las nubes 💭, sentimos felicidad, estamos despistados, el corazón se acelera, nos tiemblan las piernas, en fin son sensaciones que tenemos a través de este sentimiento y que hermoso es cuando este amor es correspondido ❤️.

Cosméticos a utilizar:
❤️ Agua Micelar marca Zoah
❤️ Protector Solar marca Zoah
❤️ Primer marca KaliyaBeauty con vitamina C
❤️ Corrector en crema de Salomé n. 1.50
❤️ Polvo compacto Naylen n.2
❤️ Pincel angular para ojos
❤️ Brocha angular para rostro
❤️ Pincel para difuminar ojos
❤️ Pincel plano pequeño
❤️ Brocha para difuminar
❤️ Esponja para difuminar
❤️ Pincel lengua de gato para ojos
❤️ Pincel lengua de gato grande
❤️ Pincel Abanico
❤️ Sombra fucsia y flamingo
❤️ Sombra glitter rosa oscuro
❤️ Pintura óleo blanca, rojo,
amarillo, azul, verde y naranja
❤️ Pintura labia rojo brillante
❤️ Iluminador L'oreal
Tutorial
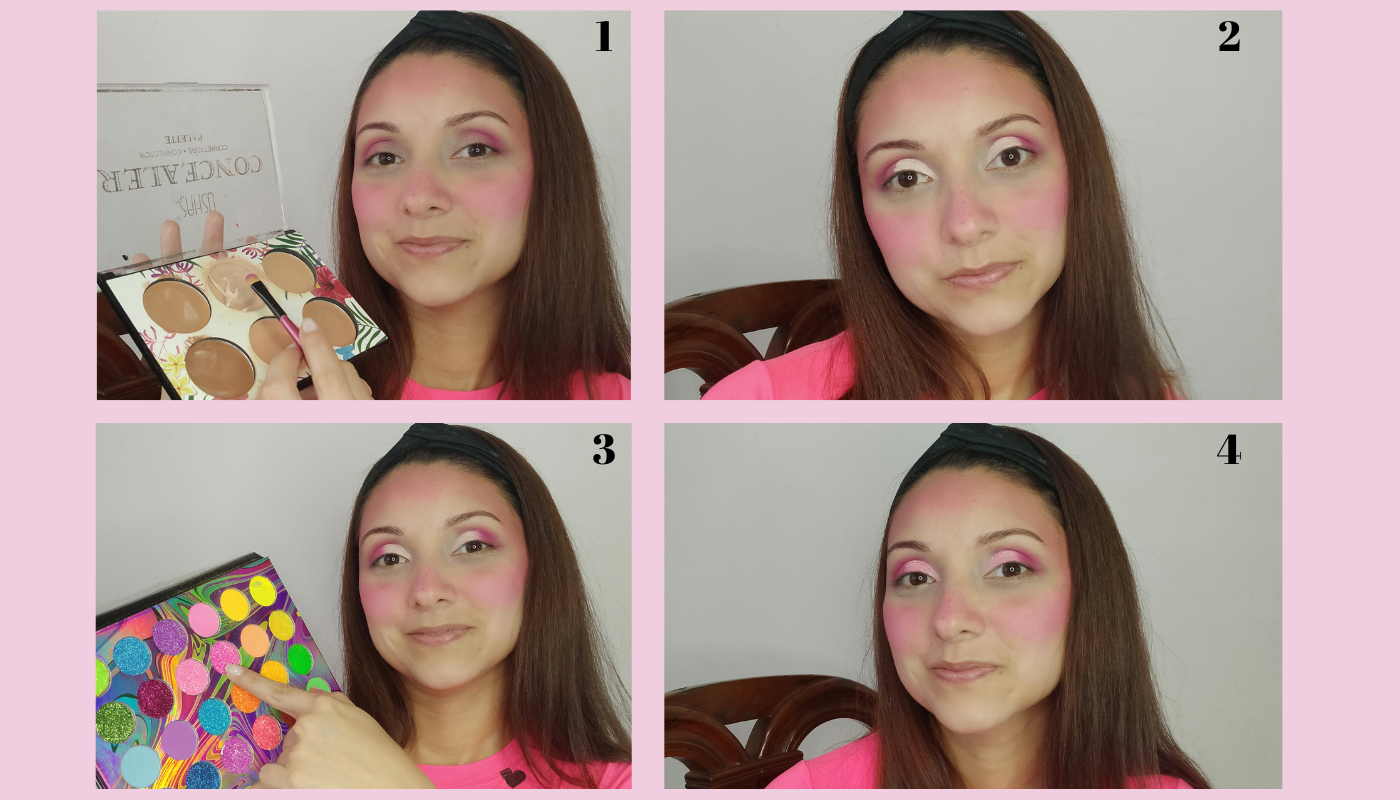
Paso 1
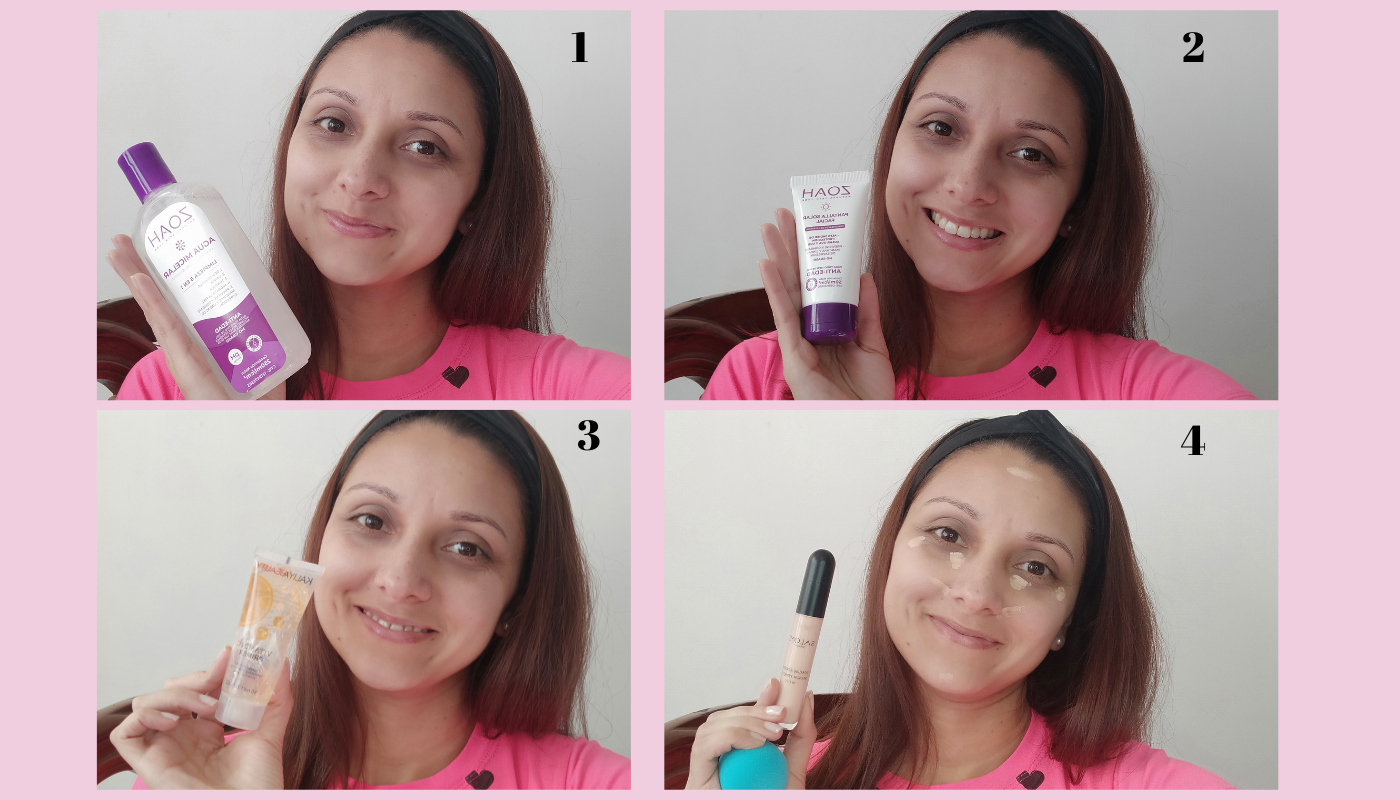
Primero realicé una limpieza facial con agua micelar marca Zoah esperé a que se secara, luego utilicé protector solar de las marca Zoah, esparcí el producto hasta que se absorbió en la piel, apliqué primer de KaliyaBeauty (creo que se puede conseguir uno mejor) y comencé el maquillaje con un corrector marca Salomé para cubrir ojeras, también apliqué en la zona de la barbilla, a los lados de la nariz. Es importante utilizar la cantidad de producto necesaria, es decir donde no botemos producto pero tampoco colocar muy poca cantidad.
Paso 2
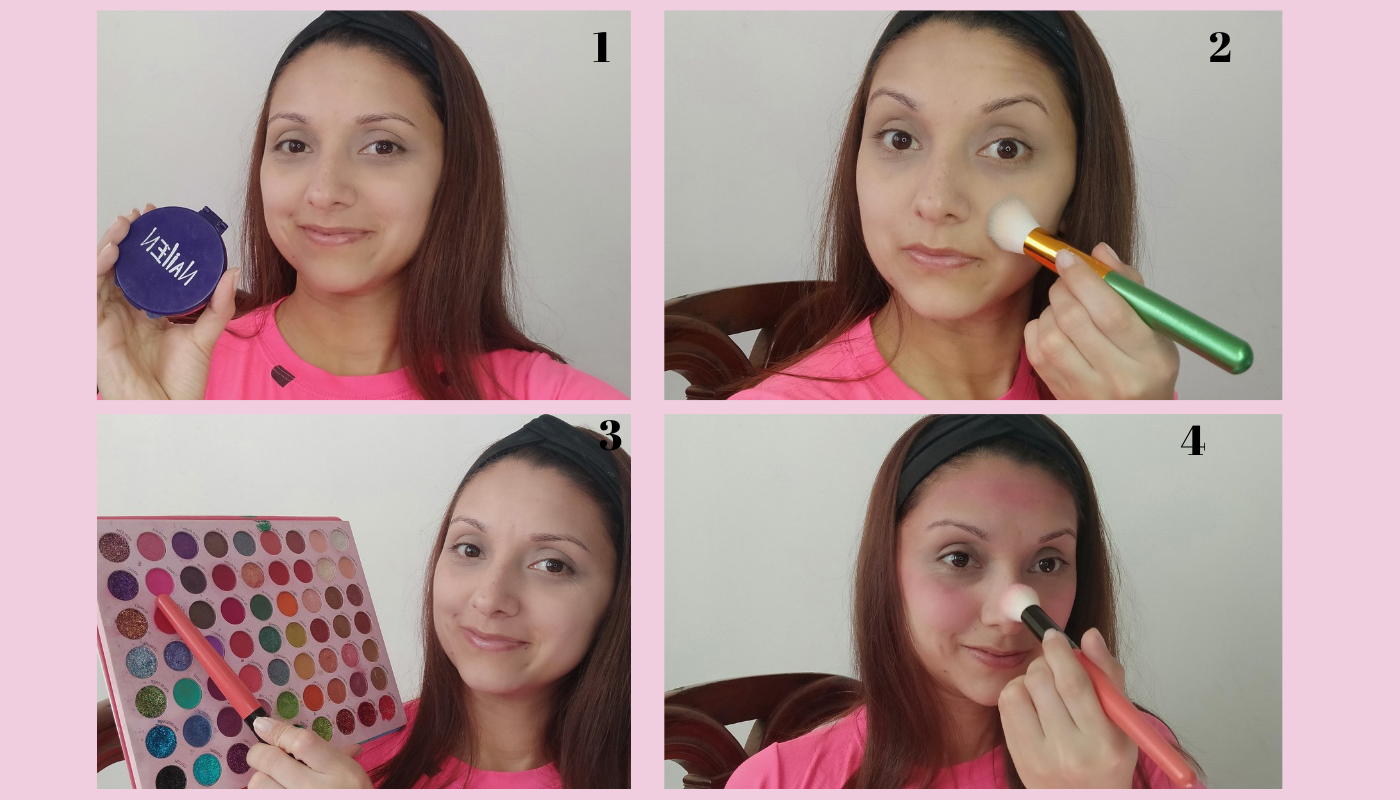
Luego con la ayuda de una brocha angular grande, apliqué compacto en polvo de la marca Nailen, difuminé por todo el rostro incluyendo el cuello, escogí la sombra fucsia, con una brocha para difuminar, apliqué por las áreas de los pómulos, mejillas, cien y frente.
Paso 3
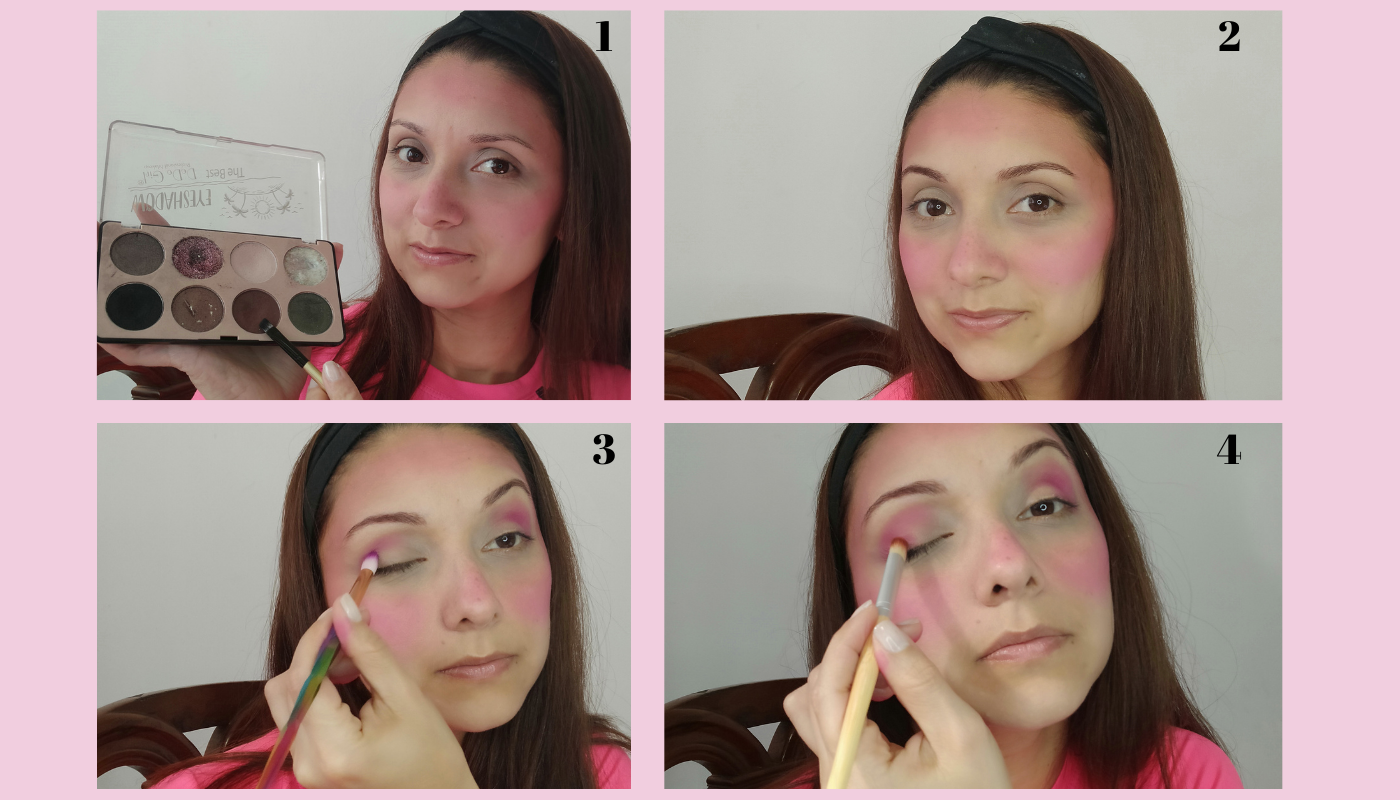
Con sombra marrón dibujé y rellené esos espacios, dandole forma a las cejas, lo que quedó de producto en la brocha lo coloque donde comienzan las cejas para hacerlas ver naturales y las peine con un cepillito, con un pincel para difuminar apliqué sombra color flamingo (tonalidad mas oscura que el fucsia) con el fin de darle profundidad a la mirada, me paré en el extremo del ojo y fui difuminando mi párpado desde la esquina hasta arriba en forma de arrastre.
Paso 4
Realicé un cut crease o un corte de cuenca con un pincel lengua de gato pequeña, luego con mi dedo anular apliqué sombra glitter en los párpados móvil para darle iluminación a la mirada.
Paso 5
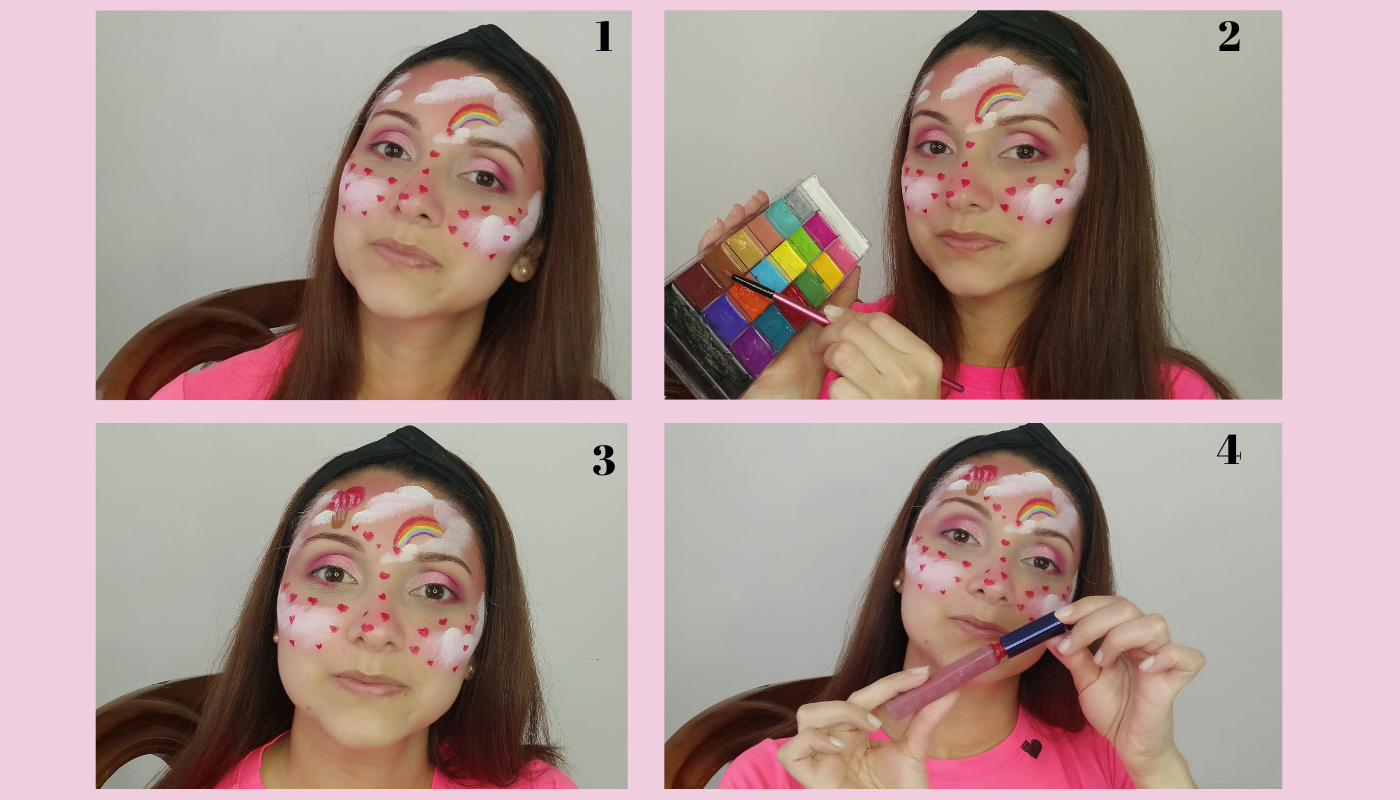
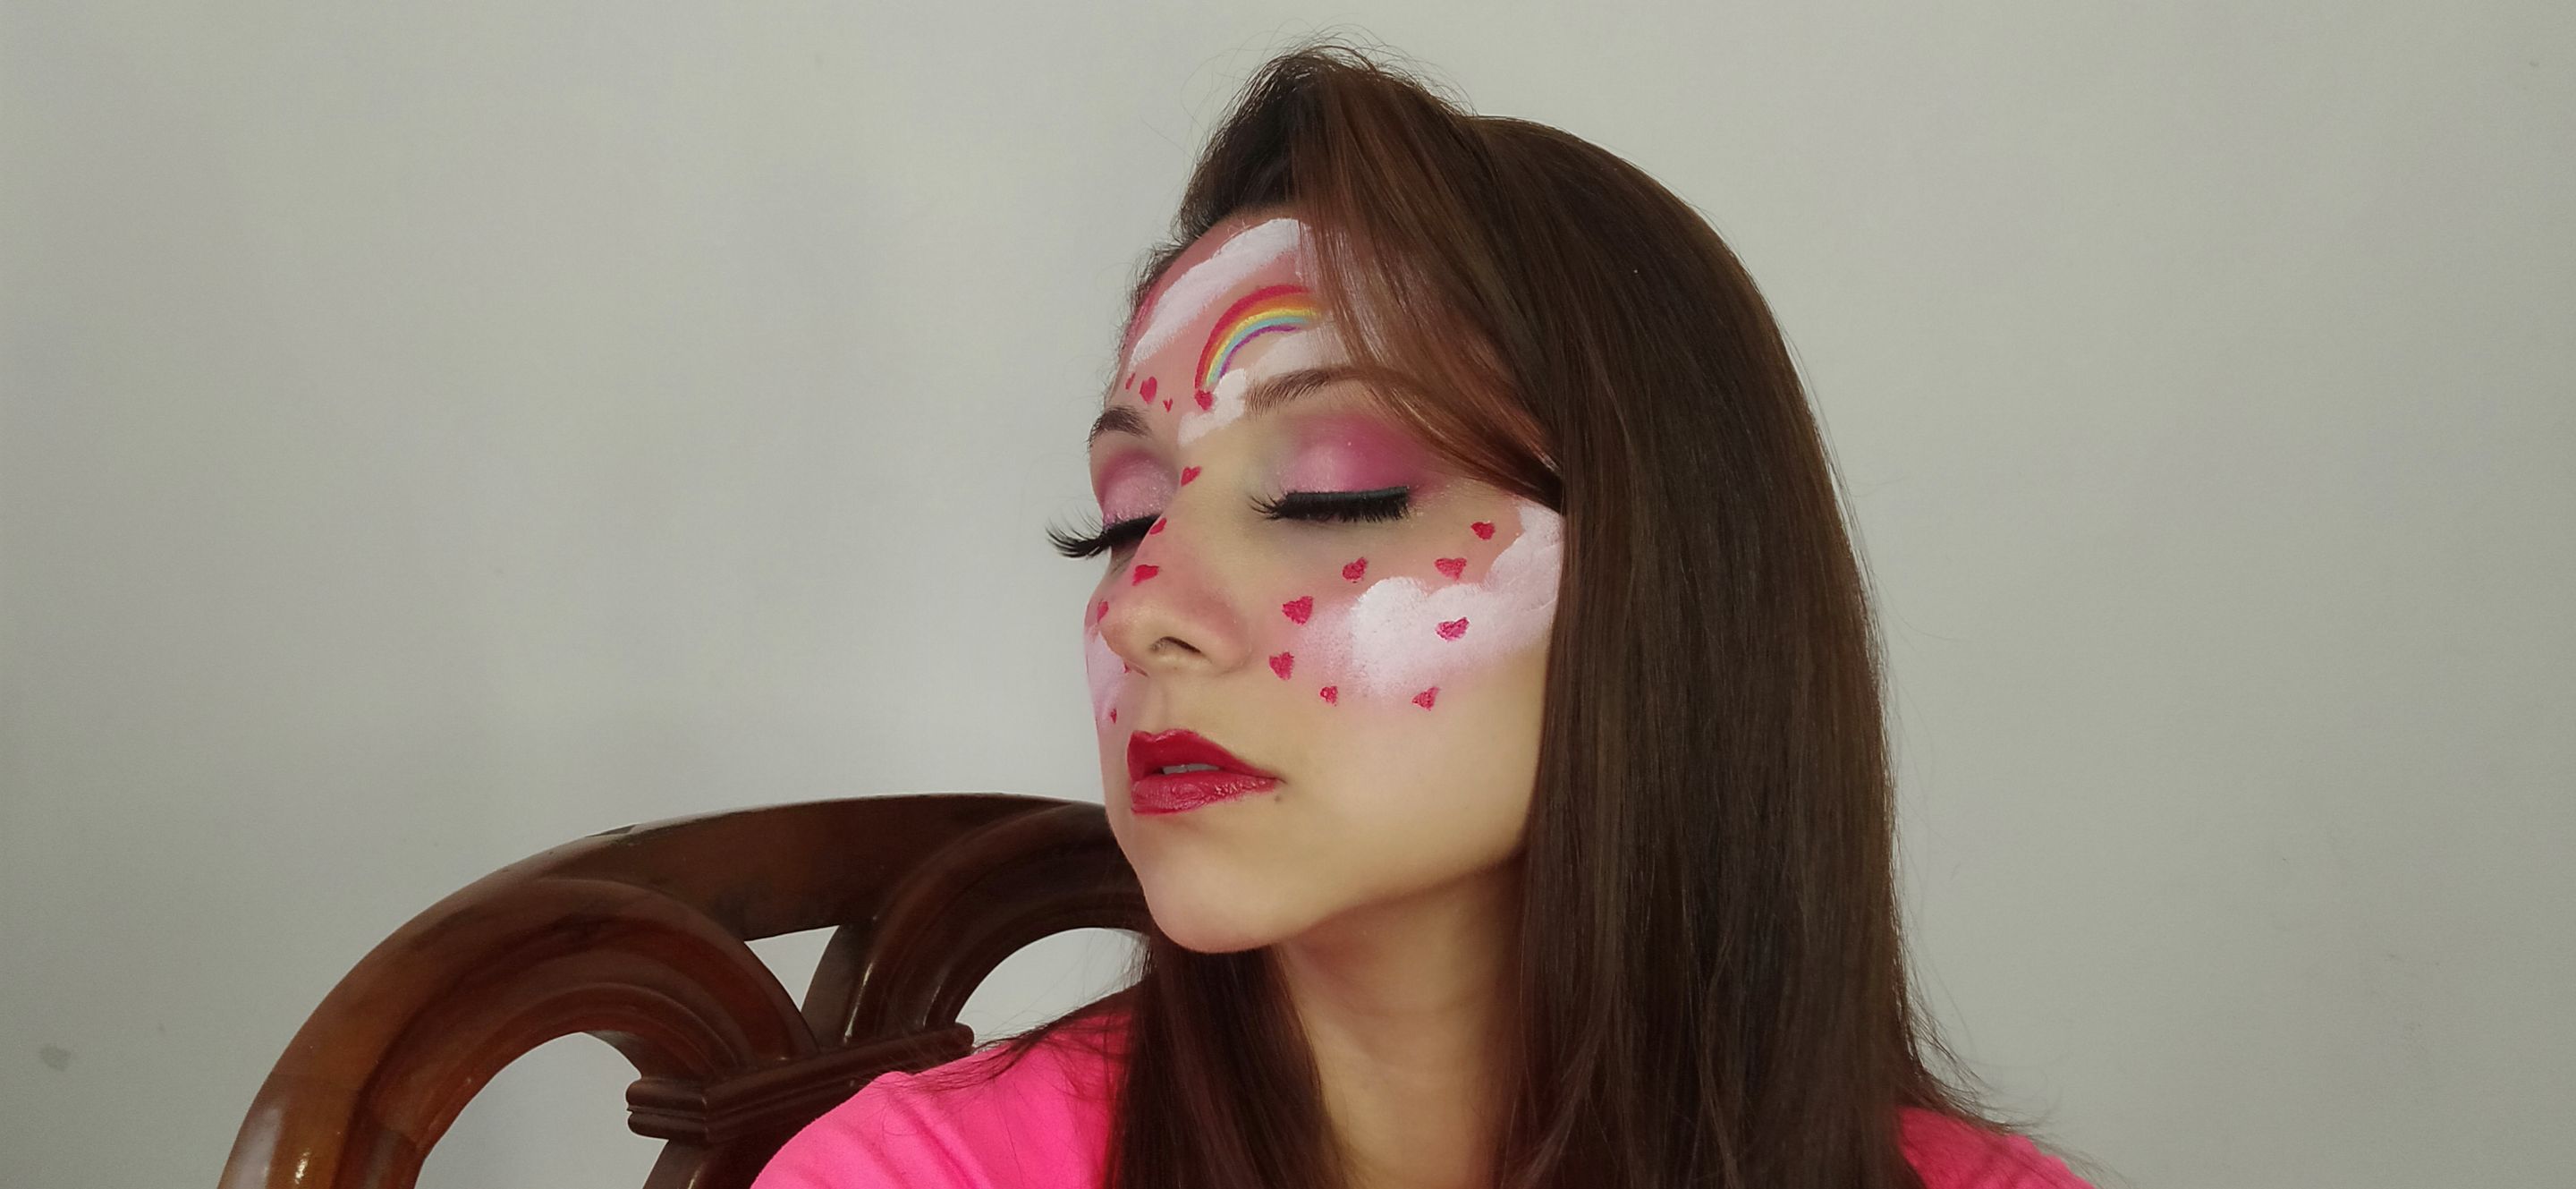
Con un pincel plano apliqué sombra fucsia en la parte inferior de los ojos, utilicé una brocha lengua de gato grande para aplicar pintura óleo blanca en el rostro y de esta manera dibujar nubes 💭, con un pincel delgado para detalles, realicé varios corazones rojos y de distintos tamaños.
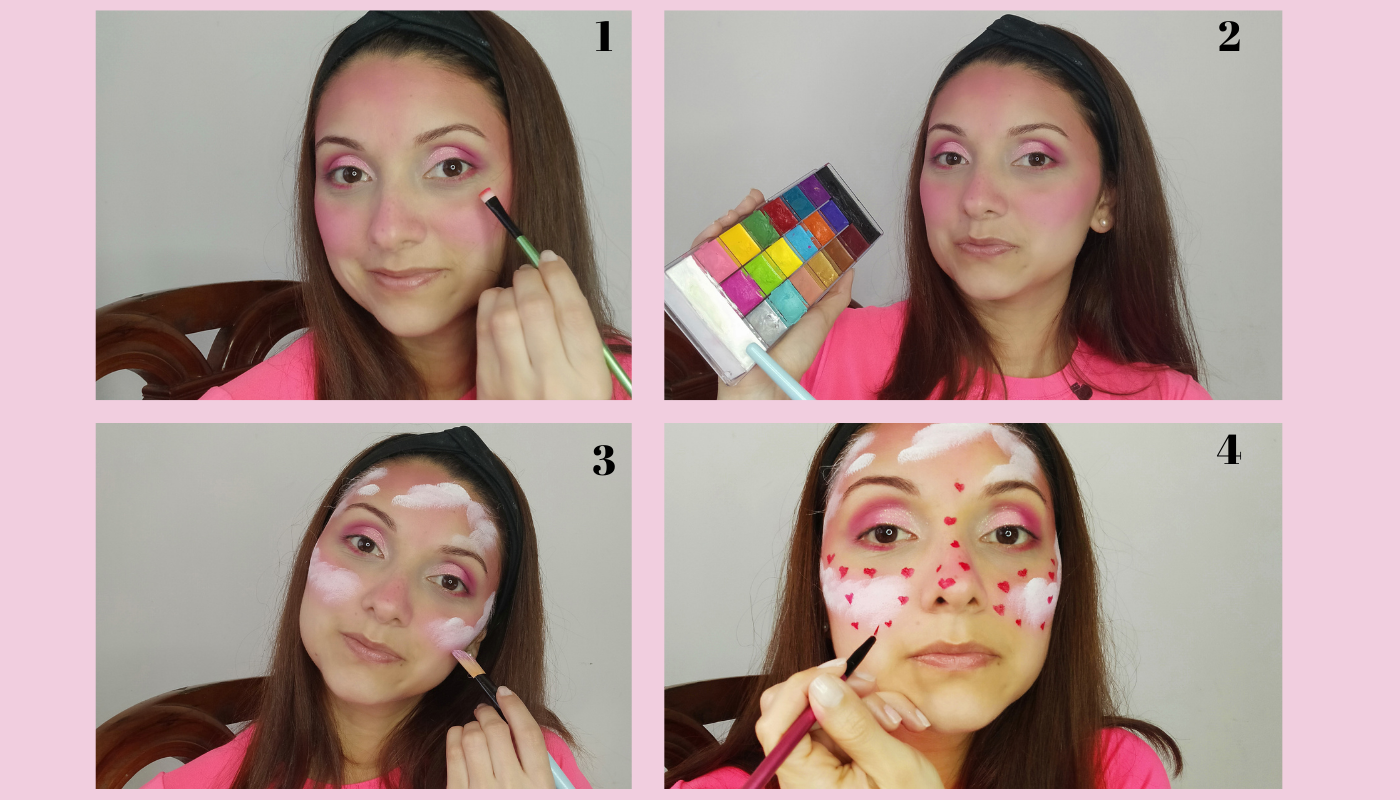
Paso 6
Finalmente con el pincel para delinear realicé un arcoíris, con la pintura de óleo marrón realicé la cesta del globo aerostático, con la pintura óleo rojo realicé el globo en forma de corazón y utilicé pintura labial roja brillante para labios. Me coloqué las pestañas y listo.
Si viste mi video puedes dejar tu comentario 😍 Espero les haya gustado, nos vemos en un próximo post...
𝘚𝘦𝘱𝘢𝘳𝘢𝘥𝘰𝘳 𝘺 𝘣𝘢𝘯𝘯𝘦𝘳: 𝘥𝘪𝘴𝘦ñ𝘢𝘥𝘰 𝘱𝘰𝘳 @𝘢𝘺𝘭𝘦𝘦𝘯𝘳 𝘦𝘯 𝘊𝘢𝘯𝘷𝘢 || 𝘾𝙤𝙡𝙡𝙖𝙜𝙚: 𝙧𝙚𝙖𝙡𝙞𝙯𝙖𝙙𝙤 𝙚𝙣 𝘊𝘢𝘯𝘷𝘢|| 𝘐𝘮á𝘨𝘦𝘯𝘦𝘴: 𝘗𝘳𝘰𝘱𝘪𝘢𝘴 𝘦𝘥𝘪𝘵𝘢𝘥𝘢𝘴 𝘦𝘯 𝘊𝘢𝘯𝘷𝘢|| 𝘍𝘰𝘵𝘰𝘨𝘳𝘢𝘧𝘪𝘢 𝘵𝘰𝘮𝘢𝘥𝘢 𝘱𝘰𝘳: @𝘢𝘺𝘭𝘦𝘦𝘯𝘳 𝘶𝘵𝘪𝘭𝘪𝘻𝘢𝘯𝘥𝘰 𝘶𝘯 𝘢𝘳𝘰 𝘥𝘦 𝘭𝘶𝘻 || 𝘛𝘳𝘢𝘥𝘶𝘤𝘵𝘰𝘳: 𝘋𝘦𝘦𝘱𝘓| 𝘝𝘪𝘥𝘦𝘰 𝘦𝘥𝘪𝘵𝘢𝘥𝘰 𝘦𝘯 𝘐𝘯𝘴𝘩𝘰𝘵 || 𝘋𝘦𝘭 - 𝘛𝘳𝘰𝘱𝘪𝘤𝘢𝘭 𝘓𝘰𝘷𝘦 | 𝘕𝘰 𝘊𝘰𝘱𝘺𝘳𝘪𝘨𝘩𝘵 𝘔𝘶𝘴𝘪𝘤 𝘍𝘰𝘳 𝘝𝘭𝘰𝘨 | 𝘛𝘖𝘗 𝘚𝘜𝘗𝘙𝘌𝘔𝘌 𝘉𝘈𝘊𝘒𝘎𝘙𝘖𝘜𝘕𝘋 𝘔𝘜𝘚𝘐𝘊 # 26 🚀 𝘥𝘦𝘴𝘥𝘦 𝘦𝘭 𝘮𝘪𝘯𝘶𝘵𝘰 00:00 𝘩𝘢𝘴𝘵𝘢 3:40 || 𝘑𝘢𝘳𝘪𝘤𝘰 - 𝘙𝘦𝘵𝘳𝘰𝘷𝘪 | 𝘕𝘰 𝘊𝘰𝘱𝘺𝘳𝘪𝘨𝘩𝘵 𝘔𝘶𝘴𝘪𝘤 𝘍𝘰𝘳 𝘝𝘭𝘰𝘨 | 𝘛𝘖𝘗 𝘚𝘜𝘗𝘙𝘌𝘔𝘌 𝘉𝘈𝘊𝘒𝘎𝘙𝘖𝘜𝘕𝘋 𝘔𝘜𝘚𝘐𝘊 # 30 🚀 𝘥𝘦𝘴𝘥𝘦 𝘦𝘭 𝘮𝘪𝘯𝘶𝘵𝘰 03:40 𝘩𝘢𝘴𝘵𝘢 7:22 || 𝘔𝘉𝘉 - 𝘍𝘳𝘦𝘴𝘩 | 𝘕𝘰 𝘊𝘰𝘱𝘺𝘳𝘪𝘨𝘩𝘵 𝘔𝘶𝘴𝘪𝘤 𝘍𝘰𝘳 𝘝𝘭𝘰𝘨 | 𝘛𝘖𝘗 𝘚𝘜𝘗𝘙𝘌𝘔𝘌 𝘉𝘈𝘊𝘒𝘎𝘙𝘖𝘜𝘕𝘋 𝘔𝘜𝘚𝘐𝘊 # 19 🚀𝘥𝘦𝘴𝘥𝘦 𝘦𝘭 𝘮𝘪𝘯𝘶𝘵𝘰 07:22 𝘩𝘢𝘴𝘵𝘢 9:45 || 𝘓𝘰𝘤𝘢𝘭𝘪𝘻𝘢𝘤𝘪ó𝘯: 𝘌𝘯 𝘮𝘪 𝘢𝘱𝘢𝘳𝘵𝘢𝘮𝘦𝘯𝘵𝘰 𝘶𝘣𝘪𝘤𝘢𝘥𝘰 𝘦𝘯 𝘊𝘢𝘳𝘢𝘤𝘢𝘴-𝘝𝘦𝘯𝘦𝘻𝘶𝘦𝘭𝘢.
ℕ𝕆𝕎 𝕀ℕ 𝔼ℕ𝔾𝕃𝕀𝕊ℍ
ℕ𝕆𝕎 𝕀ℕ 𝔼ℕ𝔾𝕃𝕀𝕊ℍ
Hello friends of Hive, I hope you are very well, today I want to show you a tutorial through a video, of a makeup on Love in the Clouds 😍 💭, who has not happened that when we fall in love, we feel like in the clouds 💭, we feel happiness, we are clueless, the heart races, our legs tremble, in short are sensations that we have through this feeling and how beautiful it is when this love is reciprocated ❤️.
Cosmetics to be used:
❤️ Zoah brand Micellar water
❤️ Zoah brand sunscreen
❤️ KaliyaBeauty brand primer with vitamin C
❤️ Salomé cream concealer n. 1.50
❤️ Naylen compact powder n.2
❤️ Angled Eye Brush
❤️ Angled Face Brush
❤️ Eye smudger brush
❤️ Small flat brush
❤️ Blurring Brush
❤️ Blending sponge
❤️ Cat tongue eye brush
❤️ Large cat tongue brush
❤️ Fan Brush
❤️ Fuchsia and flamingo eye shadow
❤️ Dark pink glitter shadow
❤️ White oil paint, red,
yellow, blue, green and orange
❤️ Bright red lipstick paint
❤️ L'oreal highlighter
Tutorial
Step 1.
First I did a facial cleansing with Zoah micellar water and waited for it to dry, then I used Zoah sunscreen, spread the product until it was absorbed into the skin, applied KaliyaBeauty primer (I think you can get a better one) and started the makeup with a Salome brand concealer to cover dark circles, I also applied on the chin area, on the sides of the nose. It is important to use the necessary amount of product, that is to say, where we do not spill product but do not apply too little either.
Step 2.
Then with the help of a large angled brush, I applied Nailen brand powder compact, blended all over the face including the neck, I chose the fuchsia shade, with a blending brush, I applied by the cheekbones, cheeks, hundred and forehead areas.
Step 3.
With brown shadow I drew and filled those spaces, giving shape to the eyebrows, what was left of product in the brush I placed it where the eyebrows begin to make them look natural and combed them with a brush, with a blending brush I applied flamingo color shadow (darker shade than fuchsia) in order to give depth to the look, I stood at the end of the eye and I was blurring my eyelid from the corner to the top in the form of drag.
Step 4.
I made a cut crease with a small cat tongue brush, then with my ring finger I applied glitter shadow on the mobile eyelids to give illumination to the look.
Step 5.
With a flat brush I applied fuchsia shadow on the lower part of the eyes, I used a large cat tongue brush to apply white oil paint on the face and thus draw clouds 💭, with a thin brush for details, I made several red hearts and of different sizes.
Step 6.
Finally with the eyeliner brush I made a rainbow, with the brown oil paint I made the basket of the hot air balloon, with the red oil paint I made the heart shaped balloon and I used bright red lipstick for lips. I applied the eyelashes and that was it.
If you saw my video you can leave your comment 😍 I hope you liked it, see you in a next post....
𝘚𝘦𝘱𝘢𝘳𝘢𝘵𝘰𝘳 𝘺 𝘣𝘢𝘯𝘯𝘦𝘳: 𝘥𝘦𝘴𝘪𝘨𝘯𝘦𝘥 𝘣𝘺 @𝘢𝘺𝘭𝘦𝘦𝘯𝘳 𝘢𝘵[𝘊𝘢𝘯𝘷𝘢](𝘩𝘵𝘵𝘱𝘴://𝘸𝘸𝘸.𝘤𝘢𝘯𝘷𝘢. 𝘤𝘰𝘮/) || 𝘾𝙤𝙡𝙡𝙖𝙜𝙚: 𝘮𝘢𝘥𝘦 𝘰𝘯 𝘊𝘢𝘯𝘷𝘢|| 𝘐𝘮𝘢𝘨𝘦𝘴: 𝘖𝘸𝘯 𝘦𝘥𝘪𝘵𝘦𝘥 𝘰𝘯 𝘊𝘢𝘯𝘷𝘢|| 𝘗𝘩𝘰𝘵𝘰𝘨𝘳𝘢𝘱𝘩𝘴 𝘵𝘢𝘬𝘦𝘯 𝘣𝘺 : @𝘢𝘺𝘭𝘦𝘦𝘯𝘳 𝘶𝘴𝘪𝘯𝘨 𝘢 𝘭𝘪𝘨𝘩𝘵 𝘳𝘪𝘯𝘨 || 𝘛𝘳𝘢𝘯𝘴𝘭𝘢𝘵𝘰𝘳: [𝘋𝘦𝘦𝘦𝘱𝘓](𝘩𝘵𝘵𝘱𝘴://𝘸𝘸𝘸.𝘥𝘦𝘦𝘱𝘭. 𝘤𝘰𝘮/𝘦𝘯/𝘵𝘳𝘢𝘯𝘴𝘭𝘢𝘵𝘰𝘳)| 𝘝𝘪𝘥𝘦𝘦𝘰 𝘦𝘥𝘪𝘵𝘢𝘥𝘰 𝘦𝘯𝘯 𝘐𝘯𝘴𝘩𝘰𝘵 || [𝘋𝘦𝘭 - 𝘛𝘳𝘰𝘱𝘪𝘤𝘢𝘭 𝘓𝘰𝘷𝘦 | 𝘕𝘰 𝘊𝘰𝘱𝘺𝘳𝘪𝘨𝘩𝘵 𝘔𝘶𝘴𝘪𝘤 𝘍𝘰𝘳 𝘝𝘭𝘰𝘨 | 𝘛𝘖𝘗 𝘚𝘜𝘗𝘙𝘌𝘔𝘌 𝘉𝘈𝘊𝘒𝘎𝘙𝘖𝘜𝘕𝘋 𝘔𝘜𝘚𝘐𝘊 # 26 🚀](𝘩𝘵𝘵𝘱𝘴://𝘺𝘰𝘶𝘵𝘶.𝘣𝘦/𝘭2𝘥𝘌𝘎𝘋-𝘚𝘷3𝘔? 𝘭𝘪𝘴𝘵=𝘗𝘓𝘋𝘊𝘌𝘋𝘨𝘤𝘚𝘢𝘱𝘟𝘠6𝘭𝘚𝘗𝘩𝘜4𝘝7𝘷2𝘥𝘨𝘕8𝘟𝘖𝘣𝘯𝘈𝘫) 𝘧𝘳𝘰𝘮 𝘮𝘪𝘯𝘶𝘵𝘦 00:00 𝘵𝘰 3:40 || [𝘑𝘢𝘳𝘪𝘤𝘰 - 𝘙𝘦𝘵𝘳𝘰𝘷𝘪 | 𝘕𝘰 𝘊𝘰𝘱𝘺𝘳𝘪𝘨𝘩𝘵 𝘔𝘶𝘴𝘪𝘤 𝘍𝘰𝘳 𝘝𝘭𝘰𝘨 | 𝘛𝘖𝘗 𝘚𝘜𝘗𝘙𝘌𝘔𝘌 𝘉𝘈𝘊𝘒𝘎𝘙𝘖𝘜𝘕𝘋 𝘔𝘜𝘚𝘐𝘊 # 30 🚀](𝘩𝘵𝘵𝘱𝘴://𝘺𝘰𝘶𝘵𝘶.𝘣𝘦/𝘟𝘹𝘠𝘣69𝘘𝘦𝘳𝘈4? 𝘭𝘪𝘴𝘵=𝘗𝘓𝘋𝘊𝘌𝘋𝘨𝘤𝘚𝘢𝘱𝘟𝘠6𝘭𝘚𝘗𝘩𝘜4𝘝7𝘷2𝘥𝘨𝘕8𝘟𝘖𝘣𝘯𝘈𝘫) 𝘧𝘳𝘰𝘮 𝘮𝘪𝘯𝘶𝘵𝘦 03:40 𝘵𝘰 7:22 || 𝘔𝘉𝘉 - 𝘍𝘳𝘦𝘴𝘩 | 𝘕𝘰 𝘊𝘰𝘱𝘺𝘳𝘪𝘨𝘩𝘵 𝘔𝘶𝘴𝘪𝘤 𝘍𝘰𝘳 𝘝𝘭𝘰𝘨 | 𝘛𝘖𝘗 𝘚𝘜𝘗𝘙𝘌𝘔𝘌 𝘉𝘈𝘊𝘒𝘎𝘙𝘖𝘜𝘕𝘋 𝘔𝘜𝘚𝘐𝘊 # 19 🚀𝘧𝘳𝘰𝘮 𝘮𝘪𝘯𝘶𝘵𝘦 07:22 𝘵𝘰 9:45 || 𝘓𝘰𝘤𝘢𝘵𝘪𝘰𝘯: 𝘐𝘯 𝘮𝘺 𝘢𝘱𝘢𝘳𝘵𝘮𝘦𝘯𝘵 𝘭𝘰𝘤𝘢𝘵𝘦𝘥 𝘪𝘯 𝘊𝘢𝘳𝘢𝘢𝘤𝘢𝘴-𝘝𝘦𝘯𝘦𝘻𝘶𝘦𝘭𝘢.
Show more
Tags :
Woo!
This creator can upvote comments using 3speak's stake today because they are a top performing creator!
Leave a quality comment relating to their content and you could receive an upvote
worth at least a dollar.
Their limit for today is $0!
Their limit for today is $0!
17 views
2 years ago
$
31 views
2 years ago
$

20 views
2 years ago
$

10 views
2 years ago
$

23 views
3 years ago
$
More Videos

6 views
5 months ago
$

4 views
a year ago
$

5 views
3 weeks ago
$

30 views
a year ago
$
8 views
2 years ago
$

1 views
3 years ago
$
16 views
a year ago
$
4 views
2 years ago
$

18 views
4 days ago
$

5 views
a month ago
$

34 views
4 years ago
$

5 views
2 years ago
$

0 views
3 years ago
$
53 views
2 years ago
$

3 views
2 years ago
$
7 views
9 months ago
$

13 views
a year ago
$

1 views
2 years ago
$

23 views
a year ago
$

4 views
a year ago
$
23 views
3 months ago
$

18 views
a month ago
$
11 views
4 years ago
$
Comments:
Reply:
To comment on this video please connect a HIVE account to your profile: Connect HIVE Account