BOLSAS DE PAPEL KRAFT DECORADAS (Esp - Eng)
21
About :
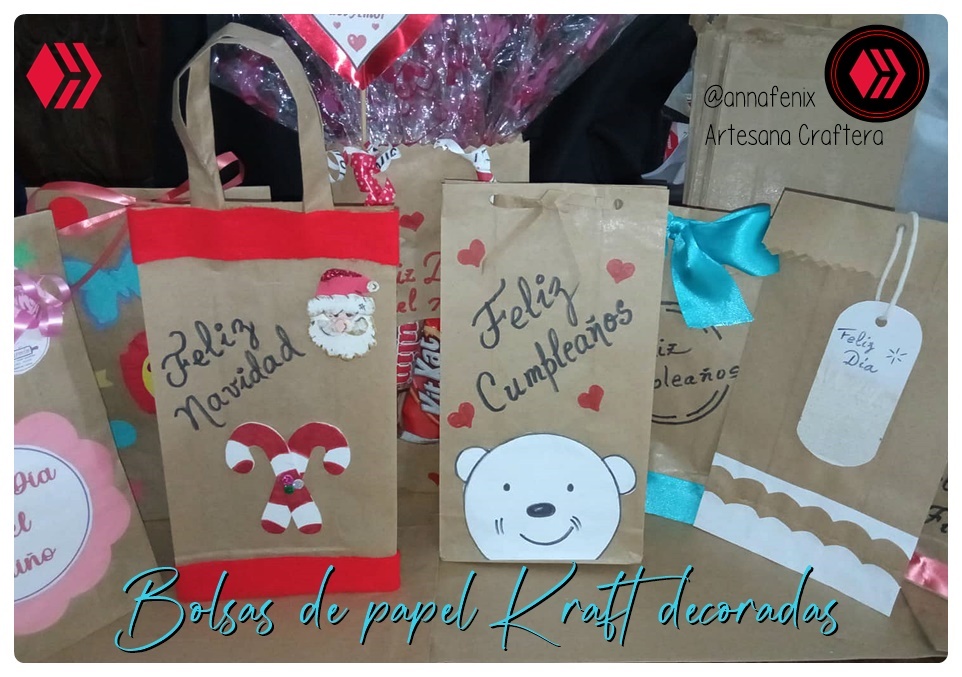
Imagen de mi propiedad // Image of my property
Editada con PhotoScape // Edited with PhotoScape
Editada con PhotoScape // Edited with PhotoScape
Buenos días a toda la gente linda de esta comunidad. Hoy les quiero compartir un trabajo manual que disfruto muchísimo por la gran variedad que podemos hacer con este material. Se trata de la Decoración de Bolsitas de Papel Kraft.
Good morning to all the beautiful people of this community. Today I want to share with you a manual work that I really enjoy because of the great variety that we can do with this material. This is the decoration of Kraf Paper Bags.

Siempre me gustó realizar los cotillones para las fiestas de mis hijos y amistades con diversos motivos, y brindar obsequios en bolsitas personalizadas, todas elaboradas con papel Kraft. También elaboré muchas bolsitas decoradas para mi emprendimiento de postres, sobre todo en los días especiales como Navidad, Cumpleaños, Día de las Madres, Día del Amor y la Amistad, etc. Con muchos detalles o con un simple lazo ya la bolsita se ve delicada.
I always liked to make party favors for my children's and friends' parties for various reasons, and offer gifts in personalized bags, all made with Kraft paper. I also made many decorated bags for my dessert business, especially on special days like Christmas, Birthdays, Mother's Day, Valentine's Day, etc. With many details or with a simple bow, the bag already looks delicate.
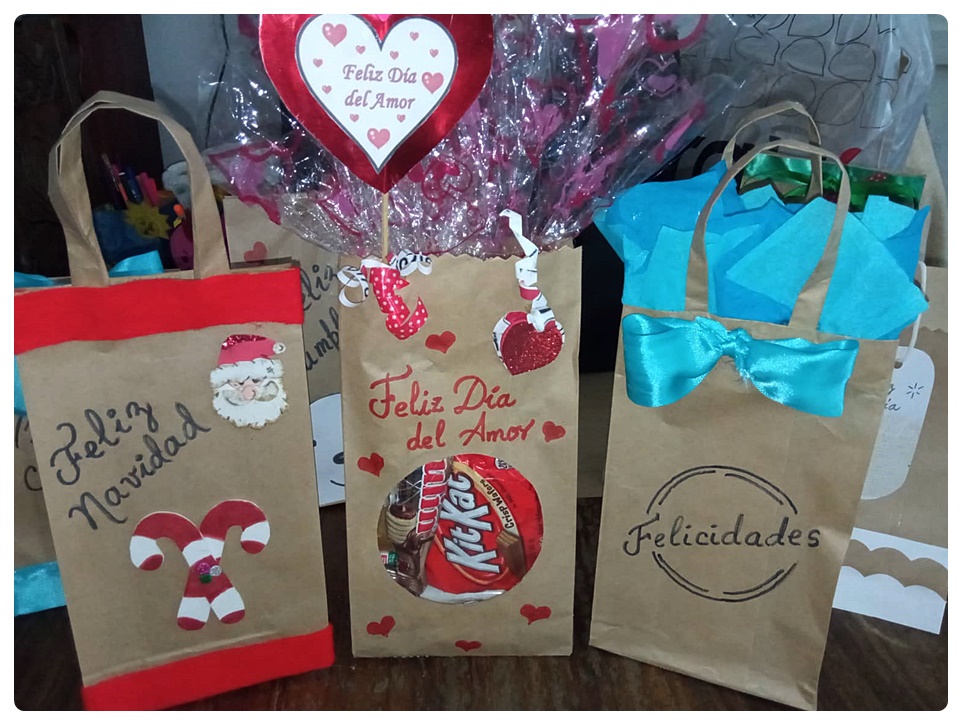
Imagen de mi propiedad // Image of my property
Hoy les voy a mostrar varias ya elaboradas y los pasos para elaborar algunas. Sobre todo el paso básico para todas que es convertirla en una bolsa con base para poder ponerla de pie y no acostada, aunque también les mostraré una en su forma sencilla de sobre.
Today I am going to show you several already made and the steps to make some. Above all, the basic step for all of them, which is to turn it into a bag with a base so that it can stand up and not lie down, although I will also show you one in its simple envelope form.
Los materiales utilizados a continuación:
The materials used below:
Imagen de mi propiedad // Image of my property
- Bolsitas de papel kraft
- Barra de silicón
- Silicón frío
- Pistola de silicón
- Tijera lisa
- Tijera de zigzag
- Cintas de diversos colores y materiales (recicladas)
- Abre huecos
- Grapadora
- Lápiz
- Marcadores gruesos de tinta china
- Lámina transparente (reciclada)
- Trozo de cartulina (reciclado)
- Hojas blancas
- Teipe
- Pega blanca
- Compás
- Papel celofán
- Papel crepé azul de dos tonos (guardados)
- Adornos reciclados (corazones, figuras de navidad, mariposas de papel, círculos,
- Trocito de fieltro rojo (guardado)
- Palito de altura (guardado)
- Kraft paper bags
- Silicon bar
- Cold sylicon
- Silicone gun
- Smooth scissors
- Zigzag scissors
- Ribbons of different colors and materials (recycled)
- Open holes
- Stapler
- Pencil
- Thick Chinese ink markers
- Transparent sheet (recycled)
- Piece of cardboard (recycled)
- White sheets
- Teipe
- White glue
- Compass
- Celofan paper
- Two-tone blue crepe paper (saved)
- Recycled decorations (hearts, Christmas figures, paper butterflies, circles,
- Piece of red felt (saved)
- Height stick (saved)
PASOS // STEPS
- Para la bolsa base de pie
Como pueden observar en el vídeo:
- For stand up base bag
As you can see in the video:
vídeo
- Diseñamos nuestra bolsa con el motivo que queremos colocar, y el mensaje personalizado.
- Recortamos la orilla superior, hacemos dos cortes laterales y doblamos 2 cm aproximadamente hacia la parte interna de la bolsa fijándola con silicón frío.
- Abrimos dos huequitos en la parte superior para insertar la cinta, en caso de querer hacer este modelo… algunas bolsitas no la llevan.
- Con retazos de las mismas bolsas kraft se elaboran dos cintas largas dobladas dos veces y selladas con silicón frío, las cuales se fijan en la orilla superior con silicón caliente para formar sus dos asas.
- Ya elaborada la bolsa base la pueden decorar a su gusto… el modelo del vídeo aparece a continuación.
- We design our bag with the reason we want to place it, and the personalized message.
- Cut the top edge, make two side cuts and fold approximately 2 cm towards the inside of the bag, fixing it with cold silicone.
- We open two small holes in the upper part to insert the tape, in case you want to make this model... some bags do not have it.
- With remnants of the same kraft bags, two long ribbons are made, folded twice and sealed with cold silicone, which are fixed on the upper edge with hot silicone to form its two handles.
- Once the base bag is made, you can decorate it to your liking... the model in the video appears below.
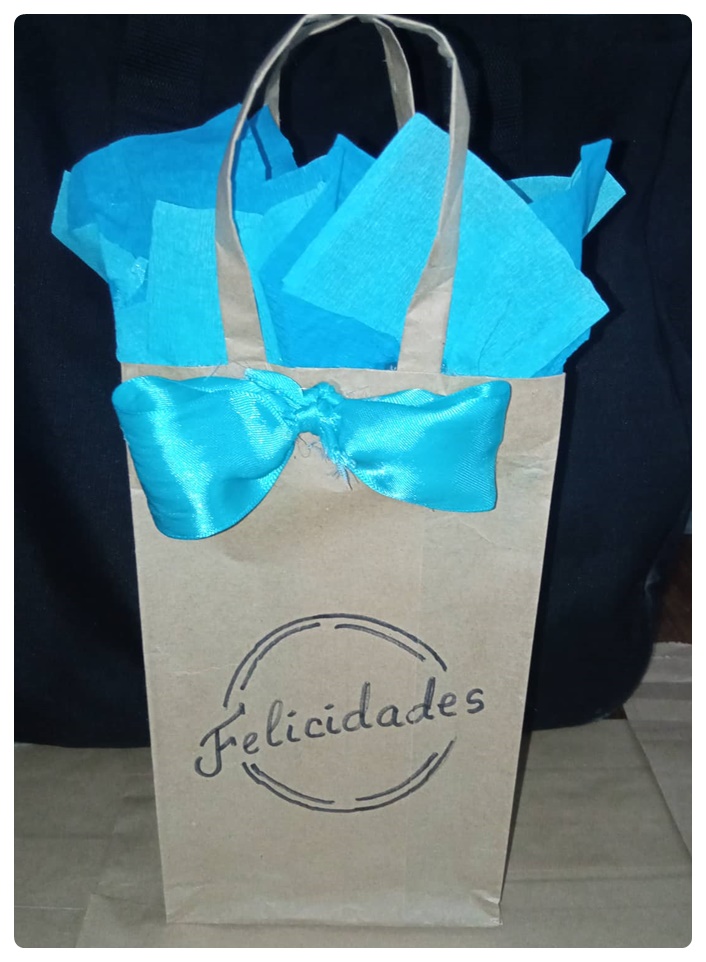
Imagen de mi propiedad // Image of my property
Este modelo se elaboró con cuadros de papel crepé azul de dos tonalidades los cuales se iban fijando alrededor de la bolsa por su parte interior dejando ver las puntas por la orilla.
This model was made with squares of blue crepe paper in two shades, which were fixed around the inside of the bag, revealing the ends along the edge.
Como detalle final se le colocó una cinta de tela de razo color azul claro. También se le puede colocar una cinta más delgada. En este caso la elaboramos con material reciclado y se le dio uso a lo que se tenía a la mano.
As a final detail, a light blue satin ribbon was placed on it. You can also put a thinner tape on it. In this case, we made it with recycled material and used what was on hand.
- Modelo de bolsa con claraboya transparente.
- El primer paso es marcar una circunferencia sobre la bolsa con un compás.
- Luego la recortamos justo por donde quedó marcada.
- Se coloca sobre la bolsa con el círculo ya recortado, una lámina transparente… en este caso usamos una vieja carpeta para desecho.
- A pulso, marcamos otro círculo sobre la lámina transparente con un marcador negro. Este círculo debe ser más amplio que el de la bolsa.
- Una vez recortado el círculo transparente, se le coloca silicón frío en las orillas y se introduce cuidadosamente en la bolsa, fijándolo justo en la orilla del círculo de la misma.
- Una vez finalizada esta bolsa, la decoramos a gusto. En este modelo la claraboya permite ver el contenido de la bolsa, y se usa más que todo para colocar galletas, o golosinas envueltas.
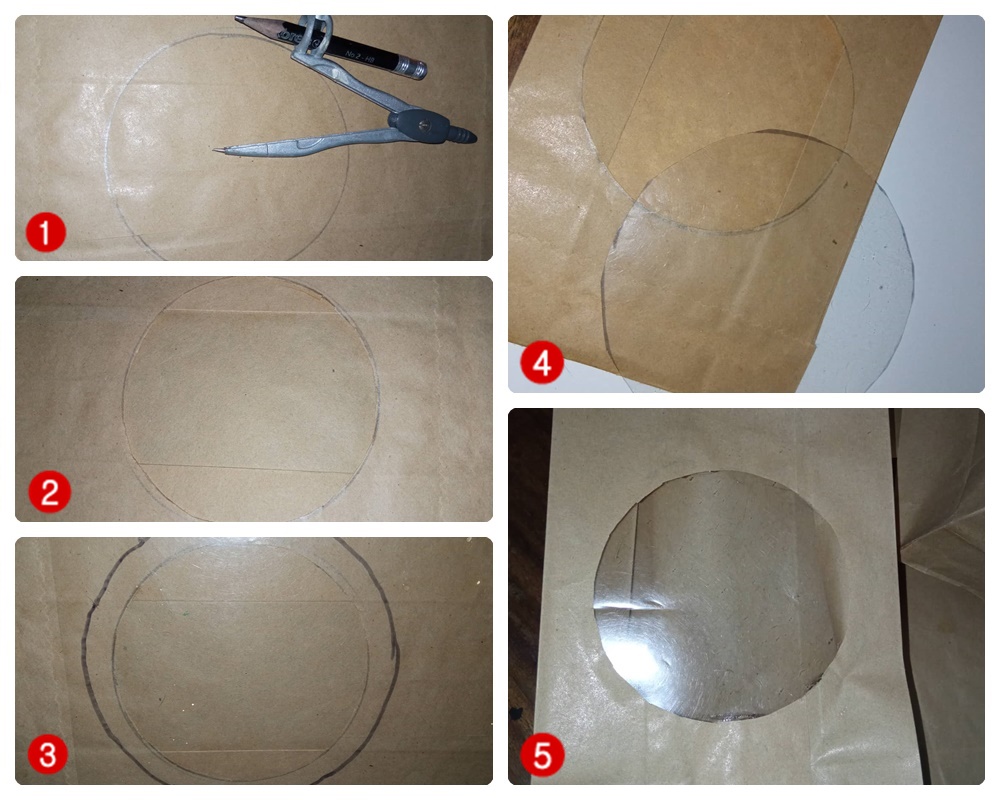
Imagen de mi propiedad // Image of my property
- Bag model with transparent skylight.
- The first step is to mark a circle on the bag with a compass.
- Then we cut it right where it was marked.
- A transparent sheet is placed on the bag with the circle already cut out... in this case we use an old folder for waste.
- Freehand, we mark another circle on the transparent sheet with a black marker. This circle should be wider than the one on the bag.
- Once the transparent circle is cut, cold silicone is placed on the edges and carefully inserted into the bag, fixing it right on the edge of the circle.
- Once this bag is finished, we decorate it to taste. In this model, the skylight allows you to see the contents of the bag, and it is used mainly to place cookies, or wrapped sweets.
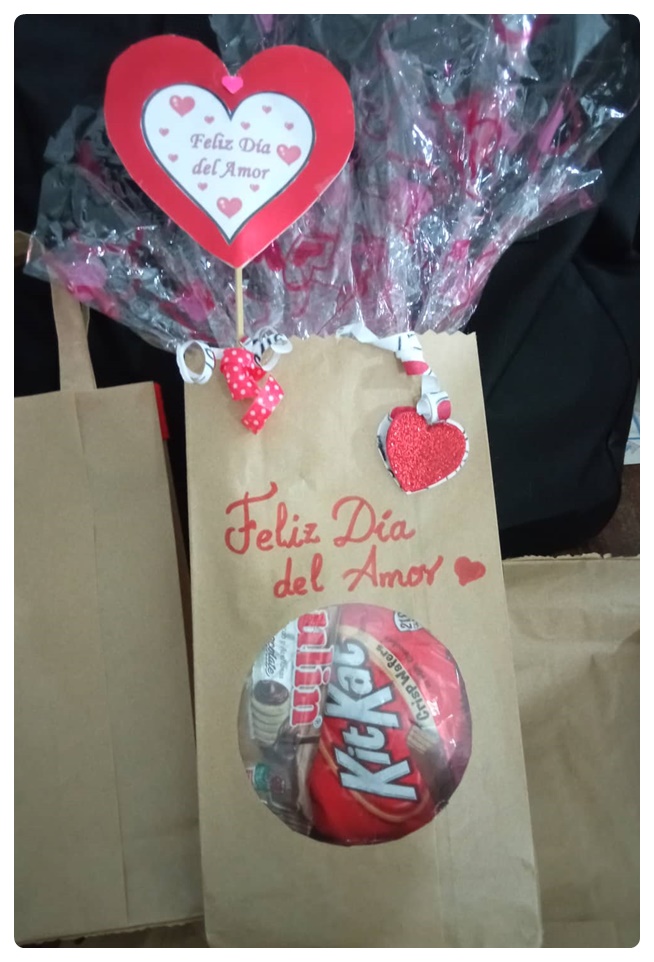
Imagen de mi propiedad // Image of my property
Este modelo de bolsa con claraboya transparente fue decorado con detalles del Día del Amor y la Amistad. Se le colocaron detalles al frente, corazones con marcador rojo, un corazón de foami sobre base de papel (reciclado), y trocitos de cintas de colores (recicladas),
This model of bag with transparent skylight was decorated with details of the Day of Love and Friendship. Details were placed on the front, hearts with a red marker, a foami heart on a paper base (recycled), and pieces of colored ribbons (recycled),
Por último se fijó en la parte trasera superior, en el interior de la bolsa, un detalle con papel celofán, y en la parte frontal se introdujo un palillo de altura con un corazón en un huequito que se hizo en la orilla.
Finally, a detail with cellophane paper was attached to the upper back part, inside the bag, and a tall toothpick with a heart was inserted into a little hole made on the edge on the front part.
- A continuación les muestro otros modelos que se elaboraron:
- Here are some other models that were made:
- Este modelo se elaboró con la bolsa base con asas, y se le colocó una franja de fieltro rojo en la orilla y otra en la base. Los detalles de figuras navideñas fueron tomados de viejos adornos.
- This model was made with the base bag with handles, and a strip of red felt was placed on the edge and another on the base. The details of Christmas figures were taken from old ornaments.
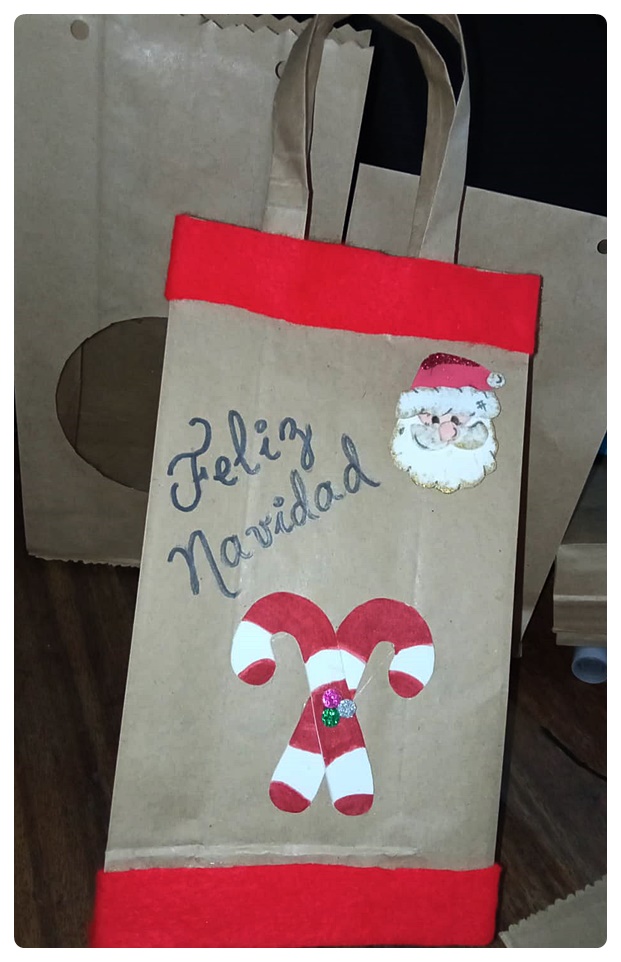
Imagen de mi propiedad // Image of my property
2.En este modelo no se realizaron los pasos para la bolsa base de pie sino que se mantuvo su aspecto de sobre y se le colocaron detalles elaborados con hojas blancas de papel. La etiqueta se hizo con una cartulina de desecho de un forro de cama, y la liga que la sostiene es de un tapabocas desechable ya sin uso.
2.In this model, the steps for the stand-up base bag were not carried out, but its envelope appearance was maintained and details made with white sheets of paper were placed on it. The tag was made from scrap cardboard from a bed liner, and the garter that holds it up is from an unused disposable mask.
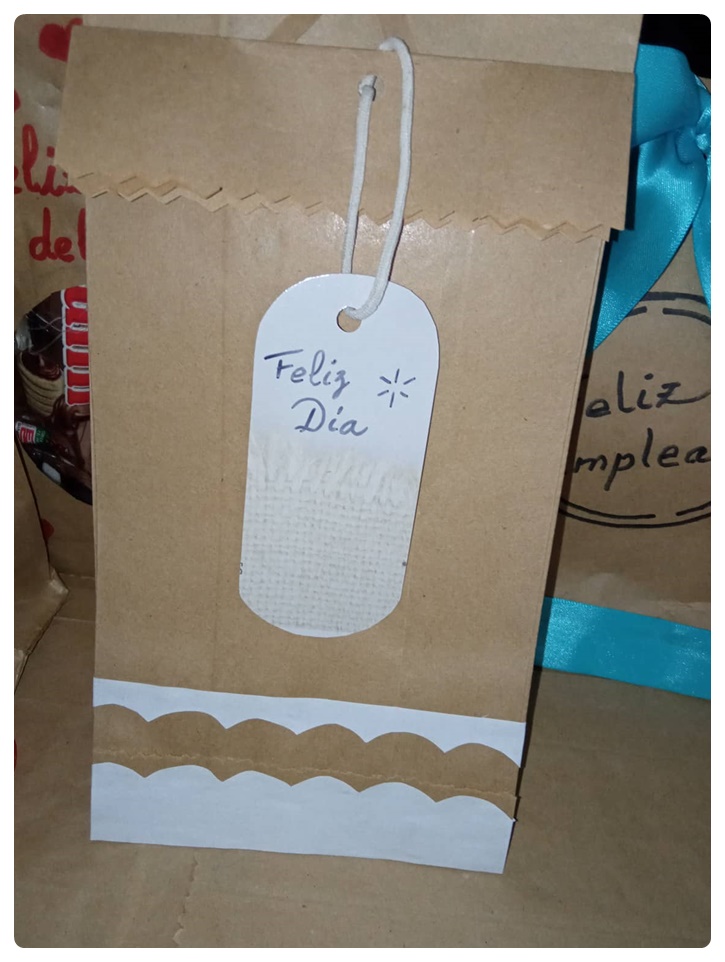
Imagen de mi propiedad // Image of my property
3.Aquí les mostramos otro modelo navideño pero sin asas, y las cintas utilizadas para decorar la bolsa son de regalo, menos la que sujeta la orilla que es de tela de razo.
3.Here we show you another Christmas model but without handles, and the ribbons used to decorate the bag are a gift, except for the one that holds the edge, which is made of satin.
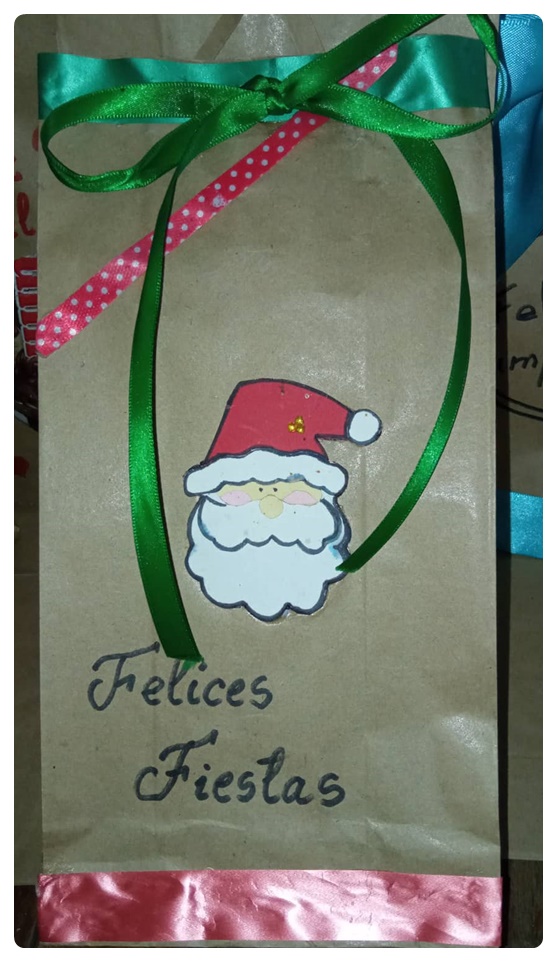
Imagen de mi propiedad // Image of my property
4.Este modelo es uno de los más sencillos. Se utilizó la bolsa base de pie sin asas, se colocó el mensaje sobre la bolsa y un detalle con cinta de razo en la base. Para sujetar, se introdujo la misma cinta azul por dos huequitos en la orilla formando un lazo con ella.
4.This model is one of the simplest. The stand-up base bag without handles was used, the message was placed on the bag and a satin ribbon detail was placed on the base. To fasten, the same blue ribbon was inserted through two small holes on the edge, forming a loop with it.
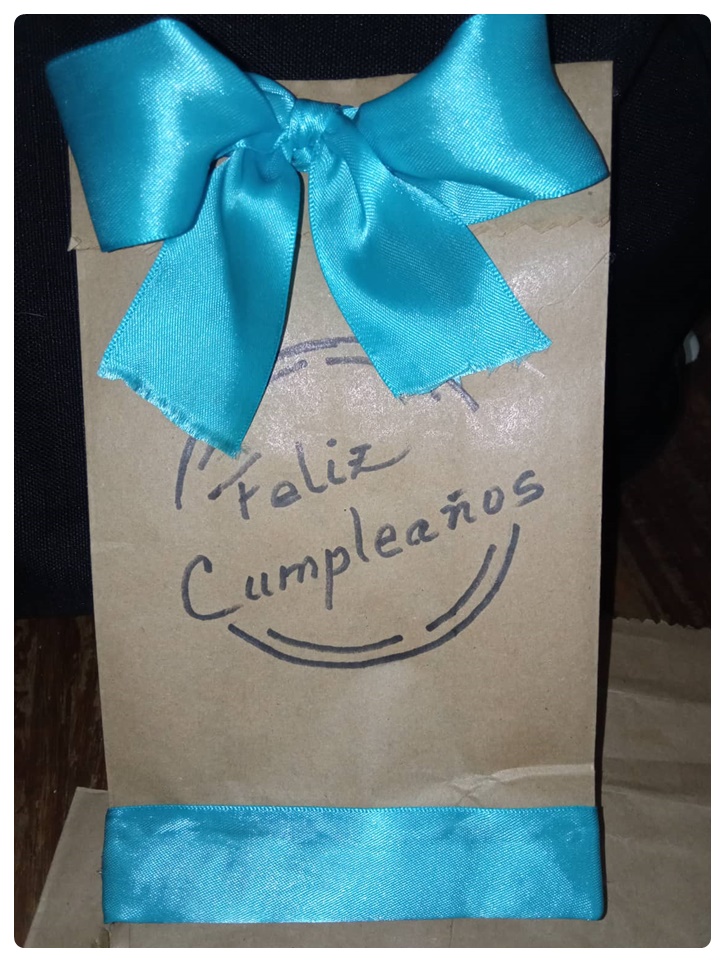
Imagen de mi propiedad // Image of my property
5.Esta decoración es especial para algún pequeño cumpleañero. Se le colocó a la parte frontal de la bolsa base un osito elaborado en hoja blanca de papel, con su mensaje en marcador negro. Para sujetar la bolsa, se introdujo por dos huequitos en la orilla una cinta hecha con retazos de papel kraft.
5.This decoration is special for a little birthday boy. A teddy bear made of a white sheet of paper was placed on the front of the base bag, with its message in black marker. To hold the bag, a ribbon made from scraps of kraf paper was inserted through two small holes on the edge.
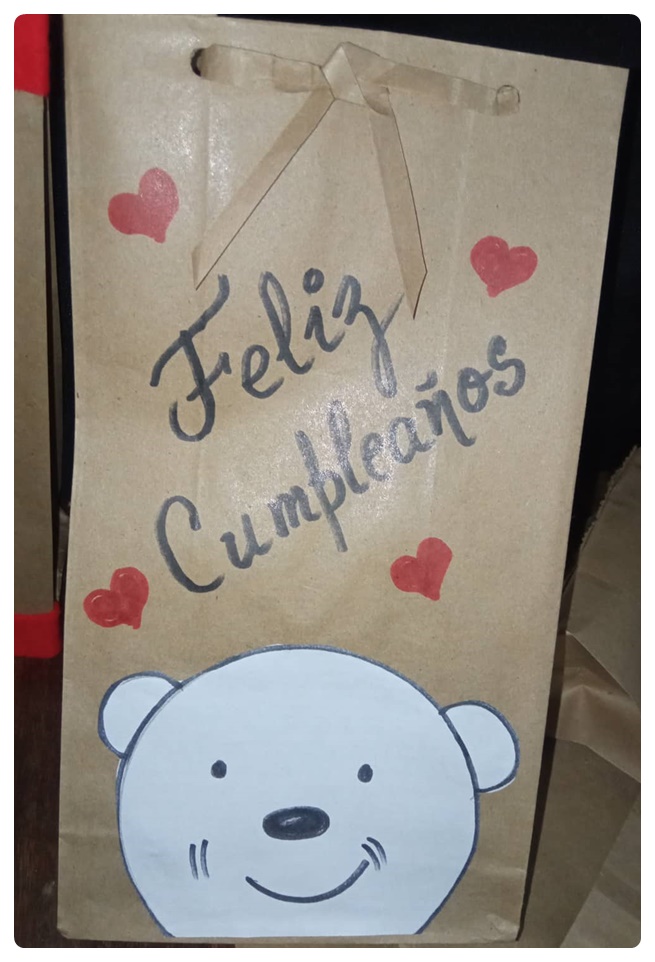
Imagen de mi propiedad // Image of my property
6.Estos modelos fueron elaborados por mí para la celebración del Día del Niño del año anterior, y fueron parte de los cotillones que hice para enviar galletas a algunas fundaciones de la zona. Los detalles son mariposas, caritas felices, lacitos de cinta de regalo, el mensaje impreso sobre papel de colores, y algunas llevaban el logo de mi emprendimiento.
6.These models were made by me for the celebration of Children's Day last year, and were part of the party favors I made to send cookies to some foundations in the area. The details are butterflies, happy faces, gift ribbon bows, the message printed on colored paper, and some had the logo of my business.
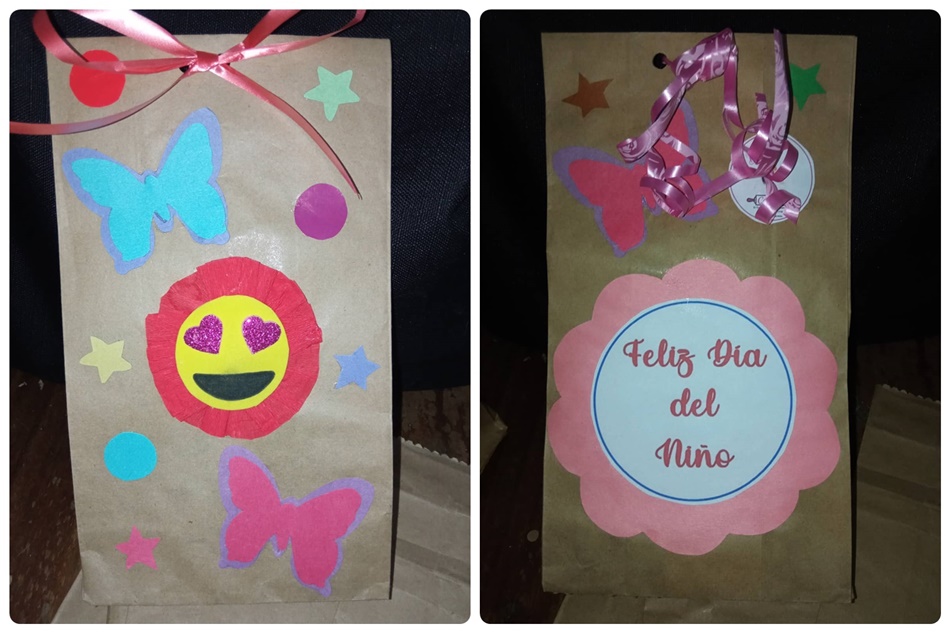
Imagen de mi propiedad // Image of my property
Como pueden ver, teniendo las bolsas de papel kraft en sus manos, ya todo depende de la creatividad y los materiales que posean. Existen miles de modelos para elaborar, y son muy prácticas a la hora de obsequiar un presente de cumpleaños o aniversario. De nosotros dependen qué tan serias y delicadas o alegres y coloridas las queremos hacer… y por supuesto dependiendo también del uso que le vamos a dar.
As you can see, having kraf paper bags in your hands, it all depends on your creativity and the materials you have. There are thousands of models to make, and they are very practical when giving a birthday or anniversary present. It depends on us how serious and delicate or cheerful and colorful we want to make them... and of course also depending on the use that we are going to give them.
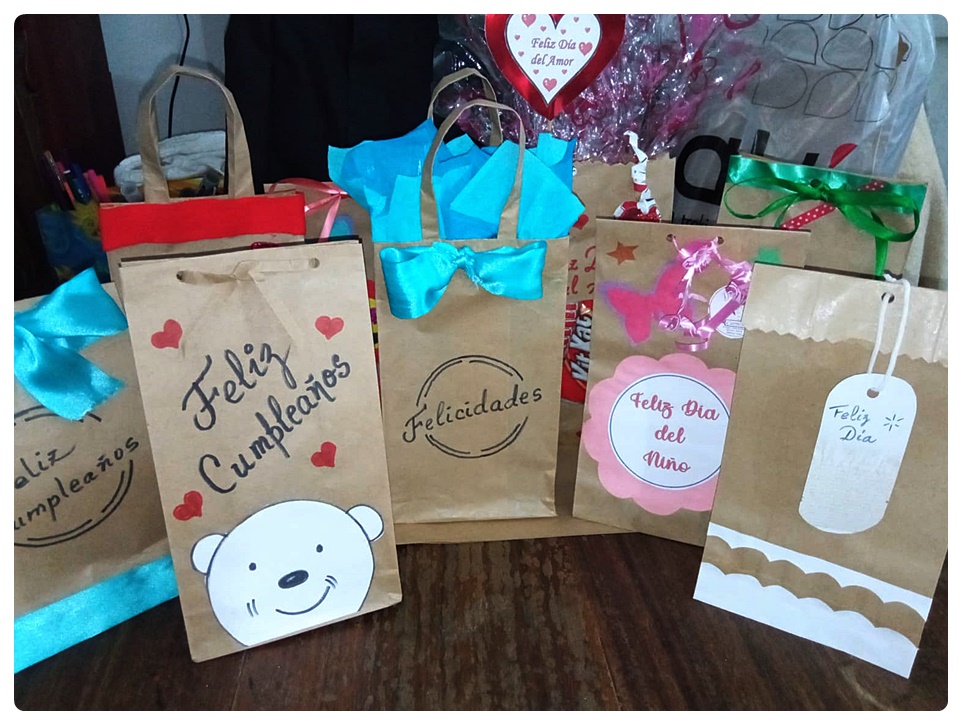
Imagen de mi propiedad // Image of my property
Espero que les haya gustado este tutorial y los modelos que les presenté, gracias por visitar mi blog. ¡¡Feliz viernes para todos!!
I hope you liked this tutorial and the models that I presented to you, thanks for visiting my blog. Happy Friday for everyone!!
Show more
Tags :
Woo!
This creator can upvote comments using 3speak's stake today because they are a top performing creator!
Leave a quality comment relating to their content and you could receive an upvote
worth at least a dollar.
Their limit for today is $0!
Their limit for today is $0!

6 views
2 years ago
$
2 views
5 months ago
$
2 views
2 years ago
$
5 views
a year ago
$

8 views
a year ago
$
More Videos

27 views
a year ago
$
12 views
8 months ago
$

2 views
a year ago
$

7 views
a year ago
$

10 views
10 months ago
$

9 views
a year ago
$

15 views
2 years ago
$

3 views
a year ago
$

5 views
a year ago
$
5 views
2 years ago
$
1 views
2 years ago
$

12 views
3 years ago
$
2 views
2 years ago
$

10 views
3 years ago
$

19 views
2 years ago
$

3 views
11 months ago
$

23 views
11 months ago
$

13 views
2 years ago
$
3 views
2 years ago
$

33 views
2 years ago
$
11 views
9 months ago
$

3 views
2 years ago
$

7 views
7 months ago
$
Comments:
Reply:
To comment on this video please connect a HIVE account to your profile: Connect HIVE Account