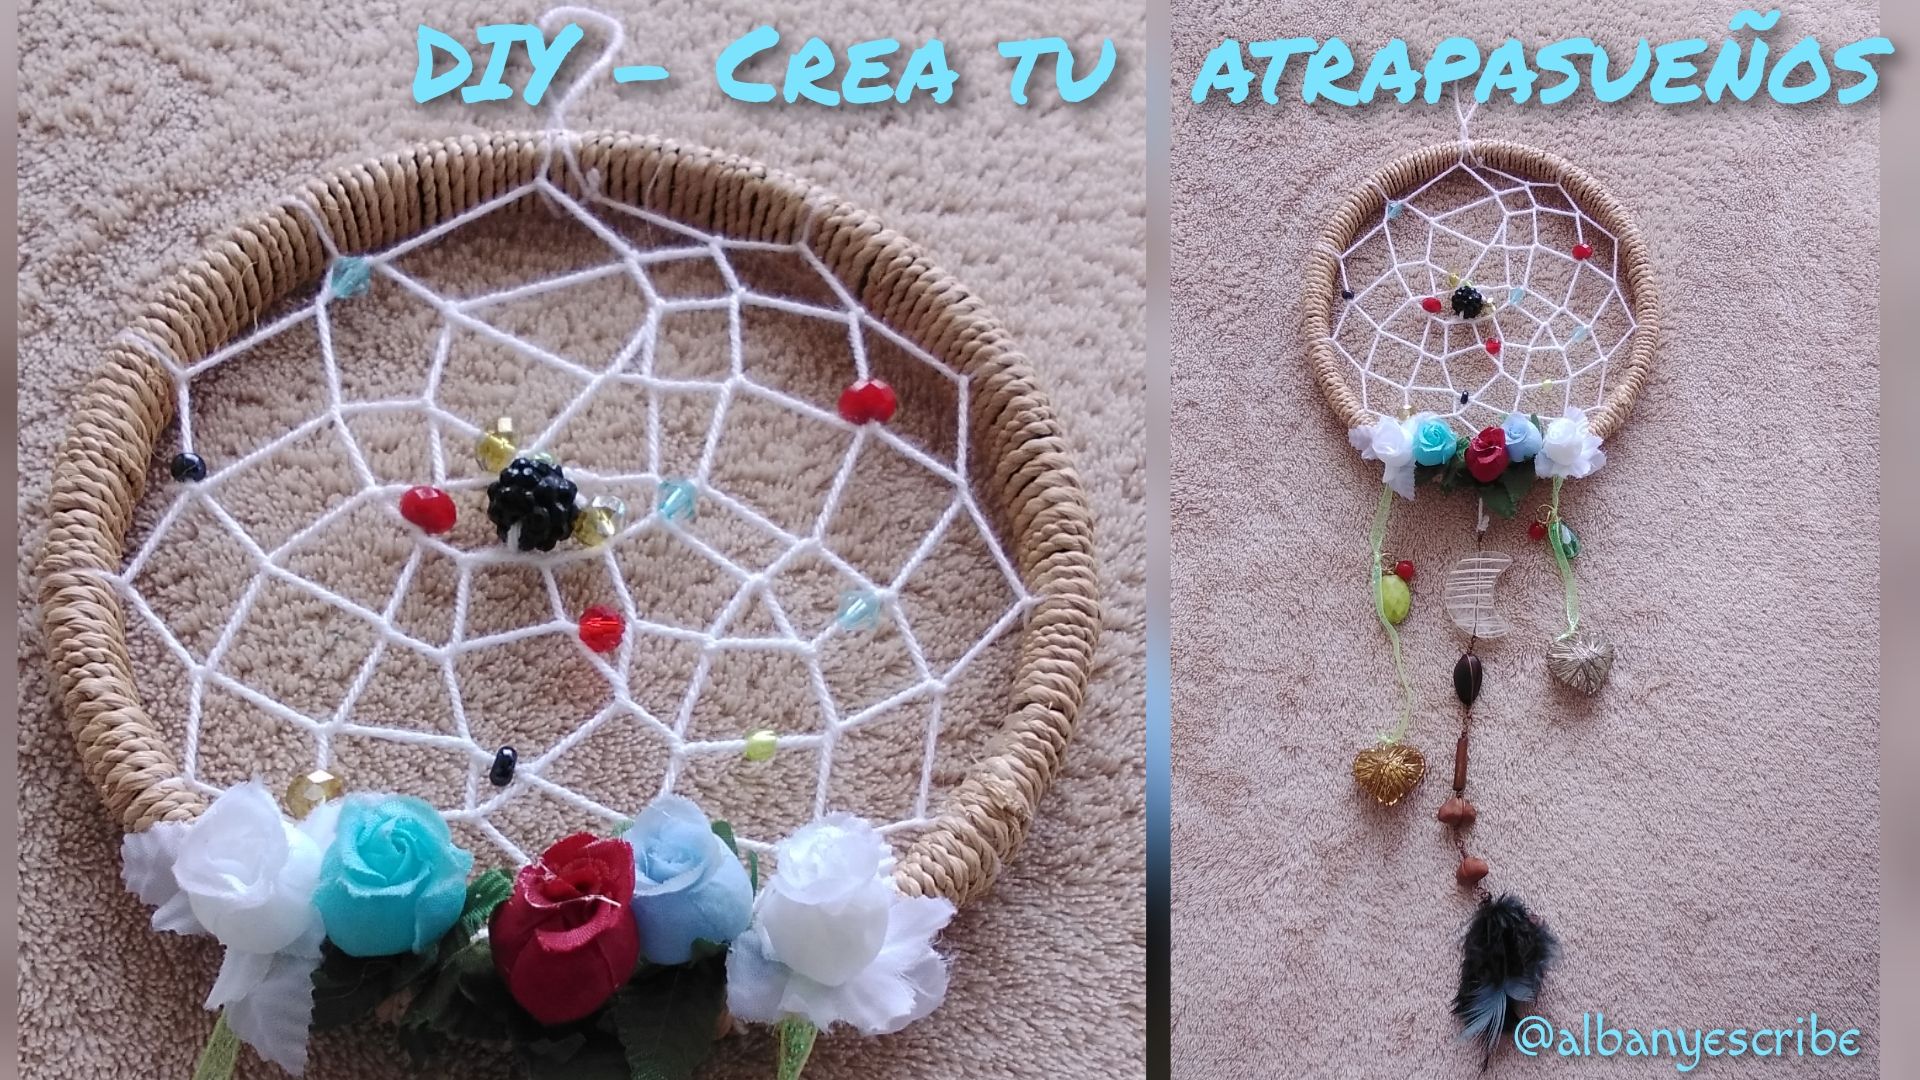
✨Hagamos un Hermoso Atrapasueños / Tutorial ✨ [esp/eng]
16
About :
¡Hola, querida comunidad de Hive diy! Es un placer para mí, publicar por primera vez para todos ustedes, y en esta oportunidad les traigo un vídeo tutorial más el paso a paso escrito, acerca de como crear un atrapasueños.
Hello, dear Hive diy community! It is a pleasure for me, to post for the first time for all of you, and this time I bring you a video tutorial plus the written step by step, about how to create a dream catcher.
¿Alguien sabrá que es el mundo de los sueños?
Algunos dicen que tu subconsciente mientras duermes refleja las cosas que observaste durante el día, otros más creyentes en la espiritualidad afirman que son mensajes que te envían de otros planos existentes. Se puede creer en cualquiera de las dos opciones; particularmente soy partidaria de la primera opción, aunque debo admitir que a aveces he tenido sueños que no tienen nada en común con la realidad en la que vivo.
Ciertamente todos tenemos sueños, algunos agradables; otros no tantos; afortunadamente los Ojibwas, cuentan con un poderoso amuleto ancestral llamado "atrapasueños" o "dreamcatcher" que nos puede ayudar a dormir con tranquilidad mientras se llevan nuestras pesadillas. Leer información
Some say that your subconscious while you sleep reflects the things you observed during the day, others more believers in spirituality affirm that they are messages sent to you from other existing planes. You can believe in any of the two options; I am particularly in favor of the first option, although I must admit that sometimes I have had dreams that have nothing in common with the reality in which I live.
Certainly we all have dreams, some pleasant; others not so pleasant; fortunately the Ojibwas have a powerful ancestral amulet called "dreamcatcher" that can help us sleep peacefully while our nightmares are carried away. Read more
Aquí les dejó el paso a paso resumido de cómo crear tu propio atrapasueños, espero que se animen a crearlo.
Here is the step by step summary of how to create your own dream catcher, I hope you are encouraged to create your own.
Materiales a utilizar para crear el atrapasueños:
Materials to use to create the dreamcatcher:
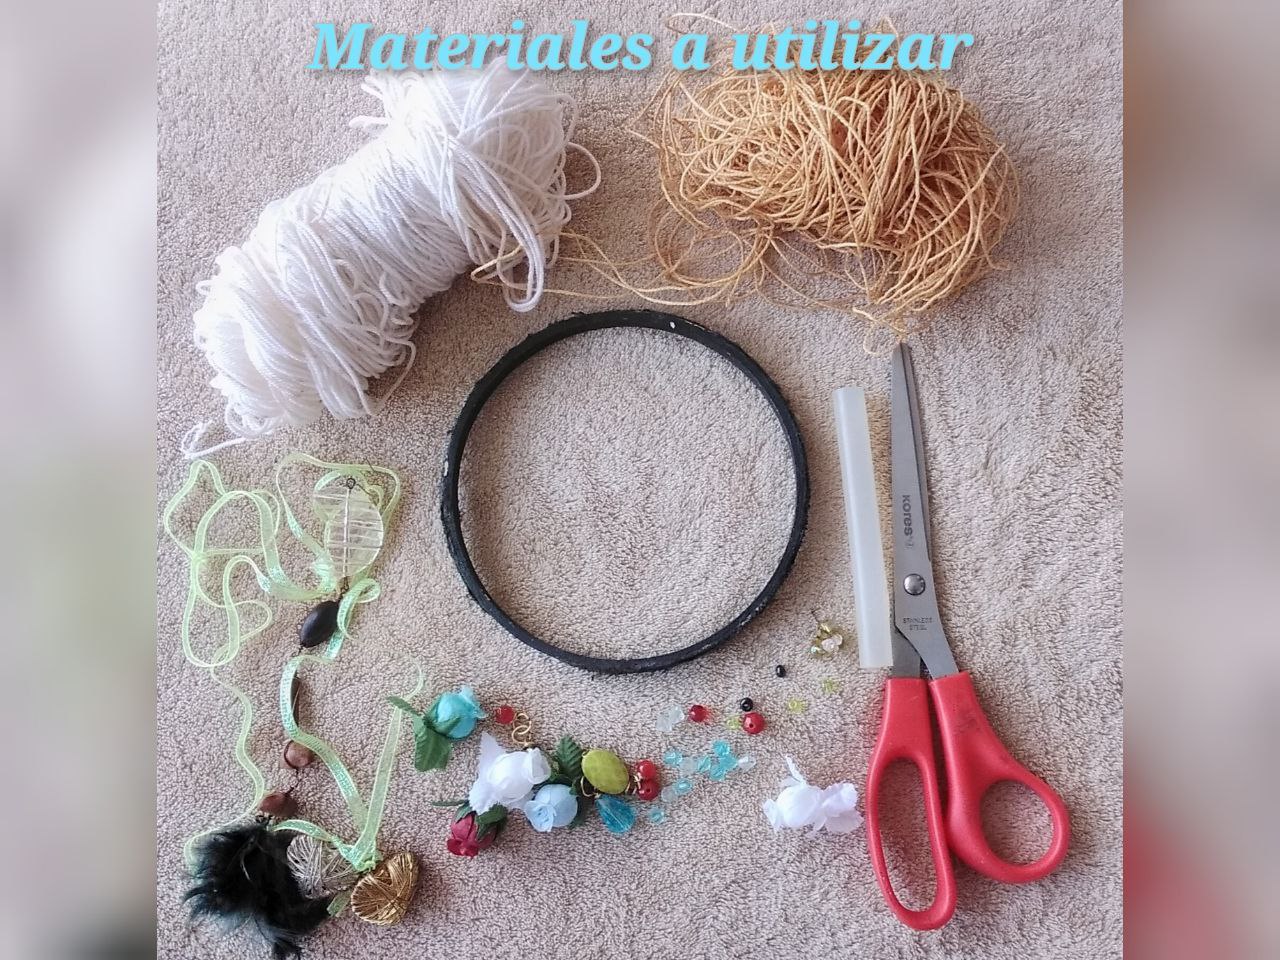
1 aro de bordar (viejo que se pueda reutilizar)
2 metros de nylon
5 metros de mecatillo
1 tijera
Silicón en frío o caliente
Piedras de imitación de Swarovski (al gusto)
20 cm de cinta (al gusto)
Plumas (al gusto)
Flores pequeñas plásticas (al gusto )
Canutillos (al gusto)
Dijes (al gusto)
1 embroidery hoop (old one that can be reused)
2 meters of nylon
5 meters of rope
1 scissors
Hot or cold glue
Swarovski rhinestones (to taste)
20 cm of ribbon (as desired)
Feathers (to taste)
Small plastic flowers (to taste)
Beads (to taste)
Charms (to taste)
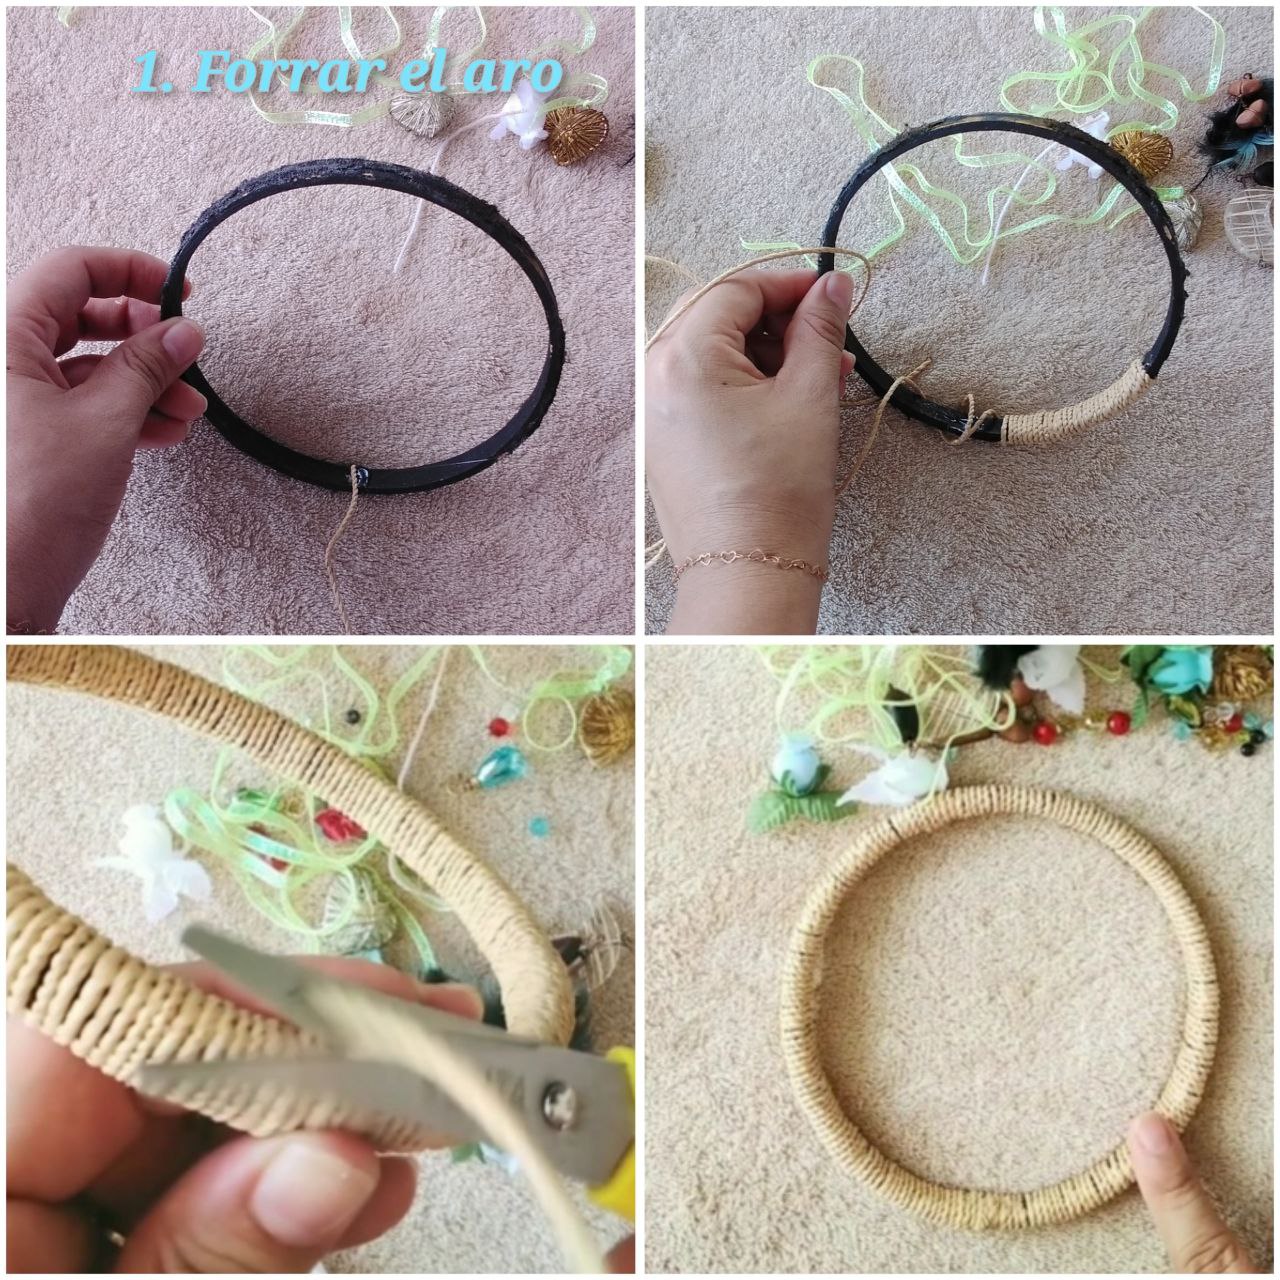
Procedimiento a seguir para realizar el atrapasueños:
Procedure to follow to make the dreamcatcher
1.Forrar la parte interna del aro para bordar con el mecatillo. Para pegar el mecatillo al aro, se puede utilizar el silicón en frío o caliente. Una vez forrado todo el aro, cortar el excedente de mecatillo.
1.Line the inside of the embroidery hoop with the cord. To glue the rope to the hoop, you can use hot or cold silicone. Once the entire hoop is lined, cut off the excess rope.
2.Medir 12 cm del nylon, doblarlo a esta distancia y luego aproximadamente en la mitad realizar un nudo. La parte de arriba servirá para guindar el atrapasueños en donde deseemos y la parte de abajo se utilizará para amarrar el nylon al aro y posteriormente realizar el tejido interno.
2.Measure 12 cm of the nylon, fold it at this distance and then tie a knot approximately in the middle. The top part will be used to hang the dreamcatcher where we want and the bottom part will be used to tie the nylon to the hoop and then make the inner fabric.
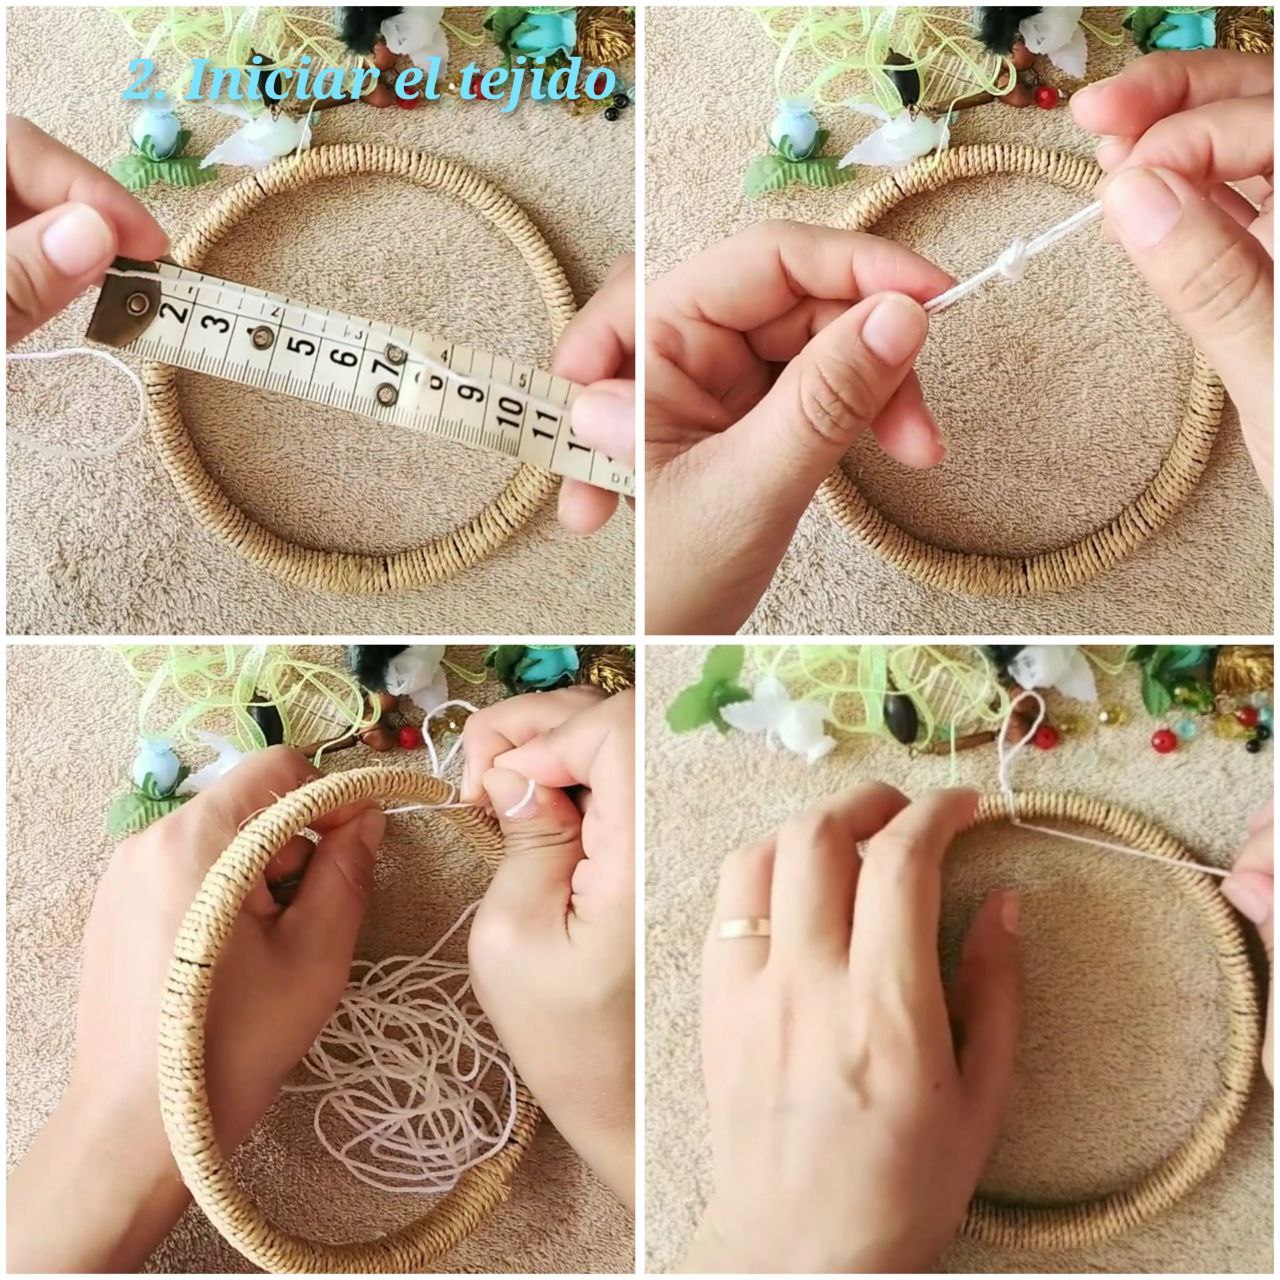
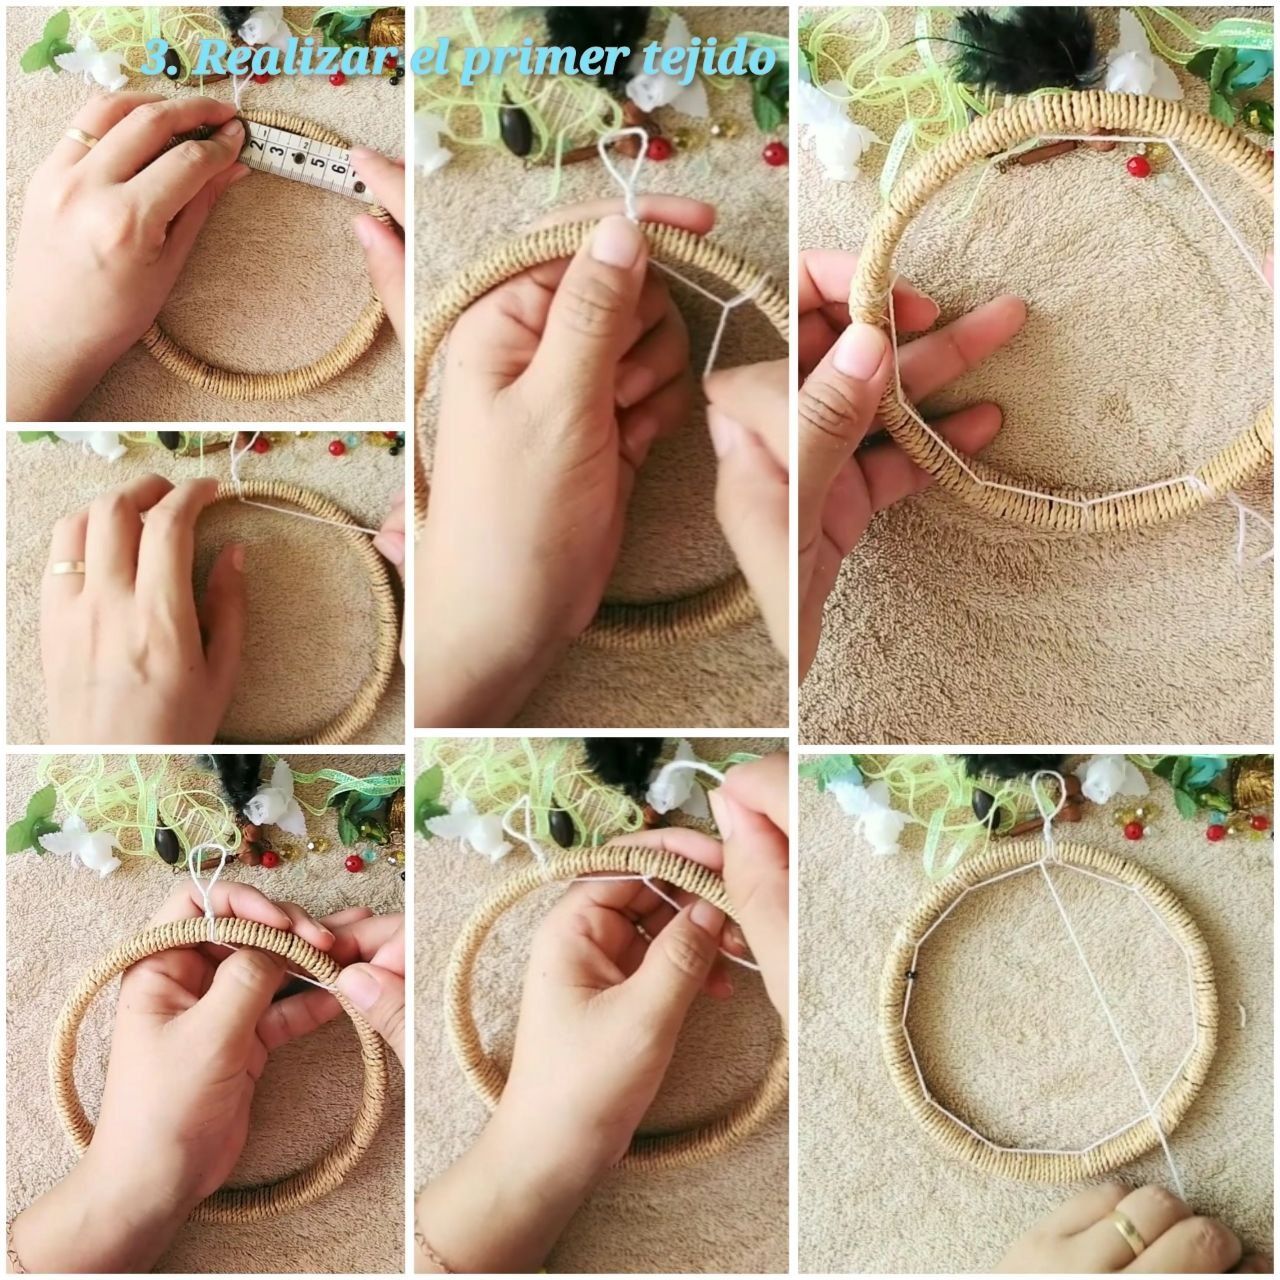
3.Para iniciar el tejido interno, se tomará una distancia aproximada de 4 cm, desde el amarre del naylon hasta el siguiente nudo. Luego de tener esta distancia, estirar el naylon por encima del aro y llevarlo a la distancia deseada. Ubicar la punta del naylon y luego se insertar por la parte de abajo del aro y sacarla por el espacio formado entre él aro y el naylon estirado, estirar el naylon para obtener un buen tejido. Realizar este procedimiento alrededor de todo el aro.
3.To start the internal weaving, take a distance of approximately 4 cm from the naylon tie to the next knot. After having this distance, stretch the naylon over the hoop and bring it to the desired distance. Place the tip of the naylon and then insert it through the bottom of the hoop and pull it out through the space formed between the hoop and the stretched naylon, stretching the naylon to obtain a good weave. Perform this procedure around the entire hoop.
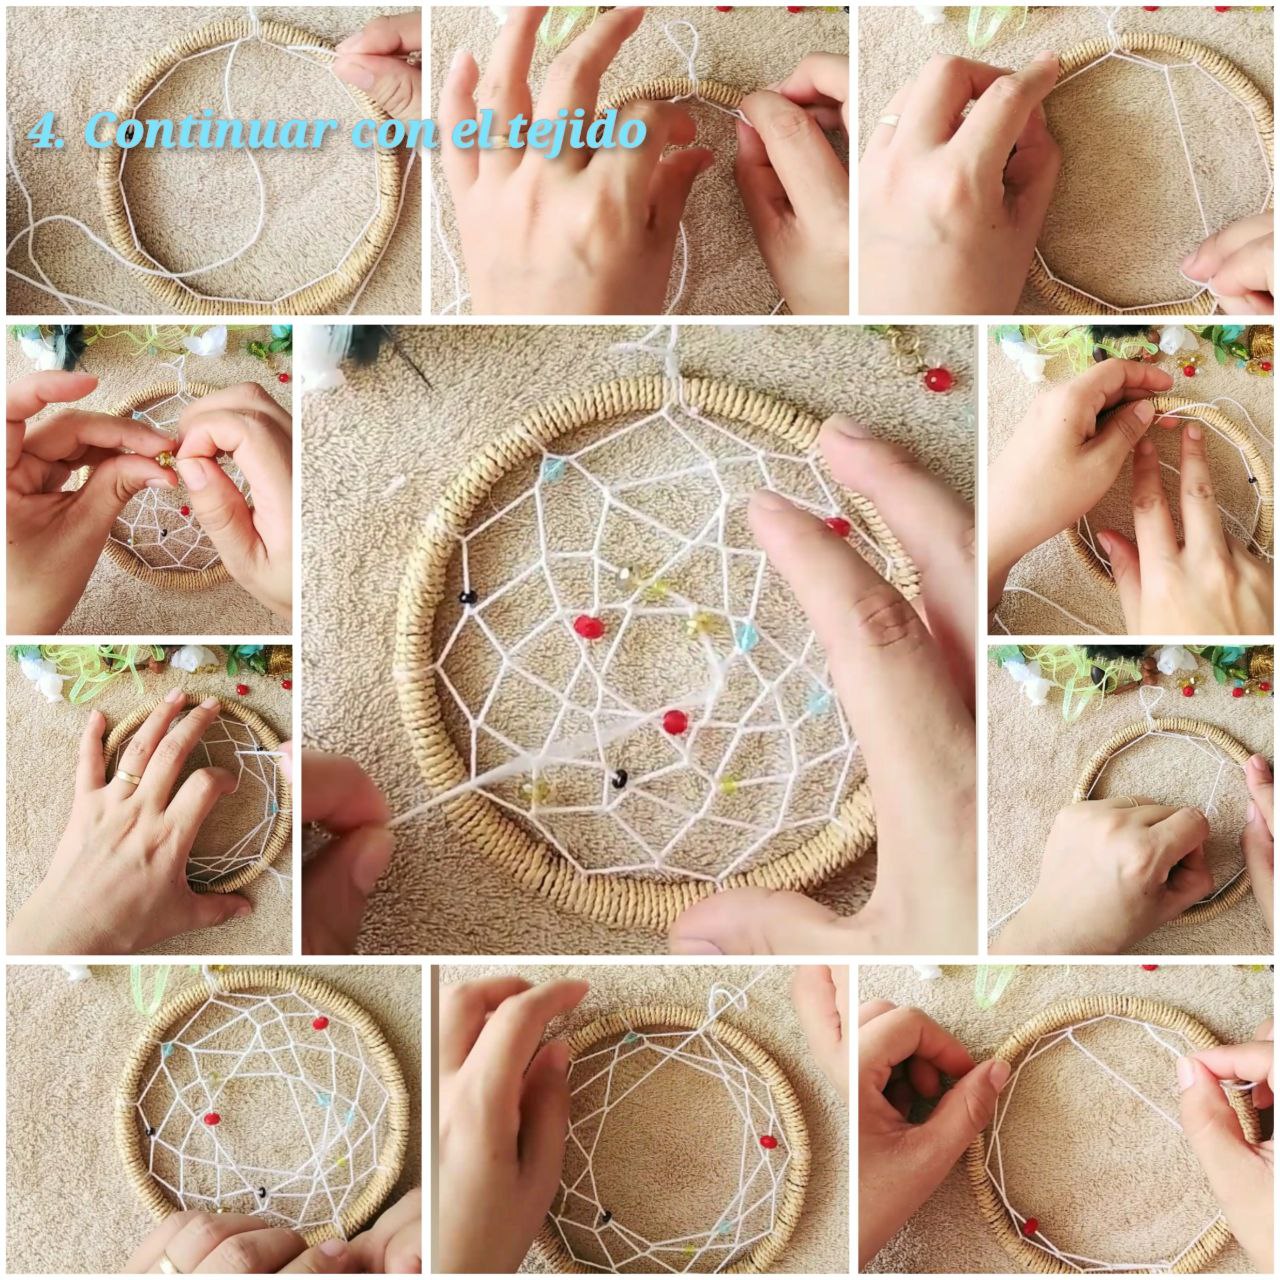
4.Al terminar la primera vuelta del tejido alrededor del aro; el tejido se debe continuar de la siguiente manera: Se ubica la punta del naylon y se inserta por la parte de arriba, en el espacio que se originó cuando se realizó el primer tejido, una vez introducido se estira el naylon para obtener el tejido. Este procedimiento se repite en cada espacio originado, las veces que sea necesario hasta cubrir todo la parte interna del aro con el tejido. Puedes colocarle canutillos, piedras de imitación de Swarovski; mientras se realice el tejido y en los lugares que se desee.
4.At the end of the first round of weaving around the hoop, the weaving should be continued in the following way: The tip of the naylon is placed and inserted from the top, in the space that was originated when the first weaving was done, once introduced, the naylon is stretched to obtain the fabric. This procedure is repeated in each space originated, as many times as necessary until the whole inner part of the hoop is covered with fabric. You can place beads, swarovski imitation stones; while the weaving is being done and in the desired places.
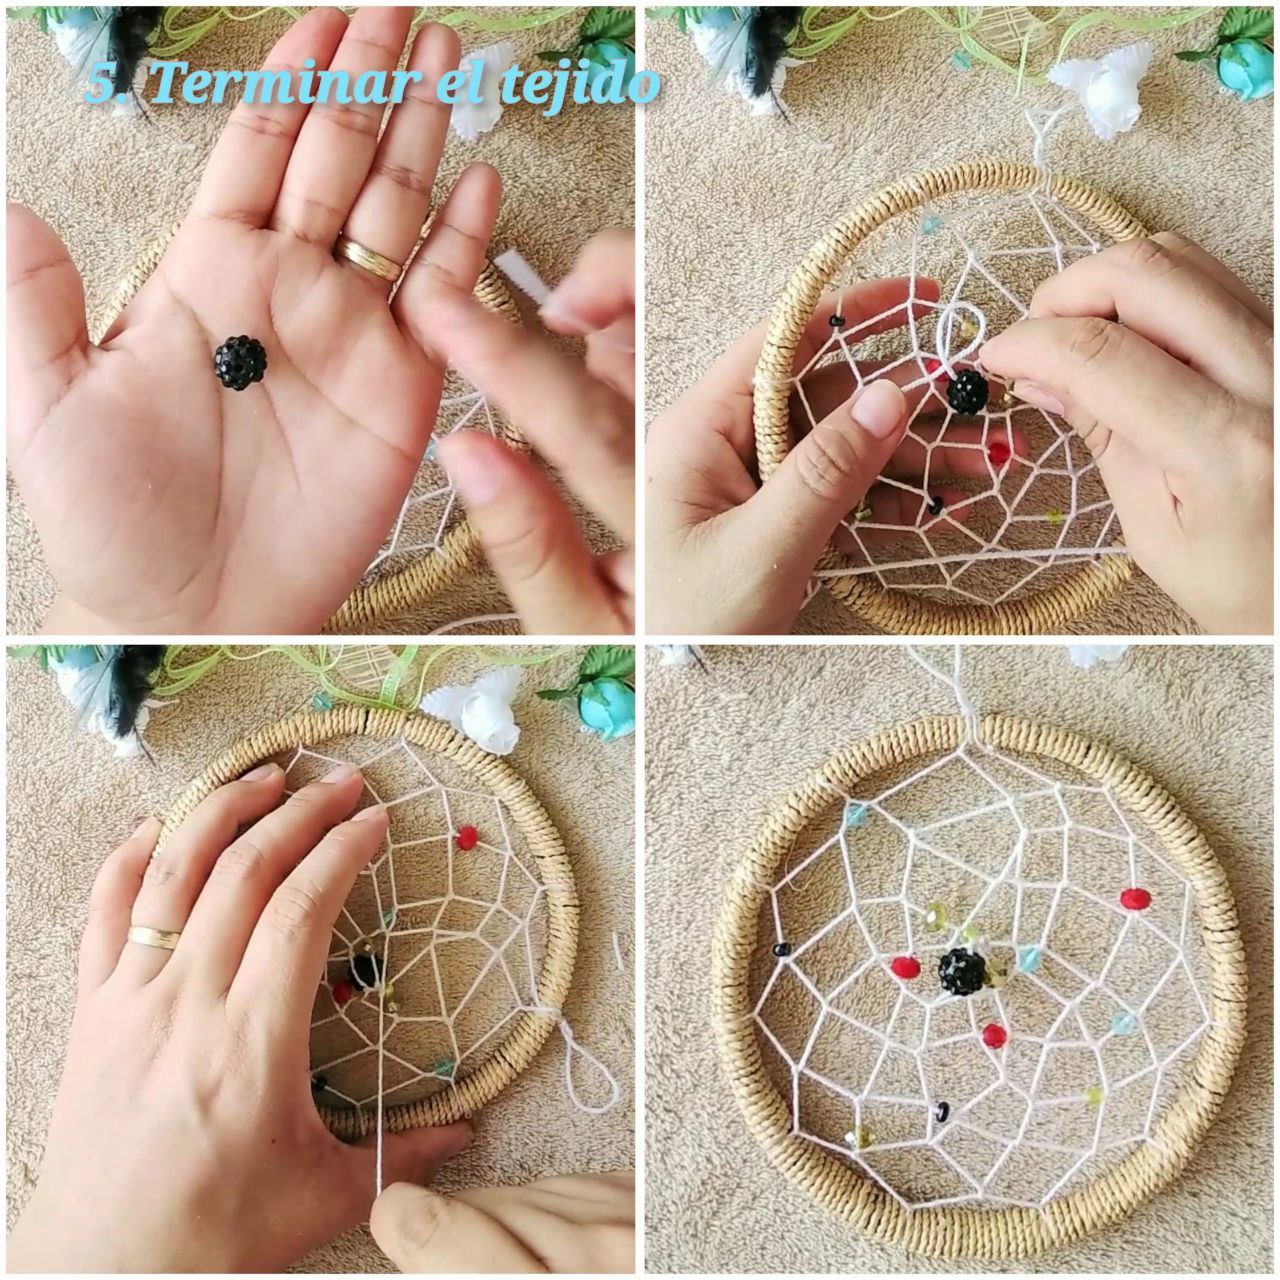
5.Para culminar el tejido, en el centro se puede dejar un espacio o se puede colocar algún Dije o piedra de imitación de Swarovski, independientemente lo que se decida realizar o colocar, debemos asegurarnos de realizar un buen nudo, para que no se suelte el tejido.
5.To finish the weaving, in the center you can leave a space or you can place a charm or an imitation Swarovski stone, whatever you decide to make or place, we must make sure to tie a good knot, so that the weaving does not come loose.
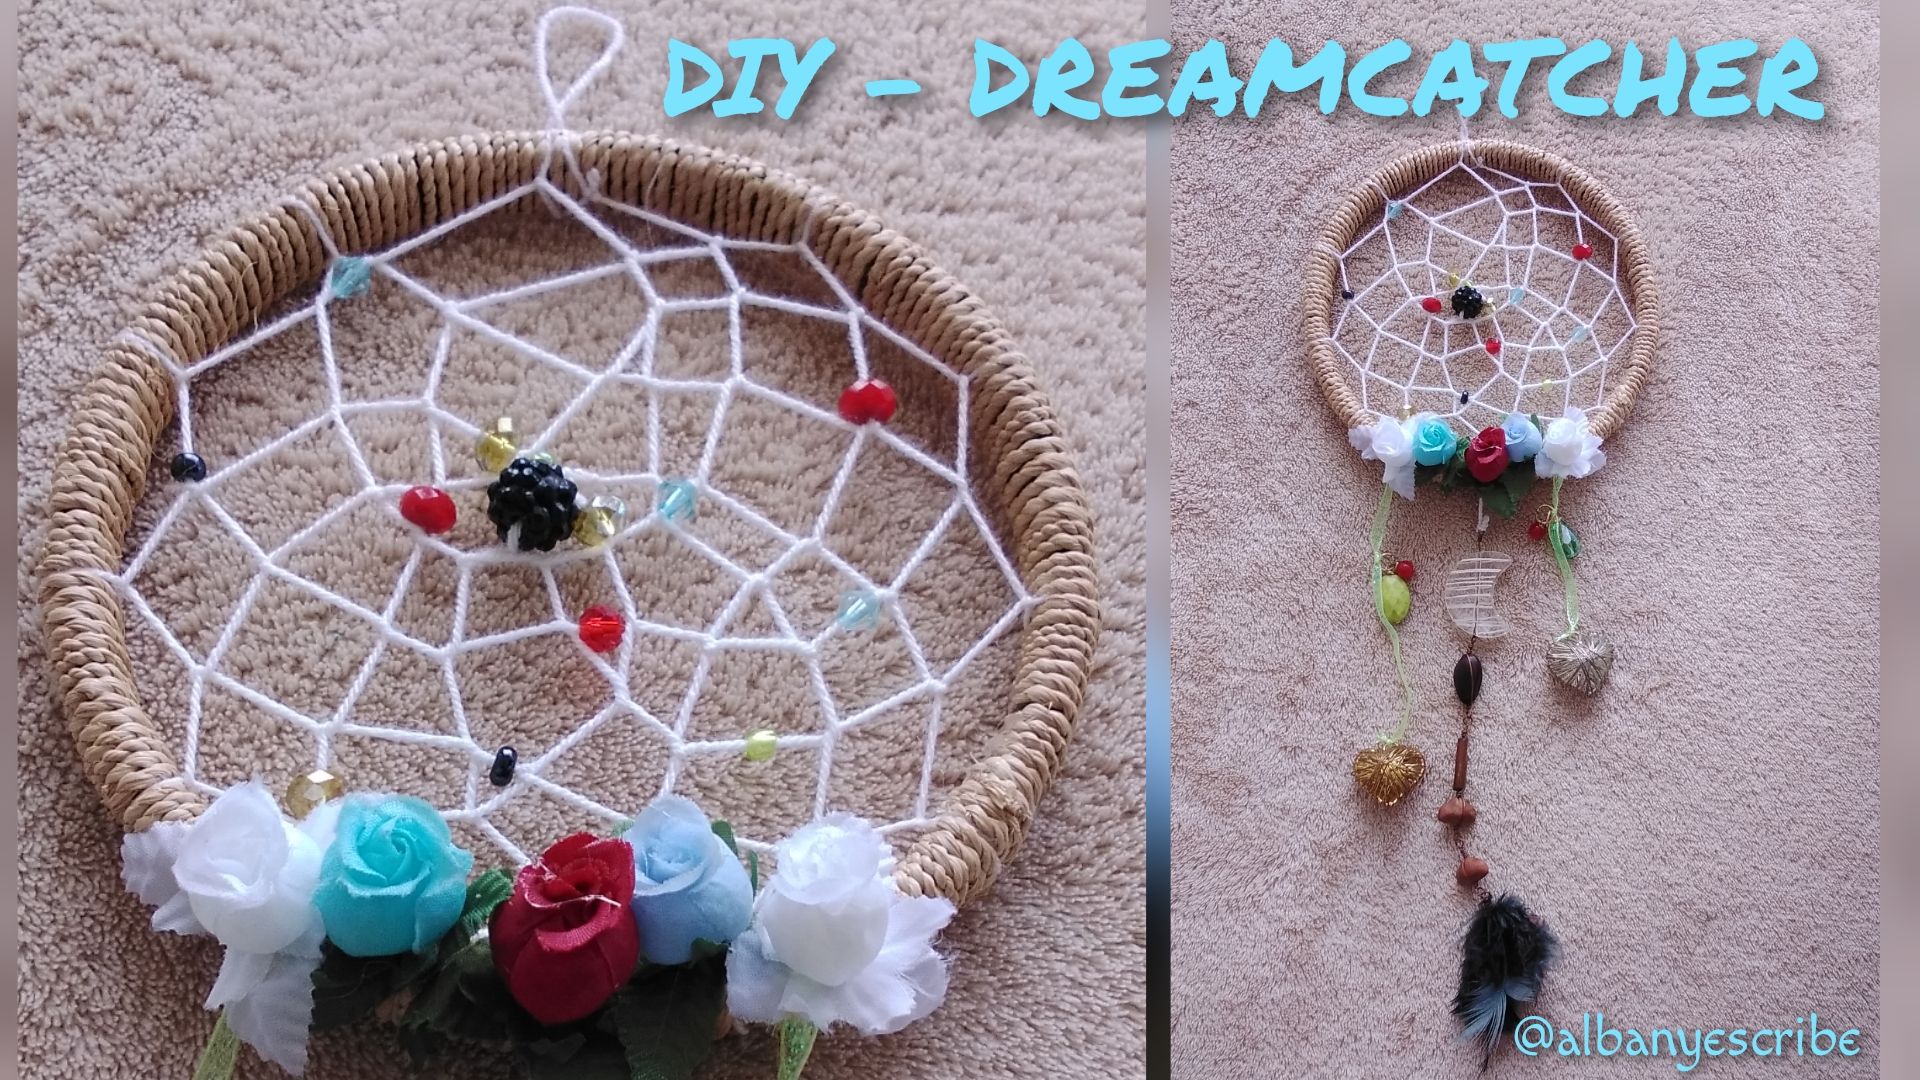
6.Puedes adornar la parte de abajo del aro con objetos que cuelguen como plumas, cintas, dijes y flores pequeñas de plástico. Todo va a depender de tu gusto y creatividad. Para pegar estos objetos al aro puedes utilizar silicón líquido o caliente.
6.You can decorate the bottom of the hoop with dangling objects such as feathers, ribbons, charms and small plastic flowers. It all depends on your taste and creativity. To glue these objects to the hoop you can use liquid or hot silicone.

Una vez realizado el aro, lo puedes colgar en tu habitación cerca de tu cama y lo más cercano a la ventana para que reciba la luz solar.
Gracias, me despido esperando que se animen a realizar su atrapasueños, cualquier duda házmela saber en los comentarios.
Once the hoop is made, you can hang it in your room near your bed and as close to the window as possible so that it receives sunlight.
Thank you, I say goodbye hoping that you are encouraged to make your dreamcatcher, any questions let me know in the comments.

Since English is not my native language, I have used the free version of the translator DeepL for the translation of this post.
All photos belong to me and were edited in the GridArt application.
The video tutorial was edited in the CapCut application.
Show more
Tags :
Woo!
This creator can upvote comments using 3speak's stake today because they are a top performing creator!
Leave a quality comment relating to their content and you could receive an upvote
worth at least a dollar.
Their limit for today is $0!
Their limit for today is $0!

17 views
a year ago
$

27 views
a year ago
$

57 views
a year ago
$
More Videos

2 views
2 years ago
$

2 views
7 months ago
$

1 views
a year ago
$

4 views
2 years ago
$

10 views
2 years ago
$

13 views
a month ago
$

24 views
5 months ago
$

6 views
a year ago
$

0 views
4 months ago
$

5 views
8 months ago
$

3 views
a year ago
$

5 views
a year ago
$

11 views
a year ago
$

2 views
11 months ago
$

3 views
2 years ago
$

3 views
2 years ago
$

13 views
a year ago
$

11 views
2 years ago
$

3 views
5 months ago
$

4 views
4 months ago
$

12 views
3 months ago
$

0 views
2 years ago
$

40 views
10 months ago
$
Comments:
Reply:
To comment on this video please connect a HIVE account to your profile: Connect HIVE Account