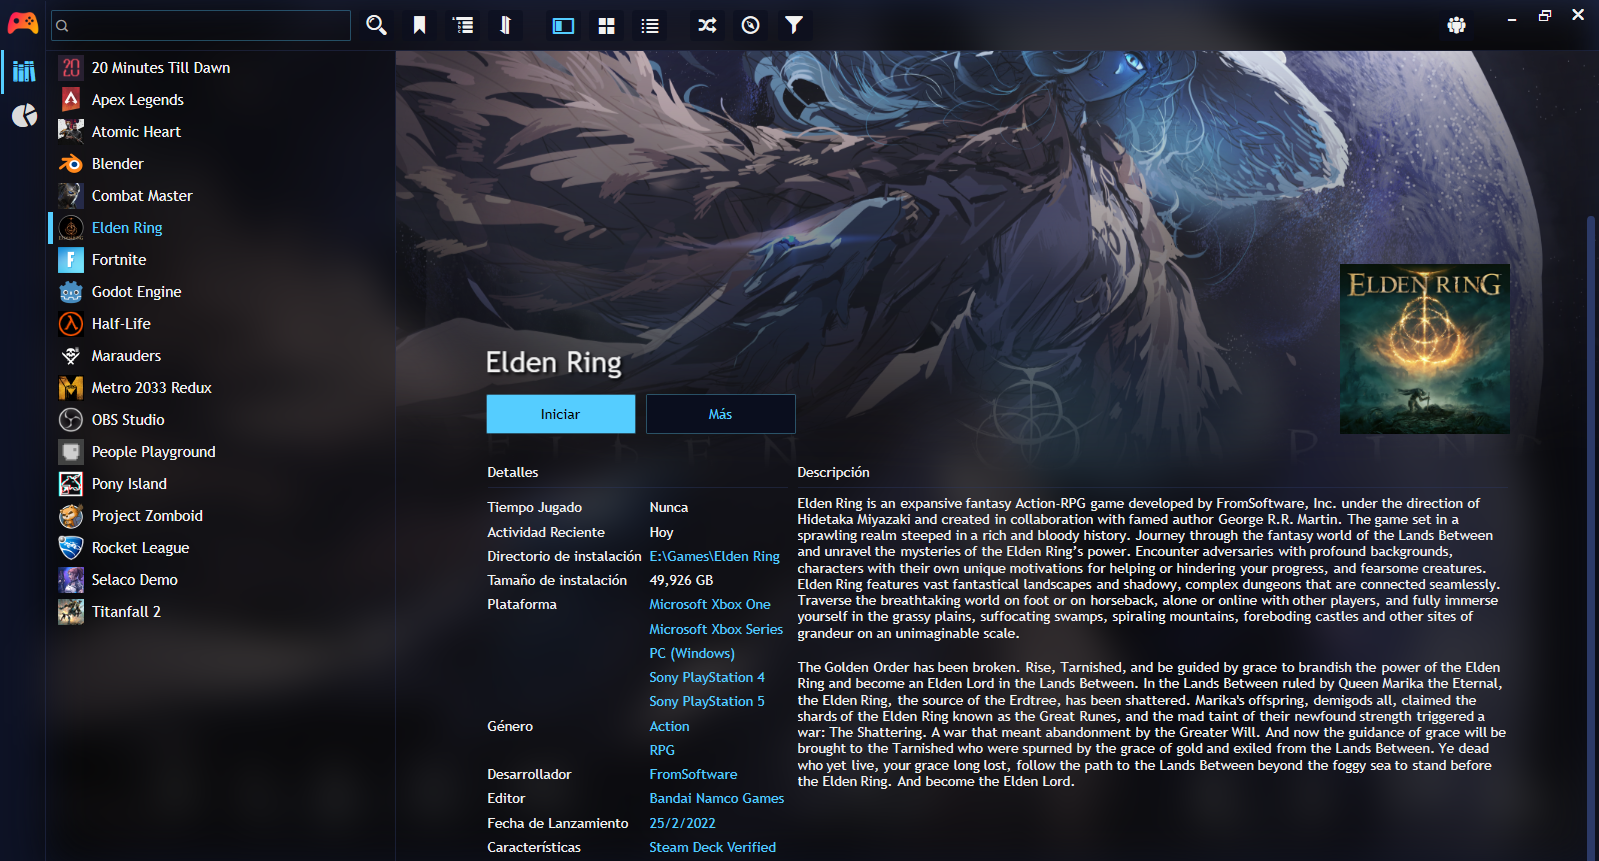
La conveniencia de utilizar Playnite - [ES_EN]
17
About :
Hola chicos, ¿Cómo están?, espero que bien
El día de hoy me gustaría presentarles una aplicación que ya llevo un par de semanas probando y sinceramente me ha sido muy útil si quiero mantener mi escritorio ordenado y creo que a ustedes les pueda ser de mucha utilidad, especialmente si tienen muchos juegos instalados y dicha aplicación se llama Playnite.
Playnite es un lanzador gratuito de código abierto en el que te ayuda a tener todos tus juegos en un mismo lugar sin tener que buscar los iconos o tener que abrir cada tienda para buscar que jugar.
Así que les explicaré un poco como es que se instala y se agrega los juegos a este lanzador:

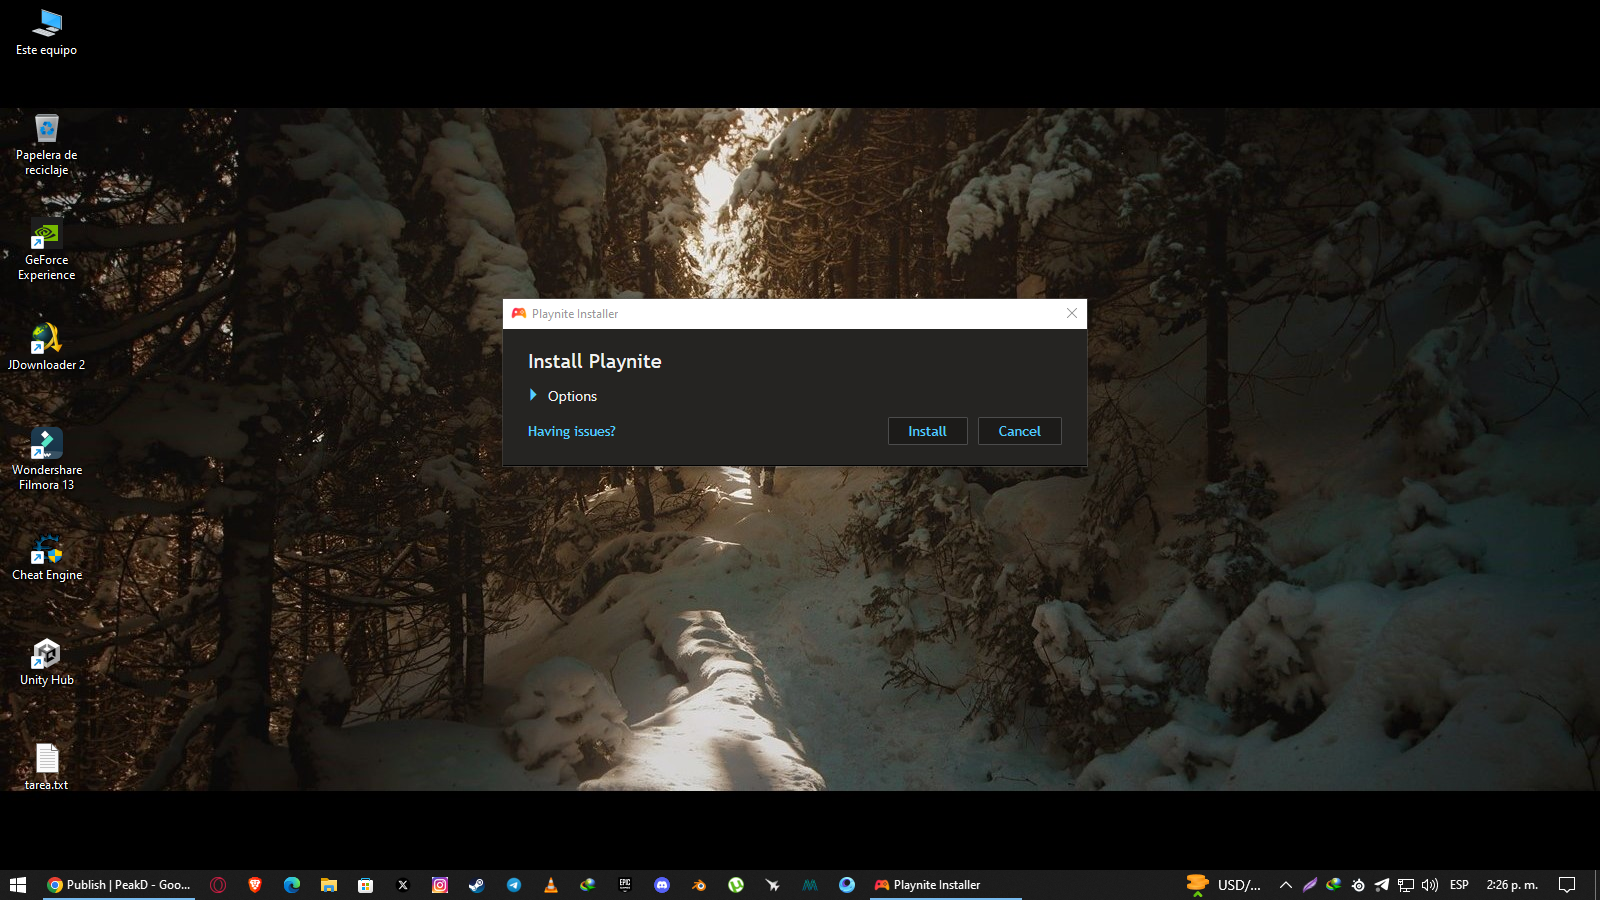
Primero es acceder a la página oficial y descargar el instalador
Cuando ya lo tengan descargado tendrán que abrir el instalador y le dan a install (con ello empezarán la descarga de unos archivos necesarios) lo cual tardará en mayor o menor medida dependiendo de su internet.
Cuando la descarga de la aplicación haya terminado te dará una pequeña introducción en la que se te explicarán como hacer que los juegos que descargues sean agregados automáticamente a la biblioteca, sin importar la tienda que utilices, como Steam, GOG, Itchio y Epic Games, como muchas otras.
Luego les dará una lista de las tiendas principales, las cuales solamente necesitarán activar las casillas y esta parte quedará en decisión de ustedes y en mi caso sería solamente marcar Epic, GOG y Steam.

Al seguir te darán la opción de vincular tus cuentas a la aplicación y si no quieren vincularlas simplemente no hagan nada, pero solamente dejan la casilla de importar los juegos activa y siguen hasta terminar con la configuración.
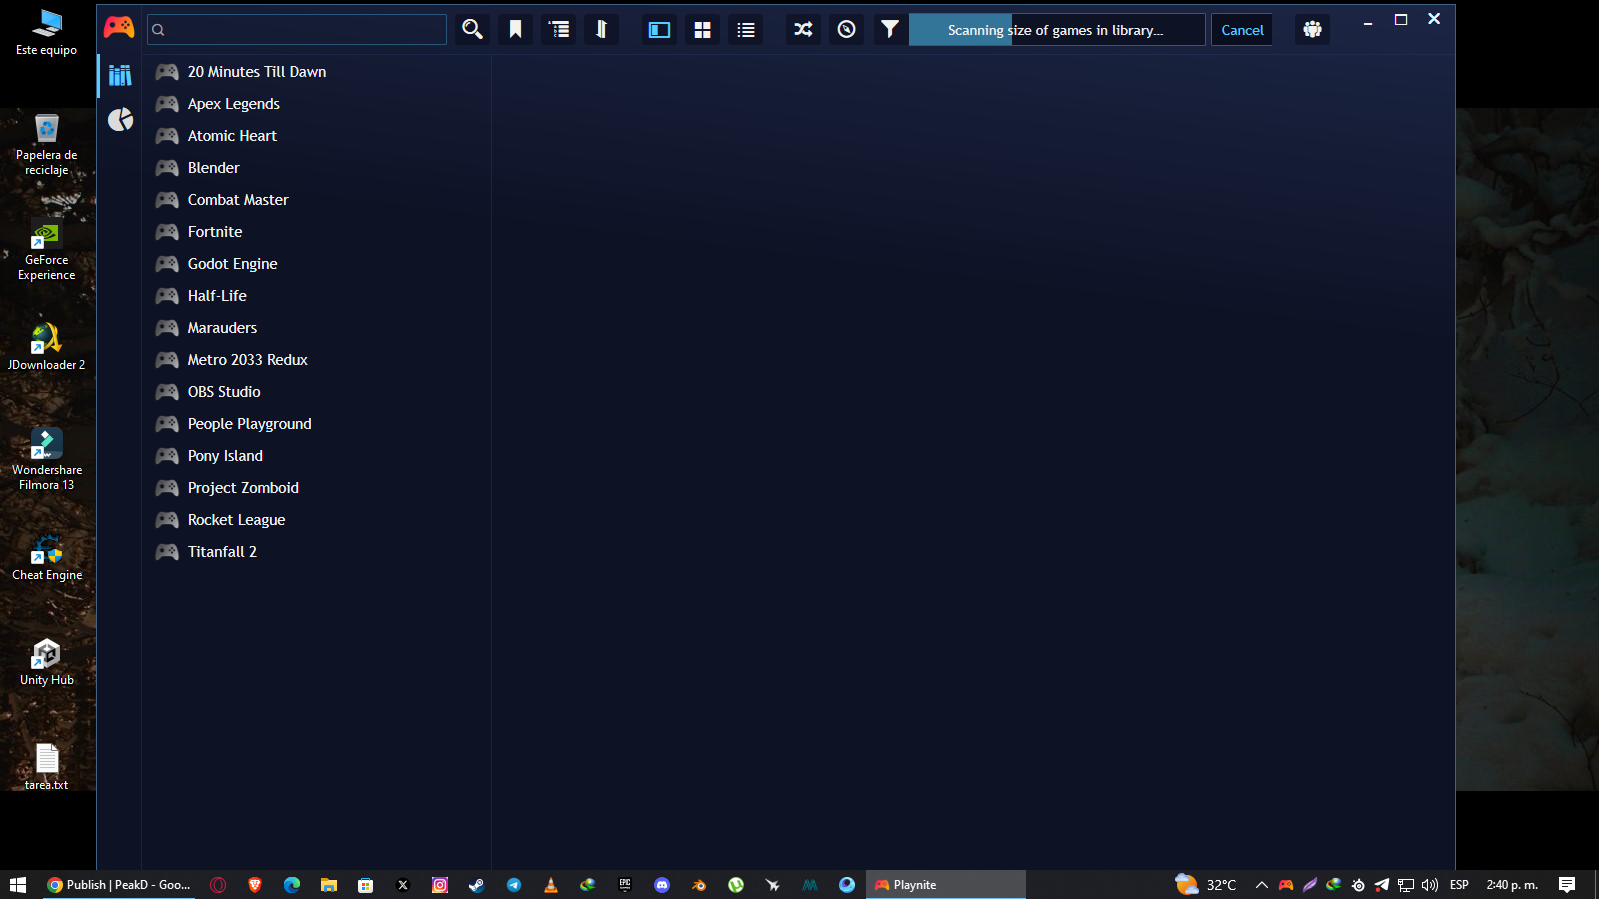
Y automáticamente se agregarán los juego, como también se empezará la descarga de metadatos de cada juego que tengas instalado actualmente.
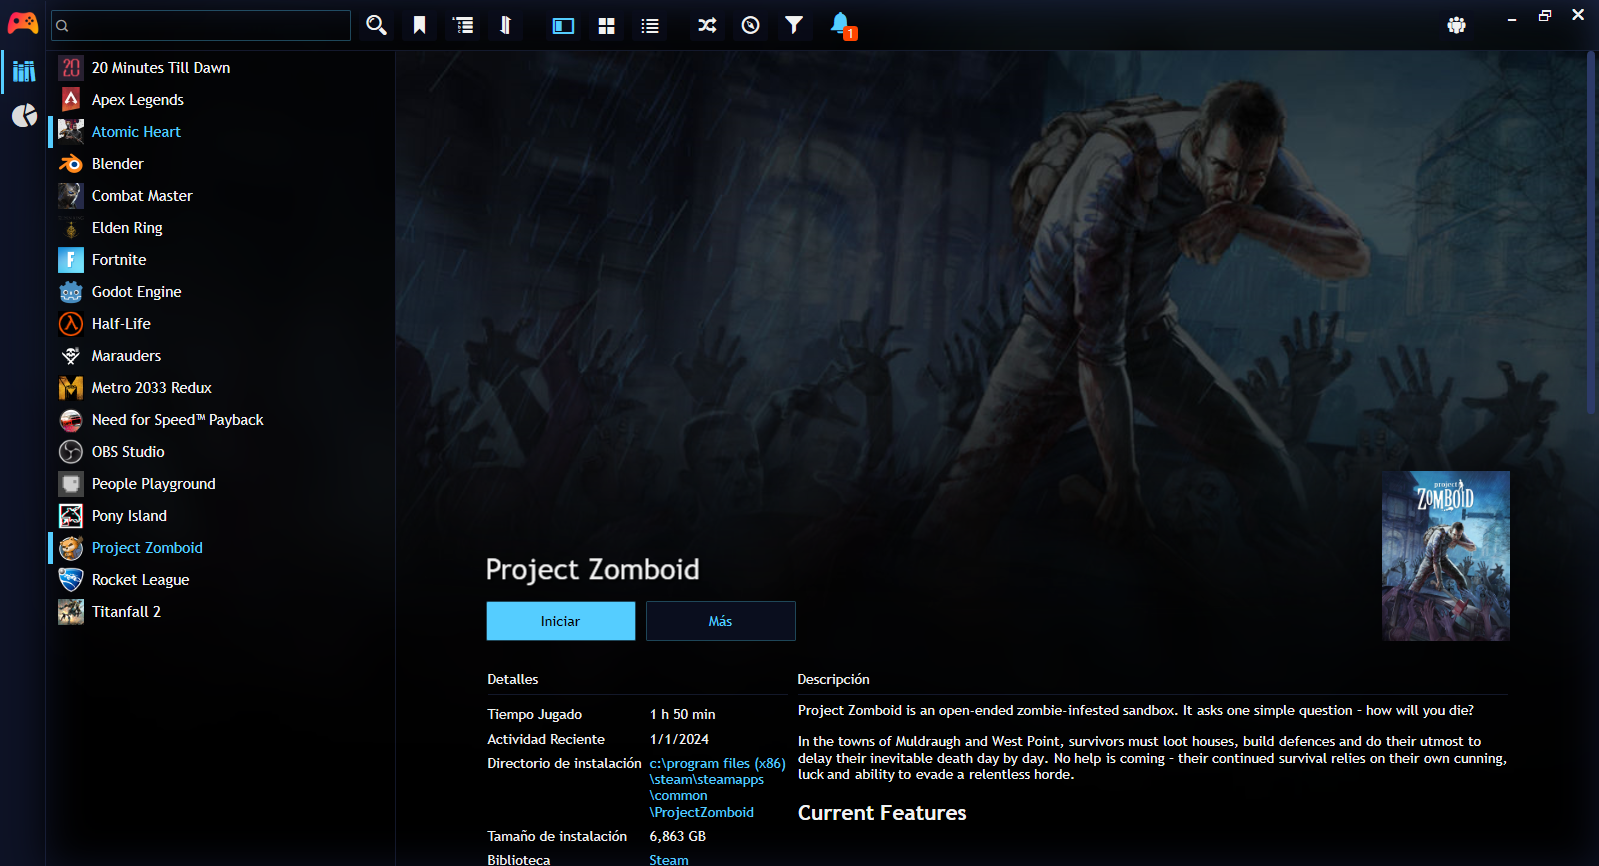
Con todo esto ya podrías empezar a jugar tranquilamente, aunque hay que mencionar que esta app no agregará el tiempo de juego que hayas invertido en él, así que el conteo empezara a partir desde el momento en que abran el juego.
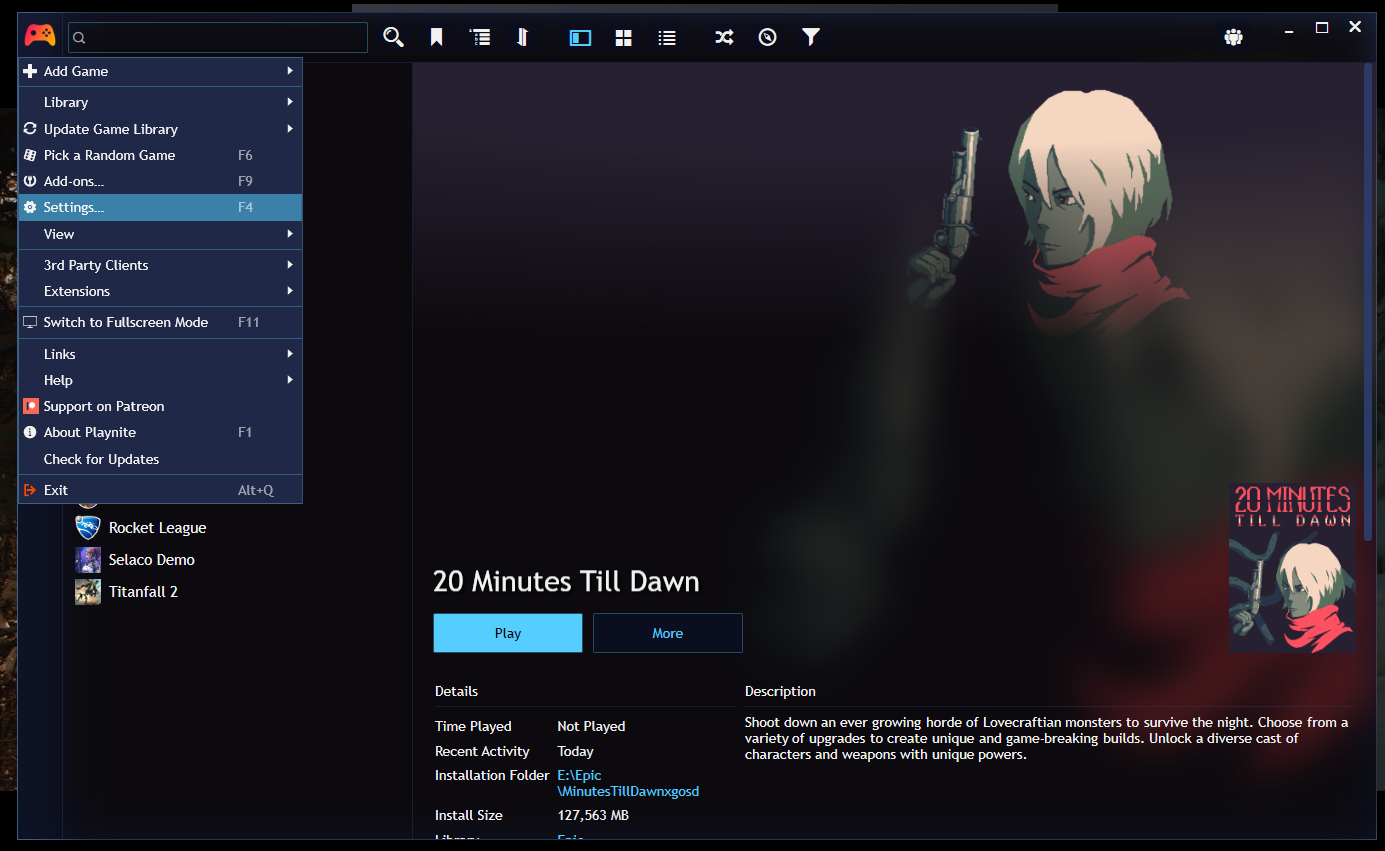
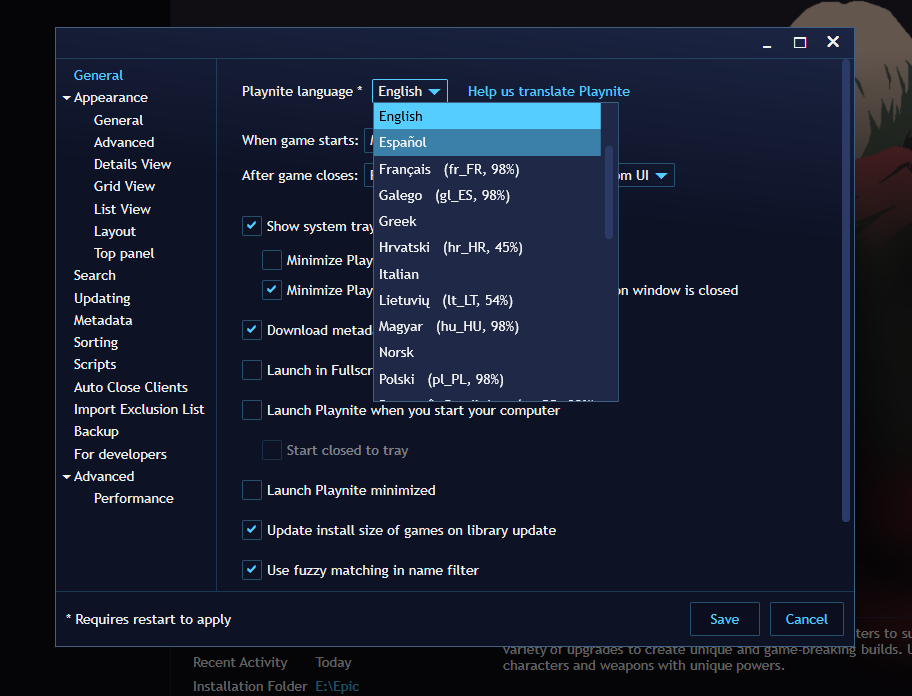
Y por último si quieren tener el lanzador en español solo deben pulsar F4 o pulsar el control naranja en la parte superior izquierda e ir a settiongs y a simple vista estará la opción para cambiarlo a español y se aplicará luego de reiniciar el lanzador.
 |  |
|---|
Ahora le toca a los juegos piratas
Así como alcanzan a leer, este lanzador también funciona con juegos piratas de igual manera como si fuesen jugados de forma lega, aunque el proceso es un poco más laborioso y es de la siguiente manera.
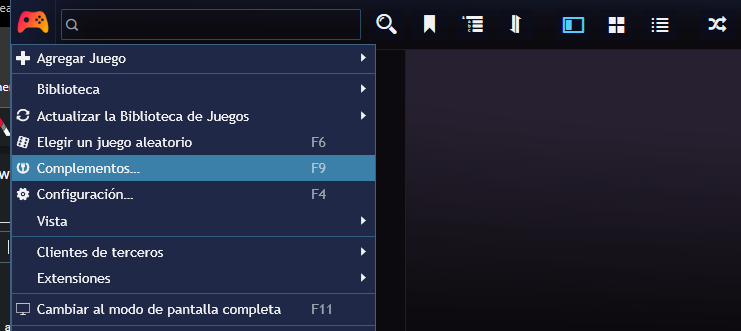
Dan click en el control naranja en la esquina superior izquierda, luego dan click en Complementos o también pueden simplemente pulsar F9.
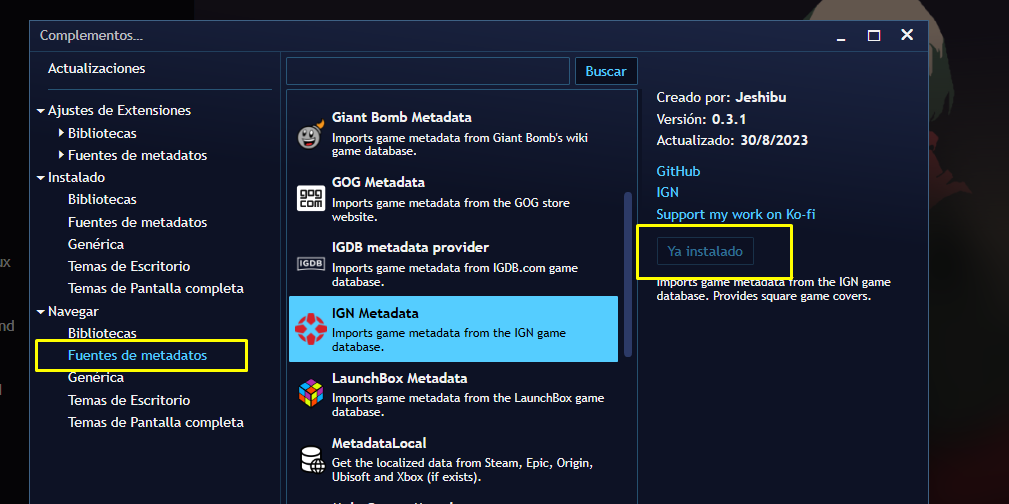
Luego tendrán que darle click en la parte inferior izquierda donde dice Fuentes de metadatos y buscan alguno como IGN u otro que deseen, esto es, para obtener información, fotos y demás cosas para nuestros juegos y guardan los cambios (esto lo verán más tarde).
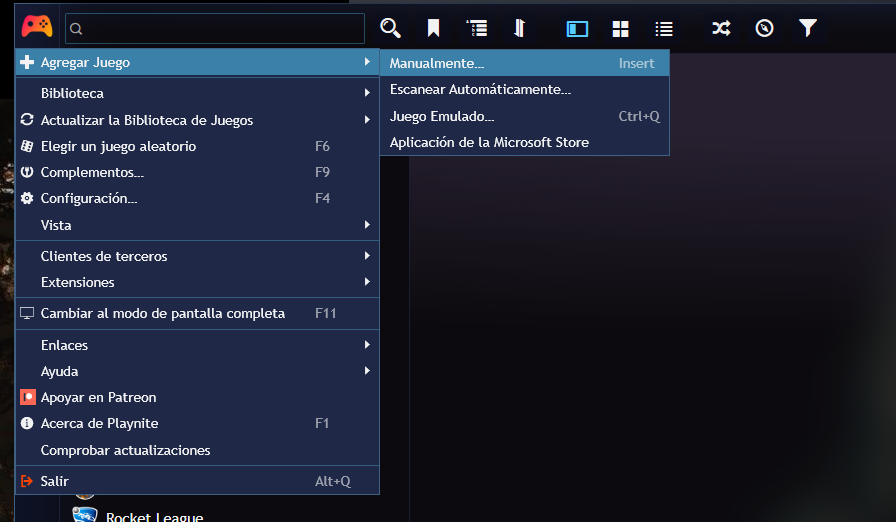
Ahora nuevamente dan click en el control naranja en la esquina superior izquierda, luego dan click en agregar juego y dan click a Manualmente…
Cuando les abra una ventana algo llena de información (y posiblemente se aturdan un poco con ella jaja), ignoran todo y van a la cventana de Instalación. estando allí le dan click a una carpeta en al parte superior derecha y buscan la carpeta del juego que desean agregar, en mi caso es elden ring y una vez agregada le dan a calcular, eso es para sacar el peso del juego.
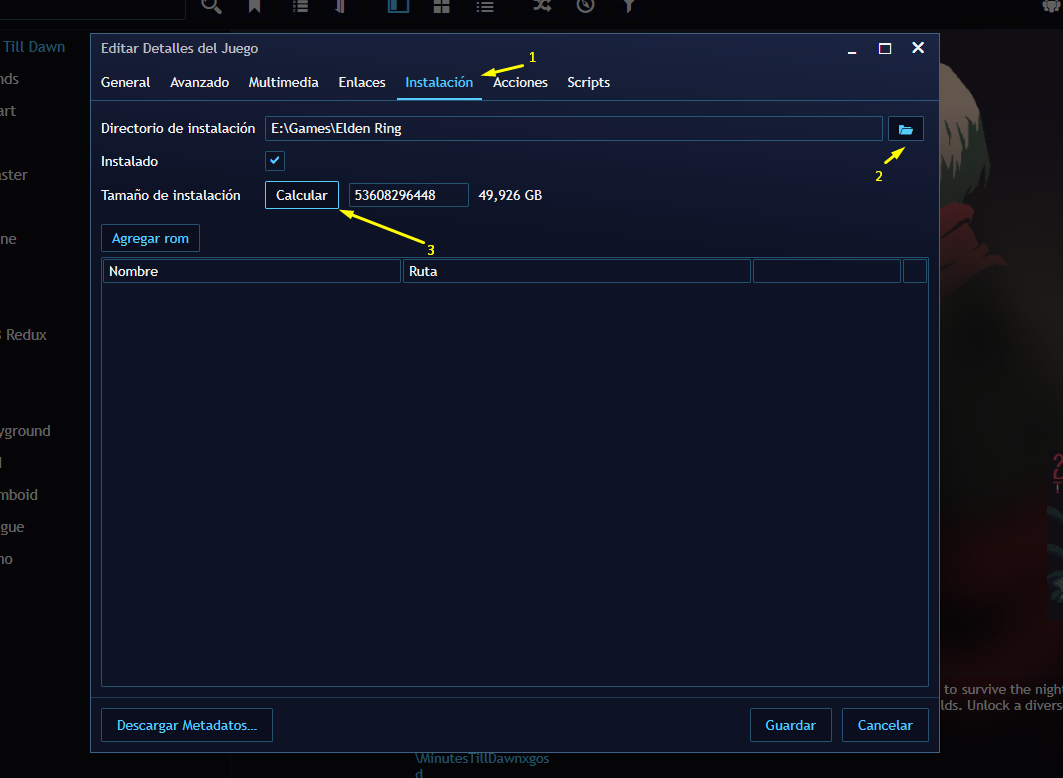
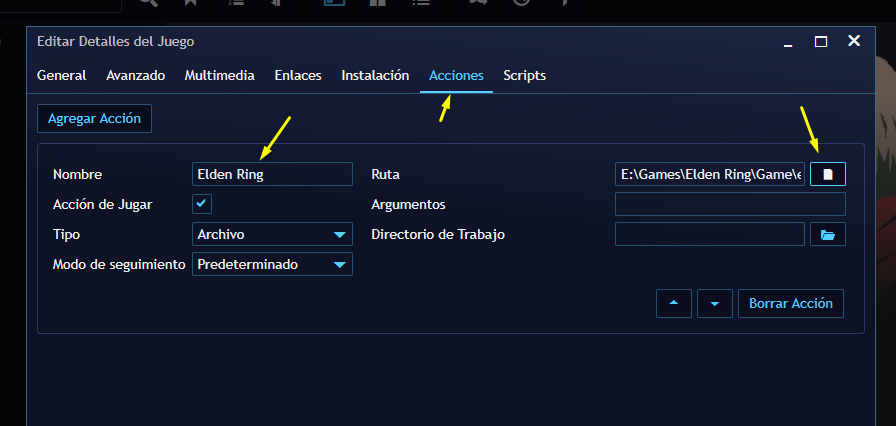
Al terminar, pasan a la ventana de acciones, luego rellenan la casilla de nombre con el nombre del juego que van a agregar y luego agregan la ruta del lanzador del juego, o sea él .exe que inicia el juego.
Una vez terminado de llenar todos estos datos, nos regresamos a la ventana de general y en la casilla de nombre volvemos a agregar el nombre del juego y en la parte inferior izquierda le damos lick al boton de Descargar metadatos donde escogerán la fuente de Metadatos que descargaron hace un momento
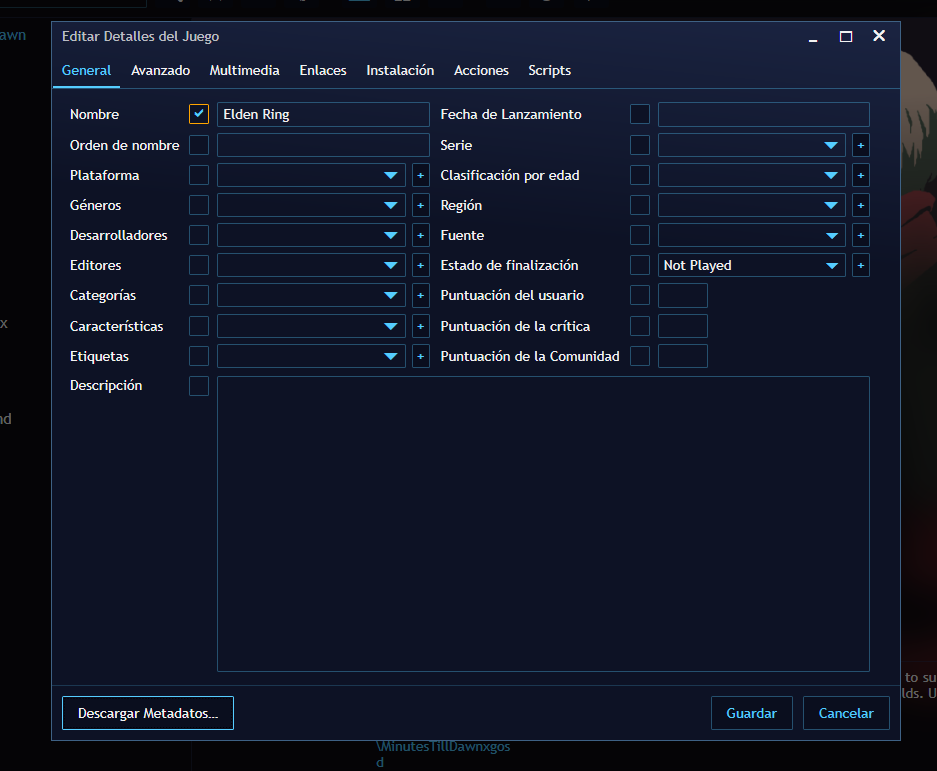
Esta parte es muy importante, porque necesitan leer bien antes de agregar los metadatos, se aseguran de escoger correctamente el juego con los nombres, plataformas y año de salida, no necesitan saberlo de memoria con una búsqueda de google se puede solucionar 😉 y en mi caso fue la primera opción.
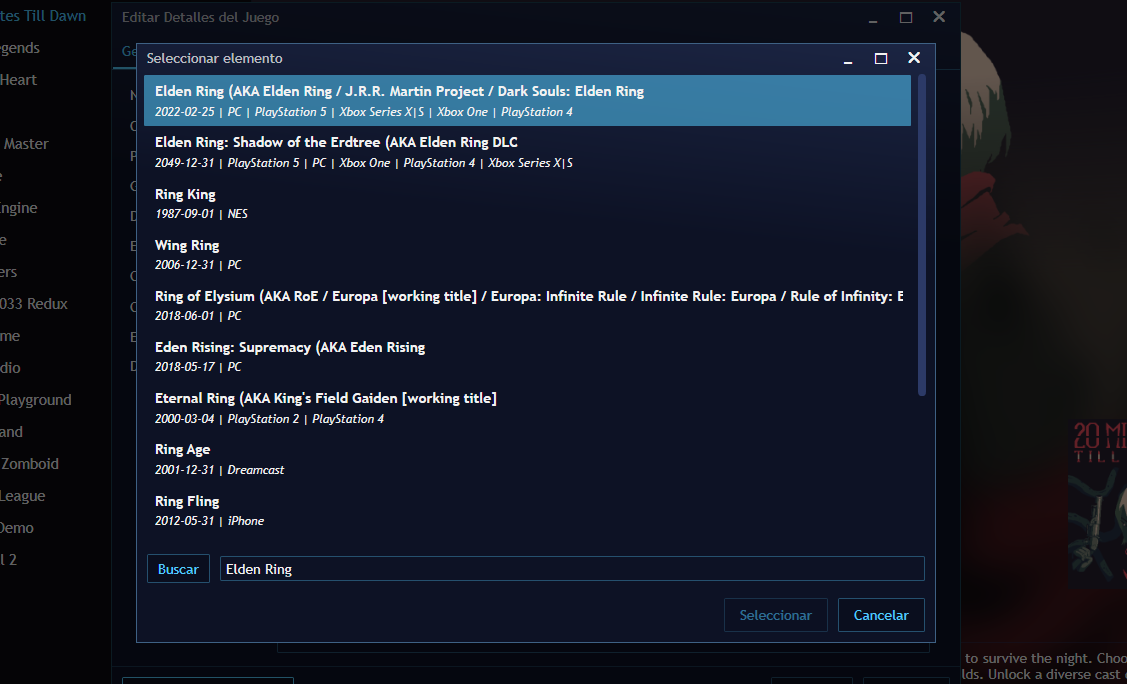
Una vez ya seleccionada, verán que la ventana anterior estará todo lleno con información del juego.
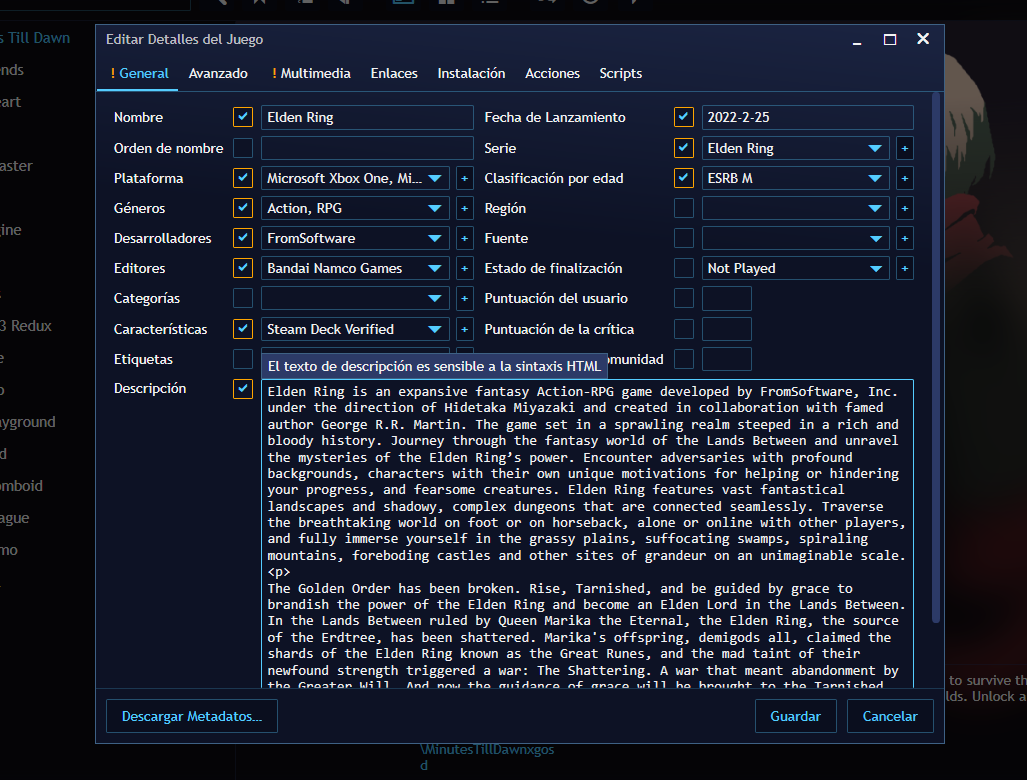
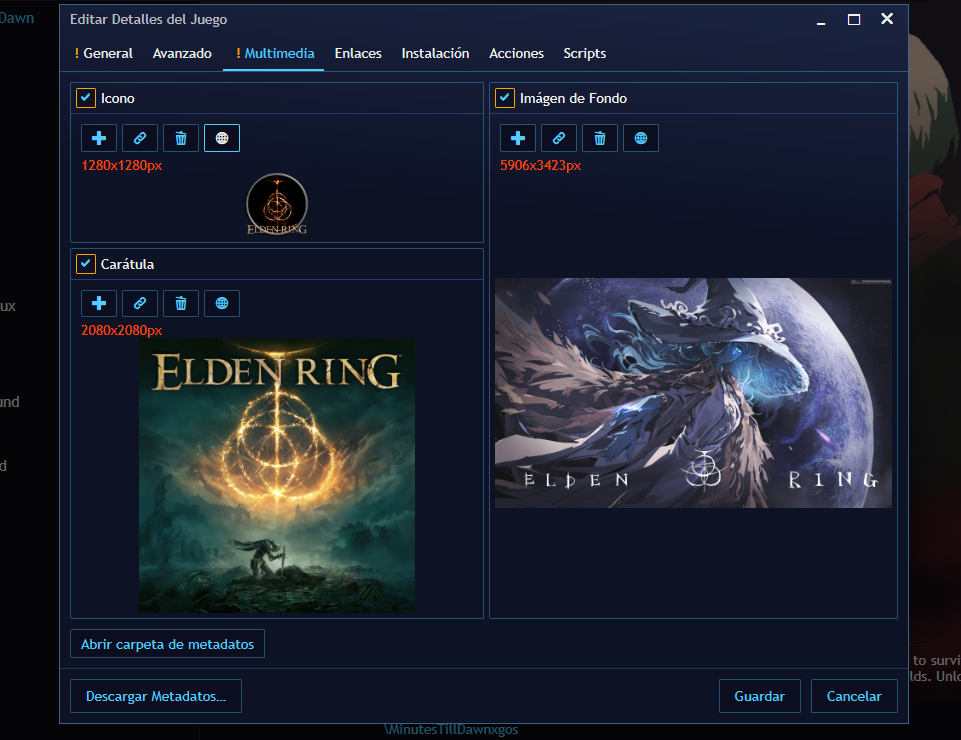
Y a partir de este momento puedes simplemente darle a guardar y empezar a jugar tranquilamente, pero hay un paso extra que también es importante estéticamente hablando y es ir a la ventana de multimedia donde se podrá agregar la carátula, icono y portada del juego.
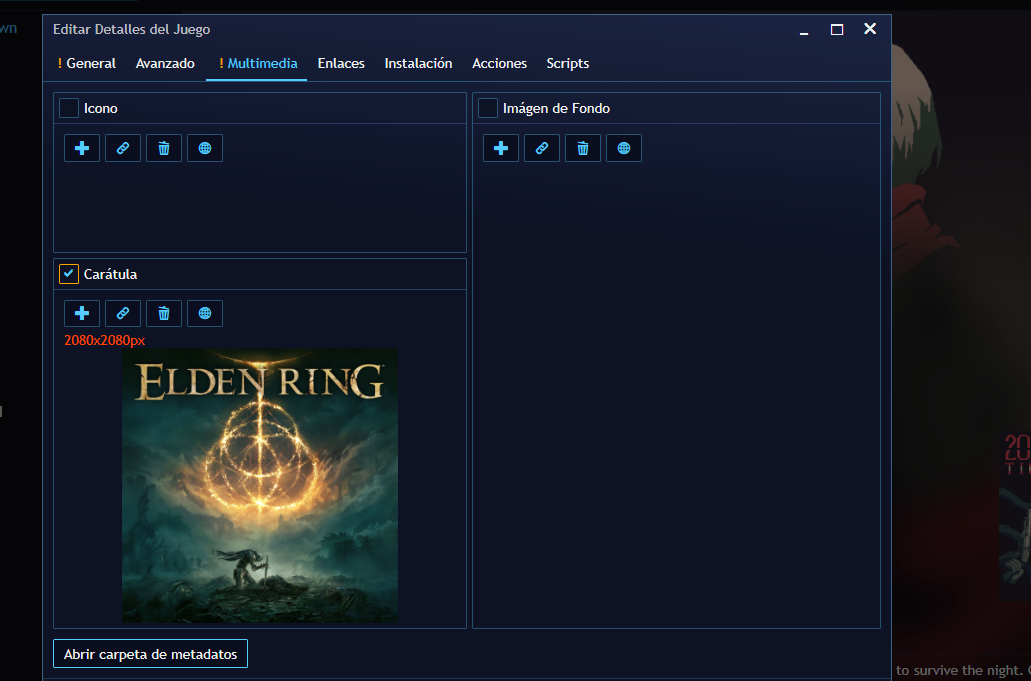
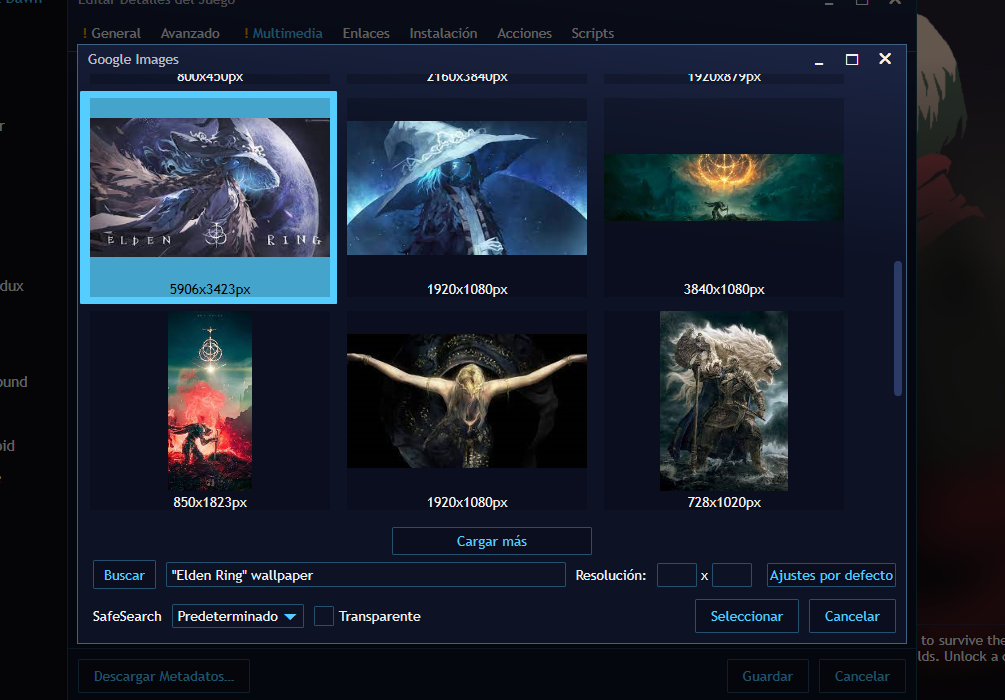
Tiene 2 opciones, pueden simplemente darle al icono de ” + ” y buscar manualmente la imagen o icono que deseas agregar, como también la segunda opción que es darle al icono del planeta donde te buscará imagen de forma automática.
 |  |
|---|
Basta solo con seleccionar una de su preferencia y se descargará dicha imagen, una vez escogido sus fotos, le dan al botón de Guardar en la parte inferior derecha y todo estaría listo, con toda su información, etiquetas, tiendas y demás cosas referente al juego.
Como último dato, si quieren cambiar las fotos, simplemente le dan al icono de un lápiz que está al lado de iniciar el juego, van a la venta de multimedia y repiten lo mencionado al cambiar las fotos.
Y esto no es todo, este lanzador tiene muchas más opciones de las cuales pueden mejorar su experiencia, pero es lo dejaré para un próximo post y si lo desean puedo hacer un video donde hago un resumen de todo lo visto hoy y también de lo próximo, espero que les haya sido de utilidad y me gustaría saber su opinión, les mando un abrazo a todos y hasta la ¡Próxima!

Hola chicos, ¿Cómo están?, espero que bien
Today I would like to introduce you to an application that I have been testing for a couple of weeks and honestly it has been very useful if I want to keep my desktop tidy and I think you may find it very useful, especially if you have many games installed and this application is called Playnite
Playnite is a free open source launcher in which helps you to have all your games in one place without having to look for icons or having to open each store to find what to play.
So I will explain a little bit about how to install and add games to this launcher:
First is to access the official website and download the installer.
When you have it downloaded you will have to open the installer and click on install (this will start the download of some necessary files) which will take more or less time depending on your internet.
When the download of the application has finished it will give you a short introduction explaining how to have the games you download automatically added to the library, no matter which store you use, such as Steam, GOG, Itchio and Epic Games, as well as many others.
It will then give you a list of the main stores, which you will only need to check the boxes and this part will be up to you and in my case it would only be to check Epic, GOG and Steam.
When you continue you will be given the option to link your accounts to the application and if you do not want to link them simply do nothing, but just leave the box to import the games active and continue until you finish with the configuration.
And it will automatically add the games, as well as start downloading metadata for each game you currently have installed.
With all this you could start to play, although it should be mentioned that this app will not add the time you have invested in the game, so the count will start from the moment you open the game.
And finally if you want to have the launcher in Spanish just press F4 or press the orange control on the top left and go to settiongs and at a glance will be the option to change it to Spanish and will be applied after restarting the launcher.
| |
|---|
Now it's the turn of pirate games
As you can read, this launcher also works with pirated games in the same way as if they were played legally, although the process is a little more laborious and is as follows.
Click on the orange control in the upper left corner, then click on Complements or you can also just press F9.
Then you will have to click on the bottom left where it says Metadata Sources and look for one like IGN or another one you want, that is, to get information, pictures and other things for our games and save the changes (you will see this later).
Now again click on the orange control in the upper left corner, then click on add game and click on Manually....
When it opens a window full of information (and possibly a little stunned with it haha), ignore everything and go to the Installation window. being there click on a folder in the top right and look for the folder of the game you want to add, in my case is elden ring and once added click on calculate, this is to get the weight of the game.
When finished, go to the actions window, then fill in the name box with the name of the game you are going to add and then add the path of the game launcher, that is the .exe that starts the game.
Una vez terminado de llenar todos estos datos, nos regresamos a la ventana de general y en la casilla de nombre volvemos a agregar el nombre del juego y en la parte inferior izquierda le damos lick al boton de Descargar metadatos donde escogerán la fuente de Metadatos que descargaron hace un momento
Esta parte es muy importante, porque necesitan leer bien antes de agregar los metadatos, se aseguran de escoger correctamente el juego con los nombres, plataformas y año de salida, no necesitan saberlo de memoria con una búsqueda de google se puede solucionar 😉 y en mi caso fue la primera opción.
Once selected, you will see that the above window will be filled with information about the game.
And from this moment you can simply hit save and start playing, but there is an extra step that is also important aesthetically speaking and is to go to the multimedia window where you can add the cover, icon and cover of the game.
You have 2 options, you can simply click on the " + " icon and manually search for the image or icon you want to add, as well as the second option which is to click on the planet icon where it will automatically search for the image.
| |
|---|
All you have to do is select one of your choice and it will download that image, once you have chosen your photos, click on the Save button on the bottom right and everything would be ready, with all your information, labels, stores and other things related to the game.
As a last piece of information, if you want to change the photos, simply click on the pencil icon next to the start game, go to the multimedia sale and repeat what was mentioned when changing the photos.
And this is not all, this launcher has many more options which can improve your experience, but I will leave it for a next post and if you want I can make a video where I make a summary of everything seen today and also the next, I hope you have been useful and I would like to know your opinion, I send you all a hug and until the next one!
Translated
Todas las imágenes y GIf usados son de mi propiedad y tomadas de mi partida personal.
Gif editados utilizando Filmora.
Show more
Tags :
Woo!
This creator can upvote comments using 3speak's stake today because they are a top performing creator!
Leave a quality comment relating to their content and you could receive an upvote
worth at least a dollar.
Their limit for today is $0!
Their limit for today is $0!

3 views
9 months ago
$
10 views
a year ago
$
3 views
a year ago
$

8 views
a year ago
$
8 views
9 months ago
$
More Videos
4 views
3 years ago
$
6 views
6 months ago
$

15 views
a year ago
$

Flow completo de Vinyasa Yoga con calentamiento y torsiones para fortalecer y desintoxicar [Eng-Esp]
23 views
a year ago
$

18 views
2 years ago
$

2 views
3 years ago
$
1 views
a year ago
$
3 views
2 years ago
$
4 views
10 months ago
$

9 views
a year ago
$
2 views
4 years ago
$

4 views
a year ago
$

4 views
a year ago
$

15 views
a year ago
$

13 views
a year ago
$

16 views
7 months ago
$

1 views
2 years ago
$
7 views
a year ago
$

2 views
2 years ago
$

16 views
a year ago
$

7 views
2 years ago
$

8 views
2 years ago
$

15 views
a year ago
$

19 views
2 years ago
$
Comments:
Reply:
To comment on this video please connect a HIVE account to your profile: Connect HIVE Account