DIY- unicorn organizer [ENG/ESP]
9
About :

¡Saludos, gente!
Ya estoy de vuelta con los videotutoriales, me gusta mostrarles en detalle el proceso que uso para realizar las manualidades que les presento, por eso les muestro en imágenes y explicación textual el paso a paso como en formato de video.
En esta ocasión, les traigo una manualidad que bien sirve como organizador, dulcero, para centro de mesa, su diseño es muy lindo, una figura que les gusta tanto a niñas como a las más grandes, en mi caso, me encantan los unicornios.
Greetings, people!
I'm back with the video tutorials, I like to show you in detail the process I use to carry out the crafts that I present, so I show you in images and textual explanation the step-by-step as in video format.
This time, I bring you a craft that can be used as an organizer, candy box, centerpiece, its design is very cute, a figure that both girls and older girls like, in my case, I love unicorns.


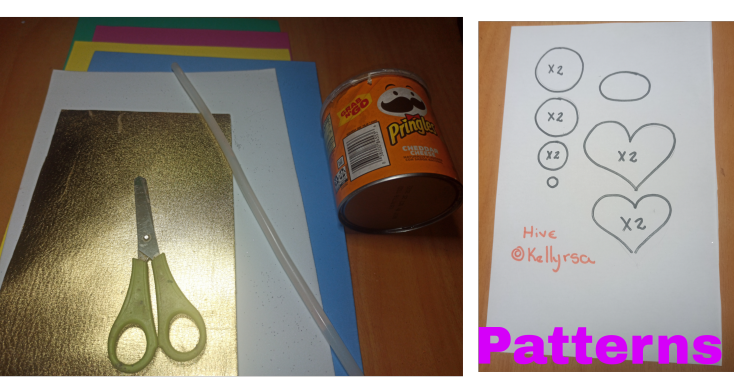
🦄 Foamy fucsia escarchado
🦄 Foamy negro, blanco
🦄 Foamy dorado
🦄 Foamy colores variados
🦄 Envase con tapa (de reciclaje)
🦄 Silicona
🦄 Tijera
🦄 Frosted fuchsia foamy
🦄 Foamy black, white
🦄 Gold foamy
🦄 Foamy assorted colors
🦄 Container with lid (for recycling)
🦄 Silicone
🦄 Scissors

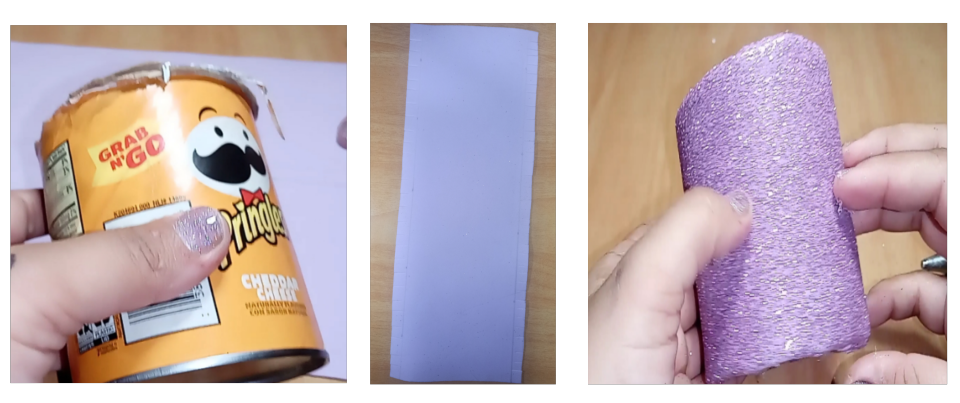
🦄 Comenzamos midiendo la altura del recipiente, trazamos esta medida en el foamy y añadimos un centímetro más en la parte superior e inferior. Forramos el recipiente.
🦄 We start by measuring the height of the container, trace this measurement on the foamy and add one centimeter more at the top and bottom. We line the container.

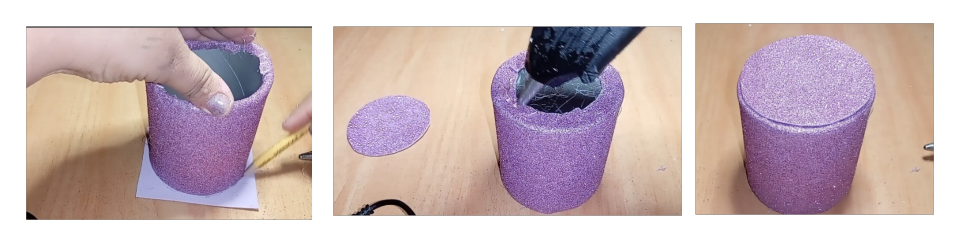
🦄Marcamos la circunferencia de la base del frasco en el foamy, cortamos y pegamos
🦄 Mark the circumference of the base of the bottle on the foamy, cut and glue.
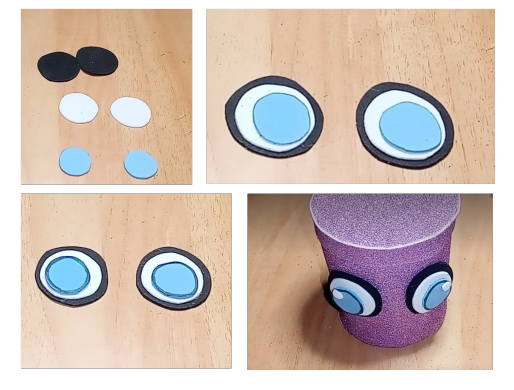
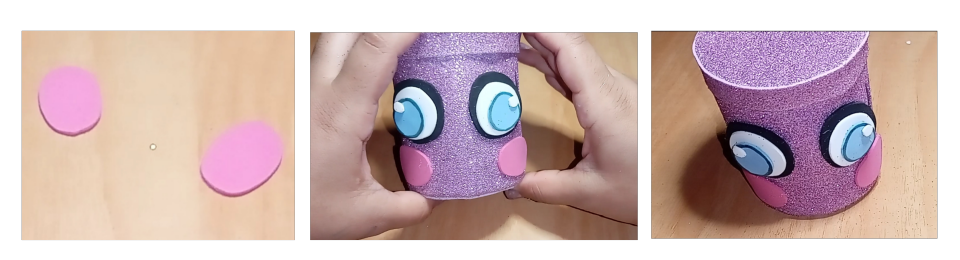
🦄 Marcamos los patrones de los ojos, el grande color negro, mediano blanco y pequeño azul. Con marcador negro hacemos un contorno en la parte azul. Para darle brillo a los ojos, hacemos un pequeño círculo en foamy blanco, pegamos en la parte azul.
🦄 We mark the patterns of the eyes, the big black, medium white and small blue. With black marker we make an outline in the blue part. To give brightness to the eyes, we make a small circle in white foamy, we glue on the blue part.
🦄 Calcamos el patrón de las mejillas en foamy rosa o fucsia y las pegamos.
🦄 We trace the pattern of the cheeks on pink or fuchsia foamy and glue them together
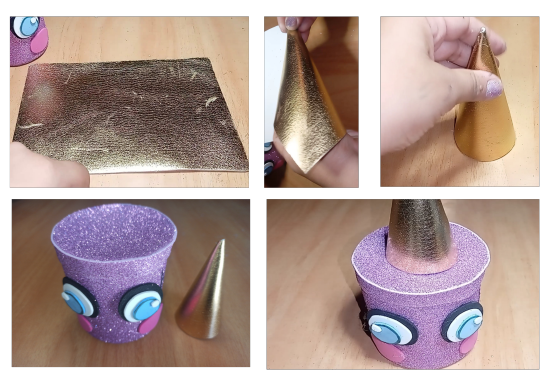
🦄 Para hacer el cuerno se utiliza la mitad de un foamy, enrollar hasta que quede puntiagudo, en forma de cono. Cortamos la parte inferior que nos quede recto.
🦄 To make the horn we use half of a foamy, roll it until it is pointed, in the shape of a cone. We cut the lower part so that it is straight.
🦄Los corazones serán las orejas, trazamos los patrones, el corazón grande color blanco, corazón pequeño color fucsia. Se pegan el fucsia encima del blanco, Pegamos las orejas de lado y lado en el envase.
🦄The hearts will be the ears, we trace the patterns, the big heart in white color, small heart in fuchsia color. Glue the fuchsia on top of the white. Glue the ears on both sides of the container.

🦄Para el cabello mágico, se cortan tiras de foamy de 20 cm de largo por 1 cm de ancho. En un lápiz o palo de madera enrolamos, pasamos una plancha caliente, Pegamos alrededor del cuerno.
🦄For the magic hair, cut foamy strips 20 cm long by 1 cm wide. On a pencil or wooden stick we roll up, pass a hot iron, Glue around the horn.

🦄Para terminar hacemos flores de diferentes colores, en el centro de las flores pegamos un círculo de otro color. Pegamos las flores alrededor del cuerno.
🦄To finish we make flowers of different colors, in the center of the flowers we glue a circle of another color. Glue the flowers around the horn.

Me gustó el resultado, ahora ese recipiente que probablemente iba a terminar en la basura, es ahora un bonito organizador para guardar los accesorios de mi hija.
I liked the result, now that container that was probably going to end up in the trash, is now a nice organizer to store my daughter's accessories.
Fotografías de mi propiedad tomadas con el celular Redmi note 8 pro,
Editadas en CANVA
Video editado desde mi teléfono en la App Inshop y CapCut
Música: Call me
Músico: LiQWYD

Show more
Tags :
Woo!
This creator can upvote comments using 3speak's stake today because they are a top performing creator!
Leave a quality comment relating to their content and you could receive an upvote
worth at least a dollar.
Their limit for today is $0!
Their limit for today is $0!

15 views
a year ago
$

16 views
a year ago
$
64 views
2 years ago
$
25 views
2 years ago
$
9 views
a year ago
$
More Videos
18 views
6 months ago
$
1 views
3 months ago
$

7 views
2 months ago
$

10 views
a year ago
$
8 views
a year ago
$
8 views
2 weeks ago
$
3 views
3 years ago
$
5 views
a month ago
$
7 views
6 days ago
$
6 views
4 months ago
$
3 views
a month ago
$
4 views
8 months ago
$
2 views
2 years ago
$
6 views
8 months ago
$

5 views
2 years ago
$

39 views
a year ago
$
5 views
2 years ago
$

8 views
3 years ago
$
12 views
a month ago
$

33 views
a year ago
$
1 views
2 years ago
$

0 views
2 years ago
$

70 views
3 years ago
$

0 views
2 years ago
$
11 views
2 years ago
$
Comments:
Reply:
To comment on this video please connect a HIVE account to your profile: Connect HIVE Account