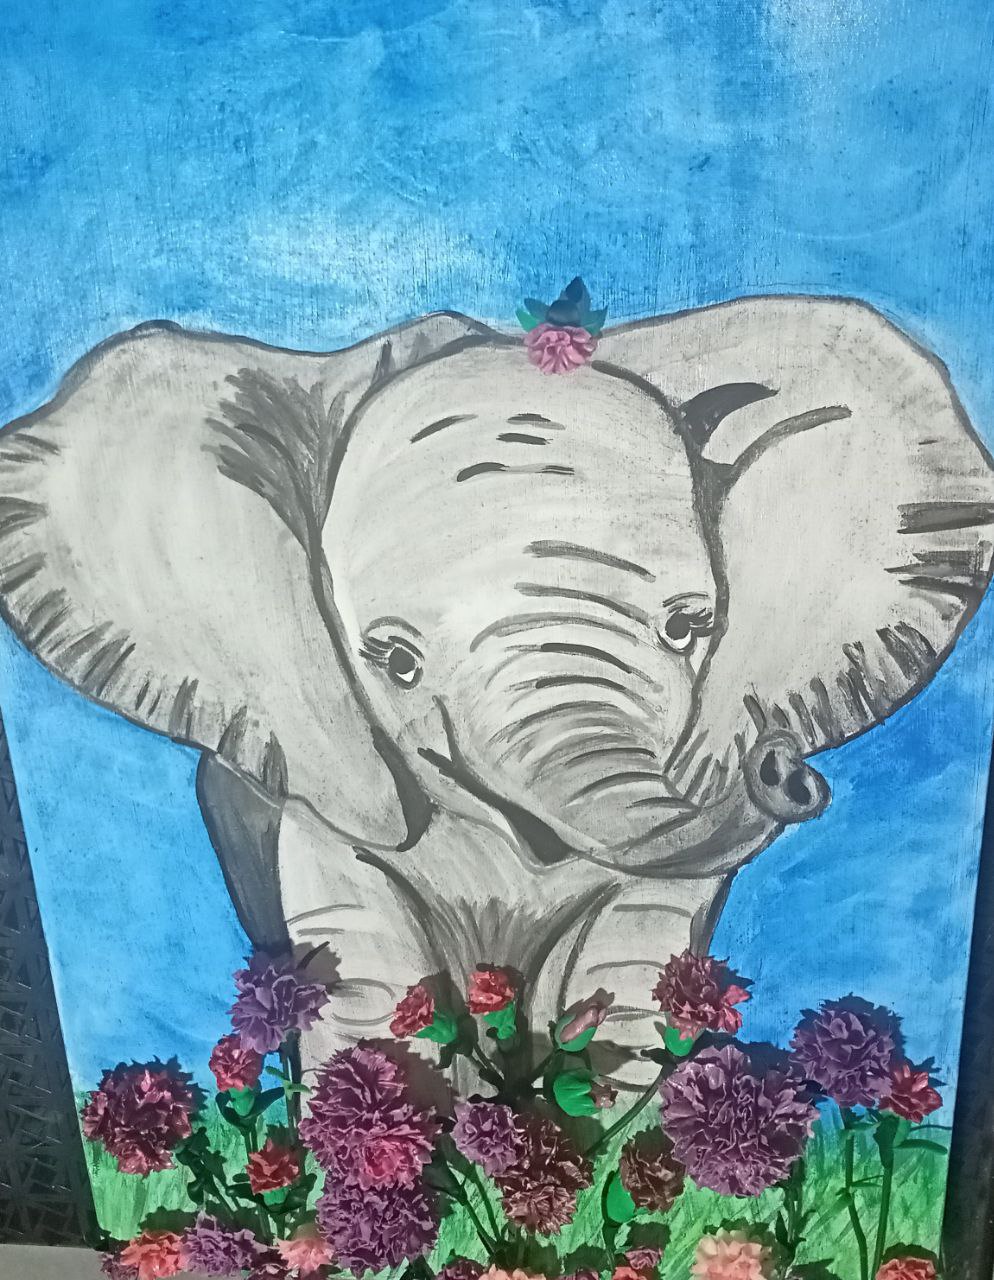
(ENG ESP) Cuadro de Elefanta con flores en 3D, Tutorial - Elephant painting with flowers in 3D, Tuto
7
About :
English
English
Hello Hive family, this time I want to share with you the step by step of making a beautiful painting of an elephant painted with watercolors and adorned with porcelain carnations.
Spanish
Spanish
Hola familia Hive, en esta oportunidad quiero compartir con ustedes el paso a paso de la elaboración de un hermoso cuadro de elefante pintado con acuarelas y adornado con claveles en porcelanicron.

Materials
Canvas
pencil
Water
watercolors
Brushes
porcelain
wire
glue
short cold
plant leaf
lacquer
Paso a paso - Step by Step
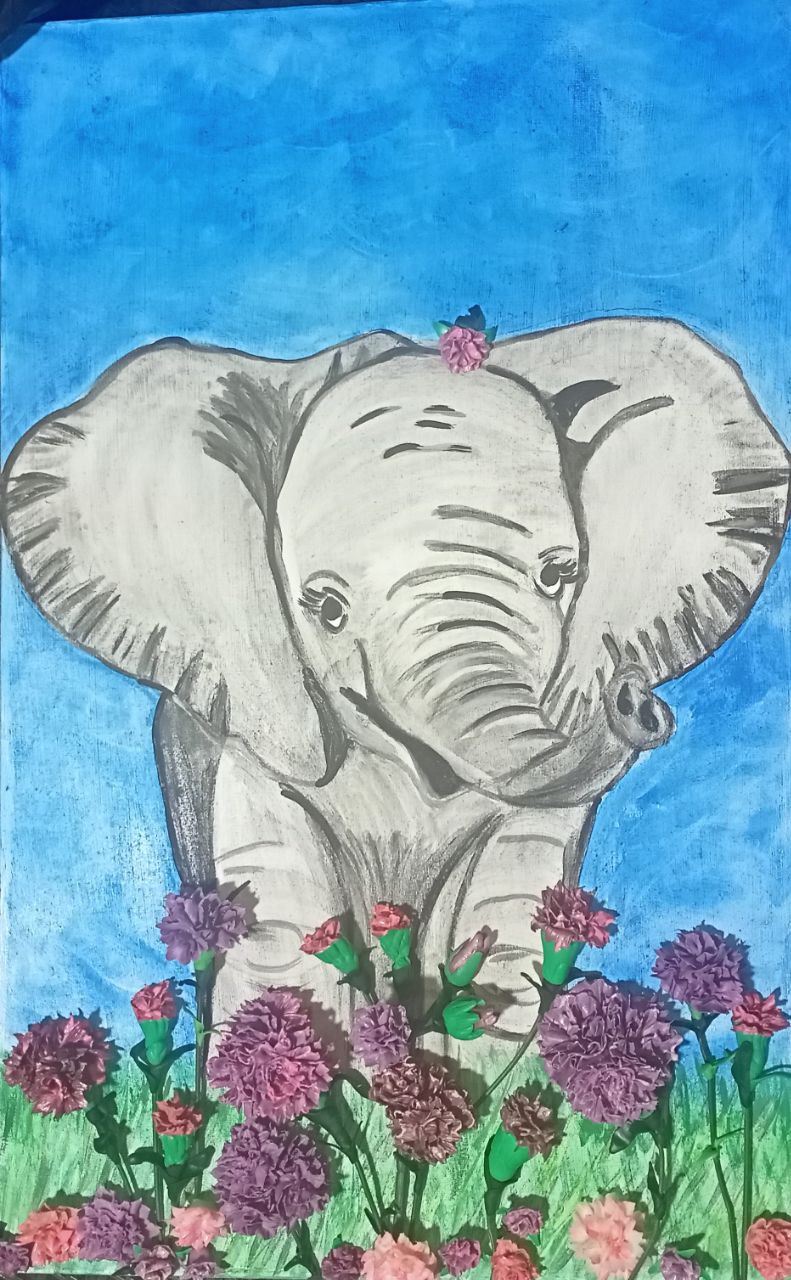
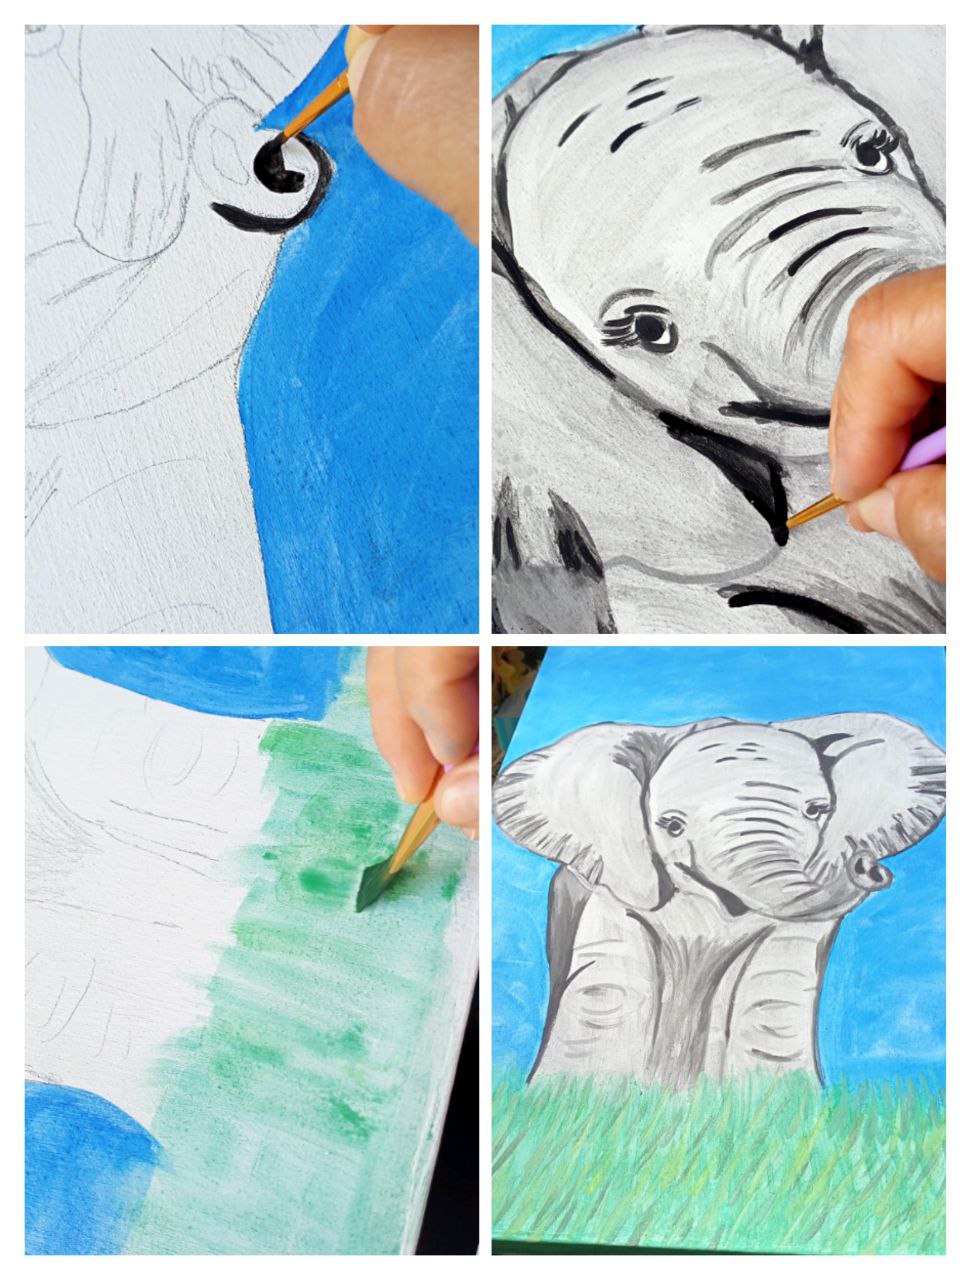
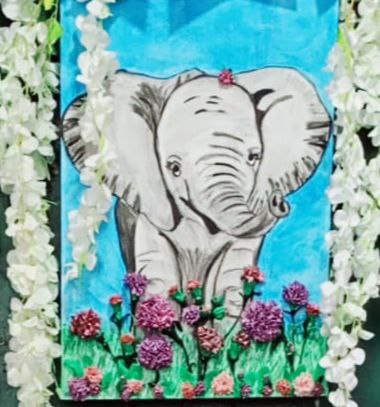
We take the canvas with the wooden frame already ready, previously they are given three or four layers of paint with white glue, this process is to prepare the canvas or fabric where the work of art is going to be captured, to prevent the paint from entering in direct contact with it, and allows it to be preserved for a longer time, I decided to paint an elephant, I proceeded to draw it and paint it in gray tones, I outlined it with black watercolor and then when applying the white watercolor the colors merged giving the different shades of gray, the watercolor technique allows us to make a fusion of colors thanks to water, in the video you will be able to appreciate what I am talking about, we must let it dry very well to continue with the manipulation, I applied lacquer so that the color of the watercolors did not come off, and continue with the elaboration of the carnations in porcelain, glue them with carpentry glue and this beautiful work of art is ready, in the video you can appreciate the elaboration of the flowers and complement with the photographs taken with my Realme C3 cell phone, thank you very much for visiting my post, blessings.
Tomamos el lienzo con el marco de madera ya listo, previamente se le dan tres o cuatro capaz de pintura con pegante blanco, este proceso es para preparar el lienzo o tela donde se va ha plasmar la obra de arte, para evitar que la pintura entrase en contacto directo con esta, y permite que se conserve por mas tiempo, yo decidí pintar un elefante, procedí a dibujarlo y pintarlo en tonalidades grises, lo delinee con acuarela negra y luego al ir aplicando la acuarela blanca se fusionaron los colores dando las diferentes tonalidades de grises, La técnica de la acuarela nos permite realizar fusión de colores gracias al agua, en el video podrán apreciar de lo que les hablo, debemos dejar secar muy bien para continuar con la manipulación, yo le aplique laca para que el color de las acuarelas no se desprendiera, y continúe con la elaboración de los claveles en porcelanicron, las pegue con pegante de carpintería y listo hermosa esta obra de arte, en el video pueden apreciar la elaboración de las flores y complementar con las fotografías tomadas con mi celular Realme C3, muchas gracias por visitar mi post, bendiciones.
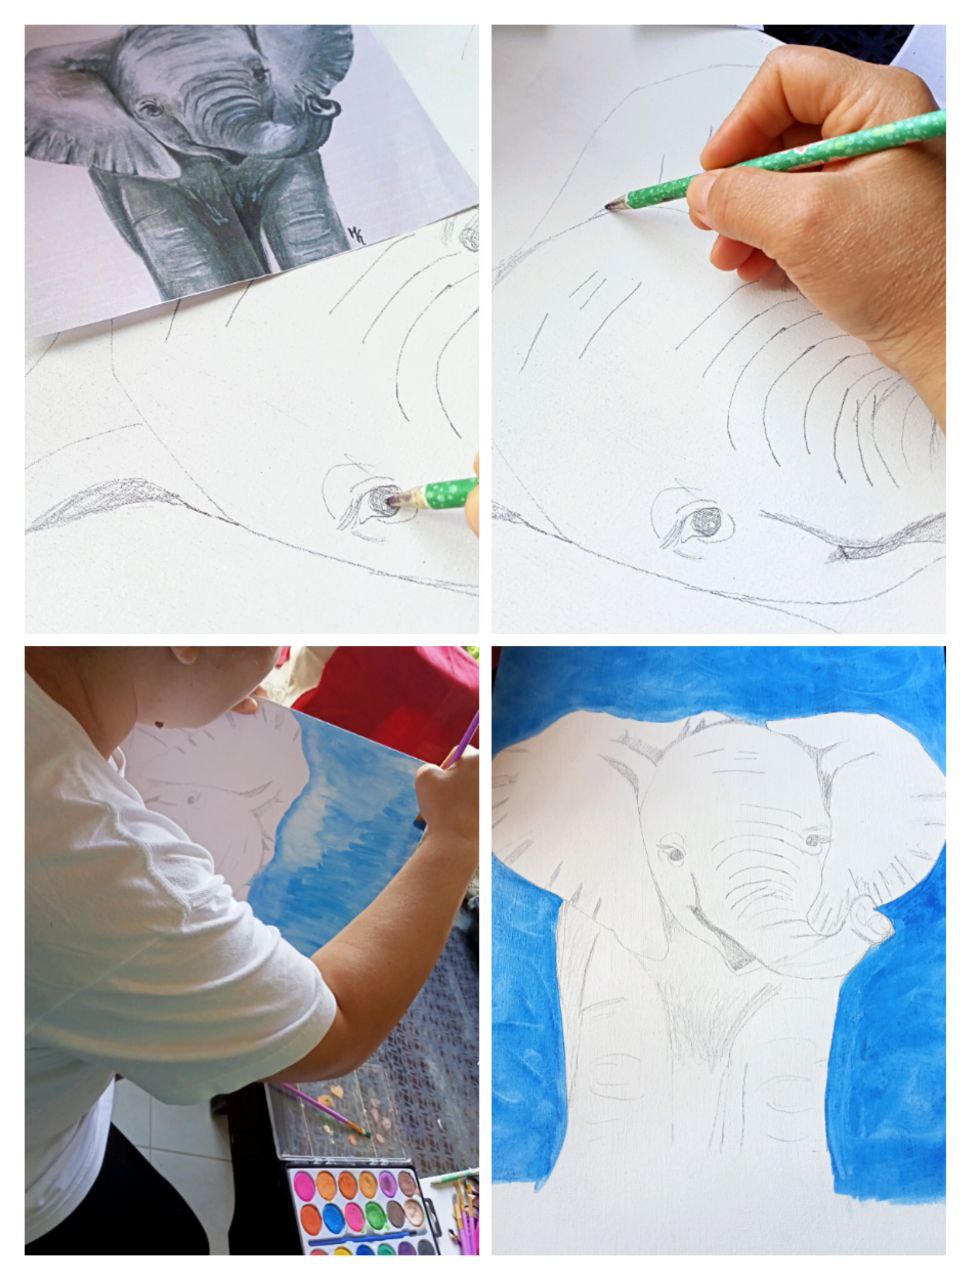
Primero dibujamos a lápiz la imagen, yo inicie pintando el fondo de color azul cielo.
First we draw the image in pencil, I start by painting the background sky blue.
__
Delinee con acuarela negra, y al aplicar el blanco se fusionaba con la acuarela negra dando las diferentes tonalidades de grises, luego pinte el pasto con el pincel siempre con la misma dirección hacia abajo, y con un pincel redondo di pinceladas finas de amarillo negro y verde mas oscuro.
I outlined with black watercolor, and when applying the white it merged with the black watercolor giving the different shades of gray, then I painted the grass with the brush always in the same direction downwards, and with a round brush I made fine brushstrokes of black yellow and darker green.
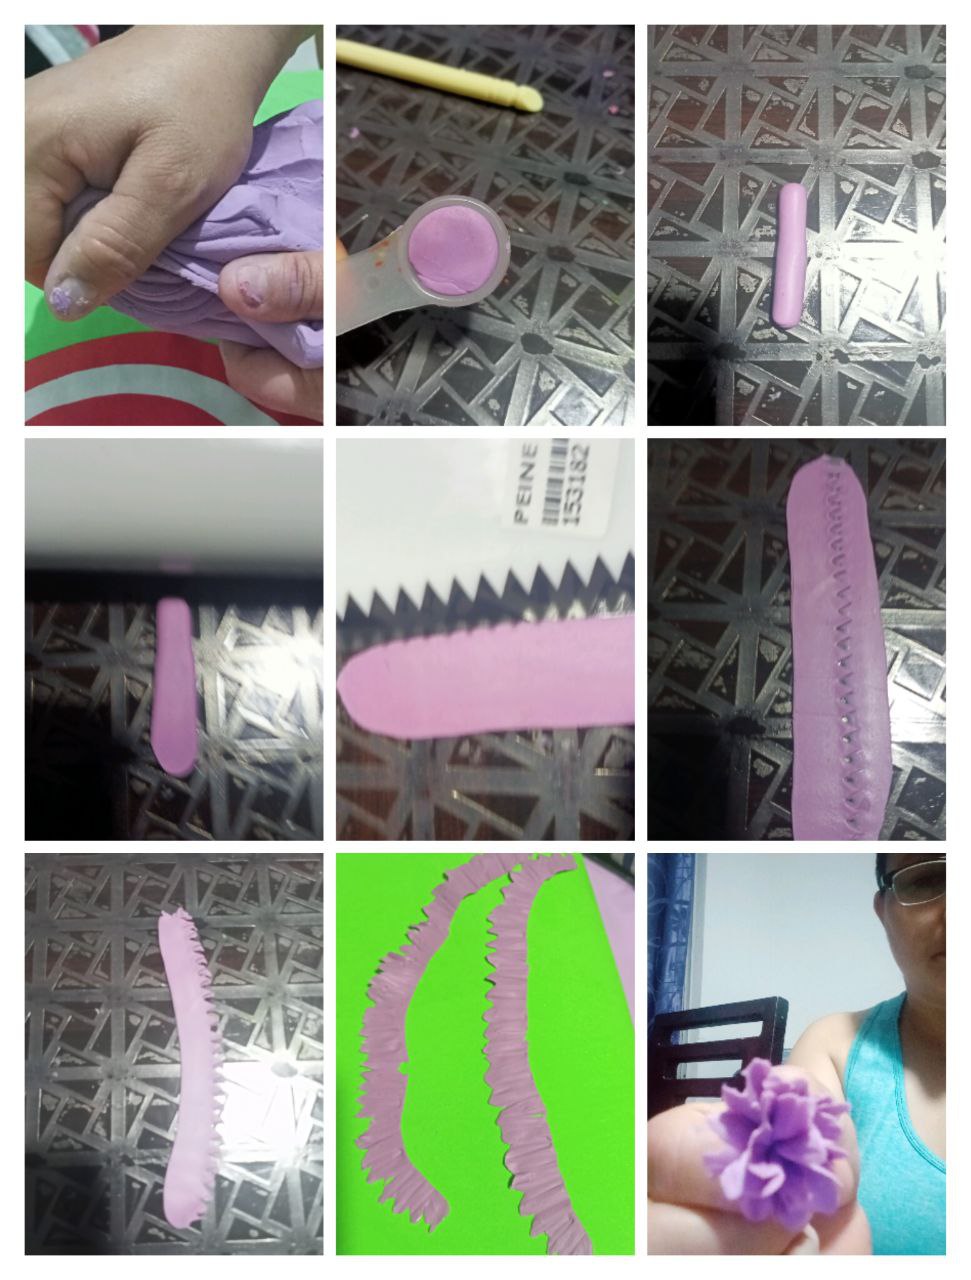
Tinture la masa de porcelanicron, tome la misma cantidad en la cuchara medidora mas pequeña, hice un cilindro y lo aplane, con un peine de cierras lo corto y procedo a dar textura y movimiento con la esteca, luego uno cada tira fijándome que cada vez recojo y fijo la masa, se deben dejar secar una hora para luego formar los claveles.
Tint the porcelanicron mass, take the same amount in the smallest measuring spoon, make a cylinder and flatten it, cut it with a zipper comb and proceed to give texture and movement with the stick, then one each strip, noticing that each time I collect and fix the dough, they should be left to dry for an hour to then form the carnations.
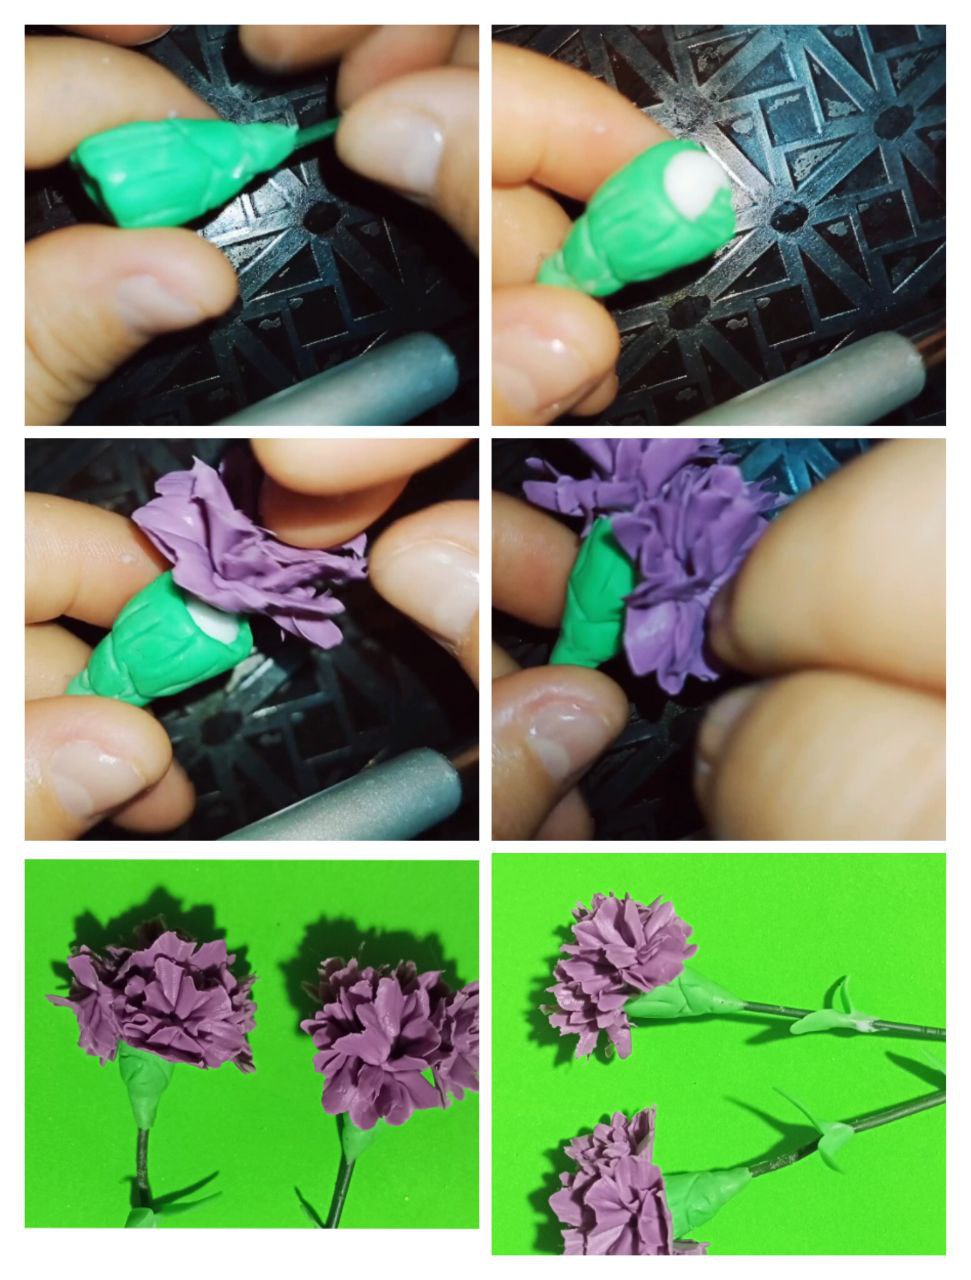
Para formar el cáliz de la flor tome un trozo de porcelanicron y forme un cono lo talle con una esteca y en la base aplique pegante y coloque los pétalos, en la punta aplique pegante y enterré un alambre verde forrado y asegure con un pedazo de masa para formar el tallo.
To form the calyx of the flower, take a piece of porcelain and form a cone, carve it with a stick and apply glue at the base and place the petals, apply glue at the tip and bury a green lined wire and secure with a piece of dough to form the stem.

las flores ya estando completamente secas las pegue al cuadro con pegante para madera, corte el alambre sobrante con un corta frio, y coloque unas hojas para tapar las uniones.
Once the flowers are completely dry, I stick them to the frame with wood glue, cut the excess wire with a cold cutter, and place some leaves to cover the joints.
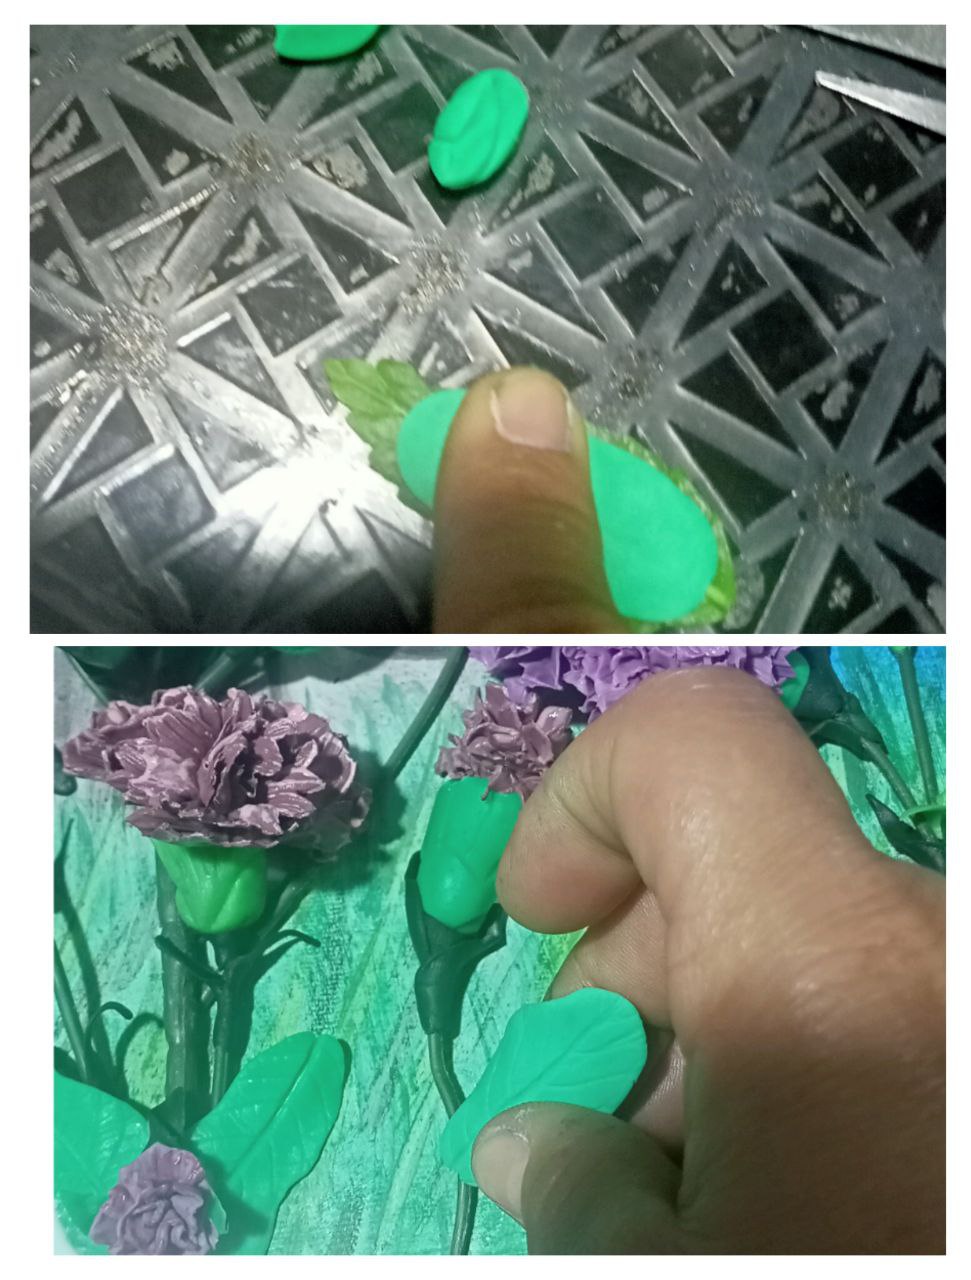
Las hojas las hice con el molde de una hoja de verdad, haciendo presión sobre ella y luego las pegue con pegante de carpintería.
I made the leaves with the mold of a real leaf, pressing on it and then sticking it with carpentry glue.
Muchas gracias por visitar mi post, espero este tutorial halla sido de su grado y se atrevan a hacerlo ya sea para regalar o vender, hasta pronto.
Thank you very much for visiting my post, I hope this tutorial has been to your degree and you dare to do it either to give away or sell, see you soon.

 -
- 
#Hivediy #manualidades #crafts #tutorial #creativecoin #appreciator #posh #spanish #english #art
Show more
Tags :
Woo!
This creator can upvote comments using 3speak's stake today because they are a top performing creator!
Leave a quality comment relating to their content and you could receive an upvote
worth at least a dollar.
Their limit for today is $0!
Their limit for today is $0!

13 views
2 years ago
$

16 views
2 years ago
$

16 views
2 years ago
$

4 views
2 years ago
$

11 views
2 years ago
$
More Videos

7 views
4 months ago
$

4 views
a year ago
$
0 views
2 years ago
$

21 views
4 years ago
$

4 views
a year ago
$

21 views
a year ago
$

1 views
2 years ago
$

5 views
a year ago
$

5 views
4 years ago
$

6 views
a year ago
$

11 views
3 years ago
$

27 views
a month ago
$
13 views
a year ago
$

19 views
2 months ago
$

7 views
a year ago
$

20 views
3 years ago
$

27 views
3 months ago
$

2 views
2 years ago
$

67 views
2 years ago
$

8 views
a year ago
$

2 views
3 months ago
$

13 views
a year ago
$

Comments:
Reply:
To comment on this video please connect a HIVE account to your profile: Connect HIVE Account